使用 Microsoft Graph 生成 Android 应用
本教程指导你如何生成使用 Microsoft Graph API 检索用户的日历信息的 Android 应用。
提示
如果只想下载已完成的教程,可以下载或克隆GitHub存储库。
先决条件
在开始本教程之前,应在开发计算机上安装 Android Studio 。
您还应该有一个在 Outlook.com 上拥有邮箱的个人 Microsoft 帐户,或者一个 Microsoft 工作或学校帐户。 如果你没有 Microsoft 帐户,则有几个选项可以获取免费帐户:
- 你可以 注册新的个人 Microsoft 帐户。
- 你可以注册开发人员计划Microsoft 365免费订阅Microsoft 365订阅。
备注
本教程是使用 Android Studio 版本 4.1.3 和 Android 10.0 SDK 编写的。 本指南中的步骤可能与其他版本一起运行,但该版本尚未经过测试。
反馈
Please provide any feedback on this tutorial in the GitHub repository.
创建 Android 应用
首先创建新的 Android Studio 项目。
打开 Android Studio,在欢迎屏幕上选择"启动新的 Android Studio 项目"。
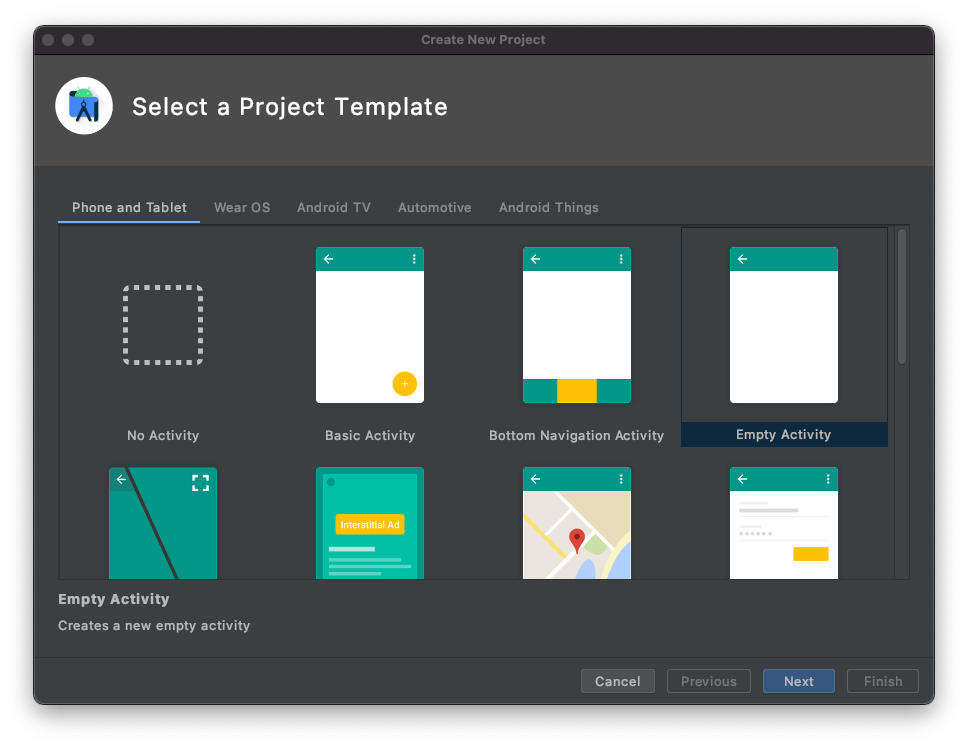
在"新建活动Project,选择"空白活动",然后选择"下一 步"。
在 "配置项目"对话框中,将
Graph Tutorial"名称"设置为 ,确保Java"语言"字段设置为 ,并确保"最低 API 级别"设置为API 29: Android 10.0 (Q)。 根据需要 修改程序包名称和****保存 位置。 选择 “完成”。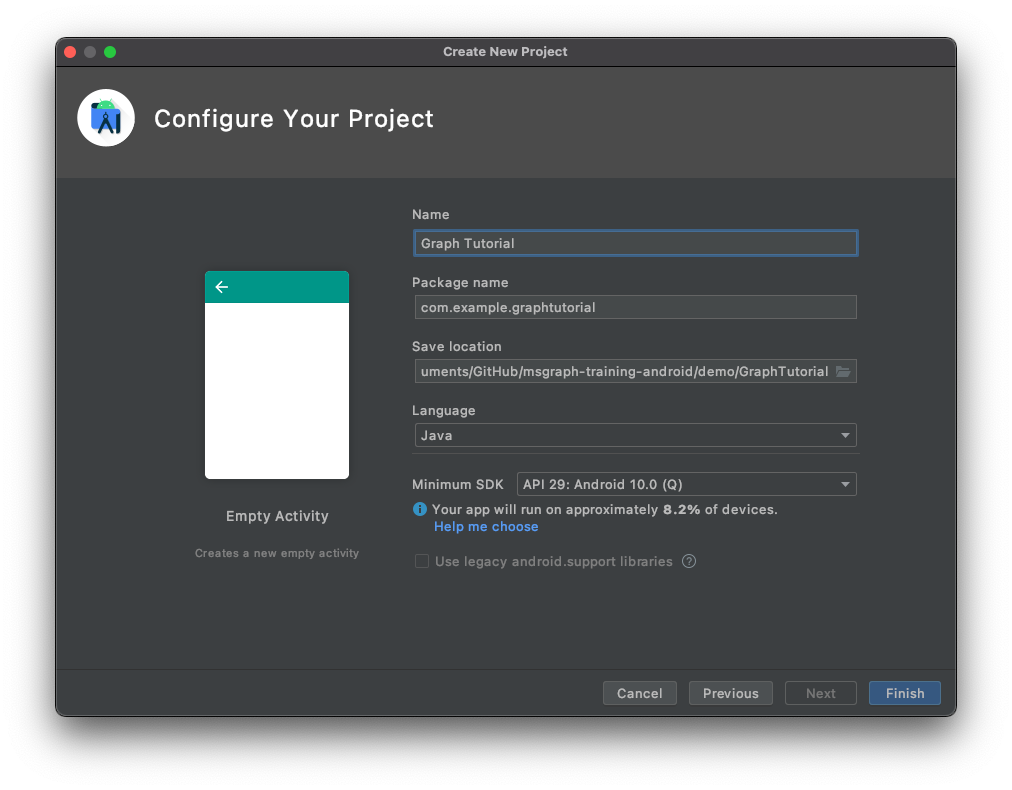
重要
本教程中的代码和说明使用程序包名称 com.example.graphtu一l。 如果在创建项目时使用不同的包名称,请确保在看到此值时使用程序包名称。
安装依赖项
在继续之前,请安装一些你稍后将使用的附加依赖项。
com.google.android.material:material使 导航视图 对应用可用。- Microsoft 身份验证库 (MSAL) For Android 处理Azure AD身份验证和令牌管理。
- Microsoft Graph SDK Java,用于调用 Microsoft Graph。
展开 "Gradle 脚本",然后打开 build.gradle (Module: Graph_Tutorial.app)。
在 值中添加以下
dependencies行。implementation 'com.google.android.material:material:1.3.0' implementation 'com.microsoft.identity.client:msal:2.0.8' implementation ('com.microsoft.graph:microsoft-graph:3.1.0') { exclude group: 'javax.activation' }在 build.gradle
packagingOptionsandroid(Module: Graph_Tutorial.app) 中添加值。packagingOptions { pickFirst 'META-INF/*' }添加 MicrosoftDeviceSDK 库的 Azure Maven 存储库,这是 MSAL 的依赖项。 打开 build.gradle (Project:Graph_Tutorial)。 将以下内容添加到值
repositories中的allprojects值中。maven { url 'https://pkgs.dev.azure.com/MicrosoftDeviceSDK/DuoSDK-Public/_packaging/Duo-SDK-Feed/maven/v1' }保存所做的更改。 在"文件" 菜单上,选择 "Project Gradle 文件同步"。
设计应用
应用程序将使用导航箱在不同视图之间导航。 在此步骤中,你将更新活动以使用导航箱布局,并添加视图的片段。
创建导航箱
在此部分中,你将为应用的导航菜单创建图标,为应用程序创建菜单,并更新应用程序的主题和布局以与导航箱兼容。
创建图标
右键单击 应用/res/drawable 文件夹,然后选择 "新建"和" 矢量资产"。
单击剪贴画旁边的 图标按钮。
在" 选择图标" 窗口中,
home在搜索栏中键入,然后选择" 主页"图标 并选择"确定 "。将 "名称" 更改为
ic_menu_home。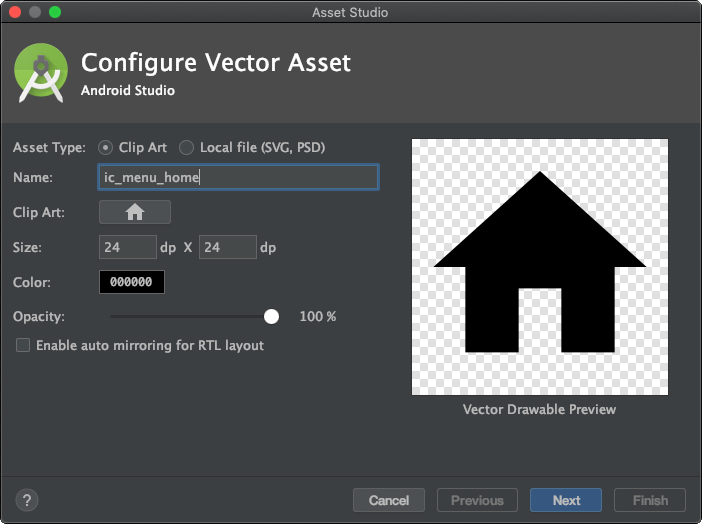
选择 "下一 步",然后选择" 完成"。
重复上一步,再创建四个图标。
- 名称:
ic_menu_calendar、图标:event - 名称:
ic_menu_add_event、图标:add box - 名称:
ic_menu_signout、图标:exit to app - 名称:
ic_menu_signin、图标:person add
- 名称:
创建菜单
右键单击 res 文件夹,然后选择 "新建"和" Android 资源目录"。
将" 资源类型"更改为 并选择
menu"确定 "。右键单击 新菜单文件夹 ,然后选择 "新建"和" 菜单资源文件"。
将文件命名,
drawer_menu然后选择"确定 "。文件打开后,选择" 代码 "选项卡以查看 XML,然后将全部内容替换为以下内容。
<?xml version="1.0" encoding="utf-8"?>
<menu xmlns:android="http://schemas.android.com/apk/res/android"
    xmlns:tools="http://schemas.android.com/tools"
    tools:showIn="navigation_view">

    <group android:checkableBehavior="single">
        <item
            android:id="@+id/nav_home"
            android:icon="@drawable/ic_menu_home"
            android:title="Home" />

        <item
            android:id="@+id/nav_calendar"
            android:icon="@drawable/ic_menu_calendar"
            android:title="Calendar" />

        <item
            android:id="@+id/nav_create_event"
            android:icon="@drawable/ic_menu_add_event"
            android:title="New Event" />

        <item
            android:id="@+id/nav_signout"
            android:icon="@drawable/ic_menu_signout"
            android:title="Sign Out" />

        <item
            android:id="@+id/nav_signin"
            android:icon="@drawable/ic_menu_signin"
            android:title="Sign In" />
    </group>
</menu>
更新应用程序主题和布局
打开 app/res/values/themes.xml 文件,在 元素中添加以下
style行。<item name="windowActionBar">false</item> <item name="windowNoTitle">true</item>打开 app/res/values-night/themes.xml 文件,在 元素中添加以下
style行。<item name="windowActionBar">false</item> <item name="windowNoTitle">true</item>右键单击 应用/res/layout 文件夹。
选择 "新建",然后选择" 布局资源文件"。
将文件命名
nav_header,将 根元素 更改为LinearLayout,然后选择"确定 "。打开 nav_header.xml文件 并选择"代码 " 选项卡。将全部内容替换为以下内容。
<?xml version="1.0" encoding="utf-8"?>
<LinearLayout xmlns:android="http://schemas.android.com/apk/res/android"
    android:layout_width="match_parent"
    android:layout_height="176dp"
    android:background="?colorPrimary"
    android:gravity="bottom"
    android:orientation="vertical"
    android:padding="16dp"
    android:theme="@style/Theme.GraphTutorial">

    <ImageView
        android:id="@+id/user_profile_pic"
        android:layout_width="wrap_content"
        android:layout_height="wrap_content"
        android:src="@mipmap/ic_launcher" />

    <TextView
        android:id="@+id/user_name"
        android:layout_width="wrap_content"
        android:layout_height="wrap_content"
        android:paddingTop="8dp"
        android:text="Test User"
        android:textColor="?colorOnPrimary"
        android:textAppearance="@style/TextAppearance.AppCompat.Body1" />

    <TextView
        android:id="@+id/user_email"
        android:layout_width="wrap_content"
        android:layout_height="wrap_content"
        android:text="test@contoso.com"
        android:textColor="?colorOnPrimary" />

</LinearLayout>
打开 app/res/layout/activity_main.xml
DrawerLayout文件,将现有 XML 替换为以下内容,将布局更新为 。<?xml version="1.0" encoding="utf-8"?> <androidx.drawerlayout.widget.DrawerLayout xmlns:android="http://schemas.android.com/apk/res/android" xmlns:app="http://schemas.android.com/apk/res-auto" xmlns:tools="http://schemas.android.com/tools" android:id="@+id/drawer_layout" android:layout_width="match_parent" android:layout_height="match_parent" android:fitsSystemWindows="true" tools:context=".MainActivity" tools:openDrawer="start"> <RelativeLayout android:layout_width="match_parent" android:layout_height="match_parent" android:orientation="vertical"> <ProgressBar android:id="@+id/progressbar" android:layout_width="75dp" android:layout_height="75dp" android:layout_centerInParent="true" android:visibility="gone"/> <androidx.appcompat.widget.Toolbar android:id="@+id/toolbar" android:layout_width="match_parent" android:layout_height="?attr/actionBarSize" android:background="?colorPrimary" app:titleTextColor="?colorOnPrimary" android:elevation="4dp" android:theme="@style/Theme.GraphTutorial" /> <FrameLayout android:id="@+id/fragment_container" android:layout_width="match_parent" android:layout_height="match_parent" android:layout_below="@+id/toolbar" /> </RelativeLayout> <com.google.android.material.navigation.NavigationView android:id="@+id/nav_view" android:layout_width="wrap_content" android:layout_height="match_parent" android:layout_gravity="start" app:headerLayout="@layout/nav_header" app:menu="@menu/drawer_menu" /> </androidx.drawerlayout.widget.DrawerLayout>打开 app/res/values/strings.xml ,在 元素内添加以下
resources元素。<string name="navigation_drawer_open">Open navigation drawer</string> <string name="navigation_drawer_close">Close navigation drawer</string>打开 app/java/com.example/graphtutorial/MainActivity 文件,将全部内容替换为以下内容。
package com.example.graphtutorial;

import android.os.Bundle;
import android.view.Menu;
import android.view.MenuItem;
import android.view.View;
import android.widget.FrameLayout;
import android.widget.ProgressBar;
import android.widget.TextView;
import androidx.annotation.NonNull;
import androidx.appcompat.app.ActionBarDrawerToggle;
import androidx.appcompat.app.AppCompatActivity;
import androidx.appcompat.widget.Toolbar;
import androidx.core.view.GravityCompat;
import androidx.drawerlayout.widget.DrawerLayout;
import com.google.android.material.navigation.NavigationView;

public class MainActivity extends AppCompatActivity implements NavigationView.OnNavigationItemSelectedListener {
    private static final String SAVED_IS_SIGNED_IN = "isSignedIn";
    private static final String SAVED_USER_NAME = "userName";
    private static final String SAVED_USER_EMAIL = "userEmail";
    private static final String SAVED_USER_TIMEZONE = "userTimeZone";

    private DrawerLayout mDrawer;
    private NavigationView mNavigationView;
    private View mHeaderView;
    private boolean mIsSignedIn = false;
    private String mUserName = null;
    private String mUserEmail = null;
    private String mUserTimeZone = null;

    @Override
    protected void onCreate(Bundle savedInstanceState) {
        super.onCreate(savedInstanceState);
        setContentView(R.layout.activity_main);

        // Set the toolbar
        Toolbar toolbar = findViewById(R.id.toolbar);
        setSupportActionBar(toolbar);

        mDrawer = findViewById(R.id.drawer_layout);

        // Add the hamburger menu icon
        ActionBarDrawerToggle toggle = new ActionBarDrawerToggle(this, mDrawer, toolbar,
                R.string.navigation_drawer_open, R.string.navigation_drawer_close);
        mDrawer.addDrawerListener(toggle);
        toggle.syncState();

        mNavigationView = findViewById(R.id.nav_view);

        // Set user name and email
        mHeaderView = mNavigationView.getHeaderView(0);
        setSignedInState(mIsSignedIn);

        // Listen for item select events on menu
        mNavigationView.setNavigationItemSelectedListener(this);

        if (savedInstanceState == null) {
            // Load the home fragment by default on startup
            openHomeFragment(mUserName);
        } else {
            // Restore state
            mIsSignedIn = savedInstanceState.getBoolean(SAVED_IS_SIGNED_IN);
            mUserName = savedInstanceState.getString(SAVED_USER_NAME);
            mUserEmail = savedInstanceState.getString(SAVED_USER_EMAIL);
            mUserTimeZone = savedInstanceState.getString(SAVED_USER_TIMEZONE);
            setSignedInState(mIsSignedIn);
        }
    }

    @Override
    protected void onSaveInstanceState(@NonNull Bundle outState) {
        super.onSaveInstanceState(outState);
        outState.putBoolean(SAVED_IS_SIGNED_IN, mIsSignedIn);
        outState.putString(SAVED_USER_NAME, mUserName);
        outState.putString(SAVED_USER_EMAIL, mUserEmail);
        outState.putString(SAVED_USER_TIMEZONE, mUserTimeZone);
    }

    @Override
    public boolean onNavigationItemSelected(@NonNull MenuItem menuItem) {
        // TEMPORARY
        return false;
    }

    @Override
    public void onBackPressed() {
        if (mDrawer.isDrawerOpen(GravityCompat.START)) {
            mDrawer.closeDrawer(GravityCompat.START);
        } else {
            super.onBackPressed();
        }
    }

    public void showProgressBar()
    {
        FrameLayout container = findViewById(R.id.fragment_container);
        ProgressBar progressBar = findViewById(R.id.progressbar);
        container.setVisibility(View.GONE);
        progressBar.setVisibility(View.VISIBLE);
    }

    public void hideProgressBar()
    {
        FrameLayout container = findViewById(R.id.fragment_container);
        ProgressBar progressBar = findViewById(R.id.progressbar);
        progressBar.setVisibility(View.GONE);
        container.setVisibility(View.VISIBLE);
    }

    // Update the menu and get the user's name and email
    private void setSignedInState(boolean isSignedIn) {
        mIsSignedIn = isSignedIn;

        mNavigationView.getMenu().clear();
        mNavigationView.inflateMenu(R.menu.drawer_menu);

        Menu menu = mNavigationView.getMenu();

        // Hide/show the Sign in, Calendar, and Sign Out buttons
        if (isSignedIn) {
            menu.removeItem(R.id.nav_signin);
        } else {
            menu.removeItem(R.id.nav_home);
            menu.removeItem(R.id.nav_calendar);
            menu.removeItem(R.id.nav_create_event);
            menu.removeItem(R.id.nav_signout);
        }

        // Set the user name and email in the nav drawer
        TextView userName = mHeaderView.findViewById(R.id.user_name);
        TextView userEmail = mHeaderView.findViewById(R.id.user_email);

        if (isSignedIn) {
            // For testing
            mUserName = "Lynne Robbins";
            mUserEmail = "lynner@contoso.com";
            mUserTimeZone = "Pacific Standard Time";

            userName.setText(mUserName);
            userEmail.setText(mUserEmail);
        } else {
            mUserName = null;
            mUserEmail = null;
            mUserTimeZone = null;

            userName.setText("Please sign in");
            userEmail.setText("");
        }
    }
}
添加片段
在此部分中,你将为家庭视图和日历视图创建片段。
右键单击 应用/res/layout 文件夹,然后选择 新建,然后选择 布局资源文件。
将文件命名
fragment_home,将 根元素 更改为RelativeLayout,然后选择"确定 "。打开 fragment_home.xml 文件,并将其内容替换为以下内容。
<?xml version="1.0" encoding="utf-8"?>
<RelativeLayout xmlns:android="http://schemas.android.com/apk/res/android"
    android:layout_width="match_parent"
    android:layout_height="match_parent">

    <LinearLayout
        android:layout_width="wrap_content"
        android:layout_height="wrap_content"
        android:layout_centerInParent="true"
        android:orientation="vertical">

        <TextView
            android:layout_width="wrap_content"
            android:layout_height="wrap_content"
            android:layout_gravity="center_horizontal"
            android:text="Welcome!"
            android:textSize="30sp" />

        <TextView
            android:id="@+id/home_page_username"
            android:layout_width="wrap_content"
            android:layout_height="wrap_content"
            android:layout_gravity="center_horizontal"
            android:paddingTop="8dp"
            android:text="Please sign in"
            android:textSize="20sp" />
    </LinearLayout>

</RelativeLayout>
右键单击 应用/res/layout 文件夹,然后选择 新建,然后选择 布局资源文件。
将文件命名
fragment_calendar,将 根元素 更改为RelativeLayout,然后选择"确定 "。打开 fragment_calendar.xml 文件,并将其内容替换为以下内容。
<?xml version="1.0" encoding="utf-8"?>
<RelativeLayout xmlns:android="http://schemas.android.com/apk/res/android"
    android:layout_width="match_parent"
    android:layout_height="match_parent">

    <TextView
        android:layout_width="wrap_content"
        android:layout_height="wrap_content"
        android:layout_centerInParent="true"
        android:text="Calendar"
        android:textSize="30sp" />

</RelativeLayout>
右键单击 应用/res/layout 文件夹,然后选择 新建,然后选择 布局资源文件。
将文件命名
fragment_new_event,将 根元素 更改为RelativeLayout,然后选择"确定 "。打开 fragment_new_event.xml 文件,并将其内容替换为以下内容。
<?xml version="1.0" encoding="utf-8"?>
<RelativeLayout xmlns:android="http://schemas.android.com/apk/res/android"
    android:layout_width="match_parent"
    android:layout_height="match_parent">

    <TextView
        android:layout_width="wrap_content"
        android:layout_height="wrap_content"
        android:layout_centerInParent="true"
        android:text="New Event"
        android:textSize="30sp" />

</RelativeLayout>
右键单击 app/java/com.example.graphtutorial 文件夹,然后选择 "新建",然后选择" Java类"。
将类命名
HomeFragment,然后选择"确定 "。打开 HomeFragment 文件并将其内容替换为以下内容。
package com.example.graphtutorial;

import android.os.Bundle;
import android.view.LayoutInflater;
import android.view.View;
import android.view.ViewGroup;
import android.widget.TextView;
import androidx.annotation.NonNull;
import androidx.annotation.Nullable;
import androidx.fragment.app.Fragment;

public class HomeFragment extends Fragment {
    private static final String USER_NAME = "userName";

    private String mUserName;

    public HomeFragment() {

    }

    public static HomeFragment createInstance(String userName) {
        HomeFragment fragment = new HomeFragment();

        // Add the provided username to the fragment's arguments
        Bundle args = new Bundle();
        args.putString(USER_NAME, userName);
        fragment.setArguments(args);
        return fragment;
    }

    @Override
    public void onCreate(@Nullable Bundle savedInstanceState) {
        super.onCreate(savedInstanceState);
        if (getArguments() != null) {
            mUserName = getArguments().getString(USER_NAME);
        }
    }

    @Nullable
    @Override
    public View onCreateView(@NonNull LayoutInflater inflater, @Nullable ViewGroup container, @Nullable Bundle savedInstanceState) {
        View homeView = inflater.inflate(R.layout.fragment_home, container, false);

        // If there is a username, replace the "Please sign in" with the username
        if (mUserName != null) {
            TextView userName = homeView.findViewById(R.id.home_page_username);
            userName.setText(mUserName);
        }

        return homeView;
    }
}
右键单击 app/java/com.example.graphtutorial 文件夹,然后选择 "新建",然后选择" Java类"。
将类命名
CalendarFragment,然后选择"确定 "。打开 CalendarFragment 文件,并将其内容替换为以下内容。
package com.example.graphtutorial;

import android.os.Bundle;
import android.view.LayoutInflater;
import android.view.View;
import android.view.ViewGroup;
import androidx.annotation.NonNull;
import androidx.annotation.Nullable;
import androidx.fragment.app.Fragment;

public class CalendarFragment extends Fragment {
    private static final String TIME_ZONE = "timeZone";

    private String mTimeZone;

    public CalendarFragment() {}

    public static CalendarFragment createInstance(String timeZone) {
        CalendarFragment fragment = new CalendarFragment();

        // Add the provided time zone to the fragment's arguments
        Bundle args = new Bundle();
        args.putString(TIME_ZONE, timeZone);
        fragment.setArguments(args);
        return fragment;
    }

    @Override
    public void onCreate(@Nullable Bundle savedInstanceState) {
        super.onCreate(savedInstanceState);
        if (getArguments() != null) {
            mTimeZone = getArguments().getString(TIME_ZONE);
        }
    }

    @Nullable
    @Override
    public View onCreateView(@NonNull LayoutInflater inflater, @Nullable ViewGroup container, @Nullable Bundle savedInstanceState) {
        return inflater.inflate(R.layout.fragment_calendar, container, false);
    }
}
右键单击 app/java/com.example.graphtutorial 文件夹,然后选择 "新建",然后选择" Java类"。
将类命名
NewEventFragment,然后选择"确定 "。打开 NewEventFragment 文件,并将其内容替换为以下内容。
package com.example.graphtutorial;

import android.os.Bundle;
import android.view.LayoutInflater;
import android.view.View;
import android.view.ViewGroup;
import androidx.annotation.NonNull;
import androidx.annotation.Nullable;
import androidx.fragment.app.Fragment;

public class NewEventFragment extends Fragment {
    private static final String TIME_ZONE = "timeZone";

    private String mTimeZone;

    public NewEventFragment() {}

    public static NewEventFragment createInstance(String timeZone) {
        NewEventFragment fragment = new NewEventFragment();

        // Add the provided time zone to the fragment's arguments
        Bundle args = new Bundle();
        args.putString(TIME_ZONE, timeZone);
        fragment.setArguments(args);
        return fragment;
    }

    @Override
    public void onCreate(@Nullable Bundle savedInstanceState) {
        super.onCreate(savedInstanceState);
        if (getArguments() != null) {
            mTimeZone = getArguments().getString(TIME_ZONE);
        }
    }

    @Nullable
    @Override
    public View onCreateView(@NonNull LayoutInflater inflater, @Nullable ViewGroup container, @Nullable Bundle savedInstanceState) {
        return inflater.inflate(R.layout.fragment_new_event, container, false);
    }
}
打开 MainActivity.java 文件,将以下函数添加到 类。
// Load the "Home" fragment
public void openHomeFragment(String userName) {
    HomeFragment fragment = HomeFragment.createInstance(userName);
    getSupportFragmentManager().beginTransaction()
            .replace(R.id.fragment_container, fragment)
            .commit();
    mNavigationView.setCheckedItem(R.id.nav_home);
}

// Load the "Calendar" fragment
private void openCalendarFragment(String timeZone) {
    CalendarFragment fragment = CalendarFragment.createInstance(timeZone);
    getSupportFragmentManager().beginTransaction()
            .replace(R.id.fragment_container, fragment)
            .commit();
    mNavigationView.setCheckedItem(R.id.nav_calendar);
}

// Load the "New Event" fragment
private void openNewEventFragment(String timeZone) {
    NewEventFragment fragment = NewEventFragment.createInstance(timeZone);
    getSupportFragmentManager().beginTransaction()
            .replace(R.id.fragment_container, fragment)
            .commit();
    mNavigationView.setCheckedItem(R.id.nav_create_event);
}

private void signIn() {
    setSignedInState(true);
    openHomeFragment(mUserName);
}

private void signOut() {
    setSignedInState(false);
    openHomeFragment(mUserName);
}
将现有的
onNavigationItemSelected函数替换为以下内容。@Override public boolean onNavigationItemSelected(@NonNull MenuItem menuItem) { // Load the fragment that corresponds to the selected item switch (menuItem.getItemId()) { case R.id.nav_home: openHomeFragment(mUserName); break; case R.id.nav_calendar: openCalendarFragment(mUserTimeZone); break; case R.id.nav_create_event: openNewEventFragment(mUserTimeZone); break; case R.id.nav_signin: signIn(); break; case R.id.nav_signout: signOut(); break; } mDrawer.closeDrawer(GravityCompat.START); return true; }保存所有更改。
在" 运行" 菜单上,选择 "运行""应用"。
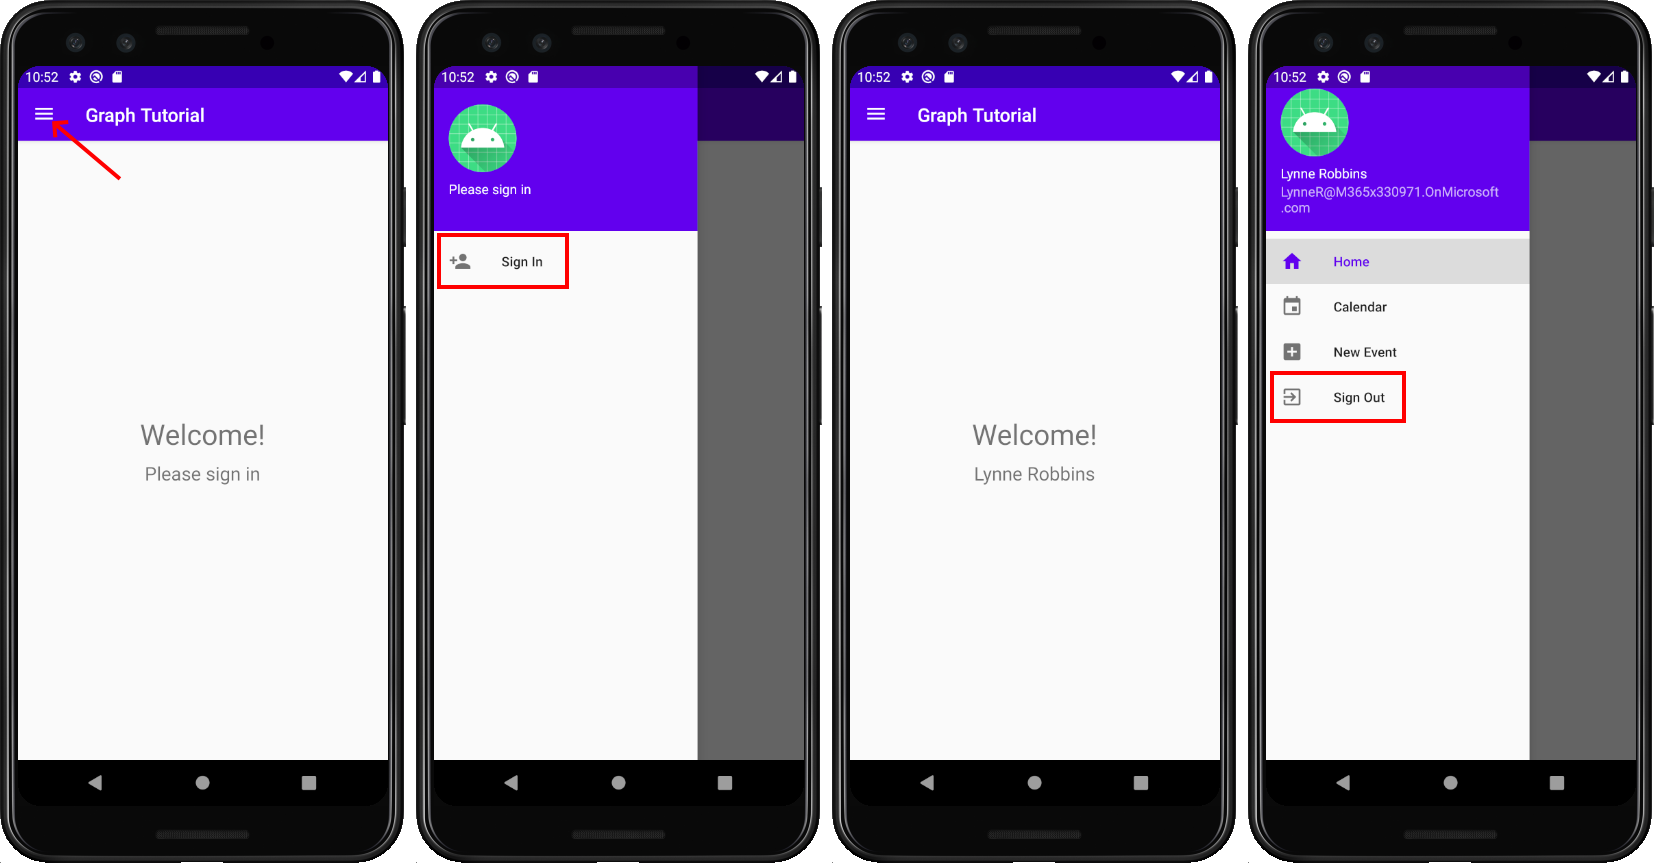
应用的菜单应该可以在两个片段之间导航,并在点击"登录"或"注销"按钮 时 更改。
在门户中注册该应用
在此练习中,你将使用管理Azure AD创建新的本机Azure Active Directory应用程序。
打开浏览器,并转到 Azure Active Directory 管理中心。然后,使用 个人帐户(亦称为“Microsoft 帐户”)或 工作或学校帐户 登录。
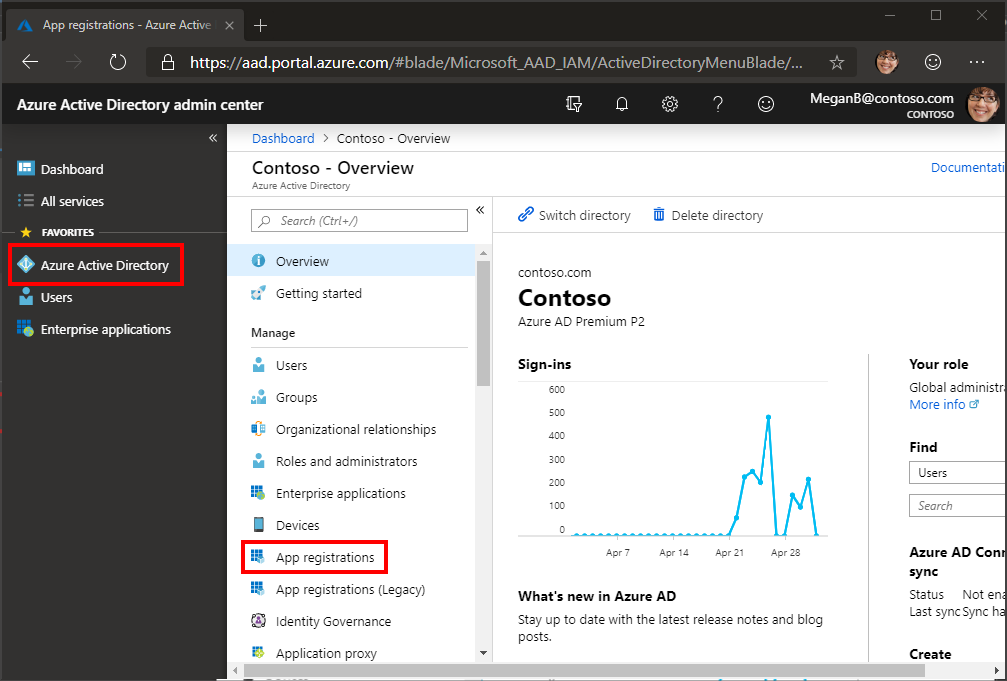
选择左侧导航栏中的“Azure Active Directory”,再选择“管理”下的“应用注册”。
选择“新注册”。 在“注册应用”页上,按如下方式设置值。
- 将“名称”设置为“
Android Graph Tutorial”。 - 将“受支持的帐户类型”设置为“任何组织目录中的帐户和个人 Microsoft 帐户”。
- 在 "重定向 URI"下,将下拉列表设置为"公共客户端 /本机 (移动 & 桌面) ",将 值设置为 ,
msauth://YOUR_PACKAGE_NAME/callback将YOUR_PACKAGE_NAME替换为项目的程序包名称。

- 将“名称”设置为“
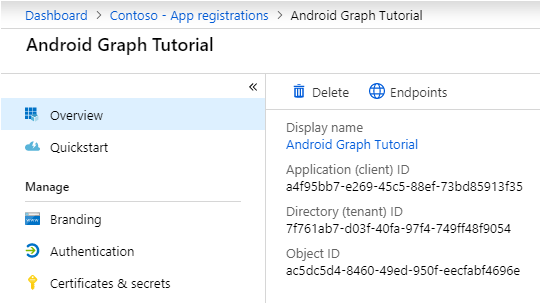
选择“注册”。 在 Android Graph 教程 页面上,复制"应用程序 (客户端) ID"的值 并 保存,下一步中将需要该值。
添加 Azure AD 身份验证
在此练习中,你将扩展上一练习中的应用程序,以支持使用 Azure AD。 这是必需的,才能获取必要的 OAuth 访问令牌来调用 Microsoft Graph。 为此,您需要将 Microsoft 身份验证库 (适用于 Android) MSAL 文件 集成到应用程序中。
右键单击 res 文件夹,然后选择 "新建"和" Android 资源目录"。
将" 资源类型"更改为 并选择
raw"确定 "。右键单击新 原始文件夹 ,然后选择 "新建"和"文件 "。
将文件命名,
msal_config.json然后选择"确定 "。将以下内容添加到 msal_config.json 文件。
{
  "client_id" : "YOUR_APP_ID_HERE",
  "redirect_uri" : "msauth://com.example.graphtutorial/callback",
  "broker_redirect_uri_registered": false,
  "account_mode": "SINGLE",
  "authorities" : [
    {
      "type": "AAD",
      "audience": {
        "type": "AzureADandPersonalMicrosoftAccount"
      },
      "default": true
    }
  ]
}
将
YOUR_APP_ID_HERE替换为应用注册中的应用 ID,将 替换为com.example.graphtutorial项目的程序包名称。重要
如果你使用的是源代码管理(如 git
msal_config.json),那么现在是从源代码管理中排除文件以避免意外泄露应用 ID 的一个好时间。
实施登录
在此部分中,你将更新清单以允许 MSAL 使用浏览器对用户进行身份验证、将重定向 URI 注册为由应用处理、创建身份验证帮助程序类,以及更新应用以登录和注销。
展开 应用/清单 文件夹 ,然后打开 AndroidManifest.xml。 在 元素上方添加以下
application元素。<uses-permission android:name="android.permission.INTERNET" /> <uses-permission android:name="android.permission.ACCESS_NETWORK_STATE" />备注
MSAL 库验证用户身份需要这些权限。
在 元素中添加以下
application元素,将YOUR_PACKAGE_NAME_HERE字符串替换为程序包名称。<!--Intent filter to capture authorization code response from the default browser on the device calling back to the app after interactive sign in --> <activity android:name="com.microsoft.identity.client.BrowserTabActivity"> <intent-filter> <action android:name="android.intent.action.VIEW" /> <category android:name="android.intent.category.DEFAULT" /> <category android:name="android.intent.category.BROWSABLE" /> <data android:scheme="msauth" android:host="YOUR_PACKAGE_NAME_HERE" android:path="/callback" /> </intent-filter> </activity>右键单击 app/java/com.example.graphtutorial 文件夹,然后选择 "新建",然后选择" Java类"。 将 "类型"****更改为"接口"。 将接口命名并选择
IAuthenticationHelperCreatedListener"确定 "。打开新文件,并将其内容替换为以下内容。
package com.example.graphtutorial;

import com.microsoft.identity.client.exception.MsalException;

public interface IAuthenticationHelperCreatedListener {
    void onCreated(final AuthenticationHelper authHelper);
    void onError(final MsalException exception);
}
右键单击 app/java/com.example.graphtutorial 文件夹,然后选择 "新建",然后选择" Java类"。 将类命名并选择
AuthenticationHelper"确定 "。打开新文件,并将其内容替换为以下内容。
package com.example.graphtutorial;

import android.app.Activity;
import android.content.Context;
import android.util.Log;

import androidx.annotation.NonNull;

import com.microsoft.graph.authentication.BaseAuthenticationProvider;
import com.microsoft.identity.client.AuthenticationCallback;
import com.microsoft.identity.client.IAuthenticationResult;
import com.microsoft.identity.client.IPublicClientApplication;
import com.microsoft.identity.client.ISingleAccountPublicClientApplication;
import com.microsoft.identity.client.PublicClientApplication;
import com.microsoft.identity.client.exception.MsalException;

import java.net.URL;
import java.util.concurrent.CompletableFuture;

import javax.annotation.Nonnull;

// Singleton class - the app only needs a single instance
// of PublicClientApplication
public class AuthenticationHelper extends BaseAuthenticationProvider {
    private static AuthenticationHelper INSTANCE = null;
    private ISingleAccountPublicClientApplication mPCA = null;
    private String[] mScopes = { "User.Read", "MailboxSettings.Read", "Calendars.ReadWrite" };

    private AuthenticationHelper(Context ctx, final IAuthenticationHelperCreatedListener listener) {
        PublicClientApplication.createSingleAccountPublicClientApplication(ctx, R.raw.msal_config,
                new IPublicClientApplication.ISingleAccountApplicationCreatedListener() {
                    @Override
                    public void onCreated(ISingleAccountPublicClientApplication application) {
                        mPCA = application;
                        listener.onCreated(INSTANCE);
                    }

                    @Override
                    public void onError(MsalException exception) {
                        Log.e("AUTHHELPER", "Error creating MSAL application", exception);
                        listener.onError(exception);
                    }
                });
    }

    public static synchronized CompletableFuture<AuthenticationHelper> getInstance(Context ctx) {

        if (INSTANCE == null) {
            CompletableFuture<AuthenticationHelper> future = new CompletableFuture<>();
            INSTANCE = new AuthenticationHelper(ctx, new IAuthenticationHelperCreatedListener() {
                @Override
                public void onCreated(AuthenticationHelper authHelper) {
                    future.complete(authHelper);
                }

                @Override
                public void onError(MsalException exception) {
                    future.completeExceptionally(exception);
                }
            });

            return future;
        } else {
            return CompletableFuture.completedFuture(INSTANCE);
        }
    }

    // Version called from fragments. Does not create an
    // instance if one doesn't exist
    public static synchronized AuthenticationHelper getInstance() {
        if (INSTANCE == null) {
            throw new IllegalStateException(
                    "AuthenticationHelper has not been initialized from MainActivity");
        }

        return INSTANCE;
    }

    public CompletableFuture<IAuthenticationResult> acquireTokenInteractively(Activity activity) {
        CompletableFuture<IAuthenticationResult> future = new CompletableFuture<>();
        mPCA.signIn(activity, null, mScopes, getAuthenticationCallback(future));

        return future;
    }

    public CompletableFuture<IAuthenticationResult> acquireTokenSilently() {
        // Get the authority from MSAL config
        String authority = mPCA.getConfiguration()
            .getDefaultAuthority().getAuthorityURL().toString();

        CompletableFuture<IAuthenticationResult> future = new CompletableFuture<>();
        mPCA.acquireTokenSilentAsync(mScopes, authority, getAuthenticationCallback(future));
        return future;
    }

    public void signOut() {
        mPCA.signOut(new ISingleAccountPublicClientApplication.SignOutCallback() {
            @Override
            public void onSignOut() {
                Log.d("AUTHHELPER", "Signed out");
            }

            @Override
            public void onError(@NonNull MsalException exception) {
                Log.d("AUTHHELPER", "MSAL error signing out", exception);
            }
        });
    }

    private AuthenticationCallback getAuthenticationCallback(
        CompletableFuture<IAuthenticationResult> future) {
        return new AuthenticationCallback() {
            @Override
            public void onCancel() {
                future.cancel(true);
            }

            @Override
            public void onSuccess(IAuthenticationResult authenticationResult) {
                future.complete(authenticationResult);
            }

            @Override
            public void onError(MsalException exception) {
                future.completeExceptionally(exception);
            }
        };
    }

    @Nonnull
    @Override
    public CompletableFuture<String> getAuthorizationTokenAsync(@Nonnull URL requestUrl) {
        if (shouldAuthenticateRequestWithUrl(requestUrl) == true) {
            return acquireTokenSilently()
                .thenApply(result -> result.getAccessToken());
        }

        return CompletableFuture.completedFuture(null);
    }
}
打开 MainActivity 并添加以下
import语句。import android.util.Log; import com.microsoft.identity.client.IAuthenticationResult; import com.microsoft.identity.client.exception.MsalClientException; import com.microsoft.identity.client.exception.MsalServiceException; import com.microsoft.identity.client.exception.MsalUiRequiredException;将以下成员属性添加到 类
MainActivity。private AuthenticationHelper mAuthHelper = null;将以下代码添加到
onCreate函数末尾。showProgressBar(); // Get the authentication helper AuthenticationHelper.getInstance(getApplicationContext()) .thenAccept(authHelper -> { mAuthHelper = authHelper; if (!mIsSignedIn) { doSilentSignIn(false); } else { hideProgressBar(); } }) .exceptionally(exception -> { Log.e("AUTH", "Error creating auth helper", exception); return null; });将以下函数添加到 类
MainActivity。// Silently sign in - used if there is already a // user account in the MSAL cache private void doSilentSignIn(boolean shouldAttemptInteractive) { mAuthHelper.acquireTokenSilently() .thenAccept(authenticationResult -> { handleSignInSuccess(authenticationResult); }) .exceptionally(exception -> { // Check the type of exception and handle appropriately Throwable cause = exception.getCause(); if (cause instanceof MsalUiRequiredException) { Log.d("AUTH", "Interactive login required"); if (shouldAttemptInteractive) doInteractiveSignIn(); } else if (cause instanceof MsalClientException) { MsalClientException clientException = (MsalClientException)cause; if (clientException.getErrorCode() == "no_current_account" || clientException.getErrorCode() == "no_account_found") { Log.d("AUTH", "No current account, interactive login required"); if (shouldAttemptInteractive) doInteractiveSignIn(); } } else { handleSignInFailure(cause); } hideProgressBar(); return null; }); } // Prompt the user to sign in private void doInteractiveSignIn() { mAuthHelper.acquireTokenInteractively(this) .thenAccept(authenticationResult -> { handleSignInSuccess(authenticationResult); }) .exceptionally(exception -> { handleSignInFailure(exception); hideProgressBar(); return null; }); } // Handles the authentication result private void handleSignInSuccess(IAuthenticationResult authenticationResult) { // Log the token for debug purposes String accessToken = authenticationResult.getAccessToken(); Log.d("AUTH", String.format("Access token: %s", accessToken)); hideProgressBar(); setSignedInState(true); openHomeFragment(mUserName); } private void handleSignInFailure(Throwable exception) { if (exception instanceof MsalServiceException) { // Exception when communicating with the auth server, likely config issue Log.e("AUTH", "Service error authenticating", exception); } else if (exception instanceof MsalClientException) { // Exception inside MSAL, more info inside MsalError.java Log.e("AUTH", "Client error authenticating", exception); } else { Log.e("AUTH", "Unhandled exception authenticating", exception); } }将现有的
signIn和signOut函数替换为以下内容。private void signIn() { showProgressBar(); // Attempt silent sign in first // if this fails, the callback will handle doing // interactive sign in doSilentSignIn(true); } private void signOut() { mAuthHelper.signOut(); setSignedInState(false); openHomeFragment(mUserName); }备注
请注意,
signIn此方法通过 (执行无提示)doSilentSignIn。 如果无提示登录失败,此方法的回调将执行交互式登录。 这可避免每次用户启动应用时提示用户。保存更改并运行该应用程序。
点击"登录 " 菜单项时,浏览器将打开Azure AD登录页。 使用你的帐户登录。
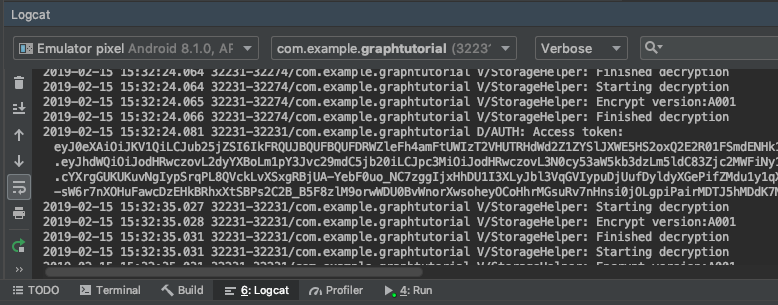
应用恢复后,你应该会看到访问令牌在 Android Studio 的调试日志中打印。
获取用户详细信息
在此部分中,你将创建一个帮助程序类来保存对 Microsoft Graph 的所有调用,MainActivity并更新该类以使用此新类获取登录用户。
右键单击 app/java/com.example.graphtutorial 文件夹,然后选择 "新建",然后选择" Java类"。 将类命名并选择
GraphHelper"确定 "。打开新文件,并将其内容替换为以下内容。
package com.example.graphtutorial;

import com.microsoft.graph.models.extensions.User;
import com.microsoft.graph.requests.GraphServiceClient;

import java.util.concurrent.CompletableFuture;

// Singleton class - the app only needs a single instance
// of the Graph client
public class GraphHelper implements IAuthenticationProvider {
    private static GraphHelper INSTANCE = null;
    private GraphServiceClient mClient = null;

    private GraphHelper() {
        AuthenticationHelper authProvider = AuthenticationHelper.getInstance();

        mClient = GraphServiceClient.builder()
            .authenticationProvider(authProvider).buildClient();
    }

    public static synchronized GraphHelper getInstance() {
        if (INSTANCE == null) {
            INSTANCE = new GraphHelper();
        }

        return INSTANCE;
    }

    public CompletableFuture<User> getUser() {
        // GET /me (logged in user)
        return mClient.me().buildRequest()
            .select("displayName,mail,mailboxSettings,userPrincipalName")
            .getAsync();
    }
}
备注
考虑此代码执行哪些功能。
- 它公开了
getUser一个函数,/me用于从登录的终结点Graph信息。- 它
.select使用 仅请求应用程序所需的用户的属性。
- 它
- 它公开了
删除以下设置用户名和电子邮件的行:
// For testing
mUserName = "Lynne Robbins";
mUserEmail = "lynner@contoso.com";
mUserTimeZone = "Pacific Standard Time";
将现有的
handleSignInSuccess函数替换为以下内容。// Handles the authentication result private void handleSignInSuccess(IAuthenticationResult authenticationResult) { // Log the token for debug purposes String accessToken = authenticationResult.getAccessToken(); Log.d("AUTH", String.format("Access token: %s", accessToken)); // Get Graph client and get user GraphHelper graphHelper = GraphHelper.getInstance(); graphHelper.getUser() .thenAccept(user -> { mUserName = user.displayName; mUserEmail = user.mail == null ? user.userPrincipalName : user.mail; mUserTimeZone = user.mailboxSettings.timeZone; runOnUiThread(() -> { hideProgressBar(); setSignedInState(true); openHomeFragment(mUserName); }); }) .exceptionally(exception -> { Log.e("AUTH", "Error getting /me", exception); runOnUiThread(()-> { hideProgressBar(); setSignedInState(false); }); return null; }); }保存更改并运行该应用程序。 登录 UI 后,会使用用户的 显示名称 和电子邮件地址进行更新。
获取日历视图
在此练习中,你将 microsoft Graph应用程序。 对于此应用程序,你将使用 Microsoft Graph SDK Java调用 Microsoft Graph。
从 Outlook 获取日历事件
在此部分中,你将扩展 类 GraphHelper 以添加一个函数,以获取用户本周的事件,并更新 CalendarFragment 为使用这些新函数。
打开 GraphHelper ,将以下
import语句添加到文件顶部。import com.microsoft.graph.options.Option; import com.microsoft.graph.options.HeaderOption; import com.microsoft.graph.options.QueryOption; import com.microsoft.graph.requests.EventCollectionPage; import com.microsoft.graph.requests.EventCollectionRequestBuilder; import java.time.ZonedDateTime; import java.time.format.DateTimeFormatter; import java.util.LinkedList; import java.util.List; import java.util.concurrent.CompletableFuture;将以下函数添加到 类
GraphHelper。public CompletableFuture<List<Event>> getCalendarView(ZonedDateTime viewStart, ZonedDateTime viewEnd, String timeZone) { final List<Option> options = new LinkedList<Option>(); options.add(new QueryOption("startDateTime", viewStart.format(DateTimeFormatter.ISO_OFFSET_DATE_TIME))); options.add(new QueryOption("endDateTime", viewEnd.format(DateTimeFormatter.ISO_OFFSET_DATE_TIME))); // Start and end times adjusted to user's time zone options.add(new HeaderOption("Prefer", "outlook.timezone=\"" + timeZone + "\"")); final List<Event> allEvents = new LinkedList<Event>(); // Create a separate list of options for the paging requests // paging request should not include the query parameters from the initial // request, but should include the headers. final List<Option> pagingOptions = new LinkedList<Option>(); pagingOptions.add(new HeaderOption("Prefer", "outlook.timezone=\"" + timeZone + "\"")); return mClient.me().calendarView() .buildRequest(options) .select("subject,organizer,start,end") .orderBy("start/dateTime") .top(5) .getAsync() .thenCompose(eventPage -> processPage(eventPage, allEvents, pagingOptions)); } private CompletableFuture<List<Event>> processPage(EventCollectionPage currentPage, List<Event> eventList, List<Option> options) { eventList.addAll(currentPage.getCurrentPage()); // Check if there is another page of results EventCollectionRequestBuilder nextPage = currentPage.getNextPage(); if (nextPage != null) { // Request the next page and repeat return nextPage.buildRequest(options) .getAsync() .thenCompose(eventPage -> processPage(eventPage, eventList, options)); } else { // No more pages, complete the future // with the complete list return CompletableFuture.completedFuture(eventList); } } // Debug function to get the JSON representation of a Graph // object public String serializeObject(Object object) { return mClient.getSerializer().serializeObject(object); }备注
考虑代码正在
getCalendarView执行哪些工作。- 将调用的 URL 为
/v1.0/me/calendarview。endDateTime和startDateTime查询参数定义日历视图的起始和结束。- 标头
Prefer: outlook.timezone使 Microsoft Graph返回用户时区中每个事件的开始时间和结束时间。 select函数将每个事件返回的字段限制为仅视图将实际使用的字段。- 函数
orderby按开始时间对结果进行排序。 - 该
top函数请求每页 25 个结果。
- 该
processPage函数检查是否有更多结果可用,并根据需要请求其他页面。
- 将调用的 URL 为
右键单击 app/java/com.example.graphtutorial 文件夹,然后选择"新建 ",然后选择" Java类"。 将类命名并选择
GraphToIana"确定 "。打开新文件,并将其内容替换为以下内容。
package com.example.graphtutorial;

import java.time.ZoneId;
import java.util.HashMap;

// Basic lookup for mapping Windows time zone identifiers to
// IANA identifiers
// Mappings taken from
// https://github.com/unicode-org/cldr/blob/master/common/supplemental/windowsZones.xml
public class GraphToIana {
    private static final HashMap<String, String> timeZoneIdMap = new HashMap<String, String>();
    static {
        timeZoneIdMap.put("Dateline Standard Time", "Etc/GMT+12");
        timeZoneIdMap.put("UTC-11", "Etc/GMT+11");
        timeZoneIdMap.put("Aleutian Standard Time", "America/Adak");
        timeZoneIdMap.put("Hawaiian Standard Time", "Pacific/Honolulu");
        timeZoneIdMap.put("Marquesas Standard Time", "Pacific/Marquesas");
        timeZoneIdMap.put("Alaskan Standard Time", "America/Anchorage");
        timeZoneIdMap.put("UTC-09", "Etc/GMT+9");
        timeZoneIdMap.put("Pacific Standard Time (Mexico)", "America/Tijuana");
        timeZoneIdMap.put("UTC-08", "Etc/GMT+8");
        timeZoneIdMap.put("Pacific Standard Time", "America/Los_Angeles");
        timeZoneIdMap.put("US Mountain Standard Time", "America/Phoenix");
        timeZoneIdMap.put("Mountain Standard Time (Mexico)", "America/Chihuahua");
        timeZoneIdMap.put("Mountain Standard Time", "America/Denver");
        timeZoneIdMap.put("Central America Standard Time", "America/Guatemala");
        timeZoneIdMap.put("Central Standard Time", "America/Chicago");
        timeZoneIdMap.put("Easter Island Standard Time", "Pacific/Easter");
        timeZoneIdMap.put("Central Standard Time (Mexico)", "America/Mexico_City");
        timeZoneIdMap.put("Canada Central Standard Time", "America/Regina");
        timeZoneIdMap.put("SA Pacific Standard Time", "America/Bogota");
        timeZoneIdMap.put("Eastern Standard Time (Mexico)", "America/Cancun");
        timeZoneIdMap.put("Eastern Standard Time", "America/New_York");
        timeZoneIdMap.put("Haiti Standard Time", "America/Port-au-Prince");
        timeZoneIdMap.put("Cuba Standard Time", "America/Havana");
        timeZoneIdMap.put("US Eastern Standard Time", "America/Indianapolis");
        timeZoneIdMap.put("Turks And Caicos Standard Time", "America/Grand_Turk");
        timeZoneIdMap.put("Paraguay Standard Time", "America/Asuncion");
        timeZoneIdMap.put("Atlantic Standard Time", "America/Halifax");
        timeZoneIdMap.put("Venezuela Standard Time", "America/Caracas");
        timeZoneIdMap.put("Central Brazilian Standard Time", "America/Cuiaba");
        timeZoneIdMap.put("SA Western Standard Time", "America/La_Paz");
        timeZoneIdMap.put("Pacific SA Standard Time", "America/Santiago");
        timeZoneIdMap.put("Newfoundland Standard Time", "America/St_Johns");
        timeZoneIdMap.put("Tocantins Standard Time", "America/Araguaina");
        timeZoneIdMap.put("E. South America Standard Time", "America/Sao_Paulo");
        timeZoneIdMap.put("SA Eastern Standard Time", "America/Cayenne");
        timeZoneIdMap.put("Argentina Standard Time", "America/Buenos_Aires");
        timeZoneIdMap.put("Greenland Standard Time", "America/Godthab");
        timeZoneIdMap.put("Montevideo Standard Time", "America/Montevideo");
        timeZoneIdMap.put("Magallanes Standard Time", "America/Punta_Arenas");
        timeZoneIdMap.put("Saint Pierre Standard Time", "America/Miquelon");
        timeZoneIdMap.put("Bahia Standard Time", "America/Bahia");
        timeZoneIdMap.put("UTC-02", "Etc/GMT+2");
        timeZoneIdMap.put("Azores Standard Time", "Atlantic/Azores");
        timeZoneIdMap.put("Cape Verde Standard Time", "Atlantic/Cape_Verde");
        timeZoneIdMap.put("UTC", "Etc/GMT");
        timeZoneIdMap.put("GMT Standard Time", "Europe/London");
        timeZoneIdMap.put("Greenwich Standard Time", "Atlantic/Reykjavik");
        timeZoneIdMap.put("Sao Tome Standard Time", "Africa/Sao_Tome");
        timeZoneIdMap.put("Morocco Standard Time", "Africa/Casablanca");
        timeZoneIdMap.put("W. Europe Standard Time", "Europe/Berlin");
        timeZoneIdMap.put("Central Europe Standard Time", "Europe/Budapest");
        timeZoneIdMap.put("Romance Standard Time", "Europe/Paris");
        timeZoneIdMap.put("Central European Standard Time", "Europe/Warsaw");
        timeZoneIdMap.put("W. Central Africa Standard Time", "Africa/Lagos");
        timeZoneIdMap.put("Jordan Standard Time", "Asia/Amman");
        timeZoneIdMap.put("GTB Standard Time", "Europe/Bucharest");
        timeZoneIdMap.put("Middle East Standard Time", "Asia/Beirut");
        timeZoneIdMap.put("Egypt Standard Time", "Africa/Cairo");
        timeZoneIdMap.put("E. Europe Standard Time", "Europe/Chisinau");
        timeZoneIdMap.put("Syria Standard Time", "Asia/Damascus");
        timeZoneIdMap.put("West Bank Standard Time", "Asia/Hebron");
        timeZoneIdMap.put("South Africa Standard Time", "Africa/Johannesburg");
        timeZoneIdMap.put("FLE Standard Time", "Europe/Kiev");
        timeZoneIdMap.put("Israel Standard Time", "Asia/Jerusalem");
        timeZoneIdMap.put("Kaliningrad Standard Time", "Europe/Kaliningrad");
        timeZoneIdMap.put("Sudan Standard Time", "Africa/Khartoum");
        timeZoneIdMap.put("Libya Standard Time", "Africa/Tripoli");
        timeZoneIdMap.put("Namibia Standard Time", "Africa/Windhoek");
        timeZoneIdMap.put("Arabic Standard Time", "Asia/Baghdad");
        timeZoneIdMap.put("Turkey Standard Time", "Europe/Istanbul");
        timeZoneIdMap.put("Arab Standard Time", "Asia/Riyadh");
        timeZoneIdMap.put("Belarus Standard Time", "Europe/Minsk");
        timeZoneIdMap.put("Russian Standard Time", "Europe/Moscow");
        timeZoneIdMap.put("E. Africa Standard Time", "Africa/Nairobi");
        timeZoneIdMap.put("Iran Standard Time", "Asia/Tehran");
        timeZoneIdMap.put("Arabian Standard Time", "Asia/Dubai");
        timeZoneIdMap.put("Astrakhan Standard Time", "Europe/Astrakhan");
        timeZoneIdMap.put("Azerbaijan Standard Time", "Asia/Baku");
        timeZoneIdMap.put("Russia Time Zone 3", "Europe/Samara");
        timeZoneIdMap.put("Mauritius Standard Time", "Indian/Mauritius");
        timeZoneIdMap.put("Saratov Standard Time", "Europe/Saratov");
        timeZoneIdMap.put("Georgian Standard Time", "Asia/Tbilisi");
        timeZoneIdMap.put("Volgograd Standard Time", "Europe/Volgograd");
        timeZoneIdMap.put("Caucasus Standard Time", "Asia/Yerevan");
        timeZoneIdMap.put("Afghanistan Standard Time", "Asia/Kabul");
        timeZoneIdMap.put("West Asia Standard Time", "Asia/Tashkent");
        timeZoneIdMap.put("Ekaterinburg Standard Time", "Asia/Yekaterinburg");
        timeZoneIdMap.put("Pakistan Standard Time", "Asia/Karachi");
        timeZoneIdMap.put("Qyzylorda Standard Time", "Asia/Qyzylorda");
        timeZoneIdMap.put("India Standard Time", "Asia/Calcutta");
        timeZoneIdMap.put("Sri Lanka Standard Time", "Asia/Colombo");
        timeZoneIdMap.put("Nepal Standard Time", "Asia/Katmandu");
        timeZoneIdMap.put("Central Asia Standard Time", "Asia/Almaty");
        timeZoneIdMap.put("Bangladesh Standard Time", "Asia/Dhaka");
        timeZoneIdMap.put("Omsk Standard Time", "Asia/Omsk");
        timeZoneIdMap.put("Myanmar Standard Time", "Asia/Rangoon");
        timeZoneIdMap.put("SE Asia Standard Time", "Asia/Bangkok");
        timeZoneIdMap.put("Altai Standard Time", "Asia/Barnaul");
        timeZoneIdMap.put("W. Mongolia Standard Time", "Asia/Hovd");
        timeZoneIdMap.put("North Asia Standard Time", "Asia/Krasnoyarsk");
        timeZoneIdMap.put("N. Central Asia Standard Time", "Asia/Novosibirsk");
        timeZoneIdMap.put("Tomsk Standard Time", "Asia/Tomsk");
        timeZoneIdMap.put("China Standard Time", "Asia/Shanghai");
        timeZoneIdMap.put("North Asia East Standard Time", "Asia/Irkutsk");
        timeZoneIdMap.put("Singapore Standard Time", "Asia/Singapore");
        timeZoneIdMap.put("W. Australia Standard Time", "Australia/Perth");
        timeZoneIdMap.put("Taipei Standard Time", "Asia/Taipei");
        timeZoneIdMap.put("Ulaanbaatar Standard Time", "Asia/Ulaanbaatar");
        timeZoneIdMap.put("Aus Central W. Standard Time", "Australia/Eucla");
        timeZoneIdMap.put("Transbaikal Standard Time", "Asia/Chita");
        timeZoneIdMap.put("Tokyo Standard Time", "Asia/Tokyo");
        timeZoneIdMap.put("North Korea Standard Time", "Asia/Pyongyang");
        timeZoneIdMap.put("Korea Standard Time", "Asia/Seoul");
        timeZoneIdMap.put("Yakutsk Standard Time", "Asia/Yakutsk");
        timeZoneIdMap.put("Cen. Australia Standard Time", "Australia/Adelaide");
        timeZoneIdMap.put("AUS Central Standard Time", "Australia/Darwin");
        timeZoneIdMap.put("E. Australia Standard Time", "Australia/Brisbane");
        timeZoneIdMap.put("AUS Eastern Standard Time", "Australia/Sydney");
        timeZoneIdMap.put("West Pacific Standard Time", "Pacific/Port_Moresby");
        timeZoneIdMap.put("Tasmania Standard Time", "Australia/Hobart");
        timeZoneIdMap.put("Vladivostok Standard Time", "Asia/Vladivostok");
        timeZoneIdMap.put("Lord Howe Standard Time", "Australia/Lord_Howe");
        timeZoneIdMap.put("Bougainville Standard Time", "Pacific/Bougainville");
        timeZoneIdMap.put("Russia Time Zone 10", "Asia/Srednekolymsk");
        timeZoneIdMap.put("Magadan Standard Time", "Asia/Magadan");
        timeZoneIdMap.put("Norfolk Standard Time", "Pacific/Norfolk");
        timeZoneIdMap.put("Sakhalin Standard Time", "Asia/Sakhalin");
        timeZoneIdMap.put("Central Pacific Standard Time", "Pacific/Guadalcanal");
        timeZoneIdMap.put("Russia Time Zone 11", "Asia/Kamchatka");
        timeZoneIdMap.put("New Zealand Standard Time", "Pacific/Auckland");
        timeZoneIdMap.put("UTC+12", "Etc/GMT-12");
        timeZoneIdMap.put("Fiji Standard Time", "Pacific/Fiji");
        timeZoneIdMap.put("Chatham Islands Standard Time", "Pacific/Chatham");
        timeZoneIdMap.put("UTC+13", "Etc/GMT-13");
        timeZoneIdMap.put("Tonga Standard Time", "Pacific/Tongatapu");
        timeZoneIdMap.put("Samoa Standard Time", "Pacific/Apia");
        timeZoneIdMap.put("Line Islands Standard Time", "Pacific/Kiritimati");
    }

    public static String getIanaFromWindows(String windowsTimeZone) {
        String iana = timeZoneIdMap.get(windowsTimeZone);

        // If a mapping was not found, assume the value passed
        // was already an IANA identifier
        return (iana == null) ? windowsTimeZone : iana;
    }

    public static ZoneId getZoneIdFromWindows(String windowsTimeZone) {
        String timeZoneId = getIanaFromWindows(windowsTimeZone);

        return ZoneId.of(timeZoneId);
    }
}
将以下
import语句添加到 CalendarFragment 文件 的顶部。import android.util.Log; import android.widget.ListView; import com.google.android.material.snackbar.BaseTransientBottomBar; import com.google.android.material.snackbar.Snackbar; import com.microsoft.graph.core.ClientException; import com.microsoft.graph.models.Event; import com.microsoft.identity.client.AuthenticationCallback; import com.microsoft.identity.client.IAuthenticationResult; import com.microsoft.identity.client.exception.MsalException; import java.time.DayOfWeek; import java.time.ZoneId; import java.time.ZonedDateTime; import java.time.temporal.ChronoUnit; import java.time.temporal.TemporalAdjusters; import java.util.List;将以下成员添加到类
CalendarFragment。private List<Event> mEventList = null;将以下函数添加到 类
CalendarFragment以隐藏和显示进度栏。private void showProgressBar() { getActivity().runOnUiThread(new Runnable() { @Override public void run() { getActivity().findViewById(R.id.progressbar) .setVisibility(View.VISIBLE); getActivity().findViewById(R.id.fragment_container) .setVisibility(View.GONE); } }); } private void hideProgressBar() { getActivity().runOnUiThread(new Runnable() { @Override public void run() { getActivity().findViewById(R.id.progressbar) .setVisibility(View.GONE); getActivity().findViewById(R.id.fragment_container) .setVisibility(View.VISIBLE); } }); }添加以下函数以输出事件列表以用于调试目的。
private void addEventsToList() { // Temporary for debugging String jsonEvents = GraphHelper.getInstance().serializeObject(mEventList); Log.d("GRAPH", jsonEvents); }将 类
onCreateView中的现有CalendarFragment函数替换为以下内容。@Nullable @Override public View onCreateView(@NonNull LayoutInflater inflater, @Nullable ViewGroup container, @Nullable Bundle savedInstanceState) { View view = inflater.inflate(R.layout.fragment_calendar, container, false); showProgressBar(); final GraphHelper graphHelper = GraphHelper.getInstance(); ZoneId tzId = GraphToIana.getZoneIdFromWindows(mTimeZone); // Get midnight of the first day of the week (assumed Sunday) // in the user's timezone, then convert to UTC ZonedDateTime startOfWeek = ZonedDateTime.now(tzId) .with(TemporalAdjusters.previousOrSame(DayOfWeek.SUNDAY)) .truncatedTo(ChronoUnit.DAYS) .withZoneSameInstant(ZoneId.of("UTC")); // Add 7 days to get the end of the week ZonedDateTime endOfWeek = startOfWeek.plusDays(7); // Get the user's events graphHelper .getCalendarView(startOfWeek, endOfWeek, mTimeZone) .thenAccept(eventList -> { mEventList = eventList; addEventsToList(); hideProgressBar(); }) .exceptionally(exception -> { hideProgressBar(); Log.e("GRAPH", "Error getting events", exception); Snackbar.make(getView(), exception.getMessage(), BaseTransientBottomBar.LENGTH_LONG).show(); return null; }); return view; }运行应用、登录,然后点击菜单中的 "日历 "导航项。 你应该在 Android Studio 的调试日志中看到事件的 JSON 转储。
显示结果
现在,可以将 JSON 转储替换为某些内容,以用户友好的方式显示结果。 在此部分中ListView Event ListView``ListView TextView,您将向日历片段添加 ,为 中的每个项目创建布局,并创建自定义列表适配器,以将每个字段的字段映射到视图中相应的 。
TextView将 中的 app/res/layout/fragment_calendar.xml 替换为ListView。<?xml version="1.0" encoding="utf-8"?> <RelativeLayout xmlns:android="http://schemas.android.com/apk/res/android" android:layout_width="match_parent" android:layout_height="match_parent"> <ListView android:id="@+id/eventlist" android:layout_width="match_parent" android:layout_height="match_parent" android:divider="?colorPrimary" android:dividerHeight="1dp" /> </RelativeLayout>右键单击 应用/res/layout 文件夹,然后选择 新建,然后选择 布局资源文件。
将文件命名
event_list_item,将 根元素 更改为RelativeLayout,然后选择"确定 "。打开 event_list_item.xml 文件,并将其内容替换为以下内容。
<?xml version="1.0" encoding="utf-8"?> <RelativeLayout xmlns:android="http://schemas.android.com/apk/res/android" android:layout_width="match_parent" android:layout_height="match_parent" android:padding="10dp"> <TextView android:id="@+id/eventsubject" android:layout_width="match_parent" android:layout_height="wrap_content" android:text="Subject" android:textSize="20sp" /> <TextView android:id="@+id/eventorganizer" android:layout_width="match_parent" android:layout_height="wrap_content" android:layout_below="@id/eventsubject" android:text="Adele Vance" android:textSize="15sp" /> <LinearLayout android:layout_width="match_parent" android:layout_height="wrap_content" android:layout_below="@id/eventorganizer" android:orientation="horizontal"> <TextView android:layout_width="wrap_content" android:layout_height="wrap_content" android:paddingEnd="2sp" android:text="Start:" android:textSize="15sp" android:textStyle="bold" /> <TextView android:id="@+id/eventstart" android:layout_width="wrap_content" android:layout_height="wrap_content" android:text="1:30 PM 2/19/2019" android:textSize="15sp" /> <TextView android:layout_width="wrap_content" android:layout_height="wrap_content" android:paddingStart="5sp" android:paddingEnd="2sp" android:text="End:" android:textSize="15sp" android:textStyle="bold" /> <TextView android:id="@+id/eventend" android:layout_width="wrap_content" android:layout_height="wrap_content" android:text="1:30 PM 2/19/2019" android:textSize="15sp" /> </LinearLayout> </RelativeLayout>右键单击 app/java/com.example.graphtutorial 文件夹,然后选择"新建 ",然后选择" Java类"。
将类命名并选择
EventListAdapter"确定 "。打开 EventListAdapter 文件,并将其内容替换为以下内容。
package com.example.graphtutorial; import android.content.Context; import android.view.LayoutInflater; import android.view.View; import android.view.ViewGroup; import android.widget.ArrayAdapter; import android.widget.TextView; import androidx.annotation.NonNull; import com.microsoft.graph.models.DateTimeTimeZone; import com.microsoft.graph.models.Event; import java.time.LocalDateTime; import java.time.ZoneId; import java.time.ZonedDateTime; import java.time.format.DateTimeFormatter; import java.time.format.FormatStyle; import java.util.List; import java.util.TimeZone; public class EventListAdapter extends ArrayAdapter<Event> { private Context mContext; private int mResource; // Used for the ViewHolder pattern // https://developer.android.com/training/improving-layouts/smooth-scrolling static class ViewHolder { TextView subject; TextView organizer; TextView start; TextView end; } public EventListAdapter(Context context, int resource, List<Event> events) { super(context, resource, events); mContext = context; mResource = resource; } @NonNull @Override public View getView(int position, View convertView, ViewGroup parent) { Event event = getItem(position); ViewHolder holder; if (convertView == null) { LayoutInflater inflater = LayoutInflater.from(mContext); convertView = inflater.inflate(mResource, parent, false); holder = new ViewHolder(); holder.subject = convertView.findViewById(R.id.eventsubject); holder.organizer = convertView.findViewById(R.id.eventorganizer); holder.start = convertView.findViewById(R.id.eventstart); holder.end = convertView.findViewById(R.id.eventend); convertView.setTag(holder); } else { holder = (ViewHolder) convertView.getTag(); } holder.subject.setText(event.subject); holder.organizer.setText(event.organizer.emailAddress.name); holder.start.setText(getLocalDateTimeString(event.start)); holder.end.setText(getLocalDateTimeString(event.end)); return convertView; } // Convert Graph's DateTimeTimeZone format to // a LocalDateTime, then return a formatted string private String getLocalDateTimeString(DateTimeTimeZone dateTime) { ZonedDateTime localDateTime = LocalDateTime.parse(dateTime.dateTime) .atZone(GraphToIana.getZoneIdFromWindows(dateTime.timeZone)); return String.format("%s %s", localDateTime.format(DateTimeFormatter.ofLocalizedDate(FormatStyle.MEDIUM)), localDateTime.format(DateTimeFormatter.ofLocalizedTime(FormatStyle.SHORT))); } }打开 CalendarFragment 类,将现有
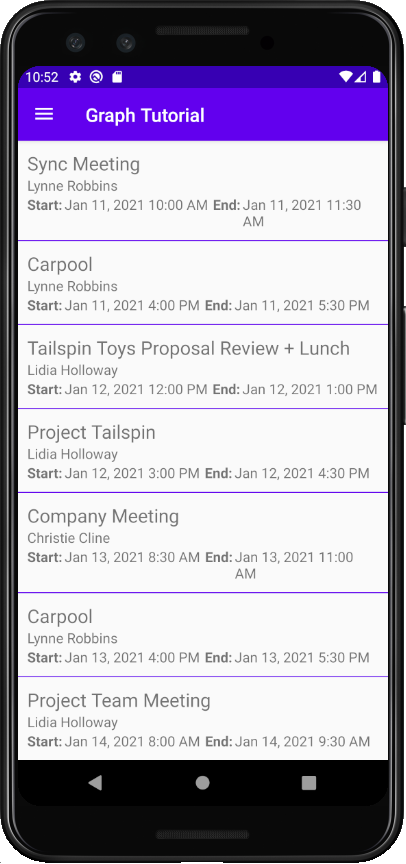
addEventsToList函数替换为以下内容。private void addEventsToList() { getActivity().runOnUiThread(new Runnable() { @Override public void run() { ListView eventListView = getView().findViewById(R.id.eventlist); EventListAdapter listAdapter = new EventListAdapter(getActivity(), R.layout.event_list_item, mEventList); eventListView.setAdapter(listAdapter); } }); }运行应用、登录,然后点击 "日历" 导航项。 你应该会看到事件列表。
创建新事件
在此部分中,您将添加在用户日历上创建事件的能力。
打开 GraphHelper ,将以下
import语句添加到文件顶部。import com.microsoft.graph.models.Attendee; import com.microsoft.graph.models.DateTimeTimeZone; import com.microsoft.graph.models.EmailAddress; import com.microsoft.graph.models.ItemBody; import com.microsoft.graph.models.AttendeeType; import com.microsoft.graph.models.BodyType;将以下函数添加到 类
GraphHelper以创建新事件。public CompletableFuture<Event> createEvent(String subject, ZonedDateTime start, ZonedDateTime end, String timeZone, String[] attendees, String body) { Event newEvent = new Event(); // Set properties on the event // Subject newEvent.subject = subject; // Start newEvent.start = new DateTimeTimeZone(); // DateTimeTimeZone has two parts: // The date/time expressed as an ISO 8601 Local date/time // Local meaning there is no UTC or UTC offset designation // Example: 2020-01-12T09:00:00 newEvent.start.dateTime = start.format(DateTimeFormatter.ISO_LOCAL_DATE_TIME); // The time zone - can be either a Windows time zone name ("Pacific Standard Time") // or an IANA time zone identifier ("America/Los_Angeles") newEvent.start.timeZone = timeZone; // End newEvent.end = new DateTimeTimeZone(); newEvent.end.dateTime = end.format(DateTimeFormatter.ISO_LOCAL_DATE_TIME); newEvent.end.timeZone = timeZone; // Add attendees if any were provided if (attendees.length > 0) { newEvent.attendees = new LinkedList<>(); for (String attendeeEmail : attendees) { Attendee newAttendee = new Attendee(); // Set the attendee type, in this case required newAttendee.type = AttendeeType.REQUIRED; // Create a new EmailAddress object with the address // provided newAttendee.emailAddress = new EmailAddress(); newAttendee.emailAddress.address = attendeeEmail; newEvent.attendees.add(newAttendee); } } // Add body if provided if (!body.isEmpty()) { newEvent.body = new ItemBody(); // Set the content newEvent.body.content = body; // Specify content is plain text newEvent.body.contentType = BodyType.TEXT; } return mClient.me().events().buildRequest() .postAsync(newEvent); }
更新新事件片段
右键单击 app/java/com.example.graphtutorial 文件夹,然后选择"新建 ",然后选择" Java类"。 将类命名并选择
EditTextDateTimePicker"确定 "。打开新文件,并将其内容替换为以下内容。
package com.example.graphtutorial; import android.app.DatePickerDialog; import android.app.TimePickerDialog; import android.content.Context; import android.view.View; import android.widget.DatePicker; import android.widget.EditText; import android.widget.TimePicker; import java.time.ZoneId; import java.time.ZonedDateTime; import java.time.format.DateTimeFormatter; import java.time.format.FormatStyle; // Class to wrap an EditText control to act as a date/time picker // When the user taps it, a date picker is shown, followed by a time picker // The values selected are combined to create a date/time value, which is then // displayed in the EditText public class EditTextDateTimePicker implements View.OnClickListener, DatePickerDialog.OnDateSetListener, TimePickerDialog.OnTimeSetListener { private Context mContext; private EditText mEditText; private ZonedDateTime mDateTime; EditTextDateTimePicker(Context context, EditText editText, ZoneId zoneId) { mContext = context; mEditText = editText; mEditText.setOnClickListener(this); // Initialize to now mDateTime = ZonedDateTime.now(zoneId).withSecond(0).withNano(0); // Round time to closest upcoming half-hour int offset = 30 - (mDateTime.getMinute() % 30); if (offset > 0) { mDateTime = mDateTime.plusMinutes(offset); } updateText(); } @Override public void onClick(View v) { // First, show a date picker DatePickerDialog dialog = new DatePickerDialog(mContext, this, mDateTime.getYear(), mDateTime.getMonthValue(), mDateTime.getDayOfMonth()); dialog.show(); } @Override public void onDateSet(DatePicker view, int year, int month, int dayOfMonth) { // Update the stored date/time with the new date mDateTime = mDateTime.withYear(year).withMonth(month).withDayOfMonth(dayOfMonth); // Show a time picker TimePickerDialog dialog = new TimePickerDialog(mContext, this, mDateTime.getHour(), mDateTime.getMinute(), false); dialog.show(); } @Override public void onTimeSet(TimePicker view, int hourOfDay, int minute) { // Update the stored date/time with the new time mDateTime = mDateTime.withHour(hourOfDay).withMinute(minute); // Update the text in the EditText updateText(); } public ZonedDateTime getZonedDateTime() { return mDateTime; } private void updateText() { mEditText.setText(String.format("%s %s", mDateTime.format(DateTimeFormatter.ofLocalizedDate(FormatStyle.MEDIUM)), mDateTime.format(DateTimeFormatter.ofLocalizedTime(FormatStyle.SHORT)))); } }此类包装控件
EditText,在用户点击控件时显示日期和时间选取器,然后使用选取的日期和时间更新值。打开 应用/res/layout/fragment_new_event.xml 并将其内容替换为以下内容。
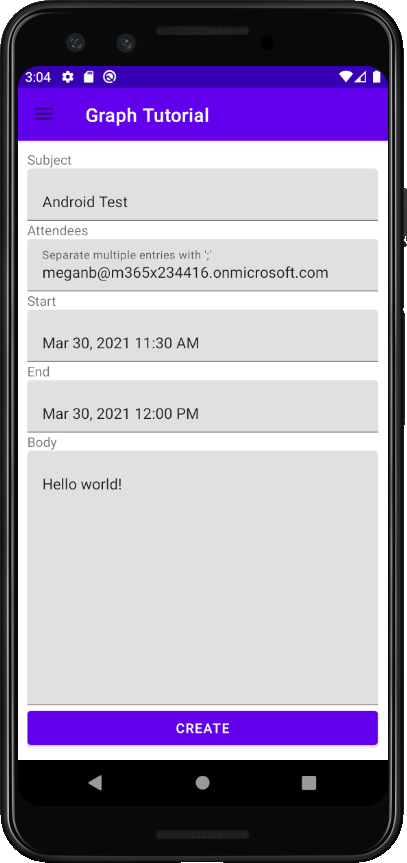
<?xml version="1.0" encoding="utf-8"?> <LinearLayout xmlns:android="http://schemas.android.com/apk/res/android" android:layout_width="match_parent" android:layout_height="match_parent" android:orientation="vertical" android:padding="10dp"> <TextView android:layout_width="wrap_content" android:layout_height="wrap_content" android:text="Subject" /> <com.google.android.material.textfield.TextInputLayout android:id="@+id/neweventsubject" android:layout_width="match_parent" android:layout_height="wrap_content"> <com.google.android.material.textfield.TextInputEditText android:layout_width="match_parent" android:layout_height="wrap_content" /> </com.google.android.material.textfield.TextInputLayout> <TextView android:layout_width="match_parent" android:layout_height="wrap_content" android:text="Attendees" /> <com.google.android.material.textfield.TextInputLayout android:id="@+id/neweventattendees" android:layout_width="match_parent" android:layout_height="wrap_content"> <com.google.android.material.textfield.TextInputEditText android:layout_width="match_parent" android:layout_height="wrap_content" android:hint="Separate multiple entries with ';'" /> </com.google.android.material.textfield.TextInputLayout> <TextView android:layout_width="match_parent" android:layout_height="wrap_content" android:text="Start" /> <com.google.android.material.textfield.TextInputLayout android:id="@+id/neweventstartdatetime" android:layout_width="match_parent" android:layout_height="wrap_content"> <com.google.android.material.textfield.TextInputEditText android:layout_width="match_parent" android:layout_height="wrap_content" android:focusable="false" android:clickable="true" /> </com.google.android.material.textfield.TextInputLayout> <TextView android:layout_width="match_parent" android:layout_height="wrap_content" android:text="End" /> <com.google.android.material.textfield.TextInputLayout android:id="@+id/neweventenddatetime" android:layout_width="match_parent" android:layout_height="wrap_content"> <com.google.android.material.textfield.TextInputEditText android:layout_width="match_parent" android:layout_height="wrap_content" android:focusable="false" android:clickable="true" /> </com.google.android.material.textfield.TextInputLayout> <TextView android:layout_width="match_parent" android:layout_height="wrap_content" android:text="Body" /> <com.google.android.material.textfield.TextInputLayout android:id="@+id/neweventbody" android:layout_width="match_parent" android:layout_height="0dp" android:layout_weight="1"> <com.google.android.material.textfield.TextInputEditText android:layout_width="match_parent" android:layout_height="match_parent" android:inputType="textMultiLine" android:gravity="top" /> </com.google.android.material.textfield.TextInputLayout> <Button android:id="@+id/createevent" android:layout_width="match_parent" android:layout_height="wrap_content" android:text="Create" /> </LinearLayout>打开 NewEventFragment ,在
import文件顶部添加以下语句。import android.util.Log; import android.widget.Button; import com.google.android.material.snackbar.BaseTransientBottomBar; import com.google.android.material.snackbar.Snackbar; import com.google.android.material.textfield.TextInputLayout; import java.time.ZoneId; import java.time.ZonedDateTime;将以下成员添加到 类
NewEventFragment。private TextInputLayout mSubject; private TextInputLayout mAttendees; private TextInputLayout mStartInputLayout; private TextInputLayout mEndInputLayout; private TextInputLayout mBody; private EditTextDateTimePicker mStartPicker; private EditTextDateTimePicker mEndPicker;添加以下函数以显示和隐藏进度栏。
private void showProgressBar() { getActivity().runOnUiThread(new Runnable() { @Override public void run() { getActivity().findViewById(R.id.progressbar) .setVisibility(View.VISIBLE); getActivity().findViewById(R.id.fragment_container) .setVisibility(View.GONE); } }); } private void hideProgressBar() { getActivity().runOnUiThread(new Runnable() { @Override public void run() { getActivity().findViewById(R.id.progressbar) .setVisibility(View.GONE); getActivity().findViewById(R.id.fragment_container) .setVisibility(View.VISIBLE); } }); }添加以下函数,从输入控件获取值并调用
GraphHelper.createEvent函数。private void createEvent() { String subject = mSubject.getEditText().getText().toString(); String attendees = mAttendees.getEditText().getText().toString(); String body = mBody.getEditText().getText().toString(); ZonedDateTime startDateTime = mStartPicker.getZonedDateTime(); ZonedDateTime endDateTime = mEndPicker.getZonedDateTime(); // Validate boolean isValid = true; // Subject is required if (subject.isEmpty()) { isValid = false; mSubject.setError("You must set a subject"); } // End must be after start if (!endDateTime.isAfter(startDateTime)) { isValid = false; mEndInputLayout.setError("The end must be after the start"); } if (isValid) { // Split the attendees string into an array String[] attendeeArray = attendees.split(";"); GraphHelper.getInstance() .createEvent(subject, startDateTime, endDateTime, mTimeZone, attendeeArray, body) .thenAccept(newEvent -> { hideProgressBar(); Snackbar.make(getView(), "Event created", BaseTransientBottomBar.LENGTH_SHORT).show(); }) .exceptionally(exception -> { hideProgressBar(); Log.e("GRAPH", "Error creating event", exception); Snackbar.make(getView(), exception.getMessage(), BaseTransientBottomBar.LENGTH_LONG).show(); return null; }); } }将 现有的
onCreateView替换为以下内容。@Nullable @Override public View onCreateView(@NonNull LayoutInflater inflater, @Nullable ViewGroup container, @Nullable Bundle savedInstanceState) { View newEventView = inflater.inflate(R.layout.fragment_new_event, container, false); ZoneId userTimeZone = GraphToIana.getZoneIdFromWindows(mTimeZone); mSubject = newEventView.findViewById(R.id.neweventsubject); mAttendees = newEventView.findViewById(R.id.neweventattendees); mBody = newEventView.findViewById(R.id.neweventbody); mStartInputLayout = newEventView.findViewById(R.id.neweventstartdatetime); mStartPicker = new EditTextDateTimePicker(getContext(), mStartInputLayout.getEditText(), userTimeZone); mEndInputLayout = newEventView.findViewById(R.id.neweventenddatetime); mEndPicker = new EditTextDateTimePicker(getContext(), mEndInputLayout.getEditText(), userTimeZone); Button createButton = newEventView.findViewById(R.id.createevent); createButton.setOnClickListener(v -> { // Clear any errors mSubject.setErrorEnabled(false); mEndInputLayout.setErrorEnabled(false); showProgressBar(); createEvent(); }); return newEventView; }保存更改并重新启动该应用。 选择" 新建事件 "菜单项,填写表单,然后选择"创建 "。
恭喜!
你已完成 Android Microsoft Graph教程。 现在,你已经拥有一个调用 Microsoft Graph,你可以试验和添加新功能。 请访问 Microsoft Graph概述,查看可以使用 Microsoft Graph 访问的所有数据。
反馈
Please provide any feedback on this tutorial in the GitHub repository.
你有关于此部分的问题? 如果有,请向我们提供反馈,以便我们对此部分作出改进。