使用 Microsoft Graph 构建 iOS Objective-C 应用
本教程指导你如何构建一个React Native Microsoft Graph API 检索用户的日历信息的应用。
提示
如果只想下载已完成的教程,可以下载或克隆GitHub存储库。
先决条件
在开始本教程之前,应在开发计算机上安装以下内容。
您还应该有一个在 Outlook.com 上拥有邮箱的个人 Microsoft 帐户,或者一个 Microsoft 工作或学校帐户。 如果你没有 Microsoft 帐户,则有几个选项可以获取免费帐户:
- 你可以 注册新的个人 Microsoft 帐户。
- 你可以注册开发人员计划Microsoft 365免费订阅Microsoft 365订阅。
备注
本教程使用 Xcode 版本 12.3 和 CocoaPods 版本 1.10.1 编写。 本指南中的步骤可能与其他版本一起运行,但该版本尚未经过测试。
反馈
Please provide any feedback on this tutorial in the GitHub repository.
创建 iOS Objective C 应用
首先创建新的 Objective-C 项目。
打开 Xcode。 在"文件" 菜单上,选择 "新建",然后选择 Project"。
选择"应用" 模板,然后选择"下一 步"。
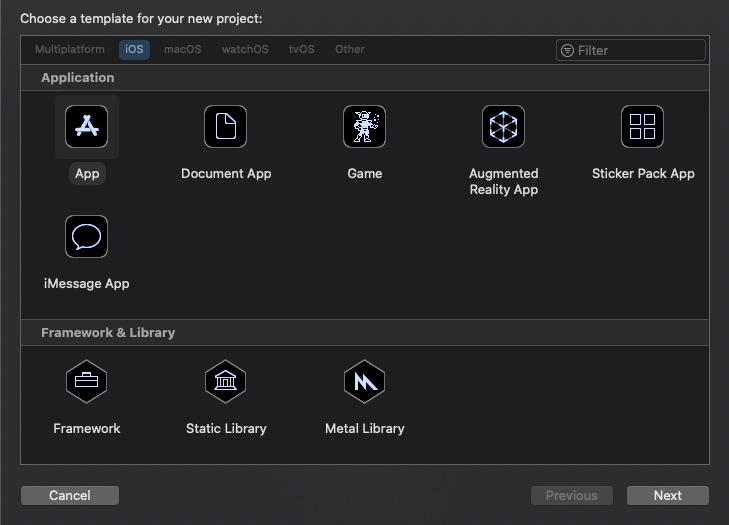
将"产品名称" 设置为
GraphTutorial,将 "语言"设置为 "Objective-C"。填写其余字段,然后选择"下一 步"。
选择项目的位置, 然后选择创建。
安装依赖项
在继续之前,请安装一些你稍后将使用的其他依赖项。
- Microsoft Authentication Library (MSAL) for iOS for authenticating to Azure AD。
- Microsoft Graph SDK for Objective C,用于调用 Microsoft Graph。
- Microsoft Graph Models SDK for Objective C for strong-typed objects representing Microsoft Graph resources like users or events.
退出 Xcode。
打开终端,将目录更改为 GraphTutorial 项目的位置。
运行以下命令以创建 Podfile。
pod init打开 Podfile,并添加行后的以下
use_frameworks!行。pod 'MSAL', '~> 1.1.13' pod 'MSGraphClientSDK', ' ~> 1.0.0' pod 'MSGraphClientModels', '~> 1.3.0'保存 Podfile,然后运行以下命令以安装依赖项。
pod install命令完成后,在 Xcode 中打开新创建的 GraphTu一l.xcworkspace。
设计应用
在此部分中,你将为应用创建视图:登录页、选项卡栏导航器、欢迎页和日历页。 你还将创建活动指示器覆盖层。
创建登录页
在 Xcode 中展开 GraphTutorial 文件夹,然后选择 ViewController.m 文件。
在 文件检查器 中 ,将文件 的名称更改为
SignInViewController.m。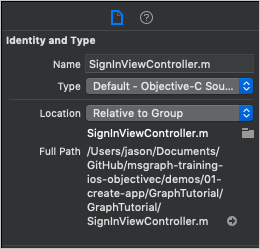
打开 SignInViewController.m, 并将其内容替换为以下代码。
#import "SignInViewController.h"

@interface SignInViewController ()

@end

@implementation SignInViewController

- (void)viewDidLoad {
    [super viewDidLoad];
    // Do any additional setup after loading the view.
}

- (IBAction)signIn {
    [self performSegueWithIdentifier: @"userSignedIn" sender: nil];
}
@end
选择 ViewController.h 文件。
在 文件检查器 中 ,将文件 的名称更改为
SignInViewController.h。打开 SignInViewController.h, 将 的所有实例
ViewController更改为SignInViewController。打开 Main.storyboard 文件。
展开 "查看控制器场景", 然后选择"查看控制器"。
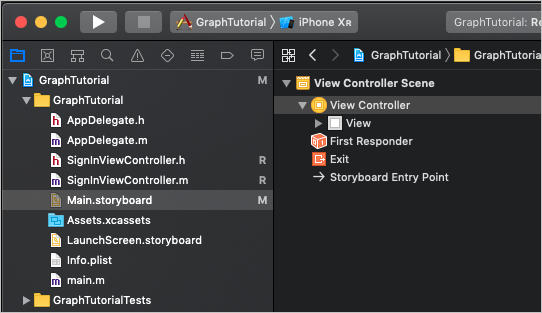
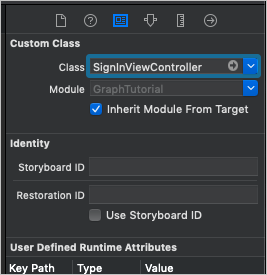
选择标识 检查器,然后将类 下拉列表更改为 SignInViewController。
选择库 ,然后将按钮拖到登录视图控制器上。
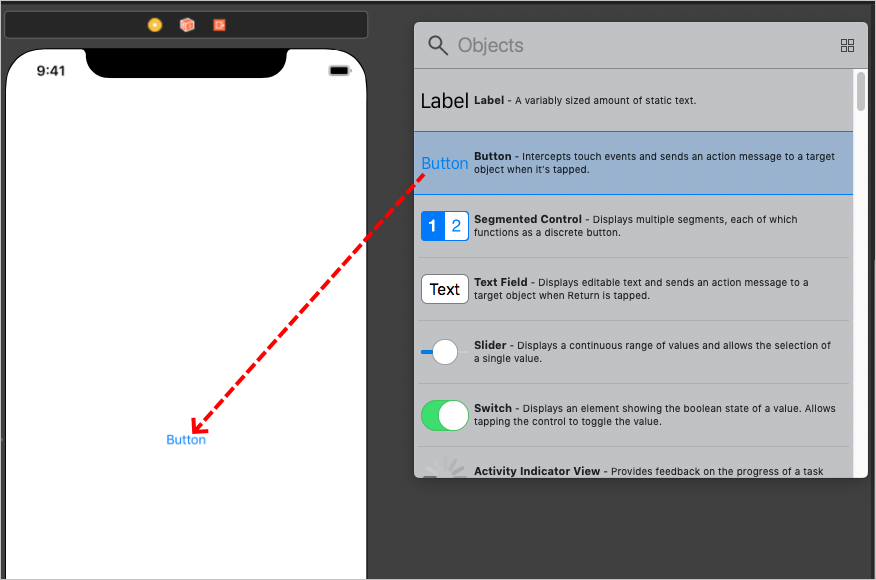
选中按钮后,选择 "属性检查器 ",将按钮 的"标题 "更改为
Sign In。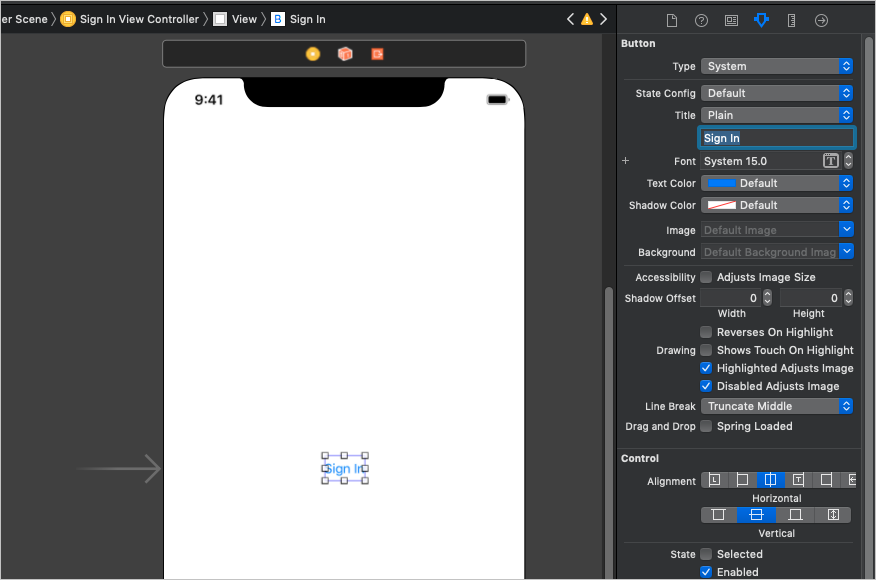
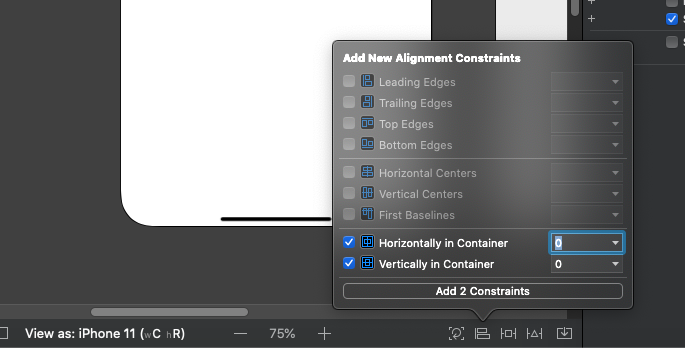
选中按钮后 ,选择情节 提要底部的"对齐"按钮。 同时选择容器中 的"水平"和"容器内垂直"约束,将其值保留为 0,然后选择"添加 2 个约束"。
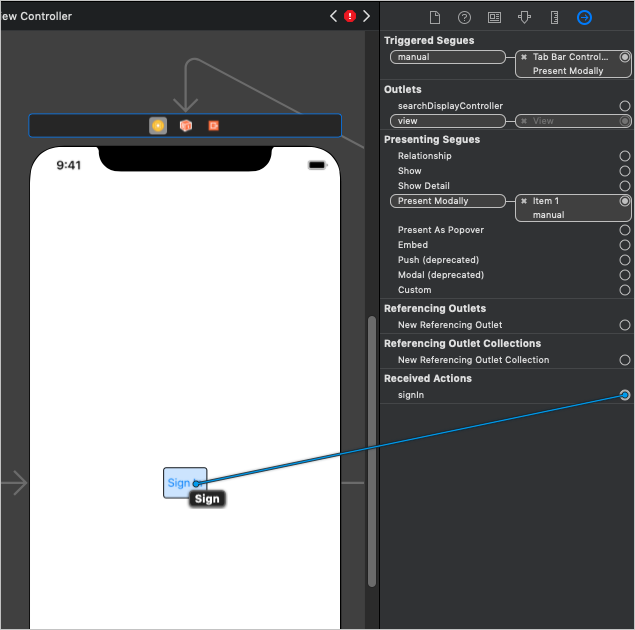
选择"登录视图控制器", 然后选择"连接 检查器"。
在 "已接收操作"下,将"登录" 旁边的未 填充圆圈拖到按钮上。 选择 弹出菜单上的 "内部触摸"。
创建选项卡栏
选择" 库", 然后将选项卡 栏控制器 拖动到情节提要上。
选择"登录视图控制器", 然后选择"连接 检查器"。
在 "触发的 Segues" 下,将手动旁的未填充圆圈拖到情节提要上的 选项卡 栏控制器上。 在 弹出菜单中选择 "模式显示"。
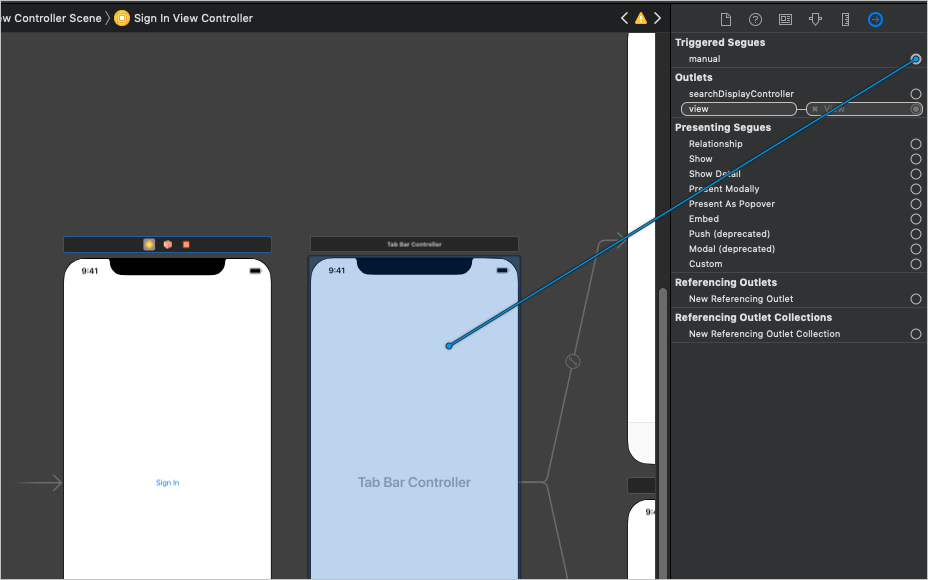
选择刚刚添加的 segue,然后选择 属性检查器。 将 "标识符" 字段设置为
userSignedIn,将 **"演示文稿"**设置为"全屏"。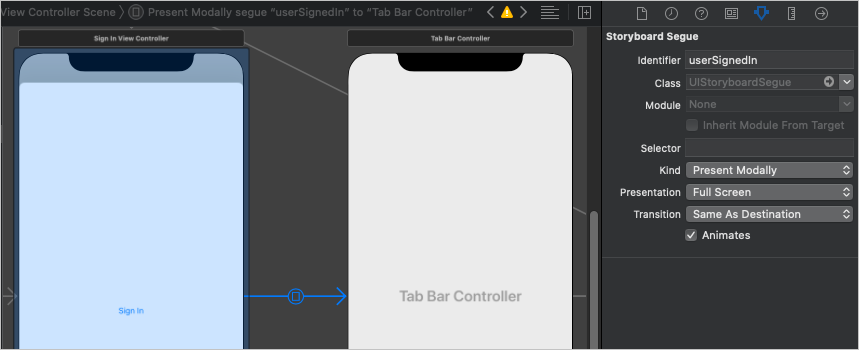
选择"项目 1 场景", 然后选择"连接 检查器"。
在 触发的 Segues 下,将手动旁的未填充圆圈拖到情节提要上的 登录视图 控制器上。 在 弹出菜单中选择 "模式显示"。
选择刚刚添加的 segue,然后选择 属性检查器。 将 "标识符" 字段设置为
userSignedOut,将 **"演示文稿"**设置为"全屏"。
创建欢迎页面
选择 Assets.xcassets 文件。
在"编辑器" 菜单上,选择"添加新资产", 然后选择"图像集"。
选择新的 Image 资源并使用 属性检查器 将其 名称设置为
DefaultUserPhoto。添加要用作默认用户配置文件照片的任何图像。
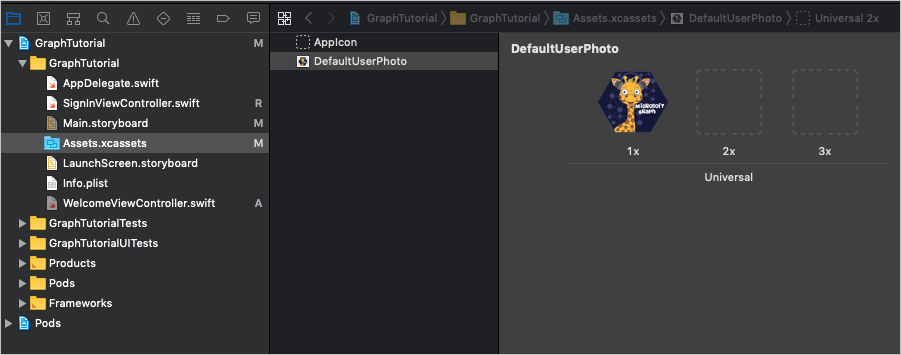
在 GraphTutorial 文件夹中新建一个名为 的 Cocoa Touch 类文件
WelcomeViewController。 在 "子类"字段中选择"UIViewController"。打开 WelcomeViewController.h, 在声明中添加以下
@interface代码。@property (nonatomic) IBOutlet UIImageView *userProfilePhoto; @property (nonatomic) IBOutlet UILabel *userDisplayName; @property (nonatomic) IBOutlet UILabel *userEmail;打开 WelcomeViewController.m, 并将其内容替换为以下代码。
#import "WelcomeViewController.h"

@interface WelcomeViewController ()

@end

@implementation WelcomeViewController

- (void)viewDidLoad {
    [super viewDidLoad];
    // Do any additional setup after loading the view.

    // TEMPORARY
    self.userProfilePhoto.image = [UIImage imageNamed:@"DefaultUserPhoto"];
    self.userDisplayName.text = @"Default User";
    [self.userDisplayName sizeToFit];
    self.userEmail.text = @"default@contoso.com";
    [self.userEmail sizeToFit];
}

- (IBAction)signOut {
    [self performSegueWithIdentifier: @"userSignedOut" sender: nil];
}

@end
打开 Main.storyboard。 选择" 项目 1 场景", 然后选择 标识检查器。 将 Class 值更改为 WelcomeViewController。
使用 库 , 将以下项添加到项目 1 场景。
- 一 个图像视图
- 两 个标签
- 一 个按钮
使用连接 检查器 进行以下连接。
- 将 userDisplayName 出口链接到第一个标签。
- 将 userEmail 出口 链接到第二个标签。
- 将 userProfilePhoto 出口链接到图像视图。
- 将 signOut received 操作链接到按钮的 "内部触摸"。
选择图像视图,然后选择大小 检查器。
将 Width 和 Height 设置为 196。
使用 "对齐 "按钮添加值为 0 的" 水平在容器内"约束。
使用"对齐" 按钮 (旁边的"添加新约束") 添加以下约束:
- 将顶部对齐到:保险箱 Area,值:0
- 下空间:用户显示名称,值:标准
- 高度,值:196
- 宽度,值:196
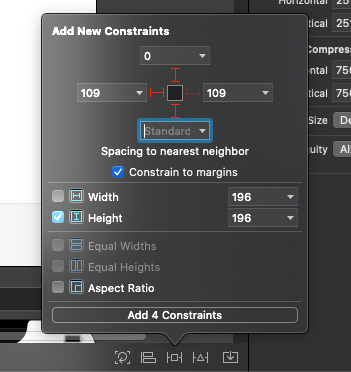
选择第一个标签,然后使用 "对齐" 按钮添加值为 0 的 " 在容器中水平放置"约束。
使用 "添加新约束" 按钮可添加以下约束:
- 顶部空间:用户配置文件照片,值:标准
- 底部空间:用户电子邮件,值:标准
选择第二个标签,然后选择 属性检查器。
将"颜色"更改为 "深灰色", 将 "字体"更改为 "系统 12.0"。
使用 "对齐 "按钮添加值为 0 的" 水平在容器内"约束。
使用 "添加新约束" 按钮可添加以下约束:
- Top Space to: User Display Name, value: Standard
- 下空间:注销,值:14
选择该按钮,然后选择"属性检查器"。
将 "标题" 更改为
Sign Out。使用 "对齐 "按钮添加值为 0 的" 水平在容器内"约束。
使用 "添加新约束" 按钮可添加以下约束:
- 顶部空间:用户电子邮件,值:14
选择场景底部的选项卡栏项,然后选择 属性检查器。 将 "标题" 更改为
Me。在"编辑器" 菜单上,选择"解决自动布局 问题",然后选择"欢迎视图控制器"中"所有视图"下的"添加缺少 的约束"。
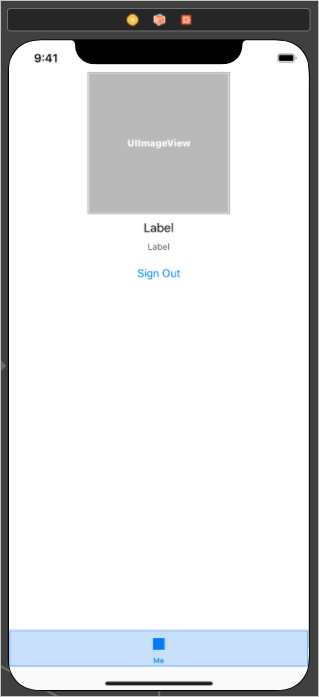
完成操作后,欢迎场景看起来应该与此类似。
创建日历页
在 GraphTutorial 文件夹中新建一个名为 的 Cocoa Touch 类文件
CalendarViewController。 在 "子类"字段中选择"UIViewController"。打开 CalendarViewController.h, 在声明中添加以下
@interface代码。@property (nonatomic) IBOutlet UITextView *calendarJSON;打开 CalendarViewController.m, 并将其内容替换为以下代码。
#import "CalendarViewController.h"

@interface CalendarViewController ()

@end

@implementation CalendarViewController

- (void)viewDidLoad {
    [super viewDidLoad];
    // Do any additional setup after loading the view.

    // TEMPORARY
    self.calendarJSON.text = @"Calendar";
    [self.calendarJSON sizeToFit];
}

@end
打开 Main.storyboard。 选择" 项目 2 场景", 然后选择 标识检查器。 将 Class 值更改为 CalendarViewController。
使用 库 , 将 文本视图添加到 项目 2 场景。
选择刚添加的文本视图。 在编辑器 上, 选择"嵌入到", 然后选择"滚动视图"。
使用连接 检查器 将 calendarJSON 出口 连接到文本视图。
选择场景底部的选项卡栏项,然后选择 属性检查器。 将 "标题" 更改为
Calendar。在"编辑器" 菜单上,选择"解决自动布局 问题",然后选择"欢迎视图控制器"中"所有视图"下的"添加缺少 的约束"。
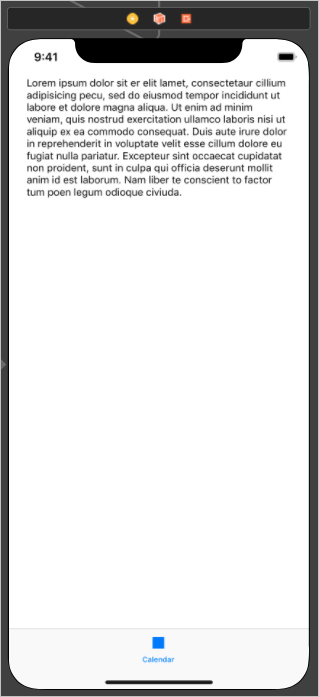
完成后,日历场景看起来应该与此类似。
创建活动指示器
在 GraphTutorial 文件夹中新建一个名为 的 Cocoa Touch 类文件
SpinnerViewController。 在 "子类"字段中选择"UIViewController"。打开 SpinnerViewController.h, 在声明中添加以下
@interface代码。- (void) startWithContainer:(UIViewController*) container; - (void) stop;打开 SpinnerViewController.m, 并将其内容替换为以下代码。
#import "SpinnerViewController.h"

@interface SpinnerViewController ()
@property (nonatomic) UIActivityIndicatorView* spinner;
@end

@implementation SpinnerViewController

- (void)viewDidLoad {
    [super viewDidLoad];

    _spinner = [[UIActivityIndicatorView alloc] initWithActivityIndicatorStyle:
                UIActivityIndicatorViewStyleLarge];

    self.view.backgroundColor = [UIColor colorWithWhite:0 alpha:0.7];
    [self.view addSubview:_spinner];

    _spinner.translatesAutoresizingMaskIntoConstraints = false;
    [_spinner startAnimating];

    [_spinner.centerXAnchor constraintEqualToAnchor:self.view.centerXAnchor].active = true;
    [_spinner.centerYAnchor constraintEqualToAnchor:self.view.centerYAnchor].active = true;
}

- (void) startWithContainer:(UIViewController *)container {
    [container addChildViewController:self];
    self.view.frame = container.view.frame;
    [container.view addSubview:self.view];
    [self didMoveToParentViewController:container];
}

- (void) stop {
    [self willMoveToParentViewController:nil];
    [self.view removeFromSuperview];
    [self removeFromParentViewController];
}

@end
测试应用程序
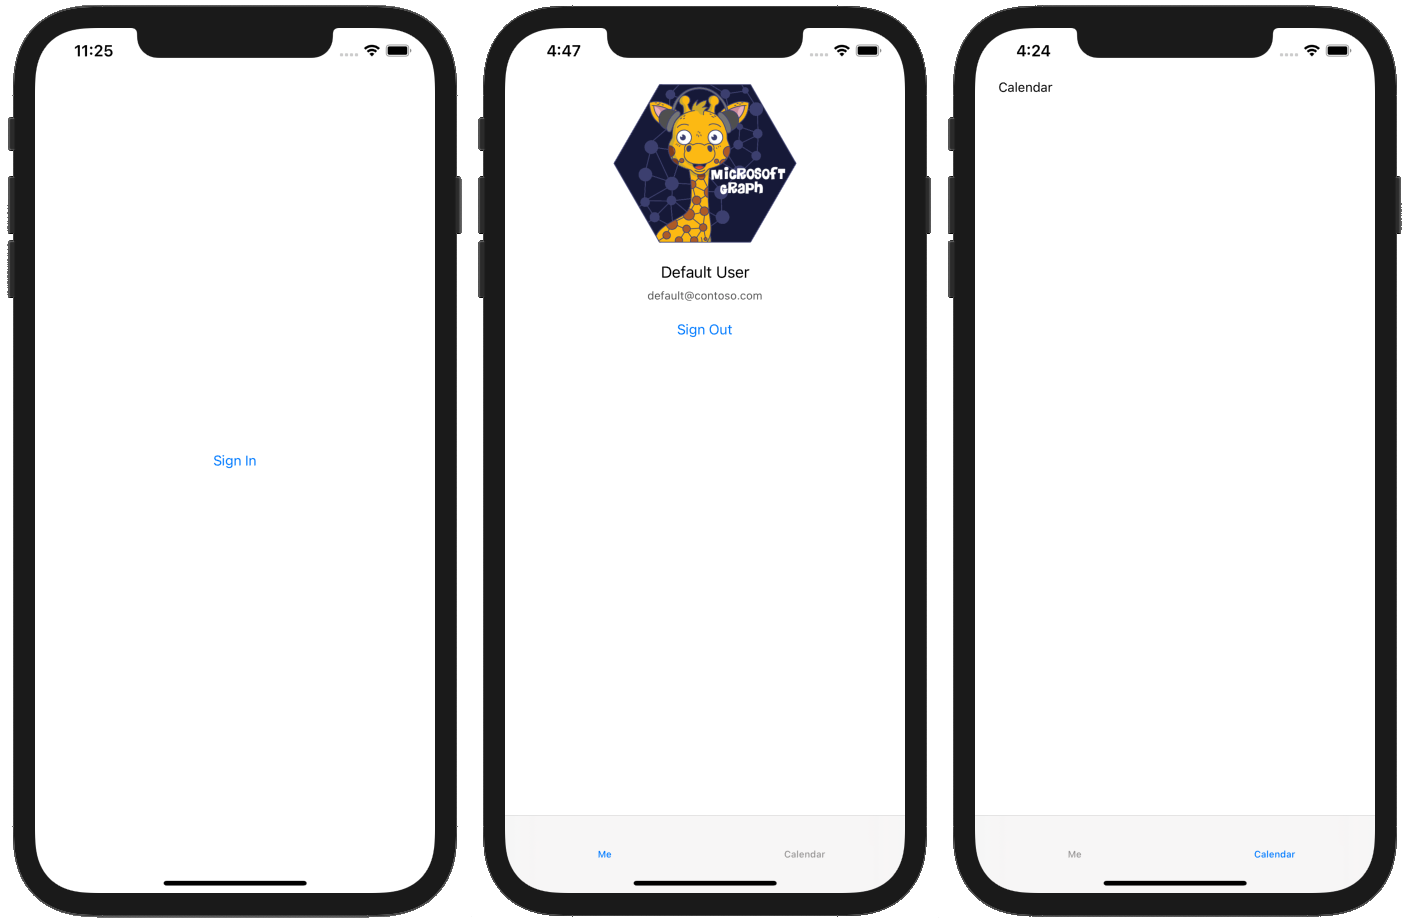
保存更改并启动应用。 你应该能够使用"登录"和"注销"按钮和选项卡栏在屏幕之间移动。
在门户中注册该应用
在此练习中,你将使用管理中心Azure Active Directory Azure AD 本机应用程序。
打开浏览器,并转到 Azure Active Directory 管理中心。然后,使用 个人帐户(亦称为“Microsoft 帐户”)或 工作或学校帐户 登录。
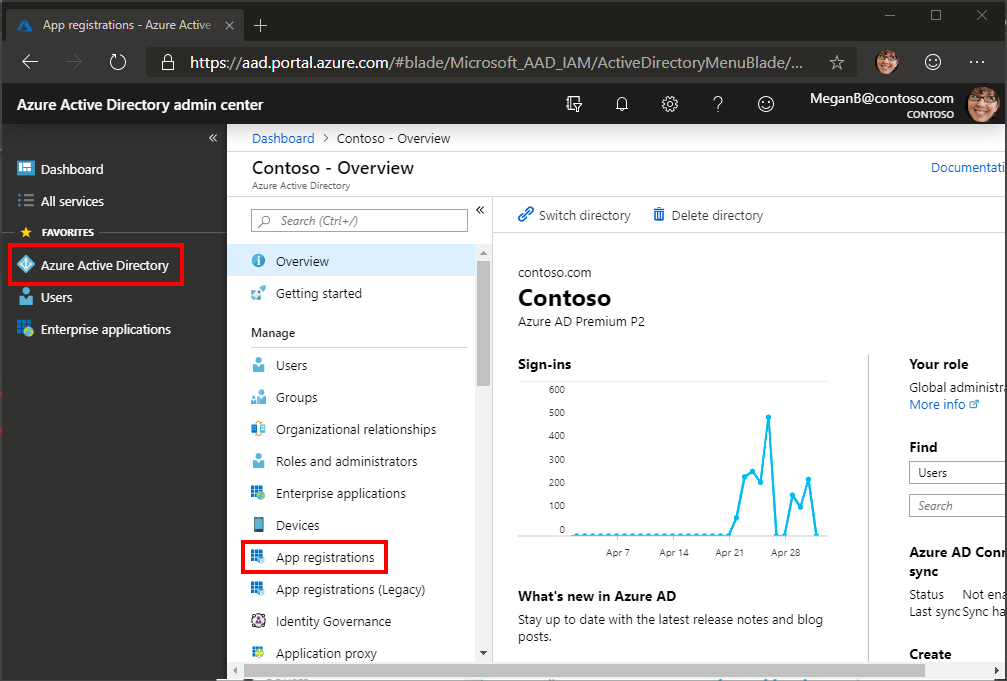
选择左侧导航栏中的“Azure Active Directory”,再选择“管理”下的“应用注册”。
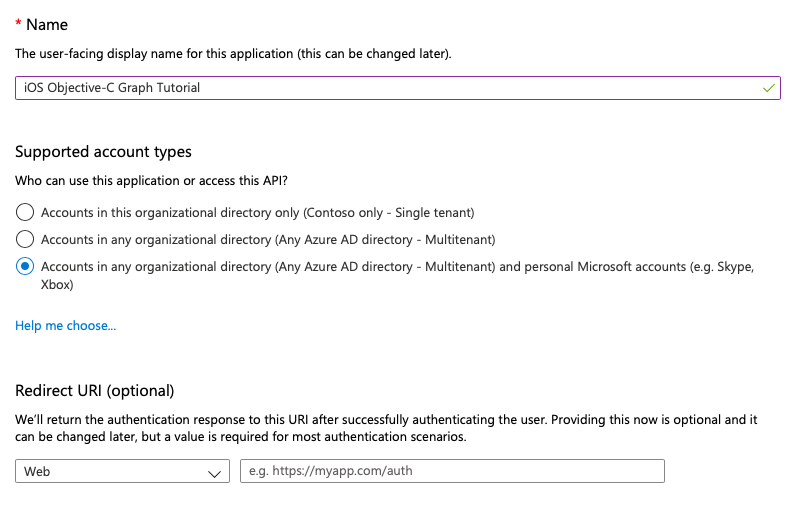
选择“新注册”。 在“注册应用”页上,按如下方式设置值。
- 将“名称”设置为“
iOS Objective-C Graph Tutorial”。 - 将“受支持的帐户类型”设置为“任何组织目录中的帐户和个人 Microsoft 帐户”。
- 保留“重定向 URI”为空。
- 将“名称”设置为“
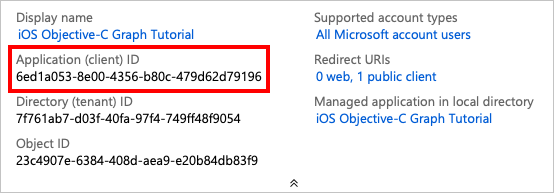
选择“注册”。 在 "iOS Objective-C Graph 教程"页上,复制"应用程序 (客户端) ID"的值并 保存它,你将在下一步中需要该值。
选择“管理”下的“身份验证”。 选择 "添加平台", 然后选择 "iOS/macOS"。
输入你的应用的捆绑包 ID,然后选择 **配置,**然后选择完成。
添加 Azure AD 身份验证
在此练习中,你将从上一练习中扩展应用程序,以支持使用 Azure AD 进行身份验证。 这是必需的,才能获取必要的 OAuth 访问令牌来调用 Microsoft Graph。 为此,您需要将适用于 iOS (MICROSOFT 身份验证库) MSAL 文档 集成到应用程序中。
在 GraphTutorial 项目中 新建一个名为 AuthSettings.plist 的属性列表文件。
将以下项添加到根字典 中的文件 。
键 类型 值 AppIdString Azure 门户中的应用程序 ID GraphScopes数组 三个 String 值 User.Read:、MailboxSettings.Read和Calendars.ReadWrite
重要
如果你使用的是源代码管理(如 git),那么现在应该从源代码管理中排除 AuthSettings.plist 文件,以避免意外泄露应用 ID。
实施登录
在此部分中,你将为 MSAL 配置项目、创建身份验证管理器类,并更新应用以登录和注销。
为 MSAL 配置项目
将新的钥匙链组添加到项目的功能中。
- 选择 GraphTutorial 项目,然后选择 "&功能"。
- 选择 + 功能,然后双击 钥匙链共享。
- 添加值为 的钥匙链组
com.microsoft.adalcache。
控件单击 "Info.plist", 然后选择"打开为",然后选择"源代码"。
在 元素中添加
<dict>以下内容。<key>CFBundleURLTypes</key> <array> <dict> <key>CFBundleURLSchemes</key> <array> <string>msauth.$(PRODUCT_BUNDLE_IDENTIFIER)</string> </array> </dict> </array> <key>LSApplicationQueriesSchemes</key> <array> <string>msauthv2</string> <string>msauthv3</string> </array>打开 AppDelegate.m, 在文件顶部添加以下 import 语句。
#import <MSAL/MSAL.h>将以下函数添加到
AppDelegate类。- (BOOL)application:(UIApplication *)app openURL:(NSURL *)url options:(NSDictionary<UIApplicationOpenURLOptionsKey,id> *)options { return [MSALPublicClientApplication handleMSALResponse:url sourceApplication:options[UIApplicationOpenURLOptionsSourceApplicationKey]]; }
创建身份验证管理器
在名为 AuthenticationManager 的 GraphTutorial 项目中创建新的 Cocoa Touch 类。 在 "子类"字段中选择"NSObject"。
打开 AuthenticationManager.h, 并将其内容替换为以下代码。
#import <Foundation/Foundation.h>
#import <MSAL/MSAL.h>
#import <MSGraphClientSDK/MSGraphClientSDK.h>

NS_ASSUME_NONNULL_BEGIN

typedef void (^GetTokenCompletionBlock)(NSString* _Nullable accessToken, NSError* _Nullable error);

@interface AuthenticationManager : NSObject<MSAuthenticationProvider>

+ (id) instance;
- (void) getTokenInteractivelyWithParentView: (UIViewController*) parentView
                          andCompletionBlock: (GetTokenCompletionBlock)completionBlock;
- (void) getTokenSilentlyWithCompletionBlock: (GetTokenCompletionBlock)completionBlock;
- (void) signOut;
- (void) getAccessTokenForProviderOptions:(id<MSAuthenticationProviderOptions>)authProviderOptions
                            andCompletion:(void (^)(NSString *, NSError *))completion;

@end

NS_ASSUME_NONNULL_END
打开 AuthenticationManager.m, 并将其内容替换为以下代码。
#import "AuthenticationManager.h"

@interface AuthenticationManager()

@property NSString* appId;
@property NSArray<NSString*>* graphScopes;
@property MSALPublicClientApplication* publicClient;

@end

@implementation AuthenticationManager

+ (id) instance {
    static AuthenticationManager *singleInstance = nil;
    static dispatch_once_t onceToken;
    dispatch_once(&onceToken, ^ {
        singleInstance = [[self alloc] init];
    });

    return singleInstance;
}

- (id) init {
    if (self = [super init]) {
        // Get app ID and scopes from AuthSettings.plist
        NSString* authConfigPath =
        [NSBundle.mainBundle pathForResource:@"AuthSettings" ofType:@"plist"];
        NSDictionary* authConfig = [NSDictionary dictionaryWithContentsOfFile:authConfigPath];

        self.appId = authConfig[@"AppId"];
        self.graphScopes = authConfig[@"GraphScopes"];

        // Create the MSAL client
        self.publicClient = [[MSALPublicClientApplication alloc] initWithClientId:self.appId error:nil];
    }

    return self;
}

- (void) getAccessTokenForProviderOptions:(id<MSAuthenticationProviderOptions>) authProviderOptions
                            andCompletion:(void (^)(NSString * _Nonnull, NSError * _Nonnull)) completion {
    [self getTokenSilentlyWithCompletionBlock:completion];
}

- (void) getTokenInteractivelyWithParentView:(UIViewController *) parentView
                          andCompletionBlock:(GetTokenCompletionBlock) completionBlock {
    MSALWebviewParameters* webParameters = [[MSALWebviewParameters alloc]
                                            initWithAuthPresentationViewController:parentView];
    MSALInteractiveTokenParameters* interactiveParameters =
    [[MSALInteractiveTokenParameters alloc]
     initWithScopes:self.graphScopes
     webviewParameters:webParameters];

    // Call acquireToken to open a browser so the user can sign in
    [self.publicClient
     acquireTokenWithParameters:interactiveParameters
     completionBlock:^(MSALResult * _Nullable result, NSError * _Nullable error) {

        // Check error
        if (error) {
            completionBlock(nil, error);
            return;
        }

        // Check result
        if (!result) {
            NSMutableDictionary* details = [NSMutableDictionary dictionary];
            [details setValue:@"No result was returned" forKey:NSDebugDescriptionErrorKey];
            completionBlock(nil, [NSError errorWithDomain:@"AuthenticationManager" code:0 userInfo:details]);
            return;
        }

        NSLog(@"Got token interactively: %@", result.accessToken);
        completionBlock(result.accessToken, nil);
    }];
}

- (void) getTokenSilentlyWithCompletionBlock:(GetTokenCompletionBlock)completionBlock {
    // Check if there is an account in the cache
    NSError* msalError;
    MSALAccount* account = [self.publicClient allAccounts:&msalError].firstObject;

    if (msalError || !account) {
        NSMutableDictionary* details = [NSMutableDictionary dictionary];
        [details setValue:@"Could not retrieve account from cache" forKey:NSDebugDescriptionErrorKey];
        completionBlock(nil, [NSError errorWithDomain:@"AuthenticationManager" code:0 userInfo:details]);
        return;
    }

    MSALSilentTokenParameters* silentParameters = [[MSALSilentTokenParameters alloc] initWithScopes:self.graphScopes
                                                                                            account:account];

    // Attempt to get token silently
    [self.publicClient
     acquireTokenSilentWithParameters:silentParameters
     completionBlock:^(MSALResult * _Nullable result, NSError * _Nullable error) {
         // Check error
         if (error) {
             completionBlock(nil, error);
             return;
         }

         // Check result
         if (!result) {
             NSMutableDictionary* details = [NSMutableDictionary dictionary];
             [details setValue:@"No result was returned" forKey:NSDebugDescriptionErrorKey];
             completionBlock(nil, [NSError errorWithDomain:@"AuthenticationManager" code:0 userInfo:details]);
             return;
         }

         NSLog(@"Got token silently: %@", result.accessToken);
         completionBlock(result.accessToken, nil);
     }];
}

- (void) signOut {
    NSError* msalError;
    NSArray* accounts = [self.publicClient allAccounts:&msalError];

    if (msalError) {
        NSLog(@"Error getting accounts from cache: %@", msalError.debugDescription);
        return;
    }

    for (id account in accounts) {
        [self.publicClient removeAccount:account error:nil];
    }
}

@end
添加登录和注销
打开 SignInViewController.m 文件,并将其内容替换为以下代码。
#import "SignInViewController.h"
#import "SpinnerViewController.h"
#import "AuthenticationManager.h"

@interface SignInViewController ()
@property SpinnerViewController* spinner;
@end

@implementation SignInViewController

- (void)viewDidLoad {
    [super viewDidLoad];
    // Do any additional setup after loading the view.

    self.spinner = [SpinnerViewController alloc];
    [self.spinner startWithContainer:self];

    [AuthenticationManager.instance
     getTokenSilentlyWithCompletionBlock:^(NSString * _Nullable accessToken, NSError * _Nullable error) {
         dispatch_async(dispatch_get_main_queue(), ^{
             [self.spinner stop];

             if (error || !accessToken) {
                 // If there is no token or if there's an error,
                 // no user is signed in, so stay here
                 return;
             }

             // Since we got a token, user is signed in
             // Go to welcome page
             [self performSegueWithIdentifier: @"userSignedIn" sender: nil];
         });
    }];
}

- (IBAction)signIn {
    [self.spinner startWithContainer:self];

    [AuthenticationManager.instance
     getTokenInteractivelyWithParentView:self
     andCompletionBlock:^(NSString * _Nullable accessToken, NSError * _Nullable error) {
         dispatch_async(dispatch_get_main_queue(), ^{
             [self.spinner stop];

             if (error || !accessToken) {
                 // Show the error and stay on the sign-in page
                 UIAlertController* alert = [UIAlertController
                                             alertControllerWithTitle:@"Error signing in"
                                             message:error.debugDescription
                                             preferredStyle:UIAlertControllerStyleAlert];

                 UIAlertAction* okButton = [UIAlertAction
                                            actionWithTitle:@"OK"
                                            style:UIAlertActionStyleDefault
                                            handler:nil];

                 [alert addAction:okButton];
                 [self presentViewController:alert animated:true completion:nil];
                 return;
             }

             // Since we got a token, user is signed in
             // Go to welcome page
             [self performSegueWithIdentifier: @"userSignedIn" sender: nil];
         });
     }];
}
@end
打开 WelcomeViewController.m, 将以下语句
import添加到文件顶部。#import "AuthenticationManager.h"将现有的
signOut函数替换为以下内容。- (IBAction)signOut { [AuthenticationManager.instance signOut]; [self performSegueWithIdentifier: @"userSignedOut" sender: nil]; }保存更改,在模拟器中重新启动应用程序。
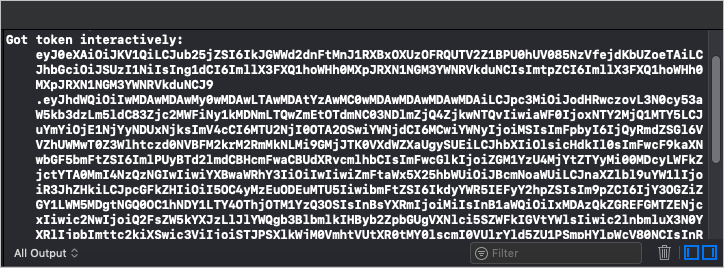
如果登录应用,应该会看到访问令牌显示在 Xcode 的输出窗口中。
获取用户详细信息
在此部分中,你将创建一个帮助程序类来保存对 Microsoft Graph 的所有调用,并更新 为使用此新类获取 WelcomeViewController 登录用户。
在 GraphTutorial 项目中新建一个名为 GraphManager 的 Cocoa Touch 类。 在 "子类"字段中选择"NSObject"。
打开 GraphManager.h, 并将其内容替换为以下代码。
#import <Foundation/Foundation.h>
#import <MSGraphClientSDK/MSGraphClientSDK.h>
#import <MSGraphClientModels/MSGraphClientModels.h>
#import <MSGraphClientModels/MSCollection.h>
#import "AuthenticationManager.h"

NS_ASSUME_NONNULL_BEGIN

typedef void (^GetMeCompletionBlock)(MSGraphUser* _Nullable user,
                                     NSError* _Nullable error);

@interface GraphManager : NSObject

+ (id) instance;
- (void) getMeWithCompletionBlock: (GetMeCompletionBlock) completion;

@end

NS_ASSUME_NONNULL_END
打开 GraphManager.m, 并将其内容替换为以下代码。
#import "GraphManager.h"

@interface GraphManager()

@property MSHTTPClient* graphClient;

@end

@implementation GraphManager

+ (id) instance {
    static GraphManager *singleInstance = nil;
    static dispatch_once_t onceToken;
    dispatch_once(&onceToken, ^ {
        singleInstance = [[self alloc] init];
    });

    return singleInstance;
}

- (id) init {
    if (self = [super init]) {
        // Create the Graph client
        self.graphClient = [MSClientFactory
                            createHTTPClientWithAuthenticationProvider:AuthenticationManager.instance];
    }

    return self;
}

- (void) getMeWithCompletionBlock: (GetMeCompletionBlock) completion {
    // GET /me
    NSString* meUrlString = [NSString stringWithFormat:@"%@/me?%@",
                             MSGraphBaseURL,
                             @"$select=displayName,mail,mailboxSettings,userPrincipalName"];
    NSURL* meUrl = [[NSURL alloc] initWithString:meUrlString];
    NSMutableURLRequest* meRequest = [[NSMutableURLRequest alloc] initWithURL:meUrl];

    MSURLSessionDataTask* meDataTask =
    [[MSURLSessionDataTask alloc]
        initWithRequest:meRequest
        client:self.graphClient
        completion:^(NSData *data, NSURLResponse *response, NSError *error) {
            if (error) {
                completion(nil, error);
                return;
            }

            // Deserialize the response as a user
            NSError* graphError;
            MSGraphUser* user = [[MSGraphUser alloc] initWithData:data error:&graphError];

            if (graphError) {
                completion(nil, graphError);
            } else {
                completion(user, nil);
            }
        }];

    // Execute the request
    [meDataTask execute];
}

@end
打开 WelcomeViewController.m, 在文件顶部
#import添加以下语句。#import "SpinnerViewController.h" #import "GraphManager.h" #import <MSGraphClientModels/MSGraphClientModels.h>将以下属性添加到
WelcomeViewController接口声明。@property SpinnerViewController* spinner;将 现有的
viewDidLoad替换为以下代码。- (void)viewDidLoad { [super viewDidLoad]; // Do any additional setup after loading the view. self.spinner = [SpinnerViewController alloc]; [self.spinner startWithContainer:self]; self.userProfilePhoto.image = [UIImage imageNamed:@"DefaultUserPhoto"]; [GraphManager.instance getMeWithCompletionBlock:^(MSGraphUser * _Nullable user, NSError * _Nullable error) { dispatch_async(dispatch_get_main_queue(), ^{ [self.spinner stop]; if (error) { // Show the error UIAlertController* alert = [UIAlertController alertControllerWithTitle:@"Error getting user profile" message:error.debugDescription preferredStyle:UIAlertControllerStyleAlert]; UIAlertAction* okButton = [UIAlertAction actionWithTitle:@"OK" style:UIAlertActionStyleDefault handler:nil]; [alert addAction:okButton]; [self presentViewController:alert animated:true completion:nil]; return; } // Set display name self.userDisplayName.text = user.displayName ? : @"Mysterious Stranger"; [self.userDisplayName sizeToFit]; // AAD users have email in the mail attribute // Personal accounts have email in the userPrincipalName attribute self.userEmail.text = user.mail ? : user.userPrincipalName; [self.userEmail sizeToFit]; // Save user time zone [GraphManager.instance setGraphTimeZone:(user.mailboxSettings.timeZone ? : @"UTC")]; }); }]; }
如果保存更改并立即重新启动应用,则登录 UI 后会使用用户的 显示名称 电子邮件地址进行更新。
获取日历视图
在此练习中,你将将 Microsoft Graph合并到应用程序中。 对于此应用程序,你将使用 Microsoft Graph SDK for Objective C调用 Microsoft Graph。
从 Outlook 获取日历事件
在此部分中,你将扩展 类以添加一个函数,以获取本周的用户事件,并 GraphManager 更新为 CalendarViewController 使用此新函数。
打开 GraphManager.h, 在声明上方添加以下
@interface代码。typedef void (^GetCalendarViewCompletionBlock)(NSData* _Nullable data, NSError* _Nullable error);将以下代码添加到
@interface声明中。- (void) getCalendarViewStartingAt: (NSString*) viewStart endingAt: (NSString*) viewEnd withCompletionBlock: (GetCalendarViewCompletionBlock) completion;打开 GraphManager.m, 将以下函数添加到
GraphManager类。- (void) getCalendarViewStartingAt: (NSString *) viewStart endingAt: (NSString *) viewEnd withCompletionBlock: (GetCalendarViewCompletionBlock) completion { // Set calendar view start and end parameters NSString* viewStartEndString = [NSString stringWithFormat:@"startDateTime=%@&endDateTime=%@", viewStart, viewEnd]; // GET /me/calendarview NSString* eventsUrlString = [NSString stringWithFormat:@"%@/me/calendarview?%@&%@&%@&%@", MSGraphBaseURL, viewStartEndString, // Only return these fields in results @"$select=subject,organizer,start,end", // Sort results by start time @"$orderby=start/dateTime", // Request at most 25 results @"$top=25"]; NSURL* eventsUrl = [[NSURL alloc] initWithString:eventsUrlString]; NSMutableURLRequest* eventsRequest = [[NSMutableURLRequest alloc] initWithURL:eventsUrl]; // Add the Prefer: outlook.timezone header to get start and end times // in user's time zone NSString* preferHeader = [NSString stringWithFormat:@"outlook.timezone=\"%@\"", self.graphTimeZone]; [eventsRequest addValue:preferHeader forHTTPHeaderField:@"Prefer"]; MSURLSessionDataTask* eventsDataTask = [[MSURLSessionDataTask alloc] initWithRequest:eventsRequest client:self.graphClient completion:^(NSData *data, NSURLResponse *response, NSError *error) { if (error) { completion(nil, error); return; } // TEMPORARY completion(data, nil); }]; // Execute the request [eventsDataTask execute]; }备注
考虑代码正在
getCalendarViewStartingAt执行哪些工作。- 将调用的 URL 为
/v1.0/me/calendarview。- 和
startDateTimeendDateTime查询参数定义日历视图的起始和结束。 select查询参数将每个事件返回的字段限定为视图将实际使用的字段。orderby查询参数按开始时间对结果进行排序。- 查询
top参数请求每页 25 个结果。 - 标头使 Microsoft Graph返回用户时区中每个事件的
Prefer: outlook.timezone开始时间和结束时间。
- 和
- 将调用的 URL 为
在 GraphTutorial 项目中新建一个名为 GraphToIana 的 Cocoa Touch 类。 在 "子类"字段中选择"NSObject"。
打开 GraphToIana.h 并将其内容替换为以下代码。
#import <Foundation/Foundation.h>

NS_ASSUME_NONNULL_BEGIN

@interface GraphToIana : NSObject

+ (NSString*) getIanaIdentifierFromGraphIdentifier: (NSString *) graphIdentifier;

@end

NS_ASSUME_NONNULL_END
打开 GraphToIana.m, 并将其内容替换为以下代码。
#import "GraphToIana.h"

@implementation GraphToIana

// Basic lookup for mapping Windows time zone identifiers to
// IANA identifiers
// Mappings taken from
// https://github.com/unicode-org/cldr/blob/master/common/supplemental/windowsZones.xml
+ (NSString*) getIanaIdentifierFromGraphIdentifier: (NSString *) graphIdentifier {
    static NSDictionary* timeZoneMap = nil;
    static dispatch_once_t onceToken;

    dispatch_once(&onceToken, ^{
        timeZoneMap = @{
            @"Dateline Standard Time" : @"Etc/GMT+12",
            @"UTC-11" : @"Etc/GMT+11",
            @"Aleutian Standard Time" : @"America/Adak",
            @"Hawaiian Standard Time" : @"Pacific/Honolulu",
            @"Marquesas Standard Time" : @"Pacific/Marquesas",
            @"Alaskan Standard Time" : @"America/Anchorage",
            @"UTC-09" : @"Etc/GMT+9",
            @"Pacific Standard Time (Mexico)" : @"America/Tijuana",
            @"UTC-08" : @"Etc/GMT+8",
            @"Pacific Standard Time" : @"America/Los_Angeles",
            @"US Mountain Standard Time" : @"America/Phoenix",
            @"Mountain Standard Time (Mexico)" : @"America/Chihuahua",
            @"Mountain Standard Time" : @"America/Denver",
            @"Central America Standard Time" : @"America/Guatemala",
            @"Central Standard Time" : @"America/Chicago",
            @"Easter Island Standard Time" : @"Pacific/Easter",
            @"Central Standard Time (Mexico)" : @"America/Mexico_City",
            @"Canada Central Standard Time" : @"America/Regina",
            @"SA Pacific Standard Time" : @"America/Bogota",
            @"Eastern Standard Time (Mexico)" : @"America/Cancun",
            @"Eastern Standard Time" : @"America/New_York",
            @"Haiti Standard Time" : @"America/Port-au-Prince",
            @"Cuba Standard Time" : @"America/Havana",
            @"US Eastern Standard Time" : @"America/Indianapolis",
            @"Turks And Caicos Standard Time" : @"America/Grand_Turk",
            @"Paraguay Standard Time" : @"America/Asuncion",
            @"Atlantic Standard Time" : @"America/Halifax",
            @"Venezuela Standard Time" : @"America/Caracas",
            @"Central Brazilian Standard Time" : @"America/Cuiaba",
            @"SA Western Standard Time" : @"America/La_Paz",
            @"Pacific SA Standard Time" : @"America/Santiago",
            @"Newfoundland Standard Time" : @"America/St_Johns",
            @"Tocantins Standard Time" : @"America/Araguaina",
            @"E. South America Standard Time" : @"America/Sao_Paulo",
            @"SA Eastern Standard Time" : @"America/Cayenne",
            @"Argentina Standard Time" : @"America/Buenos_Aires",
            @"Greenland Standard Time" : @"America/Godthab",
            @"Montevideo Standard Time" : @"America/Montevideo",
            @"Magallanes Standard Time" : @"America/Punta_Arenas",
            @"Saint Pierre Standard Time" : @"America/Miquelon",
            @"Bahia Standard Time" : @"America/Bahia",
            @"UTC-02" : @"Etc/GMT+2",
            @"Azores Standard Time" : @"Atlantic/Azores",
            @"Cape Verde Standard Time" : @"Atlantic/Cape_Verde",
            @"UTC" : @"Etc/GMT",
            @"GMT Standard Time" : @"Europe/London",
            @"Greenwich Standard Time" : @"Atlantic/Reykjavik",
            @"Sao Tome Standard Time" : @"Africa/Sao_Tome",
            @"Morocco Standard Time" : @"Africa/Casablanca",
            @"W. Europe Standard Time" : @"Europe/Berlin",
            @"Central Europe Standard Time" : @"Europe/Budapest",
            @"Romance Standard Time" : @"Europe/Paris",
            @"Central European Standard Time" : @"Europe/Warsaw",
            @"W. Central Africa Standard Time" : @"Africa/Lagos",
            @"Jordan Standard Time" : @"Asia/Amman",
            @"GTB Standard Time" : @"Europe/Bucharest",
            @"Middle East Standard Time" : @"Asia/Beirut",
            @"Egypt Standard Time" : @"Africa/Cairo",
            @"E. Europe Standard Time" : @"Europe/Chisinau",
            @"Syria Standard Time" : @"Asia/Damascus",
            @"West Bank Standard Time" : @"Asia/Hebron",
            @"South Africa Standard Time" : @"Africa/Johannesburg",
            @"FLE Standard Time" : @"Europe/Kiev",
            @"Israel Standard Time" : @"Asia/Jerusalem",
            @"Kaliningrad Standard Time" : @"Europe/Kaliningrad",
            @"Sudan Standard Time" : @"Africa/Khartoum",
            @"Libya Standard Time" : @"Africa/Tripoli",
            @"Namibia Standard Time" : @"Africa/Windhoek",
            @"Arabic Standard Time" : @"Asia/Baghdad",
            @"Turkey Standard Time" : @"Europe/Istanbul",
            @"Arab Standard Time" : @"Asia/Riyadh",
            @"Belarus Standard Time" : @"Europe/Minsk",
            @"Russian Standard Time" : @"Europe/Moscow",
            @"E. Africa Standard Time" : @"Africa/Nairobi",
            @"Iran Standard Time" : @"Asia/Tehran",
            @"Arabian Standard Time" : @"Asia/Dubai",
            @"Astrakhan Standard Time" : @"Europe/Astrakhan",
            @"Azerbaijan Standard Time" : @"Asia/Baku",
            @"Russia Time Zone 3" : @"Europe/Samara",
            @"Mauritius Standard Time" : @"Indian/Mauritius",
            @"Saratov Standard Time" : @"Europe/Saratov",
            @"Georgian Standard Time" : @"Asia/Tbilisi",
            @"Volgograd Standard Time" : @"Europe/Volgograd",
            @"Caucasus Standard Time" : @"Asia/Yerevan",
            @"Afghanistan Standard Time" : @"Asia/Kabul",
            @"West Asia Standard Time" : @"Asia/Tashkent",
            @"Ekaterinburg Standard Time" : @"Asia/Yekaterinburg",
            @"Pakistan Standard Time" : @"Asia/Karachi",
            @"Qyzylorda Standard Time" : @"Asia/Qyzylorda",
            @"India Standard Time" : @"Asia/Calcutta",
            @"Sri Lanka Standard Time" : @"Asia/Colombo",
            @"Nepal Standard Time" : @"Asia/Katmandu",
            @"Central Asia Standard Time" : @"Asia/Almaty",
            @"Bangladesh Standard Time" : @"Asia/Dhaka",
            @"Omsk Standard Time" : @"Asia/Omsk",
            @"Myanmar Standard Time" : @"Asia/Rangoon",
            @"SE Asia Standard Time" : @"Asia/Bangkok",
            @"Altai Standard Time" : @"Asia/Barnaul",
            @"W. Mongolia Standard Time" : @"Asia/Hovd",
            @"North Asia Standard Time" : @"Asia/Krasnoyarsk",
            @"N. Central Asia Standard Time" : @"Asia/Novosibirsk",
            @"Tomsk Standard Time" : @"Asia/Tomsk",
            @"China Standard Time" : @"Asia/Shanghai",
            @"North Asia East Standard Time" : @"Asia/Irkutsk",
            @"Singapore Standard Time" : @"Asia/Singapore",
            @"W. Australia Standard Time" : @"Australia/Perth",
            @"Taipei Standard Time" : @"Asia/Taipei",
            @"Ulaanbaatar Standard Time" : @"Asia/Ulaanbaatar",
            @"Aus Central W. Standard Time" : @"Australia/Eucla",
            @"Transbaikal Standard Time" : @"Asia/Chita",
            @"Tokyo Standard Time" : @"Asia/Tokyo",
            @"North Korea Standard Time" : @"Asia/Pyongyang",
            @"Korea Standard Time" : @"Asia/Seoul",
            @"Yakutsk Standard Time" : @"Asia/Yakutsk",
            @"Cen. Australia Standard Time" : @"Australia/Adelaide",
            @"AUS Central Standard Time" : @"Australia/Darwin",
            @"E. Australia Standard Time" : @"Australia/Brisbane",
            @"AUS Eastern Standard Time" : @"Australia/Sydney",
            @"West Pacific Standard Time" : @"Pacific/Port_Moresby",
            @"Tasmania Standard Time" : @"Australia/Hobart",
            @"Vladivostok Standard Time" : @"Asia/Vladivostok",
            @"Lord Howe Standard Time" : @"Australia/Lord_Howe",
            @"Bougainville Standard Time" : @"Pacific/Bougainville",
            @"Russia Time Zone 10" : @"Asia/Srednekolymsk",
            @"Magadan Standard Time" : @"Asia/Magadan",
            @"Norfolk Standard Time" : @"Pacific/Norfolk",
            @"Sakhalin Standard Time" : @"Asia/Sakhalin",
            @"Central Pacific Standard Time" : @"Pacific/Guadalcanal",
            @"Russia Time Zone 11" : @"Asia/Kamchatka",
            @"New Zealand Standard Time" : @"Pacific/Auckland",
            @"UTC+12" : @"Etc/GMT-12",
            @"Fiji Standard Time" : @"Pacific/Fiji",
            @"Chatham Islands Standard Time" : @"Pacific/Chatham",
            @"UTC+13" : @"Etc/GMT-13",
            @"Tonga Standard Time" : @"Pacific/Tongatapu",
            @"Samoa Standard Time" : @"Pacific/Apia",
            @"Line Islands Standard Time" : @"Pacific/Kiritimati"
        };
    });

    // If a mapping was not found, assume the value passed
    // was already an IANA identifier
    return timeZoneMap[graphIdentifier] ? : graphIdentifier;
}

@end
这将进行简单的查找,以根据 Microsoft Graph 返回的时区名称查找 IANA 时区Graph。
打开 CalendarViewController.m, 并将其全部内容替换为以下代码。
#import "CalendarViewController.h"
#import "SpinnerViewController.h"
#import "GraphManager.h"
#import "GraphToIana.h"
#import <MSGraphClientModels/MSGraphClientModels.h>

@interface CalendarViewController ()

@property SpinnerViewController* spinner;

@end

@implementation CalendarViewController

- (void)viewDidLoad {
    [super viewDidLoad];
    // Do any additional setup after loading the view.

    self.spinner = [SpinnerViewController alloc];
    [self.spinner startWithContainer:self];

    // Calculate the start and end of the current week
    NSString* timeZoneId = [GraphToIana
                            getIanaIdentifierFromGraphIdentifier:
                            [GraphManager.instance graphTimeZone]];

    NSDate* now = [NSDate date];
    NSCalendar* calendar = [NSCalendar calendarWithIdentifier:NSCalendarIdentifierGregorian];
    NSTimeZone* timeZone = [NSTimeZone timeZoneWithName:timeZoneId];
    [calendar setTimeZone:timeZone];

    NSDateComponents* startOfWeekComponents = [calendar
                                               components:NSCalendarUnitCalendar |
                                               NSCalendarUnitYearForWeekOfYear |
                                               NSCalendarUnitWeekOfYear
                                               fromDate:now];
    NSDate* startOfWeek = [startOfWeekComponents date];
    NSDate* endOfWeek = [calendar dateByAddingUnit:NSCalendarUnitDay
                                             value:7
                                            toDate:startOfWeek
                                           options:0];

    // Convert start and end to ISO 8601 strings
    NSISO8601DateFormatter* isoFormatter = [[NSISO8601DateFormatter alloc] init];
    NSString* viewStart = [isoFormatter stringFromDate:startOfWeek];
    NSString* viewEnd = [isoFormatter stringFromDate:endOfWeek];

    [GraphManager.instance
     getCalendarViewStartingAt:viewStart
     endingAt:viewEnd
     withCompletionBlock:^(NSData * _Nullable data, NSError * _Nullable error) {
         dispatch_async(dispatch_get_main_queue(), ^{
             [self.spinner stop];

             if (error) {
                 // Show the error
                 UIAlertController* alert = [UIAlertController
                                             alertControllerWithTitle:@"Error getting events"
                                             message:error.debugDescription
                                             preferredStyle:UIAlertControllerStyleAlert];

                 UIAlertAction* okButton = [UIAlertAction
                                            actionWithTitle:@"OK"
                                            style:UIAlertActionStyleDefault
                                            handler:nil];

                 [alert addAction:okButton];
                 [self presentViewController:alert animated:true completion:nil];
                 return;
             }

             // TEMPORARY
             self.calendarJSON.text = [[NSString alloc] initWithData:data encoding:NSUTF8StringEncoding];
             [self.calendarJSON sizeToFit];
         });
     }];
}

@end
运行应用、登录,然后点击菜单中的 "日历 "导航项。 你应该会看到应用中事件的 JSON 转储。
显示结果
现在,可以将 JSON 转储替换为某些内容,以用户友好的方式显示结果。 在此部分中,您将修改 函数以返回强类型对象,并进行修改以使用表视图 getCalendarViewStartingAt CalendarViewController 呈现事件。
更新 getCalendarViewStartingAt
打开 GraphManager.h。 将
GetCalendarViewCompletionBlock类型定义更改为以下内容。typedef void (^GetCalendarViewCompletionBlock)(NSArray<MSGraphEvent*>* _Nullable events, NSError* _Nullable error);打开 GraphManager.m。 将现有的
getCalendarViewStartingAt函数替换成以下代码。- (void) getCalendarViewStartingAt: (NSString *) viewStart endingAt: (NSString *) viewEnd withCompletionBlock: (GetCalendarViewCompletionBlock) completion { // Set calendar view start and end parameters NSString* viewStartEndString = [NSString stringWithFormat:@"startDateTime=%@&endDateTime=%@", viewStart, viewEnd]; // GET /me/calendarview NSString* eventsUrlString = [NSString stringWithFormat:@"%@/me/calendarview?%@&%@&%@&%@", MSGraphBaseURL, viewStartEndString, // Only return these fields in results @"$select=subject,organizer,start,end", // Sort results by start time @"$orderby=start/dateTime", // Request at most 25 results @"$top=25"]; NSURL* eventsUrl = [[NSURL alloc] initWithString:eventsUrlString]; NSMutableURLRequest* eventsRequest = [[NSMutableURLRequest alloc] initWithURL:eventsUrl]; // Add the Prefer: outlook.timezone header to get start and end times // in user's time zone NSString* preferHeader = [NSString stringWithFormat:@"outlook.timezone=\"%@\"", self.graphTimeZone]; [eventsRequest addValue:preferHeader forHTTPHeaderField:@"Prefer"]; MSURLSessionDataTask* eventsDataTask = [[MSURLSessionDataTask alloc] initWithRequest:eventsRequest client:self.graphClient completion:^(NSData *data, NSURLResponse *response, NSError *error) { if (error) { completion(nil, error); return; } NSError* graphError; // Deserialize to an events collection MSCollection* eventsCollection = [[MSCollection alloc] initWithData:data error:&graphError]; if (graphError) { completion(nil, graphError); return; } // Create an array to return NSMutableArray* eventsArray = [[NSMutableArray alloc] initWithCapacity:eventsCollection.value.count]; for (id event in eventsCollection.value) { // Deserialize the event and add to the array MSGraphEvent* graphEvent = [[MSGraphEvent alloc] initWithDictionary:event]; [eventsArray addObject:graphEvent]; } completion(eventsArray, nil); }]; // Execute the request [eventsDataTask execute]; }
更新 CalendarViewController
在 GraphTutorial 项目中新建一个名为 的 Cocoa Touch 类文件
CalendarTableViewCell。 在"子类"字段中 选择**"UITableViewCell"。**打开 CalendarTableViewCell.h, 并将其内容替换为以下代码。
#import <UIKit/UIKit.h>

NS_ASSUME_NONNULL_BEGIN

@interface CalendarTableViewCell : UITableViewCell

@property (nonatomic) NSString* subject;
@property (nonatomic) NSString* organizer;
@property (nonatomic) NSString* duration;

@end

NS_ASSUME_NONNULL_END
打开 CalendarTableViewCell.m 并将其内容替换为以下代码。
#import "CalendarTableViewCell.h"

@interface CalendarTableViewCell()

@property (nonatomic) IBOutlet UILabel *subjectLabel;
@property (nonatomic) IBOutlet UILabel *organizerLabel;
@property (nonatomic) IBOutlet UILabel *durationLabel;

@end

@implementation CalendarTableViewCell

- (void)awakeFromNib {
    [super awakeFromNib];
    // Initialization code
}

- (void)setSelected:(BOOL)selected animated:(BOOL)animated {
    [super setSelected:selected animated:animated];

    // Configure the view for the selected state
}

- (void) setSubject:(NSString *)subject {
    _subject = subject;
    self.subjectLabel.text = subject;
    [self.subjectLabel sizeToFit];
}

- (void) setOrganizer:(NSString *)organizer {
    _organizer = organizer;
    self.organizerLabel.text = organizer;
    [self.organizerLabel sizeToFit];
}

- (void) setDuration:(NSString *)duration {
    _duration = duration;
    self.durationLabel.text = duration;
    [self.durationLabel sizeToFit];
}

@end
在 GraphTutorial 项目中新建一个名为 的 Cocoa Touch 类文件
CalendarTableViewController。 在 "子类"字段中选择"UITableViewController"。打开 CalendarTableViewController.h 并将其内容替换为以下代码。
#import <UIKit/UIKit.h>
#import <MSGraphClientModels/MSGraphClientModels.h>

NS_ASSUME_NONNULL_BEGIN

@interface CalendarTableViewController : UITableViewController

@property (nonatomic) NSArray<MSGraphEvent*>* events;

@end

NS_ASSUME_NONNULL_END
打开 CalendarTableViewController.m, 并将其内容替换为以下代码。
#import "CalendarTableViewController.h"
#import "CalendarTableViewCell.h"
#import <MSGraphClientModels/MSGraphClientModels.h>

@interface CalendarTableViewController ()

@end

@implementation CalendarTableViewController

- (void)viewDidLoad {
    [super viewDidLoad];

    self.tableView.rowHeight = UITableViewAutomaticDimension;
    self.tableView.estimatedRowHeight = 100;
}

- (NSInteger) numberOfSections:(UITableView*) tableView {
    return 1;
}

- (NSInteger) tableView:(UITableView*) tableView numberOfRowsInSection:(NSInteger) section {
    return self.events ? self.events.count : 0;
}

- (UITableViewCell*) tableView:(UITableView *)tableView cellForRowAtIndexPath:(NSIndexPath *)indexPath {
    CalendarTableViewCell* cell = [tableView dequeueReusableCellWithIdentifier:@"EventCell"];

    // Get the event that corresponds to the row
    MSGraphEvent* event = self.events[indexPath.row];

    // Configure the cell
    cell.subject = event.subject;
    cell.organizer = event.organizer.emailAddress.name;
    cell.duration = [NSString stringWithFormat:@"%@ to %@",
                     [self formatGraphDateTime:event.start],
                     [self formatGraphDateTime:event.end]];

    return cell;
}

- (NSString*) formatGraphDateTime:(MSGraphDateTimeTimeZone*) dateTime {
    // Create a formatter to parse Graph's date format
    NSDateFormatter* isoFormatter = [[NSDateFormatter alloc] init];
    isoFormatter.dateFormat = @"yyyy-MM-dd'T'HH:mm:ss.SSSSSSS";

    // Specify the time zone
    isoFormatter.timeZone = [[NSTimeZone alloc] initWithName:dateTime.timeZone];

    NSDate* date = [isoFormatter dateFromString:dateTime.dateTime];

    // Output like 5/5/2019, 2:00 PM
    NSDateFormatter* dateFormatter = [[NSDateFormatter alloc] init];
    dateFormatter.dateStyle = NSDateFormatterShortStyle;
    dateFormatter.timeStyle = NSDateFormatterShortStyle;

    NSString* dateString = [dateFormatter stringFromDate:date];
    return dateString;
}

- (void) setEvents:(NSArray<MSGraphEvent *> *)events {
    _events = events;
    [self.tableView reloadData];
}

@end
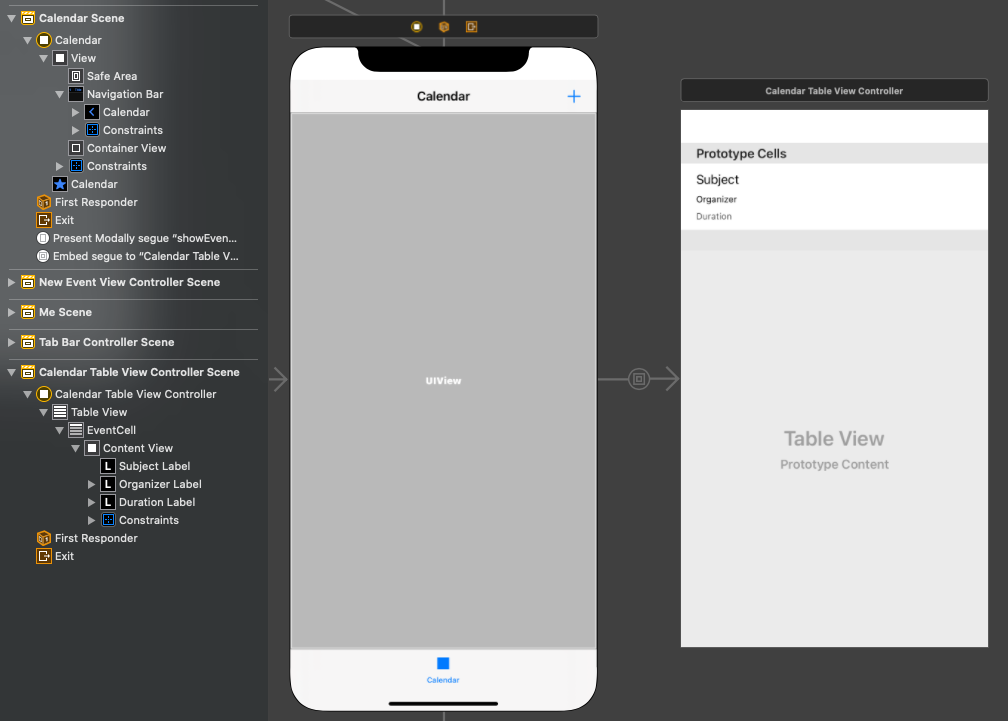
打开 Main.storyboard 并找到 "日历场景"。 从根视图中删除滚动视图。
使用 库,将 导航栏 添加到视图的顶部。
双击导航栏中的 "标题 ",然后更新为
Calendar。使用 库,将 栏按钮项 添加到导航栏的右侧。
选择新栏按钮,然后选择属性 检查器。 将 Image 更改为 加。
将 "库"中的**"容器视图**"添加到导航栏下的视图中。 调整容器视图的大小以占用视图中的所有剩余空间。
按如下方式设置导航栏和容器视图的约束。
- 导航栏
- 添加约束:Height,值:44
- 添加约束:区域前导保险箱,值:0
- 添加约束:区域尾部保险箱,值:0
- 添加约束:区域顶部保险箱,值:0
- 容器视图
- 添加约束:区域前导保险箱,值:0
- 添加约束:区域尾部保险箱,值:0
- 添加约束:顶部空间添加到导航栏底部,值:0
- 添加约束:区域的底部保险箱,值:0
- 导航栏
在添加容器视图时,找到添加到情节提要的第二个视图控制器。 它通过嵌入的 segue 连接到日历场景。 选择此控制器并使用 标识检查器 将 类 更改为 CalendarTableViewController。
从 日历表 视图 控制器中删除视图。
将库中 的表视图添加到日历表视图控制器。
选择表视图,然后选择属性 检查器。 将 原型单元格设置为 1。
拖动原型单元格的底部边缘,以为您提供更大的区域来使用。
使用 库向 原型单元格 添加三 个标签。
选择原型单元格,然后选择标识 检查器。 将 类 更改为 CalendarTableViewCell。
选择" 属性检查器", 将 "标识符" 设置为
EventCell。选择 EventCell 后,选择 "连接检查 器",并连接 、 和 添加到情节提要
durationLabelorganizerLabelsubjectLabel上的单元格的标签。按如下所示设置三个标签的属性和约束。
- 主题标签
- 添加约束:内容视图前导边距前导空格,值:0
- 向内容视图尾随边距添加尾随空格,值:0
- 添加约束:内容视图上边距的顶部空间,值:0
- 组织者标签
- 字体:System 12.0
- 添加约束:Height,值:15
- 添加约束:内容视图前导边距前导空格,值:0
- 向内容视图尾随边距添加尾随空格,值:0
- 添加约束:主题标签顶部空间底部,值:标准
- 持续时间标签
- 字体:System 12.0
- 颜色:深灰色
- 添加约束:Height,值:15
- 添加约束:内容视图前导边距前导空格,值:0
- 向内容视图尾随边距添加尾随空格,值:0
- 添加约束:将顶部空间添加到组织者标签底部,值:Standard
- 添加约束:内容视图下边距的底部空间,值:0
- 主题标签
选择 EventCell,然后选择大小 检查器。 为 行 高 启用自动。
打开 CalendarViewController.h 并删除
calendarJSON属性。打开 CalendarViewController.m, 并将其内容替换为以下代码。
#import "CalendarViewController.h"
#import "CalendarTableViewController.h"
#import "SpinnerViewController.h"
#import "GraphManager.h"
#import "GraphToIana.h"
#import <MSGraphClientModels/MSGraphClientModels.h>

@interface CalendarViewController ()

@property SpinnerViewController* spinner;
@property CalendarTableViewController* tableView;

@end

@implementation CalendarViewController

- (void)viewDidLoad {
    [super viewDidLoad];
    // Do any additional setup after loading the view.

    self.spinner = [SpinnerViewController alloc];
    [self.spinner startWithContainer:self];

    // Calculate the start and end of the current week
    NSString* timeZoneId = [GraphToIana
                            getIanaIdentifierFromGraphIdentifier:
                            [GraphManager.instance graphTimeZone]];

    NSDate* now = [NSDate date];
    NSCalendar* calendar = [NSCalendar calendarWithIdentifier:NSCalendarIdentifierGregorian];
    NSTimeZone* timeZone = [NSTimeZone timeZoneWithName:timeZoneId];
    [calendar setTimeZone:timeZone];

    NSDateComponents* startOfWeekComponents = [calendar
                                               components:NSCalendarUnitCalendar |
                                               NSCalendarUnitYearForWeekOfYear |
                                               NSCalendarUnitWeekOfYear
                                               fromDate:now];
    NSDate* startOfWeek = [startOfWeekComponents date];
    NSDate* endOfWeek = [calendar dateByAddingUnit:NSCalendarUnitDay
                                             value:7
                                            toDate:startOfWeek
                                           options:0];

    // Convert start and end to ISO 8601 strings
    NSISO8601DateFormatter* isoFormatter = [[NSISO8601DateFormatter alloc] init];
    NSString* viewStart = [isoFormatter stringFromDate:startOfWeek];
    NSString* viewEnd = [isoFormatter stringFromDate:endOfWeek];

    [GraphManager.instance
     getCalendarViewStartingAt:viewStart
     endingAt:viewEnd
     withCompletionBlock:^(NSArray<MSGraphEvent*>* _Nullable events, NSError * _Nullable error) {
         dispatch_async(dispatch_get_main_queue(), ^{
             [self.spinner stop];

             if (error) {
                 // Show the error
                 UIAlertController* alert = [UIAlertController
                                             alertControllerWithTitle:@"Error getting events"
                                             message:error.debugDescription
                                             preferredStyle:UIAlertControllerStyleAlert];

                 UIAlertAction* okButton = [UIAlertAction
                                            actionWithTitle:@"OK"
                                            style:UIAlertActionStyleDefault
                                            handler:nil];

                 [alert addAction:okButton];
                 [self presentViewController:alert animated:true completion:nil];
                 return;
             }

             [self.tableView setEvents:events];
         });
     }];
}

- (void) prepareForSegue:(UIStoryboardSegue *)segue sender:(id)sender {
    // Save a reference to the contained table view so
    // we can pass the results of the Graph call to it
    if ([segue.destinationViewController isKindOfClass:[CalendarTableViewController class]]) {
        self.tableView = segue.destinationViewController;
    }
}

- (IBAction) showNewEventForm {
    [self performSegueWithIdentifier:@"showEventForm" sender:nil];
}

@end
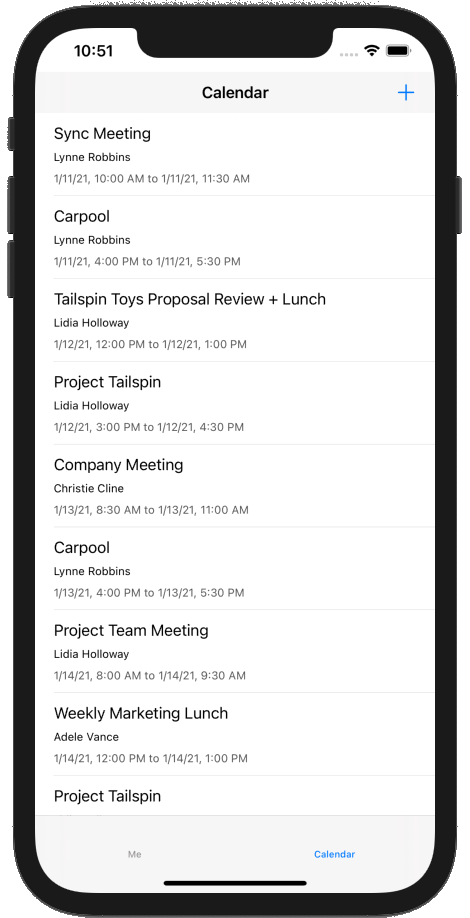
运行应用、登录,然后点击" 日历" 选项卡。你应该会看到事件列表。
创建新事件
在此部分中,您将添加在用户日历上创建事件的能力。
打开 GraphManager.h, 在声明上方添加以下
@interface代码。typedef void (^CreateEventCompletionBlock)(MSGraphEvent* _Nullable event, NSError* _Nullable error);将以下代码添加到
@interface声明中。- (void) createEventWithSubject: (NSString*) subject andStart: (NSDate*) start andEnd: (NSDate*) end andAttendees: (NSArray<NSString*>* _Nullable) attendees andBody: (NSString* _Nullable) body andCompletionBlock: (CreateEventCompletionBlock) completion;打开 GraphManager.m 并添加以下函数以在用户的日历上创建新事件。
- (void) createEventWithSubject: (NSString*) subject
                       andStart: (NSDate*) start
                         andEnd: (NSDate*) end
                   andAttendees: (NSArray<NSString*>* _Nullable) attendees
                        andBody: (NSString* _Nullable) body
             andCompletionBlock: (CreateEventCompletionBlock) completion {
    NSDateFormatter* isoFormatter = [[NSDateFormatter alloc] init];
    isoFormatter.dateFormat = @"yyyy-MM-dd'T'HH:mm";

    // Create a dictionary to represent the event
    // Current version of the Graph SDK models don't serialize properly
    // see https://github.com/microsoftgraph/msgraph-sdk-objc-models/issues/27
    NSMutableDictionary* eventDict = [NSMutableDictionary dictionary];

    [eventDict setObject:subject forKey:@"subject"];

    NSDictionary* startDict = @{
        @"dateTime": [isoFormatter stringFromDate:start],
        @"timeZone": self.graphTimeZone
    };
    [eventDict setObject:startDict forKey:@"start"];

    NSDictionary* endDict = @{
        @"dateTime": [isoFormatter stringFromDate:end],
        @"timeZone": self.graphTimeZone
    };
    [eventDict setObject:endDict forKey:@"end"];

    if (attendees != nil && attendees.count > 0) {
        NSMutableArray* attendeeArray = [NSMutableArray array];

        for (id email in attendees) {
            NSDictionary* attendeeDict = @{
                @"type": @"required",
                @"emailAddress": @{
                    @"address": email
                }
            };

            [attendeeArray addObject:attendeeDict];
        }

        [eventDict setObject:attendeeArray forKey:@"attendees"];
    }

    if (body != nil) {
        NSDictionary* bodyDict = @{
            @"content": body,
            @"contentType": @"text"
        };

        [eventDict setObject:bodyDict forKey:@"body"];
    }

    NSError* error = nil;
    NSData* eventData = [NSJSONSerialization dataWithJSONObject:eventDict
                                                        options:kNilOptions
                                                          error:&error];

    // Prepare Graph request
    NSString* eventsUrlString =
    [NSString stringWithFormat:@"%@/me/events", MSGraphBaseURL];
    NSURL* eventsUrl = [[NSURL alloc] initWithString:eventsUrlString];
    NSMutableURLRequest* eventsRequest = [[NSMutableURLRequest alloc] initWithURL:eventsUrl];

    eventsRequest.HTTPMethod = @"POST";
    eventsRequest.HTTPBody = eventData;
    [eventsRequest addValue:@"application/json" forHTTPHeaderField:@"Content-Type"];

    MSURLSessionDataTask* createEventDataTask =
    [[MSURLSessionDataTask alloc]
     initWithRequest:eventsRequest
     client:self.graphClient
     completion:^(NSData *data, NSURLResponse *response, NSError *error) {
        if (error) {
            completion(nil, error);
            return;
        }

        NSError* graphError;

        // Deserialize to an event
        MSGraphEvent* event = [[MSGraphEvent alloc] initWithData:data
                                                           error:&graphError];
        if (graphError) {
            completion(nil, graphError);
            return;
        }

        completion(event, nil);
    }];

    // Execute the request
    [createEventDataTask execute];
}
在 GraphTutorial 文件夹中新建一个名为 的 Cocoa Touch 类文件
NewEventViewController。 在 "子类"字段中选择"UIViewController"。打开 NewEventViewController.h, 在声明中添加以下
@interface代码。@property (nonatomic) IBOutlet UITextField* subject; @property (nonatomic) IBOutlet UITextField* attendees; @property (nonatomic) IBOutlet UIDatePicker* start; @property (nonatomic) IBOutlet UIDatePicker* end; @property (nonatomic) IBOutlet UITextView* body;打开 NewEventController.m, 并将其内容替换为以下代码。
#import "NewEventViewController.h"
#import "SpinnerViewController.h"
#import "GraphManager.h"

@interface NewEventViewController ()

@property SpinnerViewController* spinner;

@end

@implementation NewEventViewController

- (void)viewDidLoad {
    [super viewDidLoad];

    self.spinner = [SpinnerViewController alloc];

    // Add border around text view
    UIColor* borderColor = [UIColor colorWithRed:0.85 green:0.85 blue:0.85 alpha:1.0];
    self.body.layer.borderWidth = 0.5;
    self.body.layer.borderColor = [borderColor CGColor];
    self.body.layer.cornerRadius = 5.0;

    // Set start picker to the next closest half-hour
    NSDate* now = [NSDate date];
    NSCalendar* calendar = [NSCalendar currentCalendar];
    NSInteger minutes = [calendar component:NSCalendarUnitMinute fromDate:now];
    NSInteger offset = 30 - (minutes % 30);

    NSDate* start = [calendar dateByAddingUnit:NSCalendarUnitMinute
                                         value:offset
                                        toDate:now
                                       options:kNilOptions];
    self.start.date = start;

    // Set end picker to start + 30 min
    NSDate* end = [calendar dateByAddingUnit:NSCalendarUnitMinute
                                       value:30
                                      toDate:start
                                     options:kNilOptions];
    self.end.date = end;
}

- (IBAction) createEvent {
    [self.spinner startWithContainer:self];

    NSString* subject = self.subject.text;

    NSString* attendeeString = self.attendees.text;
    NSArray* attendees = nil;
    if (attendeeString != nil && attendeeString.length > 0) {
        attendees = [attendeeString componentsSeparatedByString:@";"];
    }

    NSDate* start = self.start.date;
    NSDate* end = self.end.date;

    NSString* body = self.body.text;

    [GraphManager.instance createEventWithSubject:subject
                                         andStart:start
                                           andEnd:end
                                     andAttendees:attendees
                                          andBody:body
                               andCompletionBlock:^(MSGraphEvent * _Nullable event,
                                                    NSError * _Nullable error) {
        dispatch_async(dispatch_get_main_queue(), ^{
            [self.spinner stop];

            NSString* alertTitle = nil;
            NSString* alertMessage = nil;

            UIAlertAction* okButton = nil;

            if (error) {
                // Show the error
                alertTitle = @"Error creating event";
                alertMessage = error.debugDescription;
                okButton = [UIAlertAction
                            actionWithTitle:@"OK"
                            style:UIAlertActionStyleDefault
                            handler:nil];
            } else {
                alertTitle = @"Success";
                alertMessage = @"Event created";
                okButton = [UIAlertAction
                            actionWithTitle:@"OK"
                            style:UIAlertActionStyleDefault
                            handler:^(UIAlertAction * action) {
                    [self dismissViewControllerAnimated:true completion:nil];
                }];
            }

            UIAlertController* alert = [UIAlertController
                                        alertControllerWithTitle:alertTitle
                                        message:alertMessage
                                        preferredStyle:UIAlertControllerStyleAlert];

            [alert addAction:okButton];
            [self presentViewController:alert animated:true completion:nil];
        });
    }];
}

- (IBAction) cancel {
    [self dismissViewControllerAnimated:true completion:nil];
}

@end
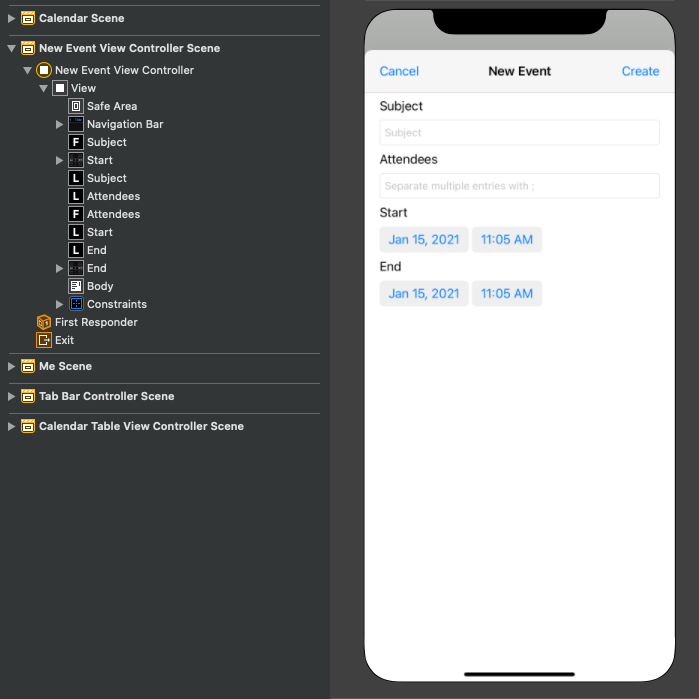
打开 Main.storyboard。 使用 库 将视图 控制器拖动 到情节提要上。
使用 库,将 导航栏 添加到视图控制器。
双击导航栏中的 "标题 ",然后更新为
New Event。使用 库,将 栏按钮项 添加到导航栏的左侧。
选择新栏按钮,然后选择属性 检查器。 将 "标题" 更改为
Cancel。使用 库,将 栏按钮项 添加到导航栏的右侧。
选择新栏按钮,然后选择属性 检查器。 将 "标题" 更改为
Create。选择视图控制器,然后选择标识 检查器。 将 类 更改为 NewEventViewController。
将库中的以下 控件 添加到视图中。
- 在导航 栏下 添加 Label。 将文本设置为
Subject。 - 在标签 下添加 文本字段。 将 Placeholder 属性设置为
Subject。 - 在文本 字段 下添加 Label。 将文本设置为
Attendees。 - 在标签 下添加 文本字段。 将 Placeholder 属性设置为
Separate multiple entries with ;。 - 在文本 字段 下添加 Label。 将文本设置为
Start。 - 在标签 下添加日期 选取器。 将"首选样式"设置为"精简",将"间隔"设置为 15 分钟,将高度设置为 35。
- 在日期 选取 器下添加 Label。 将文本设置为
End。 - 在标签 下添加日期 选取器。 将"首选样式"设置为"精简",将"间隔"设置为 15 分钟,将高度设置为 35。
- 在日期 选取器 下添加文本视图。
- 在导航 栏下 添加 Label。 将文本设置为
选择" 新建事件视图控制器", 并使用 连接 检查器建立以下连接。
- 连接"取消 栏"按钮添加"取消 接收"操作。
- 连接 createEvent received 操作的操作控制到 "创建栏" 按钮。
- 连接 第一个 文本字段添加主题出口。
- 连接 到第 二个文本字段。
- 连接 到第一个 日期选取器。
- 连接 到第二个 日期选取器。
- 连接 向文本视图 添加正文出口。
添加以下约束。
- 导航栏
- 区域前导保险箱,值:0
- 区域尾随保险箱,值:0
- 区域顶部保险箱,值:0
- 高度,值:44
- 主题标签
- 查看边距前导空格,值:0
- 查看边距的尾部空格,值:0
- 导航栏顶部空间,值:20
- 主题文本字段
- 查看边距前导空格,值:0
- 查看边距的尾部空格,值:0
- 主题标签顶部空间,值:Standard
- 与会者标签
- 查看边距前导空格,值:0
- 查看边距的尾部空格,值:0
- 主题文本字段的上空间,值:Standard
- 与会者文本字段
- 查看边距前导空格,值:0
- 查看边距的尾部空格,值:0
- 与会者标签顶部空间,值:Standard
- 开始标签
- 查看边距前导空格,值:0
- 查看边距的尾部空格,值:0
- 主题文本字段的上空间,值:Standard
- 开始日期选取器
- 查看边距前导空格,值:0
- 查看边距的尾部空格,值:0
- 与会者标签顶部空间,值:Standard
- 高度,值:35
- 结束标签
- 查看边距前导空格,值:0
- 查看边距的尾部空格,值:0
- "开始日期选取器"的顶部空间,值:Standard
- 结束日期选取器
- 查看边距前导空格,值:0
- 查看边距的尾部空格,值:0
- 结束标签的上空间,值:Standard
- 高度:35
- 正文文本视图
- 查看边距前导空格,值:0
- 查看边距的尾部空格,值:0
- 结束日期选取器的顶部空间,值:Standard
- 查看边距的底部空间,值:0
- 导航栏
选择"日历场景", 然后选择"连接 检查器"。
在 "触发的 Segues" 下,将手动旁的未填充圆圈拖到情节提要上的"新建事件视图 控制器"上。 在 弹出菜单中选择 "模式显示"。
选择刚刚添加的 segue,然后选择 属性检查器。 将 "标识符" 字段设置为
showEventForm。连接 showNewEventForm 接收操作的操作更新 + 到导航栏按钮。
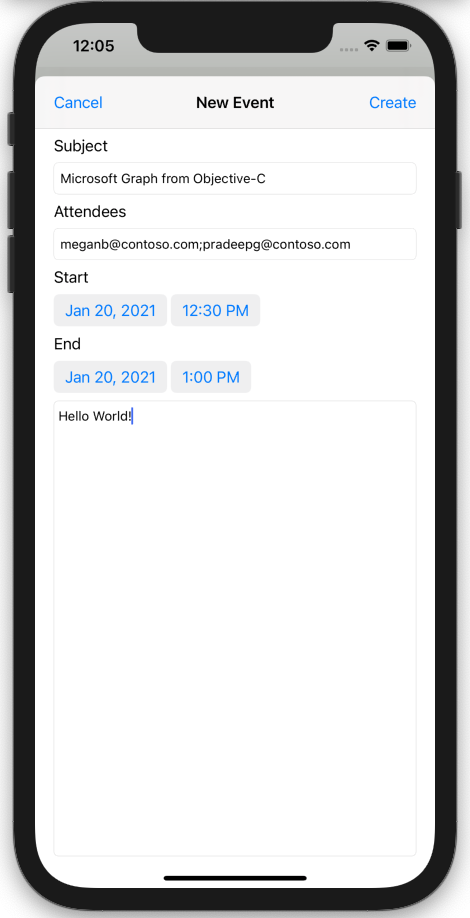
保存更改并重新启动该应用。 转到日历页面,然后点击 + 该按钮。 填写表单并点击" 创建" 创建新事件。
恭喜!
你已完成 iOS Objective-C Microsoft Graph教程。 现在,你已经拥有一个调用 Microsoft Graph,你可以试验和添加新功能。 请访问Microsoft Graph概述,查看可以使用 Microsoft Graph 访问的所有数据。
反馈
Please provide any feedback on this tutorial in the GitHub repository.
你有关于此部分的问题? 如果有,请向我们提供反馈,以便我们对此部分作出改进。