使用 Microsoft Office生成加载项Graph
本教程指导你如何使用 Microsoft Office API 为用户Excel一个 Graph 加载项来检索日历信息。
提示
如果只想下载已完成的教程,可以下载或克隆GitHub存储库。
先决条件
在开始此演示之前,应在 开发计算机上安装Node.js 和一 线。 如果没有设置或Node.js,请访问上一链接,查看下载选项。
备注
Windows用户可能需要安装 Python 和 Visual Studio 生成工具 以支持需要从 C/C++ 编译的 NPM 模块。 Node.js安装程序Windows自动安装这些工具的选项。 或者,也可以按照 中的说明进行操作 https://github.com/nodejs/node-gyp#on-windows。
您还应该有一个在 Outlook.com 上拥有邮箱的个人 Microsoft 帐户,或者一个 Microsoft 工作或学校帐户。 如果你没有 Microsoft 帐户,则有几个选项可以获取免费帐户:
- 你可以 注册新的个人 Microsoft 帐户。
- 你可以注册开发人员计划Microsoft 365免费订阅Microsoft 365订阅。
备注
本教程使用 Node 版本 14.15.0 和一线 1.22.0 版编写。 本指南中的步骤可能与其他版本一起运行,但该版本尚未经过测试。
反馈
Please provide any feedback on this tutorial in the GitHub repository.
创建 Office 加载项
在此练习中,你将Office Express 创建一个外接程序解决方案。 解决方案由两部分组成。
- 加载项,作为静态 HTML 和 JavaScript 文件实现。
- A Node.js/Express server that serves the add-in and implements a web API to retrieve data for the add-in.
创建服务器
使用 CLI (打开命令行接口) 导航到要创建项目的目录,然后运行以下命令以生成 package.json 文件。
yarn init根据情况输入提示值。 如果你不确定,默认值可以。
运行以下命令以安装依赖项。
yarn add express@4.17.1 express-promise-router@4.1.0 dotenv@10.0.0 node-fetch@2.6.1 jsonwebtoken@8.5.1@
yarn add jwks-rsa@2.0.4 @azure/msal-node@1.3.0 @microsoft/microsoft-graph-client@3.0.0
yarn add date-fns@2.23.0 date-fns-tz@1.1.6 isomorphic-fetch@3.0.0 windows-iana@5.0.2
yarn add -D typescript@4.3.5 ts-node@10.2.0 nodemon@2.0.12 @types/node@16.4.13 @types/express@4.17.13
yarn add -D @types/node-fetch@2.5.12 @types/jsonwebtoken@8.5.4 @types/microsoft-graph@2.0.0
yarn add -D @types/office-js@1.0.195 @types/jquery@3.5.6 @types/isomorphic-fetch@0.0.35
运行以下命令以生成 tsconfig.json 文件。
tsc --init在 文本编辑器中打开 ./tsconfig.json ,然后进行以下更改。
- 将值
target更改为es6。 - 取消注释值
outDir,并设置为./dist。 - 取消注释值
rootDir,并设置为./src。
- 将值
打开 ./package.json ,将以下属性添加到 JSON。
"scripts": {
  "start": "nodemon ./src/server.ts",
  "build": "tsc --project ./"
},
运行以下命令,为加载项生成和安装开发证书。
npx office-addin-dev-certs install如果系统提示确认,请确认操作。 命令完成后,你将看到与以下内容类似的输出。
You now have trusted access to https://localhost.
Certificate: <path>\localhost.crt
Key: <path>\localhost.key
在项目的根目录下创建一个名为 .env 的新文件,并添加以下代码。
AZURE_APP_ID='YOUR_APP_ID_HERE'
AZURE_CLIENT_SECRET='YOUR_CLIENT_SECRET_HERE'
TLS_CERT_PATH='PATH_TO_LOCALHOST.CRT'
TLS_KEY_PATH='PATH_TO_LOCALHOST.KEY'
将
PATH_TO_LOCALHOST.CRT替换为 localhost.crtPATH_TO_LOCALHOST.KEY的路径和上一个命令指向 localhost.key 输出的路径。在名为 src 的项目的根目录中创建新目录。
在 ./src 目录中创建两个目录: addin 和 api。
在 ./src/api 目录中创建一个名为 auth.ts 的新文件,并添加以下代码。
import Router from 'express-promise-router';

const authRouter = Router();

// TODO: Implement this router

export default authRouter;
在 ./src/api 目录中创建一个名为 graph.ts 的新文件,并添加以下代码。
import Router from 'express-promise-router';

const graphRouter = Router();

// TODO: Implement this router

export default graphRouter;
在 ./src 目录中创建一个名为 server.ts 的新文件,并添加以下代码。
import express from 'express';
import https from 'https';
import fs from 'fs';
import dotenv from 'dotenv';
import path from 'path';

// Load .env file
dotenv.config();

import authRouter from './api/auth';
import graphRouter from './api/graph';

const app = express();
const PORT = 3000;

// Support JSON payloads
app.use(express.json());
app.use(express.static(path.join(__dirname, 'addin')));
app.use(express.static(path.join(__dirname, 'dist/addin')));

app.use('/auth', authRouter);
app.use('/graph', graphRouter);

const serverOptions = {
  key: fs.readFileSync(process.env.TLS_KEY_PATH!),
  cert: fs.readFileSync(process.env.TLS_CERT_PATH!),
};

https.createServer(serverOptions, app).listen(PORT, () => {
  console.log(`⚡️[server]: Server is running at https://localhost:${PORT}`);
});
创建加载项
在 ./src/addin taskpane.html 新建一个名为taskpane.html的文件,并添加以下代码。
<html>
  <head>
    <link rel="stylesheet"
      href="https://static2.sharepointonline.com/files/fabric/office-ui-fabric-core/11.0.0/css/fabric.min.css"/>
    <link rel="stylesheet" href="taskpane.css"/>
  </head>
  <body class="ms-Fabric">
    <div class="container">
      <p class="ms-fontSize-32">Checking authentication...</p>
    </div>
    <div class="status"></div>
    <div class="overlay">
      <p class="ms-fontSize-24 ms-fontColor-white">Working...</p>
    </div>
    <script src="https://ajax.aspnetcdn.com/ajax/jQuery/jquery-3.5.1.min.js"></script>
    <script src="https://appsforoffice.microsoft.com/lib/beta/hosted/office.js"></script>
    <script src="https://cdn.jsdelivr.net/npm/luxon@1.25.0/build/global/luxon.min.js"></script>
    <script src="taskpane.js"></script>
  </body>
</html>
在 ./src/addin 目录中创建一个名为 taskpane.css 的新文件,并添加以下代码。
.container {
  margin: 10px;
}

.status {
  margin: 10px;
}

.overlay {
  position: fixed;
  display: none;
  width: 100%;
  height: 100%;
  top: 0;
  left: 0;
  right: 0;
  bottom: 0;
  background-color: rgba(0,0,0,0.5);
  z-index: 2;
  cursor: pointer;
}

.overlay p {
  position: absolute;
  top: 50%;
  left: 50%;
  transform: translate(-50%,-50%);
}

.status-card {
  padding: 1em;
}

.primary-button {
  padding: .5em;
  color: white;
  background-color: #0078d4;
  border: none;
  display: block;
}

.success-msg {
  background-color: #dff6dd;
}

.error-msg {
  background-color: #fde7e9;
}

.date-picker {
  display: block;
  padding: .5em;
  margin: 10px 0;
}

.form-input {
  display: block;
  padding: .5em;
  margin: 10px 0;
  width: 100%;
}
在 ./src/addin taskpane.js 新建一个名为taskpane.js的文件,并添加以下代码。
// TEMPORARY CODE TO VERIFY ADD-IN LOADS
'use strict';

Office.onReady(info => {
  if (info.host === Office.HostType.Excel) {
    $(function() {
      $('p').text('Hello World!!');
    });
  }
});
在名为 assets 的 .src/addin 目录中创建新 目录。
根据下表,在此目录中添加三个 PNG 文件。
文件名 大小(以像素为单位) icon-80.png 80x80 icon-32.png 32x32 icon-16.png 16x16 备注
可以使用此步骤需要的任何图像。 您还可以直接从网站下载此示例中使用的GitHub。
在项目根目录下创建一个名为 manifest 的新目录。
在 ./ manifest 文件夹中manifest.xml 名为manifest.xml 文件,并添加以下代码。 将
NEW_GUID_HERE替换为新的 GUID,如b4fa03b8-1eb6-4e8b-a380-e0476be9e019。<?xml version="1.0" encoding="UTF-8" standalone="yes"?> <OfficeApp xmlns="http://schemas.microsoft.com/office/appforoffice/1.1" xmlns:xsi="http://www.w3.org/2001/XMLSchema-instance" xmlns:bt="http://schemas.microsoft.com/office/officeappbasictypes/1.0" xmlns:ov="http://schemas.microsoft.com/office/taskpaneappversionoverrides" xsi:type="TaskPaneApp"> <Id>NEW_GUID_HERE</Id> <Version>1.0.0.0</Version> <ProviderName>Contoso</ProviderName> <DefaultLocale>en-US</DefaultLocale> <DisplayName DefaultValue="Excel Graph Calendar"/> <Description DefaultValue="An add-in that shows how to call Microsoft Graph to access the user's calendar."/> <IconUrl DefaultValue="https://localhost:3000/assets/icon-32.png"/> <HighResolutionIconUrl DefaultValue="https://localhost:3000/assets/icon-80.png"/> <SupportUrl DefaultValue="https://www.contoso.com/help"/> <AppDomains> <AppDomain>https://localhost:3000</AppDomain> </AppDomains> <Hosts> <Host Name="Workbook"/> </Hosts> <DefaultSettings> <SourceLocation DefaultValue="https://localhost:3000/taskpane.html"/> </DefaultSettings> <Permissions>ReadWriteDocument</Permissions> <VersionOverrides xmlns="http://schemas.microsoft.com/office/taskpaneappversionoverrides" xsi:type="VersionOverridesV1_0"> <Hosts> <Host xsi:type="Workbook"> <DesktopFormFactor> <GetStarted> <Title resid="GetStarted.Title"/> <Description resid="GetStarted.Description"/> <LearnMoreUrl resid="GetStarted.LearnMoreUrl"/> </GetStarted> <ExtensionPoint xsi:type="PrimaryCommandSurface"> <OfficeTab id="TabHome"> <Group id="CommandsGroup"> <Label resid="CommandsGroup.Label"/> <Icon> <bt:Image size="16" resid="Icon.16x16"/> <bt:Image size="32" resid="Icon.32x32"/> <bt:Image size="80" resid="Icon.80x80"/> </Icon> <Control xsi:type="Button" id="TaskpaneButton"> <Label resid="TaskpaneButton.Label"/> <Supertip> <Title resid="TaskpaneButton.Label"/> <Description resid="TaskpaneButton.Tooltip"/> </Supertip> <Icon> <bt:Image size="16" resid="Icon.16x16"/> <bt:Image size="32" resid="Icon.32x32"/> <bt:Image size="80" resid="Icon.80x80"/> </Icon> <Action xsi:type="ShowTaskpane"> <TaskpaneId>ImportCalendar</TaskpaneId> <SourceLocation resid="Taskpane.Url"/> </Action> </Control> </Group> </OfficeTab> </ExtensionPoint> </DesktopFormFactor> </Host> </Hosts> <Resources> <bt:Images> <bt:Image id="Icon.16x16" DefaultValue="https://localhost:3000/assets/icon-16.png"/> <bt:Image id="Icon.32x32" DefaultValue="https://localhost:3000/assets/icon-32.png"/> <bt:Image id="Icon.80x80" DefaultValue="https://localhost:3000/assets/icon-80.png"/> </bt:Images> <bt:Urls> <bt:Url id="GetStarted.LearnMoreUrl" DefaultValue="https://docs.microsoft.com/graph"/> <bt:Url id="Taskpane.Url" DefaultValue="https://localhost:3000/taskpane.html"/> </bt:Urls> <bt:ShortStrings> <bt:String id="GetStarted.Title" DefaultValue="Get started with the Excel Graph Calendar add-in!"/> <bt:String id="CommandsGroup.Label" DefaultValue="Graph Calendar"/> <bt:String id="TaskpaneButton.Label" DefaultValue="Import Calendar"/> </bt:ShortStrings> <bt:LongStrings> <bt:String id="GetStarted.Description" DefaultValue="Add-in loaded succesfully. Go to the HOME tab and click the 'Import Calendar' button to get started."/> <bt:String id="TaskpaneButton.Tooltip" DefaultValue="Click to open the Import Calendar task pane"/> </bt:LongStrings> </Resources> <WebApplicationInfo> <Id>YOUR_APP_ID_HERE</Id> <Resource>api://localhost:3000/YOUR_APP_ID_HERE</Resource> <Scopes> <Scope>openid</Scope> <Scope>profile</Scope> <Scope>access_as_user</Scope> </Scopes> </WebApplicationInfo> </VersionOverrides> </OfficeApp>
在加载项中旁加载Excel
通过运行以下命令启动服务器。
yarn start打开浏览器并浏览到
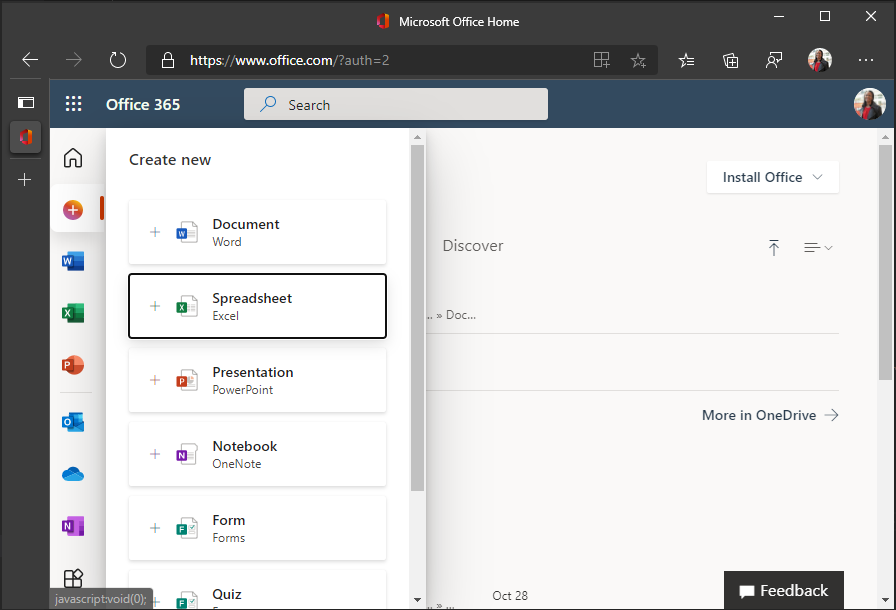
https://localhost:3000/taskpane.html。 你应该会看到一Not loaded条消息。在浏览器中,转到 Office.com 并登录。 选择 左侧 工具栏中的"创建",然后选择"电子表格 "。
选择"插入"选项卡,然后选择Office 外接程序"。
选择 Upload我的外接程序", 然后选择"浏览 "。 Upload ./manifest/manifest.xml 文件。
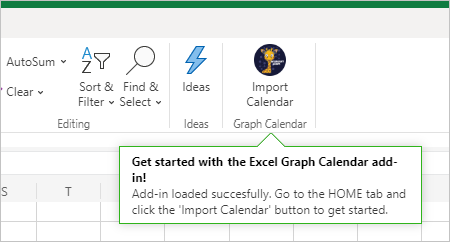
选择" 开始"选项卡 上的"导入日历 " 按钮以打开任务窗格。
任务窗格打开后,应该会看到一
Hello World!条消息。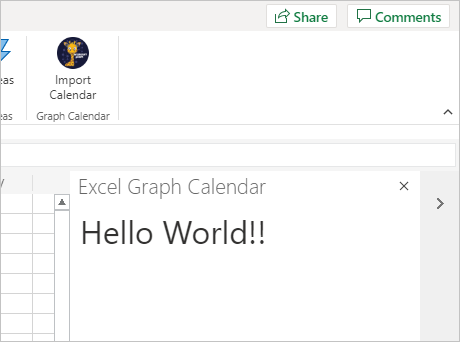
在门户中注册该应用
在此练习中,你将使用管理中心创建新的 Azure AD Azure Active Directory注册。
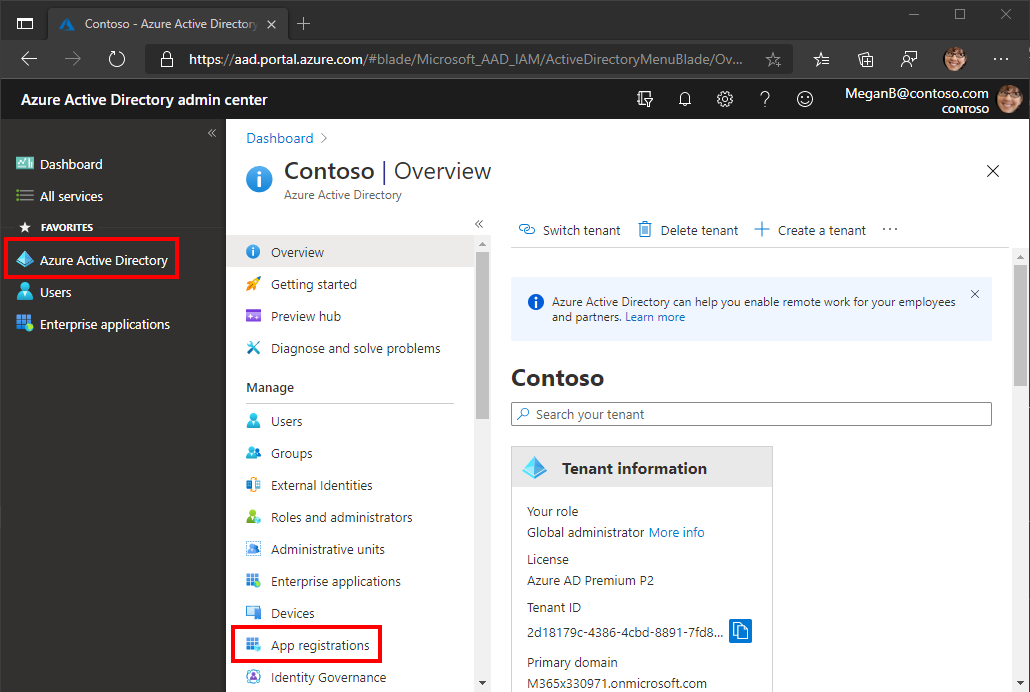
打开浏览器,并转到 Azure Active Directory 管理中心。 使用 个人帐户(亦称为“Microsoft 帐户”)或 工作或学校帐户 登录。
选择左侧导航栏中的“Azure Active Directory”,再选择“管理”下的“应用注册”。
选择“新注册”。 在“注册应用”页上,按如下方式设置值。
- 将“名称”设置为“
Office Add-in Graph Tutorial”。 - 将“受支持的帐户类型”设置为“任何组织目录中的帐户和个人 Microsoft 帐户”。
- 在“重定向 URI”下,将第一个下拉列表设置为“
Single-page application (SPA)”,并将值设置为“https://localhost:3000/consent.html”。
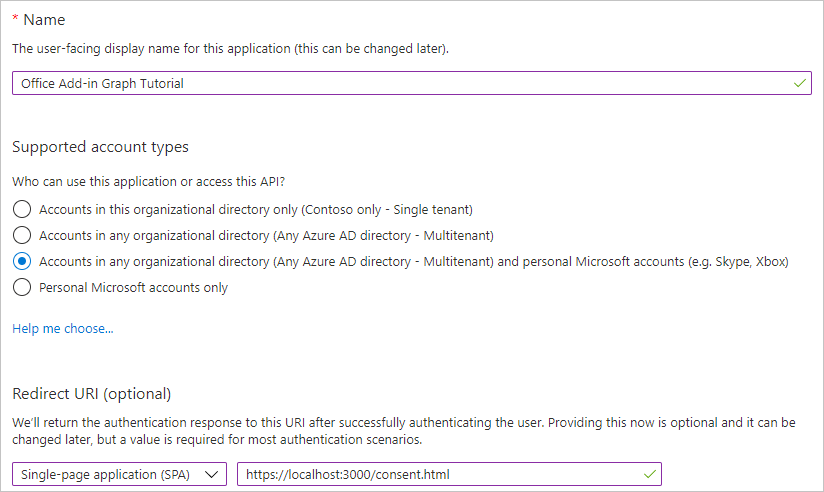
- 将“名称”设置为“
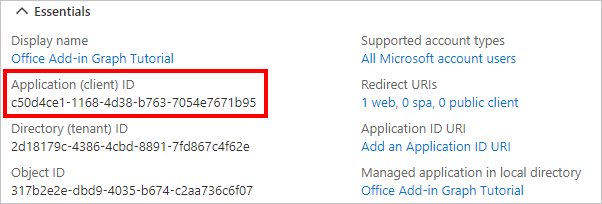
选择“注册”。 在 Office外接程序 Graph教程"页上,复制 Application (客户端) ID 的值并保存它,你将在下一步中需要该值。
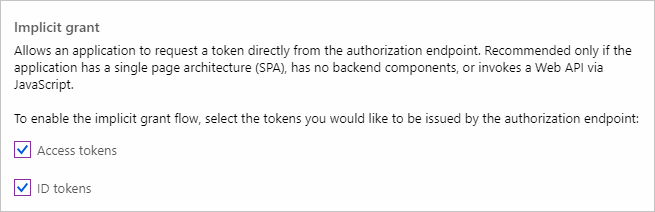
选择“管理”下的“身份验证”。 找到 隐式授予 部分并启用 访问令牌 和 ID 令牌。 选择“保存”。
选择“管理”下的“证书和密码”。 选择“新客户端密码”按钮。 在“说明”中输入值,并选择“过期”下的一个选项,再选择“添加”。
离开此页前,先复制客户端密码值。 将在下一步中用到它。
重要
此客户端密码不会再次显示,所以请务必现在就复制它。
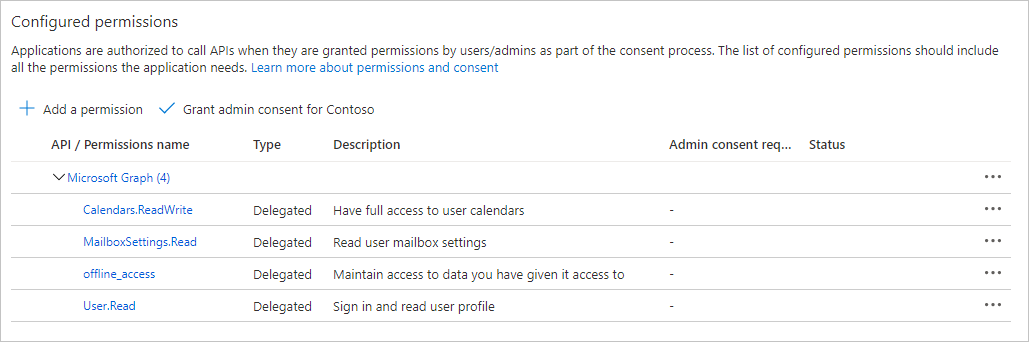
选择 "管理"下的"API 权限", 然后选择"添加权限"。
选择 "Microsoft Graph", 然后选择"委派权限"。
选择以下权限,然后选择"添加权限"。
- offline_access - 这将允许应用在令牌过期时刷新访问令牌。
- Calendars.ReadWrite - 这将允许应用读取和写入用户的日历。
- MailboxSettings.Read - 这将允许应用从用户的邮箱设置获取用户的时区。
配置Office加载项单一登录"
在此部分中,你将更新应用注册,以支持Office SSO (登录) 。
选择 "公开 API"。 在"此 API 定义的范围"部分,选择"添加范围"。 当系统提示设置应用程序 ID URI 时,将值设置为
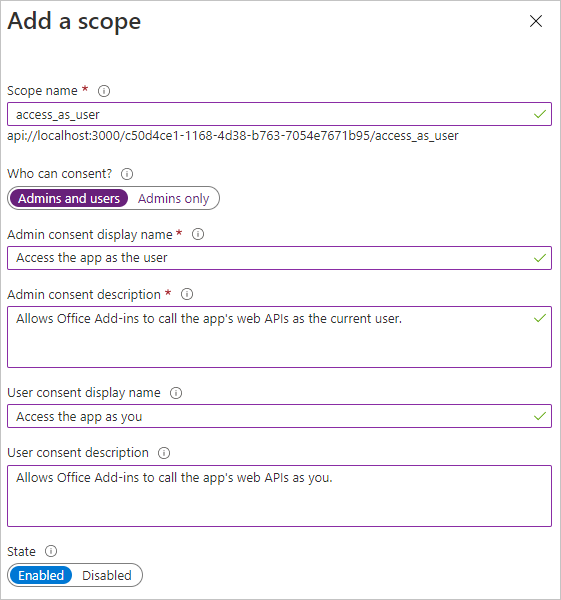
api://localhost:3000/YOUR_APP_ID_HERE,YOUR_APP_ID_HERE将 替换为应用程序 ID。 选择 "保存",然后继续。按如下所示填写字段,然后选择"添加范围"。
- 范围名称:
access_as_user - Who同意?:管理员和用户
- 管理员同意显示名称:
Access the app as the user - 管理员同意说明:
Allows Office Add-ins to call the app's web APIs as the current user. - 用户同意显示名称:
Access the app as you - 用户同意说明:
Allows Office Add-ins to call the app's web APIs as you. - 状态:已启用
- 范围名称:
在"授权客户端应用程序" 部分,选择 "添加客户端应用程序"。 从以下列表中输入客户端 ID,在"授权范围"下启用范围,然后选择"添加应用程序"。 对列表中的每个客户端 ID 重复此过程。
d3590ed6-52b3-4102-aeff-aad2292ab01c(Microsoft Office)ea5a67f6-b6f3-4338-b240-c655ddc3cc8e(Microsoft Office)57fb890c-0dab-4253-a5e0-7188c88b2bb4(Office 网页版)08e18876-6177-487e-b8b5-cf950c1e598c(Office 网页版)
添加 Azure AD 身份验证
在此练习中,你将在外接程序中启用 Office 外接程序单一登录 (SSO) ,并扩展 Web API 以支持代表流。 这是必需的,才能获取必要的 OAuth 访问令牌来调用 Microsoft Graph。
概述
Office外接程序 SSO 提供访问令牌,但此令牌仅允许外接程序调用自己的 Web API。 它不支持直接访问 Microsoft Graph。 此过程的工作方式如下。
- 加载项通过调用 getAccessToken获取令牌。 声明令牌的 (是) 应用程序注册的应用程序
audID。 - 加载项在调用 Web API 时,
Authorization在 标头中发送此令牌。 - Web API 验证令牌,然后使用代表流交换此令牌,获取 Microsoft Graph令牌。 此新令牌的受众是
https://graph.microsoft.com。 - Web API 使用新令牌调用 Microsoft Graph,将结果返回给外接程序。
配置解决方案
打开 ./.env, 然后从应用程序注册使用应用程序 ID 和
AZURE_APP_IDAZURE_CLIENT_SECRET客户端密码更新 和 。重要
如果你使用的是源代码管理(如 git),那么现在应该将 .env 文件从源代码管理中排除,以避免意外泄露应用 ID 和客户端密码。
打开 "./manifest/manifest.xml", 将 的所有实例替换为应用注册
YOUR_APP_ID_HERE中的应用程序 ID。在名为config.js的 ./src/addin 目录中创建新文件,并添加以下代码,以替换应用注册
YOUR_APP_ID_HERE中的应用程序 ID。authConfig = { clientId: 'YOUR_APP_ID_HERE' };
实施登录
打开 ./src/api/auth.ts, 在文件顶部
import添加以下语句。import jwt, { SigningKeyCallback, JwtHeader } from 'jsonwebtoken'; import jwksClient from 'jwks-rsa'; import * as msal from '@azure/msal-node';在语句后添加以下
import代码。// Initialize an MSAL confidential client const msalClient = new msal.ConfidentialClientApplication({ auth: { clientId: process.env.AZURE_APP_ID!, clientSecret: process.env.AZURE_CLIENT_SECRET! } }); const keyClient = jwksClient({ jwksUri: 'https://login.microsoftonline.com/common/discovery/v2.0/keys' }); // Parses the JWT header and retrieves the appropriate public key function getSigningKey(header: JwtHeader, callback: SigningKeyCallback): void { if (header) { keyClient.getSigningKey(header.kid!, (err, key) => { if (err) { callback(err, undefined); } else { callback(null, key.getPublicKey()); } }); } } // Validates a JWT and returns it if valid async function validateJwt(authHeader: string): Promise<string | null> { return new Promise((resolve, reject) => { const token = authHeader.split(' ')[1]; // Ensure that the audience matches the app ID // and the signature is valid const validationOptions = { audience: process.env.AZURE_APP_ID }; jwt.verify(token, getSigningKey, validationOptions, (err, payload) => { if (err) { console.log(`Verify error: ${JSON.stringify(err)}`); resolve(null); } else { resolve(token); } }); }); } // Gets a Graph token from the API token contained in the // auth header export async function getTokenOnBehalfOf(authHeader: string): Promise<string | undefined> { // Validate the supplied token if present const token = await validateJwt(authHeader); if (token) { const result = await msalClient.acquireTokenOnBehalfOf({ oboAssertion: token, skipCache: true, scopes: ['https://graph.microsoft.com/.default'] }); return result?.accessToken; } }此代码初始化 MSAL机密客户端 ,并导出函数Graph加载项发送的令牌获取令牌。
在 行前添加以下
export default authRouter;代码。// Checks if the add-in token can be silently exchanged // for a Graph token. If it can, the user is considered // authenticated. If not, then the add-in needs to do an // interactive login so the user can consent. authRouter.get('/status', async function(req, res) { // Validate access token const authHeader = req.headers['authorization']; if (authHeader) { try { const graphToken = await getTokenOnBehalfOf(authHeader); // If a token was returned, consent is already // granted if (graphToken) { console.log(`Graph token: ${graphToken}`); res.status(200).json({ status: 'authenticated' }); } else { // Respond that consent is required res.status(200).json({ status: 'consent_required' }); } } catch (error) { // Respond that consent is required if the error indicates, // otherwise return the error. const payload = error.name === 'InteractionRequiredAuthError' ? { status: 'consent_required' } : { status: 'error', error: error}; res.status(200).json(payload); } } else { // No auth header res.status(401).end(); } } );此代码实现 API () ,用于检查加载项令牌能否以静默方式交换为Graph
GET /auth/status令牌。 外接程序将使用此 API 确定是否需要向用户显示交互式登录。打开 "./src/addin/taskpane.js", 将以下代码添加到文件中。
// Handle to authentication pop dialog
let authDialog = undefined;

// Build a base URL from the current location
function getBaseUrl() {
  return location.protocol + '//' + location.hostname +
  (location.port ? ':' + location.port : '');
}

// Process the response back from the auth dialog
function processConsent(result) {
  const message = JSON.parse(result.message);

  authDialog.close();
  if (message.status === 'success') {
    showMainUi();
  } else {
    const error = JSON.stringify(message.result, Object.getOwnPropertyNames(message.result));
    showStatus(`An error was returned from the consent dialog: ${error}`, true);
  }
}

// Use the Office Dialog API to show the interactive
// login UI
function showConsentPopup() {
  const authDialogUrl = `${getBaseUrl()}/consent.html`;

  Office.context.ui.displayDialogAsync(authDialogUrl,
    {
      height: 60,
      width: 30,
      promptBeforeOpen: false
    },
    (result) => {
      if (result.status === Office.AsyncResultStatus.Succeeded) {
        authDialog = result.value;
        authDialog.addEventHandler(Office.EventType.DialogMessageReceived, processConsent);
      } else {
        // Display error
        const error = JSON.stringify(error, Object.getOwnPropertyNames(error));
        showStatus(`Could not open consent prompt dialog: ${error}`, true);
      }
    });
}

// Inform the user we need to get their consent
function showConsentUi() {
  $('.container').empty();
  $('<p/>', {
    class: 'ms-fontSize-24 ms-fontWeight-bold',
    text: 'Consent for Microsoft Graph access needed'
  }).appendTo('.container');
  $('<p/>', {
    class: 'ms-fontSize-16 ms-fontWeight-regular',
    text: 'In order to access your calendar, we need to get your permission to access the Microsoft Graph.'
  }).appendTo('.container');
  $('<p/>', {
    class: 'ms-fontSize-16 ms-fontWeight-regular',
    text: 'We only need to do this once, unless you revoke your permission.'
  }).appendTo('.container');
  $('<p/>', {
    class: 'ms-fontSize-16 ms-fontWeight-regular',
    text: 'Please click or tap the button below to give permission (opens a popup window).'
  }).appendTo('.container');
  $('<button/>', {
    class: 'primary-button',
    text: 'Give permission'
  }).on('click', showConsentPopup)
  .appendTo('.container');
}

// Display a status
function showStatus(message, isError) {
  $('.status').empty();
  $('<div/>', {
    class: `status-card ms-depth-4 ${isError ? 'error-msg' : 'success-msg'}`
  }).append($('<p/>', {
    class: 'ms-fontSize-24 ms-fontWeight-bold',
    text: isError ? 'An error occurred' : 'Success'
  })).append($('<p/>', {
    class: 'ms-fontSize-16 ms-fontWeight-regular',
    text: message
  })).appendTo('.status');
}

function toggleOverlay(show) {
  $('.overlay').css('display', show ? 'block' : 'none');
}
此代码添加函数以更新 UI,并使用 Office对话框 API启动交互式身份验证流。
添加以下函数来实现临时主 UI。
function showMainUi() {
  $('.container').empty();
  $('<p/>', {
    class: 'ms-fontSize-24 ms-fontWeight-bold',
    text: 'Authenticated!'
  }).appendTo('.container');
}
将现有
Office.onReady调用替换为以下内容。Office.onReady(info => { // Only run if we're inside Excel if (info.host === Office.HostType.Excel) { $(async function() { let apiToken = ''; try { apiToken = await OfficeRuntime.auth.getAccessToken({ allowSignInPrompt: true }); console.log(`API Token: ${apiToken}`); } catch (error) { console.log(`getAccessToken error: ${JSON.stringify(error)}`); // Fall back to interactive login showConsentUi(); } // Call auth status API to see if we need to get consent const authStatusResponse = await fetch(`${getBaseUrl()}/auth/status`, { headers: { authorization: `Bearer ${apiToken}` } }); const authStatus = await authStatusResponse.json(); if (authStatus.status === 'consent_required') { showConsentUi(); } else { // report error if (authStatus.status === 'error') { const error = JSON.stringify(authStatus.error, Object.getOwnPropertyNames(authStatus.error)); showStatus(`Error checking auth status: ${error}`, true); } else { showMainUi(); } } }); } });考虑此代码执行哪些功能。
- 首次加载任务窗格时,它将调用 获取一个范围为外接程序 Web
getAccessTokenAPI 的令牌。 - 它使用该令牌调用 API,以检查用户是否同意 Microsoft Graph
/auth/status作用域。- 如果用户尚未同意,它使用弹出窗口通过交互式登录获得用户同意。
- 如果用户已同意,它将加载主 UI。
- 首次加载任务窗格时,它将调用 获取一个范围为外接程序 Web
获取用户同意
即使外接程序使用 SSO,用户仍必须同意外接程序通过 Microsoft Graph。 获得同意是一个一次过程。 在用户同意后,SSO 令牌可以交换为一个Graph令牌,无需任何用户交互。 在此部分中,你将使用 msal-browser在外接程序中实现许可体验。
在名为consent.js的 ./src/addin 目录中 创建新文件,并添加以下代码。
'use strict';

const msalClient = new msal.PublicClientApplication({
  auth: {
    clientId: authConfig.clientId
  }
});

const msalRequest = {
  scopes: [
    'https://graph.microsoft.com/.default'
  ]
};

// Function that handles the redirect back to this page
// once the user has signed in and granted consent
function handleResponse(response) {
  localStorage.removeItem('msalCallbackExpected');
  if (response !== null) {
    localStorage.setItem('msalAccountId', response.account.homeId);
    Office.context.ui.messageParent(JSON.stringify({ status: 'success', result: response.accessToken }));
  }
}

Office.initialize = function () {
  if (Office.context.ui.messageParent) {
    // Let MSAL process a redirect response if that's what
    // caused this page to load.
    msalClient.handleRedirectPromise()
      .then(handleResponse)
      .catch((error) => {
        console.log(error);
        Office.context.ui.messageParent(JSON.stringify({ status: 'failure', result: error }));
      });

    // If we're not expecting a callback (because this is
    // the first time the page has loaded), then start the
    // login process
    if (!localStorage.getItem('msalCallbackExpected')) {
      // Set the msalCallbackExpected property so we don't
      // make repeated token requests
      localStorage.setItem('msalCallbackExpected', 'yes');

      // If the user has signed into this machine before
      // do a token request, otherwise do a login
      if (localStorage.getItem('msalAccountId')) {
        msalClient.acquireTokenRedirect(msalRequest);
      } else {
        msalClient.loginRedirect(msalRequest);
      }
    }
  }
}
此代码为用户登录,请求一组 Microsoft Graph在应用注册时配置的权限。
在名为consent.html 的 ./src/addin 目录中 创建新文件并添加以下代码。
<!DOCTYPE html>
<html>
  <head>
    <script src="https://appsforoffice.microsoft.com/lib/beta/hosted/office.js"></script>
    <script src="https://alcdn.msauth.net/browser/2.6.1/js/msal-browser.min.js"></script>
    <script src="config.js"></script>
    <script src="consent.js"></script>
  </head>
  <body class="ms-Fabric">
    <p>Authenticating...</p>
  </body>
</html>
此代码实现一个基本 HTML 页以加载 consent.js文件 。 此页面将加载到弹出对话框中。
保存全部更改,重新启动服务器。
使用在 manifest.xml Excel 中旁加载外接程序中的相同步骤,重新上传 Excel。
选择" 开始"选项卡 上的"导入 日历" 按钮以打开任务窗格。
选择 任务窗格中 的"授予权限"按钮,以在弹出窗口中启动同意对话框。 登录并授予同意。
任务窗格将更新为"Authenticated!" 消息。 你可以按如下方式检查令牌。
- 在浏览器的开发人员工具中,API 令牌显示在控制台中。
- 在运行客户端服务器的 CLI 中Node.js,将Graph令牌。
可以在 中比较这些令牌 https://jwt.ms 。 请注意,API 令牌的受众 () 设置为应用注册的应用程序 ID,并且 ()
audscp为access_as_user。
获取日历视图
在此练习中,你将 microsoft Graph应用程序。 对于此应用程序,你将使用microsoft-graph-client库调用 Microsoft Graph。
从 Outlook 获取日历事件
首先添加 API,从用户的 日历 获取日历视图。
打开 ./src/api/graph.ts, 将以下语句
import添加到文件顶部。import { zonedTimeToUtc } from 'date-fns-tz'; import { findIana } from 'windows-iana'; import * as graph from '@microsoft/microsoft-graph-client'; import { Event, MailboxSettings } from 'microsoft-graph'; import 'isomorphic-fetch'; import { getTokenOnBehalfOf } from './auth';添加以下函数以初始化 Microsoft Graph SDK 并返回 客户端。
async function getAuthenticatedClient(authHeader: string): Promise<graph.Client> {
  const accessToken = await getTokenOnBehalfOf(authHeader);

  return graph.Client.init({
    authProvider: (done) => {
      // Call the callback with the
      // access token
      done(null, accessToken!);
    }
  });
}
添加以下函数,从用户的邮箱设置获取用户的时区,并将该值转换为 IANA 时区标识符。
interface TimeZones {
  // The string returned by Microsoft Graph
  // Could be Windows name or IANA identifier.
  graph: string;
  // The IANA identifier
  iana: string;
}

async function getTimeZones(client: graph.Client): Promise<TimeZones> {
  // Get mailbox settings to determine user's
  // time zone
  const settings: MailboxSettings = await client
    .api('/me/mailboxsettings')
    .get();

  // Time zone from Graph can be in IANA format or a
  // Windows time zone name. If Windows, convert to IANA
  const ianaTzs = findIana(settings.timeZone!)
  const ianaTz = ianaTzs ? ianaTzs[0] : null;

  const returnValue: TimeZones = {
    graph: settings.timeZone!,
    iana: ianaTz ?? settings.timeZone!
  };

  return returnValue;
}
在代码行 (添加以下函数
const graphRouter = Router();) ,以使用GET /graph/calendarview() 。graphRouter.get('/calendarview', async function(req, res) { const authHeader = req.headers['authorization']; if (authHeader) { try { const client = await getAuthenticatedClient(authHeader); const viewStart = req.query['viewStart']?.toString(); const viewEnd = req.query['viewEnd']?.toString(); const timeZones = await getTimeZones(client); // Convert the start and end times into UTC from the user's time zone const utcViewStart = zonedTimeToUtc(viewStart!, timeZones.iana); const utcViewEnd = zonedTimeToUtc(viewEnd!, timeZones.iana); // GET events in the specified window of time const eventPage: graph.PageCollection = await client .api('/me/calendarview') // Header causes start and end times to be converted into // the requested time zone .header('Prefer', `outlook.timezone="${timeZones.graph}"`) // Specify the start and end of the calendar view .query({ startDateTime: utcViewStart.toISOString(), endDateTime: utcViewEnd.toISOString() }) // Only request the fields used by the app .select('subject,start,end,organizer') // Sort the results by the start time .orderby('start/dateTime') // Limit to at most 25 results in a single request .top(25) .get(); const events: any[] = []; // Set up a PageIterator to process the events in the result // and request subsequent "pages" if there are more than 25 // on the server const callback: graph.PageIteratorCallback = (event) => { // Add each event into the array events.push(event); return true; }; const iterator = new graph.PageIterator(client, eventPage, callback, { headers: { 'Prefer': `outlook.timezone="${timeZones.graph}"` } }); await iterator.iterate(); // Return the array of events res.status(200).json(events); } catch (error) { console.log(error); res.status(500).json(error); } } else { // No auth header res.status(401).end(); } } );考虑此代码执行哪些功能。
- 它获取用户的时区,并使用该时区将请求的日历视图的起始和结尾转换为 UTC 值。
- 它向
GETAPI Graph/me/calendarview。- 它使用 函数来设置标头,从而根据用户的时区调整返回事件的
headerPrefer: outlook.timezone开始时间和结束时间。 - 它使用
query函数添加 和 参数,并startDateTime设置日历endDateTime视图的起始和结束。 - 它使用
select函数仅请求加载项使用的字段。 - 它使用
orderby函数按开始时间对结果进行排序。 - 它使用
top函数将单个请求中的结果限制为 25。
- 它使用 函数来设置标头,从而根据用户的时区调整返回事件的
- 它使用 PageIteratorCallback 对象 来对结果进行浏览,并可在更多结果页可用时提出其他请求。
更新 UI
现在,让我们更新任务窗格,以允许用户指定日历视图的开始日期和结束日期。
打开 "./src/addin/taskpane.js", 将现有
showMainUi函数替换为以下内容。function showMainUi() { $('.container').empty(); // Use luxon to calculate the start // and end of the current week. Use // those dates to set the initial values // of the date pickers const now = luxon.DateTime.local(); const startOfWeek = now.startOf('week'); const endOfWeek = now.endOf('week'); $('<h2/>', { class: 'ms-fontSize-24 ms-fontWeight-semibold', text: 'Select a date range to import' }).appendTo('.container'); // Create the import form $('<form/>').on('submit', getCalendar) .append($('<label/>', { class: 'ms-fontSize-16 ms-fontWeight-semibold', text: 'Start' })).append($('<input/>', { class: 'form-input', type: 'date', value: startOfWeek.toISODate(), id: 'viewStart' })).append($('<label/>', { class: 'ms-fontSize-16 ms-fontWeight-semibold', text: 'End' })).append($('<input/>', { class: 'form-input', type: 'date', value: endOfWeek.toISODate(), id: 'viewEnd' })).append($('<input/>', { class: 'primary-button', type: 'submit', id: 'importButton', value: 'Import' })).appendTo('.container'); $('<hr/>').appendTo('.container'); $('<h2/>', { class: 'ms-fontSize-24 ms-fontWeight-semibold', text: 'Add event to calendar' }).appendTo('.container'); // Create the new event form $('<form/>').on('submit', createEvent) .append($('<label/>', { class: 'ms-fontSize-16 ms-fontWeight-semibold', text: 'Subject' })).append($('<input/>', { class: 'form-input', type: 'text', required: true, id: 'eventSubject' })).append($('<label/>', { class: 'ms-fontSize-16 ms-fontWeight-semibold', text: 'Start' })).append($('<input/>', { class: 'form-input', type: 'datetime-local', required: true, id: 'eventStart' })).append($('<label/>', { class: 'ms-fontSize-16 ms-fontWeight-semibold', text: 'End' })).append($('<input/>', { class: 'form-input', type: 'datetime-local', required: true, id: 'eventEnd' })).append($('<input/>', { class: 'primary-button', type: 'submit', id: 'importButton', value: 'Create' })).appendTo('.container'); }此代码添加一个简单的表单,以便用户可以指定开始日期和结束日期。 它还实现了用于创建新事件的第二个表单。 该表单目前不起作用,您将在下一节中实现该功能。
将以下代码添加到文件中,以在活动工作表中创建一个表,其中包含从日历视图中检索到的事件。
const DAY_MILLISECONDS = 86400000;
const DAY_MINUTES = 1440;
const EXCEL_DATE_OFFSET = 25569;

// Excel date cells require an OLE Automation date format
// You can use the Moment-MSDate plug-in
// (https://docs.microsoft.com/office/dev/add-ins/excel/excel-add-ins-ranges-advanced#work-with-dates-using-the-moment-msdate-plug-in)
// Or you can do the conversion yourself
function convertDateToOAFormat(dateTime) {
  const date = new Date(dateTime);

  // Get the time zone offset for the browser's time zone
  // since all of the dates here are handled in that time zone
  const tzOffset = date.getTimezoneOffset() / DAY_MINUTES;

  // Calculate the OLE Automation date, which is
  // the number of days since midnight, December 30, 1899
  const oaDate = date.getTime() / DAY_MILLISECONDS + EXCEL_DATE_OFFSET - tzOffset;
  return oaDate;
}

async function writeEventsToSheet(events) {
  await Excel.run(async (context) => {
    const sheet = context.workbook.worksheets.getActiveWorksheet();
    const eventsTable = sheet.tables.add('A1:D1', true);

    // Create the header row
    eventsTable.getHeaderRowRange().values = [[
      'Subject',
      'Organizer',
      'Start',
      'End'
    ]];

    // Create the data rows
    const data = [];
    events.forEach((event) => {
      data.push([
        event.subject,
        event.organizer.emailAddress.name,
        convertDateToOAFormat(event.start.dateTime),
        convertDateToOAFormat(event.end.dateTime)
      ]);
    });

    eventsTable.rows.add(null, data);

    const tableRange = eventsTable.getRange();
    tableRange.numberFormat = [["[$-409]m/d/yy h:mm AM/PM;@"]];
    tableRange.format.autofitColumns();
    tableRange.format.autofitRows();

    try {
      await context.sync();
    } catch (err) {
      console.log(`Error: ${JSON.stringify(err)}`);
      showStatus(err, true);
    }
  });
}
添加以下函数以调用日历视图 API。
async function getCalendar(evt) {
  evt.preventDefault();
  toggleOverlay(true);

  try {
    const apiToken = await OfficeRuntime.auth.getAccessToken({ allowSignInPrompt: true });

    const viewStart = $('#viewStart').val();
    const viewEnd = $('#viewEnd').val();

    const requestUrl =
      `${getBaseUrl()}/graph/calendarview?viewStart=${viewStart}&viewEnd=${viewEnd}`;

    const response = await fetch(requestUrl, {
      headers: {
        authorization: `Bearer ${apiToken}`
      }
    });

    if (response.ok) {
      const events = await response.json();
      writeEventsToSheet(events);
      showStatus(`Imported ${events.length} events`, false);
    } else {
      const error = await response.json();
      showStatus(`Error getting events from calendar: ${JSON.stringify(error)}`, true);
    }

    toggleOverlay(false);
  } catch (err) {
    console.log(`Error: ${JSON.stringify(err)}`);
    showStatus(`Exception getting events from calendar: ${JSON.stringify(error)}`, true);
  }
}
保存所有更改,重新启动服务器,并刷新任务窗格中Excel (关闭所有打开的任务窗格,然后) 。
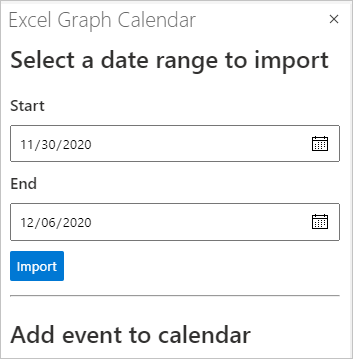
选择"开始日期和结束日期",然后选择"导入 "。

创建新事件
在此部分中,您将添加在用户日历上创建事件的能力。
实现 API
打开 ./src/api/graph.ts 并添加以下代码,以使用
POST /graph/newevent() 。graphRouter.post('/newevent', async function(req, res) { const authHeader = req.headers['authorization']; if (authHeader) { try { const client = await getAuthenticatedClient(authHeader); const timeZones = await getTimeZones(client); // Create a new Graph Event object const newEvent: Event = { subject: req.body['eventSubject'], start: { dateTime: req.body['eventStart'], timeZone: timeZones.graph }, end: { dateTime: req.body['eventEnd'], timeZone: timeZones.graph } }; // POST /me/events await client.api('/me/events') .post(newEvent); // Send a 201 Created res.status(201).end(); } catch (error) { console.log(error); res.status(500).json(error); } } else { // No auth header res.status(401).end(); } } );打开 ./src/addin/taskpane.js 并添加以下函数以调用新的事件 API。
async function createEvent(evt) {
  evt.preventDefault();
  toggleOverlay(true);

  const apiToken = await OfficeRuntime.auth.getAccessToken({ allowSignInPrompt: true });

  const payload = {
    eventSubject: $('#eventSubject').val(),
    eventStart: $('#eventStart').val(),
    eventEnd: $('#eventEnd').val()
  };

  const requestUrl = `${getBaseUrl()}/graph/newevent`;

  const response = await fetch(requestUrl, {
    method: 'POST',
    headers: {
      authorization: `Bearer ${apiToken}`,
      'Content-Type': 'application/json'
    },
    body: JSON.stringify(payload)
  });

  if (response.ok) {
    showStatus('Event created', false);
  } else {
    const error = await response.json();
    showStatus(`Error creating event: ${JSON.stringify(error)}`, true);
  }

  toggleOverlay(false);
}
保存所有更改,重新启动服务器,并刷新任务窗格中Excel (关闭所有打开的任务窗格,然后) 。
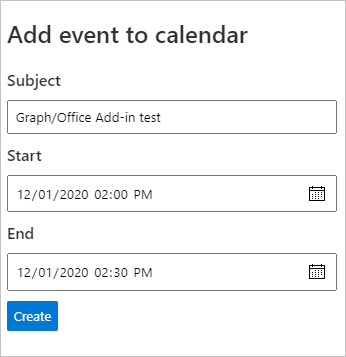
填写表单,然后选择"创建 "。 验证事件是否添加到用户日历。
恭喜!
已完成 Microsoft Office 加载项Graph教程。 现在,您具有一个调用 Microsoft Graph,您可以试验并添加新功能。 请访问Microsoft Graph概述,查看可以使用 Microsoft Graph 访问的所有数据。
反馈
Please provide any feedback on this tutorial in the GitHub repository.
你有关于此部分的问题? 如果有,请向我们提供反馈,以便我们对此部分作出改进。