概述
<asp> 元素的 <limits> 为 Internet Information Services (IIS) 7 指定以下 Active Server Pages (ASP) 连接和队列限制:
bufferingLimit 属性设置 ASP 缓冲区的最大大小。 如果启用响应缓冲,此属性控制 ASP 页在刷新发生前可以写入响应缓冲区的最大字节数。
maxRequestEntityAllowed 属性指定 ASP 请求的实体正文中允许的最大字节数。 如果存在 Content-Length 标头,并且指定的数据量大于 maxRequestEntityAllowed 的值,则 IIS 将返回错误响应 HTTP 403。
processorThreadMax 属性指定 IIS 可为每个处理器创建的最大工作线程数。
注意
此设置可能会极大地影响 Web 应用程序的可伸缩性和服务器的一般性能。 因为此属性定义了可以同时执行的最大 ASP 请求数,所以此设置应保持为默认值,除非你的 ASP 应用程序正在对外部组件进行扩展调用。
queueConnectionTestTime 属性指定在 ASP 确定客户端是否仍已连接之前请求可以排队的时间长度(以秒为单位)。 如果请求排队时间超过 queueConnectionTestTime 属性指定的秒数,ASP 会在执行请求之前检查以确定客户端是否仍已连接。 如果客户端不再连接,则不会处理请求,并从队列中删除。
注意
大多数情况下,用户期望在几秒内看到 ASP 页面处理完毕。 尽管最大等待时间因用户而异,但通常接受的最大值约为 10 秒。 可以使用 queueConnectionTestTime 属性来确保 IIS 不会浪费时间处理用户已放弃的请求。 此属性可用于使 ASP 处理效率仅达到 ASP 开始处理脚本的点。 但是,一旦脚本开始运行,你的应用程序应该使用 ASP 内置 Response 对象的 IsClientConnected 方法适时继续检查客户端连接。
queueTimeout 属性指定允许 ASP 脚本请求在队列中等待的时间(以秒为单位)。 当从队列中拉出请求时,将检查请求是否已过期(等待时间超过此参数的值)。 过期的请求将被拒绝,并显示一条消息,指出服务器太忙。
requestQueueMax 属性指定允许进入队列的最大并发 ASP 请求数。 当队列已满时,任何试图请求 ASP 文件的客户端浏览器都会收到“HTTP 500 服务器太忙”错误。
scriptTimeout 属性指定(以秒为单位)ASP 页允许脚本运行的默认时间长度,超过此时间长度后,将终止脚本并将向 Windows 事件日志中写入一个事件。 使用 ASP 内置 Session 对象的 ScriptTimeout 属性,ASP 脚本可以覆盖此值。 ScriptTimeout 属性允许 ASP 应用程序设置更高的脚本超时值。 例如,在特定用户通过登录或订购产品建立有效会话后,你可以使用此设置来调整超时。
兼容性
| 版本 | 说明 |
|---|---|
| IIS 10.0 | <limits> 元素在 IIS 10.0 中未进行修改。 |
| IIS 8.5 | <limits> 元素在 IIS 8.5 中未进行修改。 |
| IIS 8.0 | <limits> 元素在 IIS 8.0 中未进行修改。 |
| IIS 7.5 | <limits> 元素在 IIS 7.5 中未进行修改。 |
| IIS 7.0 | IIS 7.0 中引入了 <asp> 元素的 <limits> 元素。 |
| IIS 6.0 | <limits> 元素替换以下 IIS 6.0 元数据库属性:
|
安装
若要在 Web 服务器上支持和配置 ASP 应用程序,必须安装 ASP 模块。 要安装 ASP 模块,请遵循以下步骤。
Windows Server 2012 或 Windows Server 2012 R2
- 在任务栏上,单击 “服务器管理器”。
- 在“服务器管理器”中,单击“管理”菜单,然后单击“添加角色和功能”。 在“添加角色和功能”向导中,单击“下一步”。 选择安装类型,然后单击“下一步”。 选择目标服务器,然后单击“下一步”。
- 在“服务器角色”页上,依次展开“Web 服务器 (IIS)”、“Web 服务器”和“应用程序开发”,然后选择“ASP”。

- 如果出现“是否添加 ASP 所需的功能?”对话框,请单击“添加功能”。 (仅当尚未在服务器上安装 ISAPI 扩展角色服务时,才会显示此页面。)
- 在“服务器角色”页上,单击“下一步”。
- 在“选择功能”页上,单击“下一步”。
- 在“确认安装选择”页上,单击“安装”。
- 在“结果” 页面中单击“关闭” 。
Windows 8 或 Windows 8.1
在“开始”屏幕上,将指针一直移动到左下角,右键单击“开始”按钮,然后单击“控制面板”。
在“控制面板”中,单击“程序与功能”,然后单击“打开或关闭 Windows 功能”。
依次展开“Internet 信息服务”、“万维网服务”和“应用程序开发功能”,然后选择“ASP.NET”。
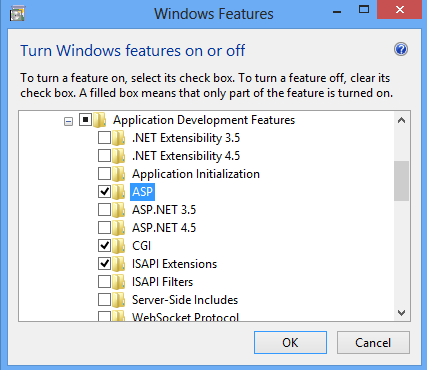
注意
如果尚未安装 ISAPI 扩展角色,则会选择该角色。
单击“确定”。
单击“关闭” 。
Windows Server 2008 或 Windows Server 2008 R2
- 在任务栏上,单击“开始”,指向“管理工具”,然后单击“服务器管理器”。
- 在“服务器管理器”层次结构窗格中,展开“角色”,然后单击“Web 服务器(IIS)”。
- 在“Web 服务器(IIS)”窗格中,滚动到“角色服务”部分,然后单击“添加角色服务”。
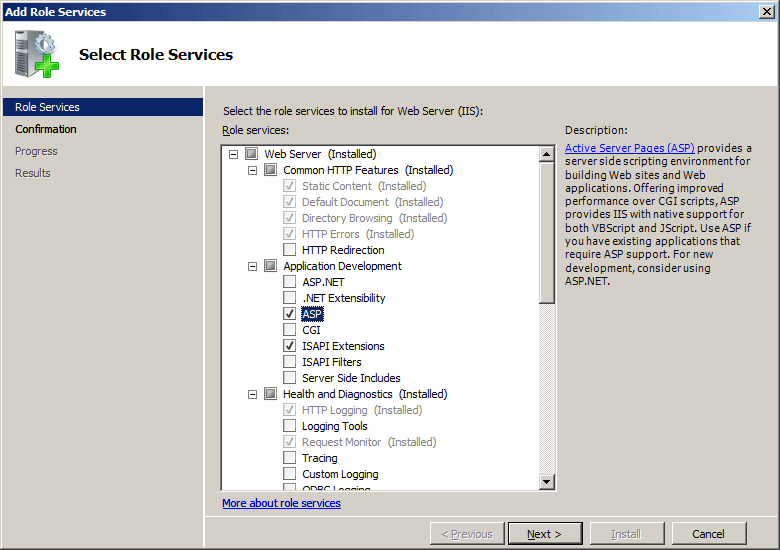
- 在“添加角色服务向导”的“选择角色服务”页,选择“ASP”。
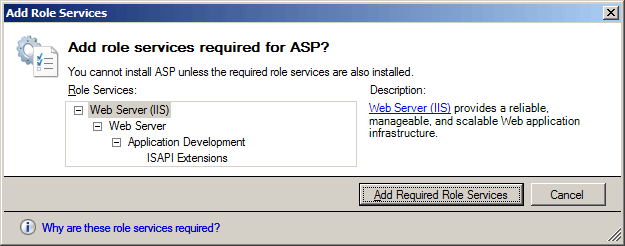
- 如果出现“添加 ASP 所需的角色服务”对话框,请单击“添加所需的角色服务”。 (仅当尚未在服务器上安装 ISAPI 扩展角色服务时,才会显示此页面。)
- 在“选择角色服务”页上,单击“下一步”。
- 在“确认安装选择”页中,单击“安装”。
- 在“结果” 页面中单击“关闭” 。
Windows Vista 或 Windows 7
- 在任务栏上,单击“开始”,然后单击“控制面板”。
- 在“控制面板”中,单击“程序与功能”,然后单击“打开或关闭 Windows 功能”。
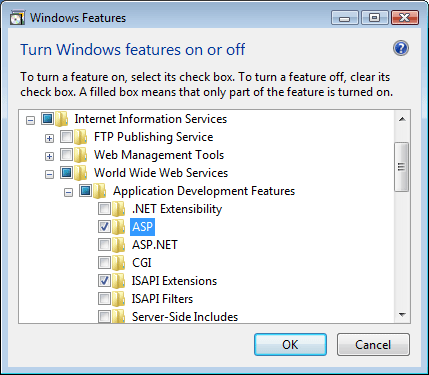
- 依次展开“Internet Information Services”、“万维网服务”和“应用程序开发功能”。
- 选择“ASP”,然后单击“确定”。
操作方式
如何配置服务器的 ASP 缓存设置
打开 Internet Information Services (IIS) 管理器:
如果使用的是 Windows Server 2012 或 Windows Server 2012 R2:
- 在任务栏上,单击“服务器管理器”,单击“工具”,然后单击“Internet Information Services (IIS)管理器”。
如果使用的是 Windows 8 或 Windows 8.1:
- 按住 Windows 键,按字母 X,然后单击“控制面板”。
- 单击“管理工具”,然后双击“Internet 信息服务(IIS)管理器”。
如果使用的是 Windows Server 2008 或 Windows Server 2008 R2:
- 在任务栏上,单击“开始”,指向“管理工具”,然后单击“Internet Information Services (IIS)管理器”。
如果使用的是 Windows Vista 或 Windows 7:
- 在任务栏上,单击“开始”,然后单击“控制面板”。
- 双击“管理工具”,然后双击“Internet 信息服务(IIS)管理器”。
在“连接”窗格中,突出显示服务器的名称。
在服务器的“主页”窗格中,双击“ASP”。
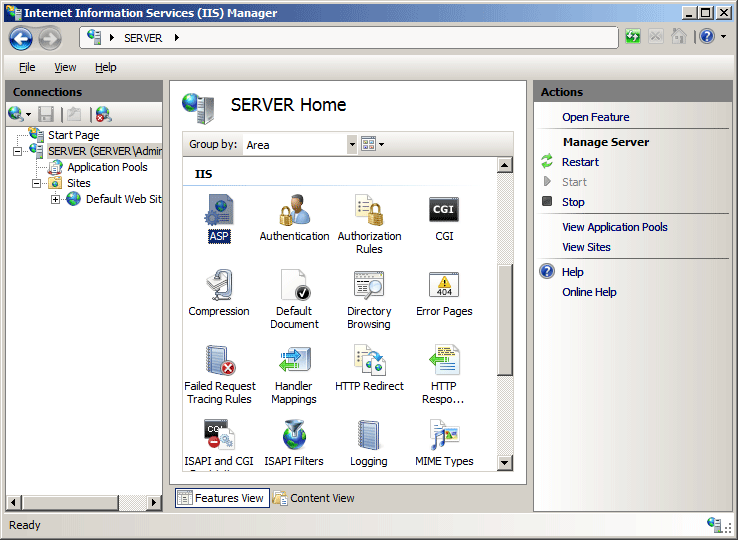
在 ASP 窗格中,展开“限制属性”部分,配置所需的设置,然后在“操作 ”窗格中单击“应用”。

配置
特性
| 属性 | 说明 |
|---|---|
bufferingLimit |
可选 uint 属性。 指定 ASP 缓冲区的最大大小(以字节为单位)。 如果启用响应缓冲,此属性控制 ASP 页在刷新发生前可以写入响应缓冲区的最大字节数。 此值是 0 到 2147483647 范围内的整数。 默认值为 4194304。 |
maxRequestEntityAllowed |
可选 uint 属性。 指定 ASP 请求的整个正文中允许的最大字节数。 此值是 0 到 2147483647 范围内的整数。 默认值为 200000。 |
processorThreadMax |
可选 uint 属性。 指定 ASP 可以为每个处理器创建的最大工作线程数。 默认值为 25。 |
queueConnectionTestTime |
可选的 timeSpan 属性。 指定时间间隔 (hh:mm:ss),ASP 将在此时间间隔后检查客户端在执行请求之前是否仍然处于连接状态。 如果客户端不再连接,则不会处理请求,并从队列中删除。 默认值为 00:00:03。 |
queueTimeout |
可选的 timeSpan 属性。 指定 ASP 请求在请求队列中可以等待的最长时间段 (hh:mm:ss)。 默认值为 00:00:00。 |
requestQueueMax |
可选 uint 属性。 指定允许放入请求队列中的并发 ASP 请求的最大数量。 默认值为 3000。 |
scriptTimeout |
可选的 timeSpan 属性。 指定 ASP 页允许脚本运行的最大时间段 (hh:mm:ss),超过后,将终止脚本并将向 Windows 事件日志中写入一个事件。 默认值为 00:01:30。 |
子元素
无。
配置示例
以下配置示例将 ASP 脚本超时设置为 2 分钟,将 ASP 在执行请求之前检查客户端是否仍处于连接状态的时间设置为 5 秒,并将请求队列中的最大并发 ASP 请求数设置为 1,000。
<configuration>
   <system.webServer>
      <asp>
         <cache diskTemplateCacheDirectory="%SystemDrive%\inetpub\temp\ASP Compiled Templates" />
         <limits scriptTimeout="00:02:00"
            queueConnectionTestTime="00:00:05"
            requestQueueMax="1000" />
      </asp>
   <system.webServer>
<configuration>
代码示例
以下代码示例将 ASP 脚本超时设置为 2 分钟,将 ASP 在执行请求之前检查客户端是否仍处于连接状态的时间设置为 5 秒,并将请求队列中的最大并发 ASP 请求数设置为 1,000。
AppCmd.exe
appcmd.exe set config -section:system.webServer/asp /limits.scriptTimeout:"00:02:00" /commit:apphost
appcmd.exe set config -section:system.webServer/asp /limits.queueConnectionTestTime:"00:00:05" /commit:apphost
appcmd.exe set config -section:system.webServer/asp /limits.requestQueueMax:"1000" /commit:apphost
注意
使用 AppCmd.exe 配置这些设置时,必须确保将 commit 参数设置为 apphost。 这会将配置设置提交到 ApplicationHost.config 文件中的相应位置部分。
C#
using System;
using System.Text;
using Microsoft.Web.Administration;

internal static class Sample
{
   private static void Main()
   {
      using (ServerManager serverManager = new ServerManager())
      {
         Configuration config = serverManager.GetApplicationHostConfiguration();
         ConfigurationSection aspSection = config.GetSection("system.webServer/asp");

         ConfigurationElement limitsElement = aspSection.GetChildElement("limits");
         limitsElement["scriptTimeout"] = TimeSpan.Parse("00:02:00");
         limitsElement["queueConnectionTestTime"] = TimeSpan.Parse("00:00:05");
         limitsElement["requestQueueMax"] = 1000;

         serverManager.CommitChanges();
      }
   }
}
VB.NET
Imports System
Imports System.Text
Imports Microsoft.Web.Administration

Module Sample

   Sub Main()
      Dim serverManager As ServerManager = New ServerManager
      Dim config As Configuration = serverManager.GetApplicationHostConfiguration
      Dim aspSection As ConfigurationSection = config.GetSection("system.webServer/asp")

      Dim limitsElement As ConfigurationElement = aspSection.GetChildElement("limits")
      limitsElement("scriptTimeout") = TimeSpan.Parse("00:02:00")
      limitsElement("queueConnectionTestTime") = TimeSpan.Parse("00:00:05")
      limitsElement("requestQueueMax") = 1000

      serverManager.CommitChanges()
   End Sub

End Module
JavaScript
var adminManager = new ActiveXObject('Microsoft.ApplicationHost.WritableAdminManager');
adminManager.CommitPath = "MACHINE/WEBROOT/APPHOST";

var aspSection = adminManager.GetAdminSection("system.webServer/asp", "MACHINE/WEBROOT/APPHOST");
var limitsElement = aspSection.ChildElements.Item("limits");
limitsElement.Properties.Item("scriptTimeout").Value = "00:02:00";
limitsElement.Properties.Item("queueConnectionTestTime").Value = "00:00:05";
limitsElement.Properties.Item("requestQueueMax").Value = 1000;

adminManager.CommitChanges();
VBScript
Set adminManager = WScript.CreateObject("Microsoft.ApplicationHost.WritableAdminManager")
adminManager.CommitPath = "MACHINE/WEBROOT/APPHOST"

Set aspSection = adminManager.GetAdminSection("system.webServer/asp", "MACHINE/WEBROOT/APPHOST")
Set limitsElement = aspSection.ChildElements.Item("limits")
limitsElement.Properties.Item("scriptTimeout").Value = "00:02:00"
limitsElement.Properties.Item("queueConnectionTestTime").Value = "00:00:05"
limitsElement.Properties.Item("requestQueueMax").Value = 1000

adminManager.CommitChanges()