作者:Tobin Titus
介绍
Pkgmgr.exe 是 Windows Vista/Windows Server ® 2008 中用于安装 Windows 可选功能的新命令工具:
- 替换 sysocmgr.exe 来安装 Windows 可选功能
- 允许直接从命令提示符或脚本安装/取消安装 Windows Vista 可选功能
Pkgmgr 可以通过命令行获取要安装的 Windows 功能列表,也可以将 xml 文件名作为无人参与安装的参数。 本文将说明如何使用 pkgmgr 无人参与文件来安装可选功能。
先决条件
支持 Windows Vista/Windows Server 2008 版本
本演练适用于以下版本的 Windows Vista/Windows Server 2008:
- Windows Vista 家庭高级版
- Windows Vista 专业版
- Windows Vista 旗舰版
- Windows Server 2008 版
在继续操作之前,请确保你已安装其中一个受支持的 Windows Vista/Windows Server 2008 版本。
本地用户管理员 (LUA) 安全性
确保你在计算机上拥有管理权限:默认情况下,如果你以内置管理员帐户以外的用户身份登录,即使此用户已添加到计算机上的本地 管理员组(这是 Windows Server 2008 中名为 LUA 的新安全功能,它在本文的范畴之外),你不会获得管理权限。 请确保使用“runas”命令行工具以内置管理员帐户身份登录,或根据需要以内置管理员身份显式调用应用程序。
例如,若要启动 notepad.exe,请运行此命令:"runas /user:administrator notepad.exe"。 系统会提示输入管理员帐户的密码。 通过运行 "runas /user:administrator cmd.exe" 拥有已提升的 cmd-box shell 是很有用的。 从该 cmd-box 运行的每个应用程序也会被提升,并且不需要使用该 cmd-box 中的“runas”语法。
过程
步骤 1:Pkgmgr.exe 概述
Vista/Windows Server 2008 中的 Windows 可选功能是使用名为 Pkgmgr 的新命令工具安装的。 使用 pkgmgr.exe 的命令行语法为:
Start /w pkgmgr.exe /iu:update1;update2…
Pkgmgr.exe 命令
/iu:{update name};
这会指定要按更新名称安装的更新,并采用分号分隔的更新名称进行安装。
/uu:{update name};
这会指定要卸载的更新,并采用分号分隔的可选择更新列表来从系统卸载。 必须至少指定一个更新名称
/n:{unattend XML}
这会指定无人参与的 XML 文件的文件名。
注意
如果在没有“start /w”前缀的情况下运行 pkgmgr,则 pkgmgr cmd 将立即返回,并且你不知道可选功能安装何时完成。
步骤 2:打开命令窗口
按照上述先决条件部分中的说明启动作为本地管理员帐户运行的命令窗口。
步骤 3:创建 Unattend.xml 文件
在命令窗口中,运行 notepad.exe。
若要仅安装 IIS 7.0 默认功能,请将以下 unattend.xml 文本复制到记事本中。
<?xml version="1.0" ?>
<unattend xmlns="urn:schemas-microsoft-com:unattend"
    xmlns:wcm="http://schemas.microsoft.com/WMIConfig/2002/State">
<servicing>
   <!-- Install a selectable update in a package that is in the Windows Foundation namespace -->
   <package action="configure">
      <AssemblyIdentity
         name="Microsoft-Windows-Foundation-Package"
         version="6.0.5308.6"
         language="neutral"
         processorArchitecture="x86"
         publicKeyToken="31bf3856ad364e35"
         versionScope="nonSxS"
      />
    <selection name="IIS-WebServerRole" state="true"/>
    <selection name="WAS-WindowsActivationService" state="true"/>
    <selection name="WAS-ProcessModel" state="true"/>
    <selection name="WAS-NetFxEnvironment" state="true"/>
    <selection name="WAS-ConfigurationAPI" state="true"/>
  </package>
</servicing>
</unattend>
如果要安装所有 IIS 7.0 功能以进行评估,请使用以下某个 unattend.xml 文件。
对于 Windows Vista 专业版、Windows Vista 旗舰版或 Windows Server 2008 版,请将以下文本复制粘贴到记事本中。
<?xml version="1.0" ?>
<unattend xmlns="urn:schemas-microsoft-com:unattend"
    xmlns:wcm="http://schemas.microsoft.com/WMIConfig/2002/State">
<servicing>
   <!-- Install a selectable update in a package that is in the Windows Foundation namespace -->
   <package action="configure">
      <assemblyIdentity
         name="Microsoft-Windows-Foundation-Package"
         version="6.0.5308.6"
         language="neutral"
         processorArchitecture="x86"
         publicKeyToken="31bf3856ad364e35"
         versionScope="nonSxS"
      />
    <selection name="IIS-WebServerRole" state="true"/>
    <selection name="IIS-WebServer" state="true"/>
    <selection name="IIS-CommonHttpFeatures" state="true"/>
    <selection name="IIS-StaticContent" state="true"/>
    <selection name="IIS-DefaultDocument" state="true"/>
    <selection name="IIS-DirectoryBrowsing" state="true"/>
    <selection name="IIS-HttpErrors" state="true"/>
    <selection name="IIS-HttpRedirect" state="true"/>
    <selection name="IIS-ApplicationDevelopment" state="true"/>
    <selection name="IIS-ASPNET" state="true"/>
    <selection name="IIS-NetFxExtensibility" state="true"/>
    <selection name="IIS-ASP" state="true"/>
    <selection name="IIS-CGI" state="true"/>
    <selection name="IIS-ISAPIExtensions" state="true"/>
    <selection name="IIS-ISAPIFilter" state="true"/>
    <selection name="IIS-ServerSideIncludes" state="true"/>
    <selection name="IIS-HealthAndDiagnostics" state="true"/>
    <selection name="IIS-HttpLogging" state="true"/>
    <selection name="IIS-LoggingLibraries" state="true"/>
    <selection name="IIS-RequestMonitor" state="true"/>
    <selection name="IIS-HttpTracing" state="true"/>
    <selection name="IIS-CustomLogging" state="true"/>
    <selection name="IIS-ODBCLogging" state="true"/>
    <selection name="IIS-Security" state="true"/>
    <selection name="IIS-BasicAuthentication" state="true"/>
    <selection name="IIS-WindowsAuthentication" state="true"/>
    <selection name="IIS-DigestAuthentication" state="true"/>
    <selection name="IIS-ClientCertificateMappingAuthentication" state="true"/>
    <selection name="IIS-IISCertificateMappingAuthentication" state="true"/>
    <selection name="IIS-URLAuthorization" state="true"/>
    <selection name="IIS-RequestFiltering" state="true"/>
    <selection name="IIS-IPSecurity" state="true"/>
    <selection name="IIS-Performance" state="true"/>
    <selection name="IIS-HttpCompressionStatic" state="true"/>
    <selection name="IIS-HttpCompressionDynamic" state="true"/>
    <selection name="IIS-WebServerManagementTools" state="true"/>
    <selection name="IIS-ManagementConsole" state="true"/>
    <selection name="IIS-ManagementScriptingTools" state="true"/>
    <selection name="IIS-ManagementService" state="true"/>
    <selection name="IIS-IIS6ManagementCompatibility" state="true"/>
    <selection name="IIS-Metabase" state="true"/>
    <selection name="IIS-WMICompatibility" state="true"/>
    <selection name="IIS-LegacyScripts" state="true"/>
    <selection name="IIS-LegacySnapIn" state="true"/>
    <selection name="IIS-FTPPublishingService" state="true"/>
    <selection name="IIS-FTPServer" state="true"/>
    <selection name="IIS-FTPManagement" state="true"/>
    <selection name="WAS-WindowsActivationService" state="true"/>
    <selection name="WAS-ProcessModel" state="true"/>
    <selection name="WAS-NetFxEnvironment" state="true"/>
    <selection name="WAS-ConfigurationAPI" state="true"/>
  </package>
</servicing>
</unattend>
如果要在 Windows Vista 家庭高级版上安装 IIS 7.0,请将以下文本复制粘贴到记事本中:
<?xml version="1.0" ?>
<unattend xmlns="urn:schemas-microsoft-com:unattend"
    xmlns:wcm="http://schemas.microsoft.com/WMIConfig/2002/State">
<servicing>
   <!-- Install a selectable update in a package that is in the Windows Foundation namespace -->
   <package action="configure">
      <assemblyIdentity
         name="Microsoft-Windows-Foundation-Package"
         version="6.0.5303.0"
         language="neutral"
        processorArchitecture="x86"
         publicKeyToken="31bf3856ad364e35"
         versionScope="nonSxS"
      />
    <selection name="IIS-WebServerRole" state="true"/>
    <selection name="IIS-WebServer" state="true"/>
    <selection name="IIS-CommonHttpFeatures" state="true"/>
    <selection name="IIS-StaticContent" state="true"/>
    <selection name="IIS-DefaultDocument" state="true"/>
    <selection name="IIS-DirectoryBrowsing" state="true"/>
    <selection name="IIS-HttpErrors" state="true"/>
    <selection name="IIS-HttpRedirect" state="true"/>
    <selection name="IIS-ApplicationDevelopment" state="true"/>
    <selection name="IIS-ASPNET" state="true"/>
    <selection name="IIS-NetFxExtensibility" state="true"/>
    <selection name="IIS-ASP" state="true"/>
    <selection name="IIS-CGI" state="true"/>
    <selection name="IIS-ISAPIExtensions" state="true"/>
    <selection name="IIS-ISAPIFilter" state="true"/>
    <selection name="IIS-ServerSideIncludes" state="true"/>
    <selection name="IIS-HealthAndDiagnostics" state="true"/>
    <selection name="IIS-HttpLogging" state="true"/>
    <selection name="IIS-LoggingLibraries" state="true"/>
    <selection name="IIS-RequestMonitor" state="true"/>
    <selection name="IIS-HttpTracing" state="true"/>
    <selection name="IIS-CustomLogging" state="true"/>
    <selection name="IIS-ODBCLogging" state="true"/>
    <selection name="IIS-Security" state="true"/>
    <selection name="IIS-BasicAuthentication" state="true"/>
    <selection name="IIS-URLAuthorization" state="true"/>
    <selection name="IIS-RequestFiltering" state="true"/>
    <selection name="IIS-IPSecurity" state="true"/>
    <selection name="IIS-Performance" state="true"/>
    <selection name="IIS-HttpCompressionStatic" state="true"/>
    <selection name="IIS-HttpCompressionDynamic" state="true"/>
    <selection name="IIS-WebServerManagementTools" state="true"/>
    <selection name="IIS-ManagementConsole" state="true"/>
    <selection name="IIS-ManagementScriptingTools" state="true"/>
    <selection name="IIS-ManagementService" state="true"/>
    <selection name="IIS-IIS6ManagementCompatibility" state="true"/>
    <selection name="IIS-Metabase" state="true"/>
    <selection name="IIS-WMICompatibility" state="true"/>
    <selection name="IIS-LegacyScripts" state="true"/>
    <selection name="IIS-LegacySnapIn" state="true"/>
    <selection name="WAS-WindowsActivationService" state="true"/>
    <selection name="WAS-ProcessModel" state="true"/>
    <selection name="WAS-NetFxEnvironment" state="true"/>
    <selection name="WAS-ConfigurationAPI" state="true"/>
  </package>
</servicing>
</unattend>
步骤 4:获取 Windows 生成号
然后,你必须检查已安装的 Windows 的版本号。 若要查找确切的版本,请执行以下操作:
在开始菜单中,单击“运行”并进入资源管理器。
- 在资源管理器中,浏览到 Windows 目录并找到 regedit.exe
- 右键单击 regedit.exe 并选择“属性”
- 在“属性”对话框中,选择“详细信息”选项卡并记下产品版本。
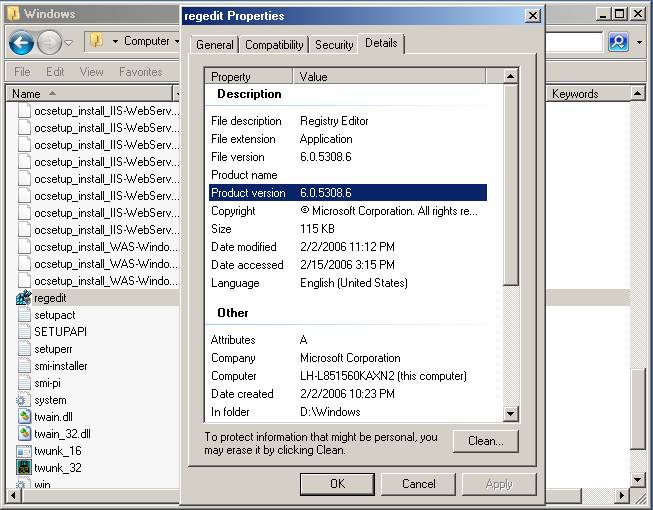
在记事本中,在 XML 特性版本中输入此值以匹配已安装的版本。
在本例中,version="6.0.5308.6"
如果在 64 位 CPU 上安装,则必须编辑 processorArchitecture XML 特性:
processorArchitecture="amd64"

注意
可能的值包括:x86、amd64 和 ia64。
步骤 5:保存 Unattend.xml 文件
保存名为“unattend.xml”的记事本文件
步骤 6:使用 Unattend.xml 文件运行 Pkgmgr
在命令窗口中,输入以下命令行:
start /w pkgmgr /n:unattend.xml
注意:如果将 unattend.xml 保存到除当前驱动器和命令窗口的文件夹以外的驱动器文件夹,则必须在 pkgmgr /n: 参数中指定 unattend.xml 文件的完整路径。
步骤 7:等待安装完成
通过 pkgmgr.exe 安装 IIS 7.0 需要 1 到 5 分钟。 当命令提示符返回时,IIS 7.0 安装就完成了。
步骤 8:检查错误代码
在命令提示符处,键入:
echo %errorlevel%
结果为 0 表示成功。
总结
在本文中,我们探究了如何使用 pckmgr.exe 安装操作系统和 IIS 7.0。