本指南详细介绍了从传统的基架模板迁移到 Microsoft Teams 中的新项目结构的过程。 转换对于使用最新功能并提高项目可维护性至关重要。 新的项目结构引入了一种更简化、更高效的方式来通过 .ttkproj 文件管理 Teams 应用程序,以表示新的项目类型。
在新的 Microsoft 365 代理工具包 (以前称为 Teams 工具包) 版本 17.10 中,Teams 解决方案包含两个项目:Teams 项目和源代码。
- Teams 项目:Teams 项目包含 Teams 应用包和 Agents Toolkit 配置文件。
- 源代码:源代码项目是选项卡、机器人或其他工具的业务逻辑。
Teams 项目和源代码的分离允许将现有 Web 或机器人解决方案集成到 Teams 中。 此方法简化了将任何现有项目或解决方案与 Teams 集成的过程。
先决条件
在开始迁移过程之前,请确保具有以下各项:
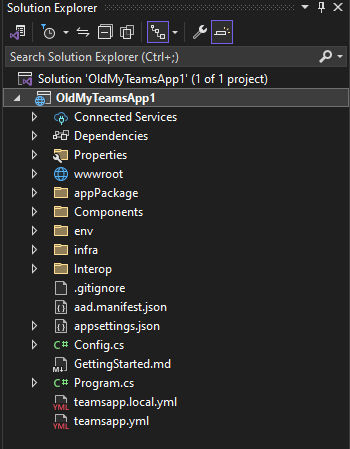
- 使用 Agents Toolkit for Visual Studio 17.9 或更低版本创建的 Teams 项目。
- Visual Studio 版本 17.10 预览版 3 或更高版本。
- 多个启动功能。 若要启用多个启动,请转到 “工具>选项>”“预览功能>”“启用多项目启动配置文件”。
迁移过程
执行以下步骤以迁移到新的项目结构:
在具有 Visual Studio 解决方案文件的 Teams 项目文件夹中,创建一个新文件夹。 此文件夹在后续步骤中命名为 TeamsApp 。
在 TeamsApp 文件夹中创建 TeamsApp.ttkproj 文件,项目文件名必须与新文件夹名称匹配。 将以下代码添加到 TeamsApp.ttkproj 文件:
<?xml version="1.0" encoding="utf-8"?>
<Project ToolsVersion="15.0" Sdk="Microsoft.TeamsFx.Sdk">
  <ItemGroup>
    <ProjectCapability Include="ProjectConfigurationsDeclaredDimensions" />
  </ItemGroup>
</Project>
从项目文件夹中删除以下配置文件夹和文件,并将其添加到 TeamsApp 文件夹中。
- 文件夹:
appPackage、env、infra - 文件:
m365agents.yml、m365agents.local.yml、aad.manifest.json
注意
移动文件夹和文件后,它们将自动包含在 TeamsApp.ttkproj 文件中,你无需手动将它们添加到 TeamsApp.ttkproj 。
- 文件夹:
根据你的
launchSettings.json,将启动浏览器或测试工具功能移动到launchSettings.jsonTeamsApp 文件夹。-
launchSettings.json在 TeamsApp 文件夹中创建文件。 将项目文件夹的文件launchSettings.json内容添加到 TeamsApp 文件夹中新创建的launchSettings.json。 - 在新创建的
launchSettings.jsonTeamsApp 文件夹中,删除dotnetRunMessages、、launchBrowserapplicationUrl、environmentVariables和hotReloadProfile字段。 - 在项目文件夹的 中
launchSettings.json,删除launchBrowser、launchPlayground和launchUrl字段和重复的配置文件。
注意
-
launchSettings.json项目的 必须单独开始。 -
launchSettings.jsonTeamsApp 文件夹的 配置为启动与项目通信的浏览器或测试工具应用。
-
使用 Visual Studio 版本 17.10 预览版 3 或更高版本打开解决方案文件,并将新项目
TeamsApp.ttkproj从 TeamsApp 文件夹添加到 Visual Studio 中的解决方案文件。在项目中删除
<ProjectCapability Include="TeamsFx"/>。创建
{{solutionName}}.slnLaunch.user文件。 可以通过 VS 或手动创建此文件。- 右键单击解决方案,然后选择 “配置启动项目...”。
- 选择“ 多个启动项目 ”,并添加更多同时启动 TeamsApp 和项目的配置文件。 可以根据需要重命名配置文件。
- 选择“确定”。 该文件
{{solutionName}}.slnLaunch.user自动保存在解决方案文件夹中。
m365agents.local.yml修改 TeamsApp 文件夹中的 和m365agents.yml文件。由于路径已更新,因此必须更新更改项目的每个作。 专注于以下作:
-
uses: file/createOrUpdateJsonFile:此作可能会更改appSettings.json项目的文件以配置运行时环境。 将target字段更新为正确的路径。重要
无需使用
file/createOrUpdateJsonFile进行修改launchSettings.json。 如果 存在于 中m365agents.local.yml,请将其删除。 -
uses: cli/runDotnetCommand:此作在项目中执行命令.NET来打包它。 将workingDirectory字段调整为新路径,并使用正确的.csproj路径更新命令字符串。 -
uses: azureAppService/zipDeploy:此作将远程部署打包的文件。 将workingDirectory字段更新为正确的路径。
下面是如何修改 YAML 配置的示例:
# For example:
# Generate runtime appsettings to JSON file
- uses: file/createOrUpdateJsonFile
  with:
    target: ../MyTeamsApp8/appsettings.Development.json
    content:
      TeamsFx:
        Authentication:
        ClientId: ${{AAD_APP_CLIENT_ID}}
        ClientSecret: ${{SECRET_AAD_APP_CLIENT_SECRET}}
        InitiateLoginEndpoint: ${{TAB_ENDPOINT}}/auth-start.html
        OAuthAuthority: ${{AAD_APP_OAUTH_AUTHORITY}}

# Triggered when 'teamsapp deploy' is executed
deploy:
- uses: cli/runDotnetCommand
  with:
    args: publish --configuration Release MyTeamsApp8.csproj
    workingDirectory: ../MyTeamsApp8

# Deploy your application to Azure App Service using the zip deploy feature.
# For additional details, refer to https://aka.ms/zip-deploy-to-app-services.
- uses: azureAppService/zipDeploy
  with:
    # Deploy base folder
    artifactFolder: bin/Release/net8.0/publish
    # The resource id of the cloud resource to be deployed to.
    # This key will be generated by arm/deploy action automatically.
    # You can replace it with your existing Azure Resource id
    # or add it to your environment variable file.
    resourceId: ${{TAB_AZURE_APP_SERVICE_RESOURCE_ID}}
    workingDirectory: ../MyTeamsApp8
注意
我们重新注释你在新的项目文件夹上预配和部署以测试应用。
-
关闭解决方案并确保保存所有更改。
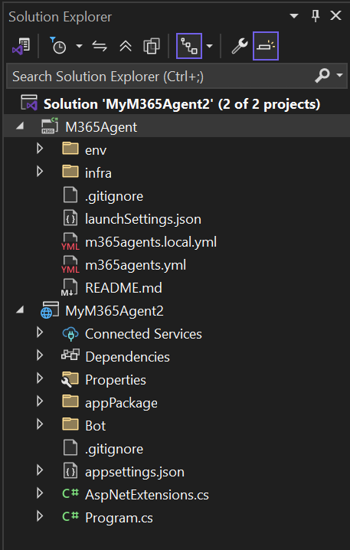
已成功迁移项目,并且文件夹结构已更新,如下所示:
文件夹结构
项目类型文件
此文件扩展名为 .ttkproj。
<?xml version="1.0" encoding="utf-8"?>
<Project ToolsVersion="15.0" Sdk="Microsoft.TeamsFx.Sdk">
  <PropertyGroup Label="Globals">
    <ProjectGuid>f05bbd29-f3bc-4bb8-8f1f-842235db6b49</ProjectGuid>
  </PropertyGroup>
  <ItemGroup>
    <ProjectCapability Include="ProjectConfigurationsDeclaredDimensions" />
  </ItemGroup>
</Project>
LaunchSettings.json
以下代码是 C# 项目的示例:
{
  "profiles": {
    "Start Project": {
      "commandName": "Project",
      "dotnetRunMessages": true,
      "applicationUrl": "https://localhost:44302;http://localhost:2544",
      "environmentVariables": {
        "ASPNETCORE_ENVIRONMENT": "Development"
      },
      "hotReloadProfile": "aspnetcore"
    }
  }
}
以下代码是 TeamsApp 项目的示例:
{
  "profiles": {
    // Debug project within Teams
    "Microsoft Teams (browser)": {
      "commandName": "Project",
      "launchUrl": "https://teams.microsoft.com/l/app/${{TEAMS_APP_ID}}?installAppPackage=true&webjoin=true&appTenantId=${{TEAMS_APP_TENANT_ID}}&login_hint=${{TEAMSFX_M365_USER_NAME}}",
    },
    // Debug project within Microsoft 365
    "Microsoft 365 app (browser)": {
      "commandName": "Project",
      "launchUrl": "https://www.office.com/m365apps/${{M365_APP_ID}}?auth=2&login_hint=${{TEAMSFX_M365_USER_NAME}}",
    },
    // Debug project within Outlook
    "Outlook (browser)": {
      "commandName": "Project",
      "launchUrl": "https://outlook.office.com/host/${{M365_APP_ID}}?login_hint=${{TEAMSFX_M365_USER_NAME}}",
    }
  }
}
Teams 应用 YAML 文件
以下代码是teamapp.local.yml的示例:
# Generate runtime appsettings to JSON file
  - uses: file/createOrUpdateJsonFile
    with:
      target: ../MyTeamsApp8/appsettings.Development.json
      content:
        TeamsFx:
          Authentication:
            ClientId: ${{AAD_APP_CLIENT_ID}}
            ClientSecret: ${{SECRET_AAD_APP_CLIENT_SECRET}}
            InitiateLoginEndpoint: ${{TAB_ENDPOINT}}/auth-start.html
            OAuthAuthority: ${{AAD_APP_OAUTH_AUTHORITY}}
以下代码是teamapp.yml的示例:
# Triggered when 'teamsapp deploy' is executed
deploy:
  - uses: cli/runDotnetCommand
    with:
      args: publish --configuration Release MyTeamsApp8.csproj
      workingDirectory: ../MyTeamsApp8
  # Deploy your application to Azure App Service using the zip deploy feature.
  # For additional details, refer to https://aka.ms/zip-deploy-to-app-services.
  - uses: azureAppService/zipDeploy
    with:
      # Deploy base folder
      artifactFolder: bin/Release/net8.0/publish
      # The resource id of the cloud resource to be deployed to.
      # This key will be generated by arm/deploy action automatically.
      # You can replace it with your existing Azure Resource id
      # or add it to your environment variable file.
      resourceId: ${{TAB_AZURE_APP_SERVICE_RESOURCE_ID}}
      workingDirectory: ../MyTeamsApp8
解决方案启动用户文件
此文件必须存储在解决方案文件夹的同一级别。
[
  {
    "Name": "Microsoft Teams (browser)",
    "Projects": [
      {
        "Name": "TeamsApp\\TeamsApp.ttkproj",
        "Action": "StartWithoutDebugging",
        "DebugTarget": "Microsoft Teams (browser)"
      },
      {
        "Name": "MyTeamsApp8\\MyTeamsApp8.csproj",
        "Action": "Start",
        "DebugTarget": "Start Project"
      }
    ]
  },
  {
    "Name": "Microsoft 365 app (browser)",
    "Projects": [
      {
        "Name": "TeamsApp\\TeamsApp.ttkproj",
        "Action": "StartWithoutDebugging",
        "DebugTarget": "Microsoft 365 app (browser)"
      },
      {
        "Name": "MyTeamsApp8\\MyTeamsApp8.csproj",
        "Action": "Start",
        "DebugTarget": "Start Project"
      }
    ]
  },
  {
    "Name": "Outlook (browser)",
    "Projects": [
      {
        "Name": "TeamsApp\\TeamsApp.ttkproj",
        "Action": "StartWithoutDebugging",
        "DebugTarget": "Outlook (browser)"
      },
      {
        "Name": "MyTeamsApp8\\MyTeamsApp8.csproj",
        "Action": "Start",
        "DebugTarget": "Start Project"
      }
    ]
  }
]