发送时将内容预置或追加到邮件或约会正文
发送前附加和发送时追加功能使 Outlook 加载项能够在邮件项目发送时将内容插入邮件或约会的正文。 这些功能使用户能够:
- 为其邮件和约会添加敏感度和分类标签,以便于项目标识和组织。
- 出于法律目的插入免责声明。
- 为营销和通信目的添加标准化标头。
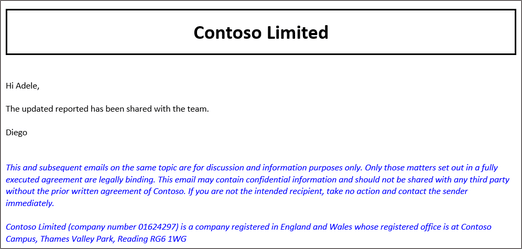
在本演练中,你将开发一个加载项,该加载项在邮件发送时追加标头并追加免责声明。
设置环境
完成 Outlook 快速入门 ,该快速入门使用 Office 加载项的 Yeoman 生成器创建外接程序项目。
配置清单
若要配置清单,请选择要使用的清单类型的选项卡。
下面演示了如何配置统一清单以启用发送前附加和发送时追加功能。
打开 manifest.json 文件。
将以下 对象添加到“extensions.runtimes”数组。 对于此代码,请注意以下事项。
- 邮箱要求集的“minVersion”设置为“1.13”,因此无法在不支持此功能的平台和 Office 版本上安装加载项。
- 运行时的“id”设置为描述性名称“function_command_runtime”。
- “code.page”属性设置为将加载函数命令的无 UI HTML 文件的 URL。
- “lifetime”属性设置为“short”,这意味着运行时在选择函数命令按钮时启动,并在函数完成时关闭。 (在某些情况下,运行时在处理程序完成之前关闭。请参阅 Office Add-ins.) 中的运行时
- 指定了运行“prependHeaderOnSend”和“appendDisclaimerOnSend”函数的操作。 你将在后面的步骤中创建这些函数。
{
    "requirements": {
        "capabilities": [
            {
                "name": "Mailbox",
                "minVersion": "1.13"
            }
        ],
        "formFactors": [
            "desktop"
        ]
    },
    "id": "function_command_runtime",
    "type": "general",
    "code": {
        "page": "https://localhost:3000/commands.html"
    },
    "lifetime": "short",
    "actions": [
        {
            "id": "prependHeaderOnSend",
            "type": "executeFunction",
            "displayName": "prependHeaderOnSend"
        },
        {
            "id": "appendDisclaimerOnSend",
            "type": "executeFunction",
            "displayName": "appendDisclaimerOnSend"
        }
    ]
}
将以下 对象添加到“extensions.ribbons”数组。 对于此代码,请注意以下事项。
- 将“mailCompose”值添加到“contexts”数组中,以在撰写窗口中显示“发送前”和“追加发送时”按钮。
- “控件”对象创建并配置 prepend-on-send 函数和 append-on-send 函数的按钮。 每个对象的“actionId”属性必须反映“extensions.runtimes”对象的适用“actions.id”属性中指定的相同值。
{
    "contexts": [
        "mailCompose"
    ],
    "tabs": [
        {
            "builtInTabId": "TabDefault",
            "groups": [
                {
                    "id": "msgComposeGroup",
                    "label": "Contoso Add-in",
                    "icons": [
                        {
                            "size": 16,
                            "url" "https://localhost:3000/assets/icon-16.png"
                        },
                        {
                            "size": 32,
                            "url" "https://localhost:3000/assets/icon-32.png"
                        },
                        {
                            "size": 80,
                            "url" "https://localhost:3000/assets/icon-80.png"
                        }
                    ],
                    "controls": [
                        {
                            "id": "PrependButton",
                            "type": "button",
                            "label": "Prepend header on send",
                            "icons": [
                                {
                                    "size": 16,
                                    "url" "https://localhost:3000/assets/icon-16.png"
                                },
                                {
                                    "size": 32,
                                    "url" "https://localhost:3000/assets/icon-32.png"
                                },
                                {
                                    "size": 80,
                                    "url" "https://localhost:3000/assets/icon-80.png"
                                }
                            ],
                            "supertip": {
                                "title": "Prepend header on send",
                                "description": "Prepend the Contoso header on send."
                            },
                            "actionId": "prependHeaderOnSend"
                        },
                        {
                            "id": "AppendButton",
                            "type": "button",
                            "label": "Append disclaimer on send",
                            "icons": [
                                {
                                    "size": 16,
                                    "url" "https://localhost:3000/assets/icon-16.png"
                                },
                                {
                                    "size": 32,
                                    "url" "https://localhost:3000/assets/icon-32.png"
                                },
                                {
                                    "size": 80,
                                    "url" "https://localhost:3000/assets/icon-80.png"
                                }
                            ],
                            "supertip": {
                                "title": "Append disclaimer on send",
                                "description": "Append the Contoso disclaimer on send."
                            },
                            "actionId": "appendDisclaimerOnSend"
                        }
                    ]
                }
            ]
        }
    ]
}
在“authorization.permissions.resourceSpecific”数组中,添加以下 对象。 请确保它与数组中的其他对象之间用逗号分隔。
{
  "name": "Mailbox.AppendOnSend.User",
  "type": "Delegated"
}
保存所做的更改。
提示
- 用户必须通过任务窗格或函数命令按钮激活 prepend-on-send 和 append-on-send 功能。 如果希望在发送内容之前追加或追加内容,而无需用户执行其他操作,则可以在 基于事件的激活外接程序中实现这些功能。
- 若要详细了解 Outlook 外接程序清单,请参阅 Office 外接程序清单。
实现 prepend-on-send 处理程序
在本部分中,你将实现 JavaScript 代码,以在邮件项目发送时将示例公司标头追加到邮件项前面。
导航到项目的 ./src/commands 文件夹并打开 commands.js 文件。
在文件的末尾插入以下函数。
function prependHeaderOnSend(event) {
  // It's recommended to call the getTypeAsync method and pass its returned value to the options.coercionType parameter of the prependOnSendAsync call.
  Office.context.mailbox.item.body.getTypeAsync(
    {
      asyncContext: event
    },
    (asyncResult) => {
      if (asyncResult.status === Office.AsyncResultStatus.Failed) {
        console.log(asyncResult.error.message);
        return;
      }

      // Sets the header to be prepended to the body of the message on send.
      const bodyFormat = asyncResult.value;
      // Because of the various ways in which HTML text can be formatted, the content may render differently when it's prepended to the mail item body.
      // In this scenario, a <br> tag is added to the end of the HTML string to preserve its format.
      const header = '<div style="border:3px solid #000;padding:15px;"><h1 style="text-align:center;">Contoso Limited</h1></div><br>';

      Office.context.mailbox.item.body.prependOnSendAsync(
        header,
        {
          asyncContext: asyncResult.asyncContext,
          coercionType: bodyFormat
        },
        (asyncResult) => {
          if (asyncResult.status === Office.AsyncResultStatus.Failed) {
            console.log(asyncResult.error.message);
            return;
          }

          console.log("The header will be prepended when the mail item is sent.");
          asyncResult.asyncContext.completed();
        }
      );
  });
}
保存所做的更改。
实现 append-on-send 处理程序
在本部分中,你将实现 JavaScript 代码,以在邮件项目发送时向邮件项目追加示例公司免责声明。
在同一 commands.js 文件中,在 函数后面
prependHeaderOnSend插入以下函数。function appendDisclaimerOnSend(event) { // Calls the getTypeAsync method and passes its returned value to the options.coercionType parameter of the appendOnSendAsync call. Office.context.mailbox.item.body.getTypeAsync( { asyncContext: event }, (asyncResult) => { if (asyncResult.status === Office.AsyncResultStatus.Failed) { console.log(asyncResult.error.message); return; } // Sets the disclaimer to be appended to the body of the message on send. const bodyFormat = asyncResult.value; const disclaimer = '<p style = "color:blue"> <i>This and subsequent emails on the same topic are for discussion and information purposes only. Only those matters set out in a fully executed agreement are legally binding. This email may contain confidential information and should not be shared with any third party without the prior written agreement of Contoso. If you are not the intended recipient, take no action and contact the sender immediately.<br><br>Contoso Limited (company number 01624297) is a company registered in England and Wales whose registered office is at Contoso Campus, Thames Valley Park, Reading RG6 1WG</i></p>'; Office.context.mailbox.item.body.appendOnSendAsync( disclaimer, { asyncContext: asyncResult.asyncContext, coercionType: bodyFormat }, (asyncResult) => { if (asyncResult.status === Office.AsyncResultStatus.Failed) { console.log(asyncResult.error.message); return; } console.log("The disclaimer will be appended when the mail item is sent."); asyncResult.asyncContext.completed(); } ); }); }保存所做的更改。
注册 JavaScript 函数
- 在同 一commands.js 文件中,在 函数后面
appendDisclaimerOnSend插入以下内容。 这些调用将清单中指定的函数名称映射到其 JavaScript 对应名称。 清单中函数名称的位置因外接程序使用的清单类型而异。
XML 清单:FunctionName> 元素中指定的<函数名称。
Microsoft 365 的统一清单:在“extensions.runtimes.actions”数组中对象的“id”属性中指定的函数名称。
Office.actions.associate("prependHeaderOnSend", prependHeaderOnSend);
Office.actions.associate("appendDisclaimerOnSend", appendDisclaimerOnSend);
- 保存所做的更改。
试用
在项目的根目录中运行以下命令。 运行此命令时,如果本地 Web 服务器尚未运行,则本地 Web 服务器将启动,并且加载项将被旁加载。
npm start注意
如果加载项未自动旁加载,请按照 旁加载 Outlook 外接程序 中的说明进行测试,在 Outlook 中手动旁加载加载项。
Create新邮件,并将自己添加到“To”行。
(可选) 在邮件正文中输入文本。
在功能区或溢出菜单中,选择“ 前置页眉”。
在功能区或溢出菜单中,选择“ 追加免责声明”。
发送邮件,然后从 “收件箱” 或“ 已发送邮件” 文件夹打开它以查看插入的内容。

提示
由于内容仅在邮件发送后追加或追加,发件人只能查看其 “收件箱” 或“ 已发送邮件 ”文件夹中添加的内容。 如果要求发件人在发送邮件之前查看添加的内容,请参阅 在 Outlook 中撰写约会或邮件时在正文中插入数据。
查看功能行为和限制
在外接程序中实现 prepend-on-send 和 append-on-send 时,请记住以下几点。
只有在撰写模式下才支持 prepend-on-send 和 append-on-send。
要预置或追加的字符串不能超过 5,000 个字符。
HTML 不能追加或追加到邮件或约会的纯文本正文中。 但是,纯文本可以添加到邮件或约会的 HTML 格式正文中。
应用于前面附加或追加内容的任何格式都不会影响邮件项目正文其余部分的样式。
不能在实现 on-send 功能的同一外接程序中实现 prepend-on-send 和 append-on-send。 作为替代方法,请考虑改为实现 智能警报 。
在同一外接程序中实现智能警报时,在 和
OnAppointmentSend事件处理程序操作之前OnMessageSend,将执行 prepend-on-send 和 append-on-send 操作。如果多个活动加载项使用 prepend-on-send 或 append-on-send,则要插入的内容的顺序取决于外接程序的运行顺序。 对于 prepend-on-send,最后运行的外接程序的内容显示在邮件项目正文顶部,位于之前附加的内容之前。 对于“发送时追加”,最后运行的加载项的内容显示在邮件项正文底部,紧跟先前追加的内容。
只要在共享邮箱或所有者的帐户上启用了实现 prepend-on-send 或 append-on-send 的加载项,就支持委托和共享邮箱方案。
排查加载项问题
如果在实现 prepend-on-send 和 append-on-send 功能时遇到错误,请参阅下表以获取指导。
| 错误 | 说明 | 解决方案 |
|---|---|---|
DataExceedsMaximumSize |
要追加或追加的内容长度超过 5,000 个字符。 | 缩短传递给 data 或 appendOnSendAsync 调用的 参数的prependOnSendAsync字符串。 |
InvalidFormatError |
邮件或约会正文采用纯文本格式,但 coercionType 传递给 prependOnSendAsync 或 appendOnSendAsync 方法的 设置为 Office.CoercionType.Html。 |
只能将纯文本插入邮件或约会的纯文本正文中。 若要验证正在撰写的邮件项的格式,请调用 Office.context.mailbox.item.body.getTypeAsync,然后将其返回的值传递给 或 prependOnSendAsyncappendOnSendAsync 呼叫。 |
另请参阅
反馈
即将发布:在整个 2024 年,我们将逐步淘汰作为内容反馈机制的“GitHub 问题”,并将其取代为新的反馈系统。 有关详细信息,请参阅:https://aka.ms/ContentUserFeedback。
提交和查看相关反馈