将约会笔记和其他详细信息保存到客户关系管理 (CRM) 或记笔记应用程序有助于跟踪已参加的会议。
本文介绍如何设置 Outlook 移动加载项,使用户能够将有关其约会的笔记和其他详细信息记录到 CRM 或记笔记应用程序中。 在本文中,我们将使用名为“Contoso”的虚构 CRM 服务提供商。
可以选择实现函数命令或任务窗格加载项。 使用函数命令实现,用户可以在选择加载项按钮时记录和查看有关其约会的笔记和其他详细信息。 通过任务窗格实现,用户可以直接从任务窗格界面管理其约会笔记。 按照本文中的说明作时,请选择要开发的加载项类型的选项卡。
支持的客户端
使用 Microsoft 365 订阅的 Outlook 和 iOS 支持从 Outlook 移动加载项将笔记记录到外部应用程序。
设置环境
完成 Outlook 快速入门 ,使用 Office 外接程序的 Yeoman 生成器创建外接程序项目。
配置清单
若要配置外接程序的清单,请选择正在使用的清单类型。
Microsoft 365 的统一清单
在代码编辑器中打开快速入门项目。
打开位于项目根目录处的 manifest.json 文件。
在数组中
"authorization.permissions.resourceSpecific",找到 第一个 对象,并将其"name"属性设置为"MailboxItem.ReadWrite.User"。 完成后,它应如下所示。{ "name": "MailboxItem.ReadWrite.User", "type": "Delegated" }在数组中
"validDomains",确保包含的https://www.contoso.comURL。 完成后,数组应如下所示。"validDomains": [ "https://www.contoso.com" ],在 数组中
"extensions.runtimes",删除其 设置为"TaskPaneRuntime"的对象"id"。在同一数组中,导航到其余对象(其
"id"设置为"CommandsRuntime"),并将其替换为以下 对象。{ "requirements": { "capabilities": [ { "name": "Mailbox", "minVersion": "1.3" } ] }, "id": "CommandsRuntime", "type": "general", "code": { "page": "https://localhost:3000/commands.html", "script": "https://localhost:3000/commands.js" }, "lifetime": "short", "actions": [ { "id": "logCRMEvent", "type": "executeFunction" } ] }在 数组中
"ribbons",将现有 对象替换为以下代码。 请注意以下有关这些更改的信息。-
"desktop"数组中的"ribbons.requirements.formFactors"和"mobile"值将“登录到 Contoso”按钮配置为在移动设备和桌面客户端上的 Outlook 中显示。 -
"logEventMeetingDetailsAttendee"数组中的"contexts"值将加载项按钮配置为显示在“约会与会者”图面中,以便用户可以记录其约会笔记。 - 数组中的
"ribbons.tabs.groups.controls"对象配置外接程序按钮,该按钮调用 Outlook 桌面客户端中的笔记日志记录函数。 属性"actionId"必须与数组中"extensions.runtimes"对象的 匹配"actions.id"。 - 数组中的
"ribbons.tabs.customMobileRibbonGroups"对象配置加载项按钮,该按钮在移动设备上调用 Outlook 中的笔记日志记录函数。 移动按钮需要数组中指定的"customMobileRibbonGroups.controls.icons"所有 9 个对象。 此外,"customMobileRibbonGroups.controls.actionId"属性必须与数组中"extensions.runtimes"对象的 匹配"actions.id"。
{ "requirements": { "formFactors": [ "desktop", "mobile" ] }, "contexts": [ "logEventMeetingDetailsAttendee" ], "tabs": [ { "builtInTabId": "TabDefault", "groups": [ { "id": "apptReadGroup", "label": "Contoso Add-in", "icons": [ { "size": 16, "url": "https://localhost:3000/assets/icon-16.png" }, { "size": 32, "url": "https://localhost:3000/assets/icon-32.png" }, { "size": 80, "url": "https://localhost:3000/assets/icon-80.png" } ], "controls": [ { "id": "desktopLogToCRM", "type": "button", "label": "Log to Contoso", "icons": [ { "size": 16, "url": "https://www.contoso.com/assets/icon-16.png" }, { "size": 32, "url": "https://www.contoso.com/assets/icon-32.png" }, { "size": 80, "url": "https://www.contoso.com/assets/icon-80.png" } ], "supertip": { "title": "Log to Contoso CRM", "description": "Log notes to Contoso CRM for this appointment." }, "actionId": "logCRMEvent" } ] } ], "customMobileRibbonGroups": [ { "id": "mobileApptReadGroup", "label": "Contoso Add-in", "controls": [ { "id": "mobileLogToCRM", "label": "Log to Contoso", "type": "mobileButton", "icons": [ { "scale": 1, "size": 25, "url": "https://contoso.com/assets/icon-25.png" }, { "scale": 1, "size": 32, "url": "https://contoso.com/assets/icon-32.png" }, { "scale": 1, "size": 48, "url": "https://contoso.com/assets/icon-48.png" }, { "scale": 2, "size": 25, "url": "https://contoso.com/assets/icon-25.png" }, { "scale": 2, "size": 32, "url": "https://contoso.com/assets/icon-32.png" }, { "scale": 2, "size": 48, "url": "https://contoso.com/assets/icon-48.png" }, { "scale": 3, "size": 25, "url": "https://contoso.com/assets/icon-25.png" }, { "scale": 3, "size": 32, "url": "https://contoso.com/assets/icon-32.png" }, { "scale": 3, "size": 48, "url": "https://contoso.com/assets/icon-48.png" } ], "actionId": "logCRMEvent" } ] } ] } ] }-
保存所做的更改。
仅加载项清单
若要使用户能够使用外接程序记录约会笔记,必须在父元素 MobileFormFactor下的清单中配置 MobileLogEventAppointmentAttendee 扩展点。 不支持其他外形规格。
在代码编辑器中打开快速入门项目。
打开位于项目根目录处的 manifest.xml 文件。
选择整个
<VersionOverrides>节点 (包括打开和关闭标记) ,并将其替换为以下 XML。 请确保将对 Contoso 的所有引用替换为公司的信息。<VersionOverrides xmlns="http://schemas.microsoft.com/office/mailappversionoverrides" xsi:type="VersionOverridesV1_0"> <VersionOverrides xmlns="http://schemas.microsoft.com/office/mailappversionoverrides/1.1" xsi:type="VersionOverridesV1_1"> <Description resid="residDescription"></Description> <Requirements> <bt:Sets> <bt:Set Name="Mailbox" MinVersion="1.3"/> </bt:Sets> </Requirements> <Hosts> <Host xsi:type="MailHost"> <DesktopFormFactor> <FunctionFile resid="residFunctionFile"/> <!-- Configures the add-in button to appear in the Appointment Attendee surface of Outlook desktop clients. --> <ExtensionPoint xsi:type="AppointmentAttendeeCommandSurface"> <OfficeTab id="TabDefault"> <Group id="apptReadGroup"> <Label resid="residDescription"/> <Control xsi:type="Button" id="apptReadDesktopFunctionButton"> <Label resid="residLabel"/> <Supertip> <Title resid="residLabel"/> <Description resid="residTooltip"/> </Supertip> <Icon> <bt:Image size="16" resid="icon-16"/> <bt:Image size="32" resid="icon-32"/> <bt:Image size="80" resid="icon-80"/> </Icon> <Action xsi:type="ExecuteFunction"> <FunctionName>logCRMEvent</FunctionName> </Action> </Control> </Group> </OfficeTab> </ExtensionPoint> </DesktopFormFactor> <MobileFormFactor> <FunctionFile resid="residFunctionFile"/> <!-- Configures the add-in button to appear in the Appointment Attendee surface of Outlook on mobile devices. --> <ExtensionPoint xsi:type="MobileLogEventAppointmentAttendee"> <Control xsi:type="MobileButton" id="apptReadMobileFunctionButton"> <Label resid="residLabel"/> <Icon> <bt:Image size="25" scale="1" resid="icon-16"/> <bt:Image size="25" scale="2" resid="icon-16"/> <bt:Image size="25" scale="3" resid="icon-16"/> <bt:Image size="32" scale="1" resid="icon-32"/> <bt:Image size="32" scale="2" resid="icon-32"/> <bt:Image size="32" scale="3" resid="icon-32"/> <bt:Image size="48" scale="1" resid="icon-48"/> <bt:Image size="48" scale="2" resid="icon-48"/> <bt:Image size="48" scale="3" resid="icon-48"/> </Icon> <Action xsi:type="ExecuteFunction"> <FunctionName>logCRMEvent</FunctionName> </Action> </Control> </ExtensionPoint> </MobileFormFactor> </Host> </Hosts> <Resources> <bt:Images> <bt:Image id="icon-16" DefaultValue="https://contoso.com/assets/icon-16.png"/> <bt:Image id="icon-32" DefaultValue="https://contoso.com/assets/icon-32.png"/> <bt:Image id="icon-48" DefaultValue="https://contoso.com/assets/icon-48.png"/> <bt:Image id="icon-80" DefaultValue="https://contoso.com/assets/icon-80.png"/> </bt:Images> <bt:Urls> <bt:Url id="residFunctionFile" DefaultValue="https://contoso.com/commands.html"/> </bt:Urls> <bt:ShortStrings> <bt:String id="residDescription" DefaultValue="Log appointment notes and other details to Contoso CRM."/> <bt:String id="residLabel" DefaultValue="Log to Contoso"/> </bt:ShortStrings> <bt:LongStrings> <bt:String id="residTooltip" DefaultValue="Log notes to Contoso CRM for this appointment."/> </bt:LongStrings> </Resources> </VersionOverrides> </VersionOverrides>保存所做的更改。
提示
若要了解有关 Outlook 外接程序清单的详细信息,请参阅 Office 外接程序清单 和 在移动设备上的 Outlook 中添加对外接程序命令的支持。
捕获约会笔记
在本部分中,了解当用户选择“ 日志 ”按钮时,外接程序如何提取约会详细信息。
在同一快速入门项目中,在代码编辑器中打开文件 ./src/commands/commands.js 。
将 commands.js 文件的全部内容替换为以下 JavaScript。
let event;

// Add start-up logic code to the onReady function, if any.
Office.onReady();

function logCRMEvent(appointmentEvent) {
  event = appointmentEvent;
  console.log(`Subject: ${Office.context.mailbox.item.subject}`);
  Office.context.mailbox.item.body.getAsync(
    "html",
    { asyncContext: "This is passed to the callback" },
    (result) => {
      if (result.status === Office.AsyncResultStatus.Succeeded) {
        event.completed({ allowEvent: true });
      } else {
        console.error("Failed to get body.");
        event.completed({ allowEvent: false });
      }
    }
  );
}

// Register the function.
Office.actions.associate("logCRMEvent", logCRMEvent);
保存所做的更改。
打开外接程序项目的 ./src/commands/commands.html 文件。
找到
<script type="text/javascript" src="https://appsforoffice.microsoft.com/lib/1/hosted/office.js"></script>,然后在它后面添加以下代码。 这会添加对 commands.js 文件的引用。<script type="text/javascript" src="commands.js"></script>保存所做的更改。
查看约会笔记
可以通过设置为此目的保留的 EventLogged 自定义属性来切换“日志”按钮标签以显示“视图”。 当用户选择“ 查看 ”按钮时,他们可以查看此约会的记录笔记。
加载项定义日志查看体验。 例如,在函数命令实现中,当用户选择“ 查看 ”按钮时,可以在对话框中显示记录的约会笔记。 有关如何实现对话的详细信息,请参阅 在 Office 外接程序中使用 Office 对话 API。
在 ./src/commands/commands.js中添加以下函数。 此函数设置当前约会项上的 EventLogged 自定义属性。
function updateCustomProperties() {
  Office.context.mailbox.item.loadCustomPropertiesAsync((customPropertiesResult) => {
    if (customPropertiesResult.status === Office.AsyncResultStatus.Succeeded) {
      const customProperties = customPropertiesResult.value;
      customProperties.set("EventLogged", true);
      customProperties.saveAsync((setSaveAsyncResult) => {
        if (setSaveAsyncResult.status === Office.AsyncResultStatus.Succeeded) {
          console.log("EventLogged custom property saved successfully.");
          event.completed({ allowEvent: true });
          event = undefined;
        }
      });
    }
  });
}
保存所做的更改。
在加载项成功记录约会笔记后调用 updateCustomProperties 函数。 例如,可以从 logCRMEvent 调用它,如以下代码所示。
function logCRMEvent(appointmentEvent) {
  event = appointmentEvent;
  console.log(`Subject: ${Office.context.mailbox.item.subject}`);
  Office.context.mailbox.item.body.getAsync(
    "html",
    { asyncContext: "This is passed to the callback" },
    (result) => {
      if (result.status === Office.AsyncResultStatus.Succeeded) {
        // Replace `event.completed({ allowEvent: true });` with the following statement.
        updateCustomProperties();
      } else {
        console.error("Failed to get body.");
        event.completed({ allowEvent: false });
      }
    }
  );
}
删除约会日志
如果你希望用户撤消日志记录或删除记录的约会笔记,以便可以保存替换日志,你有两个选项。
- 当用户在任务窗格中选择相应的按钮时,使用 Microsoft Graph 清除自定义属性对象 。
- 创建一个函数以清除当前约会项上的 EventLogged 自定义属性, (如以下示例) 所示。
在 ./src/commands/commands.js中添加以下函数以清除当前约会项上的 EventLogged 自定义属性。
function clearCustomProperties() {
  Office.context.mailbox.item.loadCustomPropertiesAsync((customPropertiesResult) => {
    if (customPropertiesResult.status === Office.AsyncResultStatus.Succeeded) {
      const customProperties = customPropertiesResult.value;
      customProperties.remove("EventLogged");
      customProperties.saveAsync((removeSaveAsyncResult) => {
        if (removeSaveAsyncResult.status === Office.AsyncResultStatus.Succeeded) {
          console.log("Custom properties cleared");
          event.completed({ allowEvent: true });
          event = undefined;
        }
      });
    }
  });
}
保存所做的更改。
如果要清除自定义属性,请调用 clearCustomProperties 函数。 例如,如果设置日志以某种方式失败,可以从 logCRMEvent 调用它,如以下函数所示。
function logCRMEvent(appointmentEvent) {
  event = appointmentEvent;
  console.log(`Subject: ${Office.context.mailbox.item.subject}`);
  Office.context.mailbox.item.body.getAsync(
    "html",
    { asyncContext: "This is passed to the callback" },
    (result) => {
      if (result.status === Office.AsyncResultStatus.Succeeded) {
        updateCustomProperties();
      } else {
        console.error("Failed to get body.");
        // Replace `event.completed({ allowEvent: false });` with the following statement.
        clearCustomProperties();
      }
    }
  );
}
测试和验证
- 按照常规指南 测试和验证加载项。
- 在 Outlook 网页版 旁加载加载项后,在 Windows (新) 或经典) ,或者在 Mac 上重启 Android 或 iOS 移动设备上的 Outlook。
- 以与会者身份打开约会,然后验证在“会议见解”卡下,是否有一个新的卡,其中包含加载项的名称以及“日志”按钮。
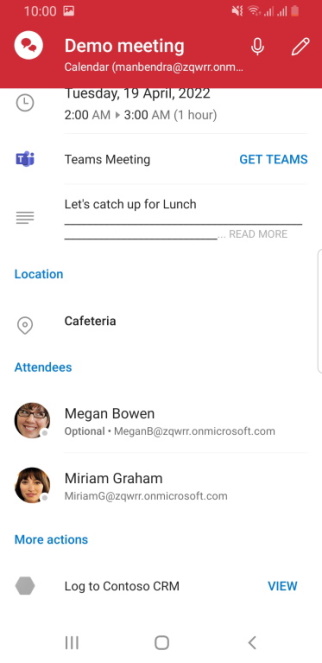
UI:记录约会笔记
作为与会者,打开会议时,应会看到类似于下图的屏幕。
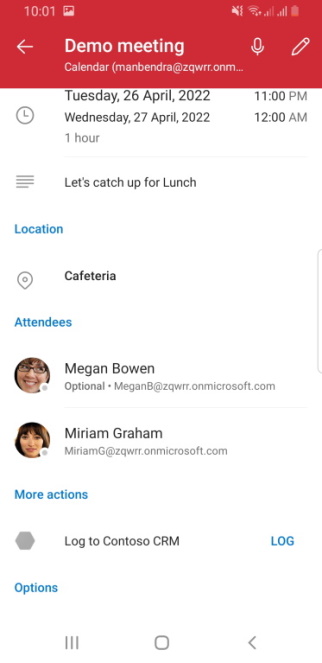
UI:查看约会日志
成功记录约会笔记后,按钮现在应标记为 “视图 ”而不是 “日志”。 应会看到类似于下图的屏幕。
可用 API
以下 API 可用于此功能。
- Dialog API
- Office.AddinCommands.Event
- Office.CustomProperties
- Office.RoamingSettings
- 约会 读取 (与会者) API,但以下 API 除外 :
若要详细了解移动设备上的 Outlook 支持的 API,请参阅移动设备 上的 Outlook 支持的 Outlook JavaScript API。
限制
存在一些限制。
- 无法更改 “日志 ”按钮名称。 但是,可以通过在约会项上设置自定义属性来显示不同的标签。 有关详细信息,请参阅 查看约会笔记。
- 如果要将“日志”按钮的标签切换为“查看并返回”,则必须使用 EventLogged 自定义属性。
- 加载项图标应采用灰度,使用十六进制代码
#919191或其等效的其他 颜色格式。 - 加载项应在一分钟的超时期限内从约会表单中提取会议详细信息。 但是,例如,在打开加载项进行身份验证的对话框中花费的任何时间都排除在超时期限之外。