本文介绍如何创建 Power Pages 以及如何使用 Power Automate 云端流来调用 MSN 天气应用,该应用在页面上显示当前天气的详细信息。
先决条件
要完成这些步骤,您需要一个 Power Automate 和 Power Pages 环境。 如果您没有许可证,可以注册 Power Pages 和 Power Automate 试用。
步骤 1:创建云端流
使用 Power Pages 触发器创建流,使用 MSN 天气操作提取天气数据。
登录到 Power Pages。
选择站点 + 编辑
导航至设置工作区,然后选择应用程序集成下的云端流。
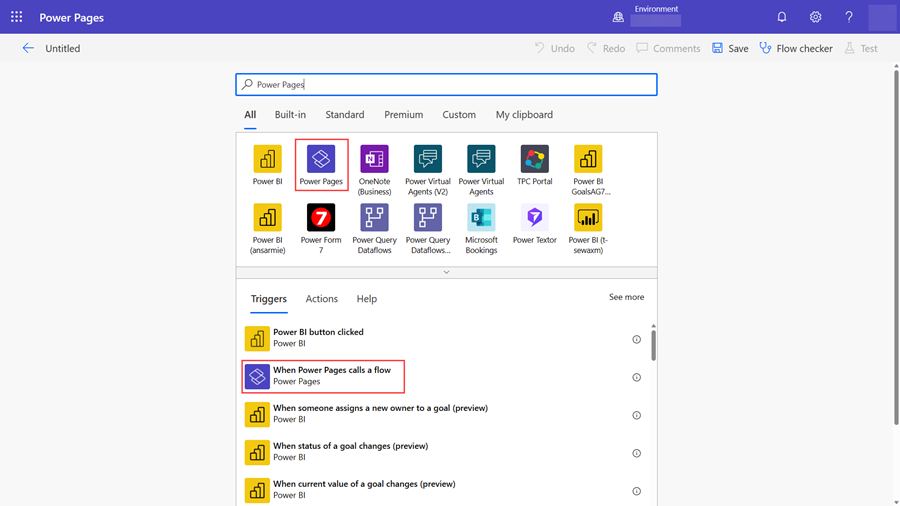
选择 + 创建新流
搜索 Power Pages。
- 选择 Power Pages 调用流时触发器。
选择+ 添加输入。
选择文本。
使用位置添加名称。
选择 + 新建步骤。
搜索 MSN 天气。
选择获取当前天气操作。
将光标聚焦在位置输入文本上,在动态内容中选择 Power Pages 调用流时下的位置参数。
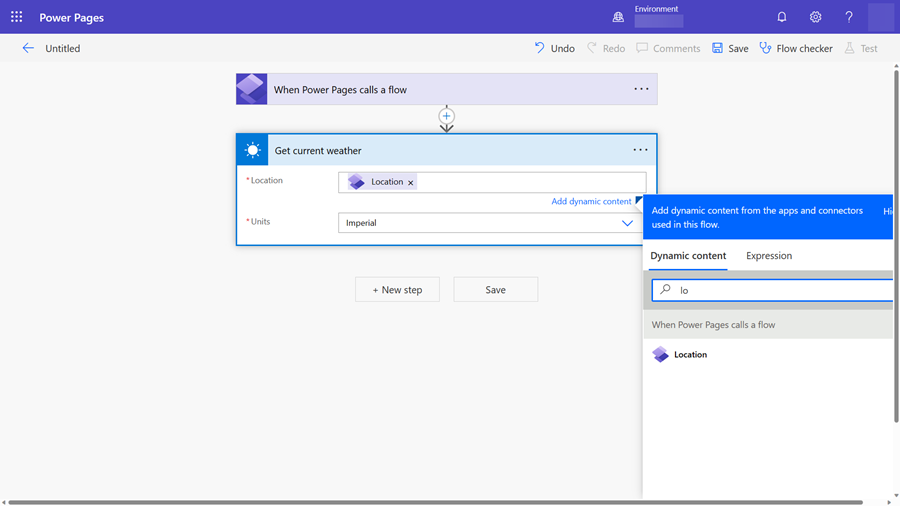
备注
您可以保留英制单位,也可以更改为公制单位。
选择 + 新建步骤。
搜索 Power Pages。
选择将值返回 Power Pages 操作。
选择 + 添加和输出。
选择文本。
输入 Pressure 作为标题。
在获取当前天气下,选择动态内容气压。
使用文本类型重复上述步骤创建以下输出步骤:
- 湿度
- 温度
- UV 指数
- 风速
- 地点
- Visibility Distance
- Latitude
- Longitude
- 温度单位
- 压力单位
- 速度单位
- 距离单位
- 条件
选择保存
将流命名为获取当前天气。
步骤 2:向站点添加流
保存流后,您需要将其添加到站点并分配适当的 Web 角色。
登录到 Power Pages。
创建具有起点布局之一的站点。
选择站点,然后选择编辑。
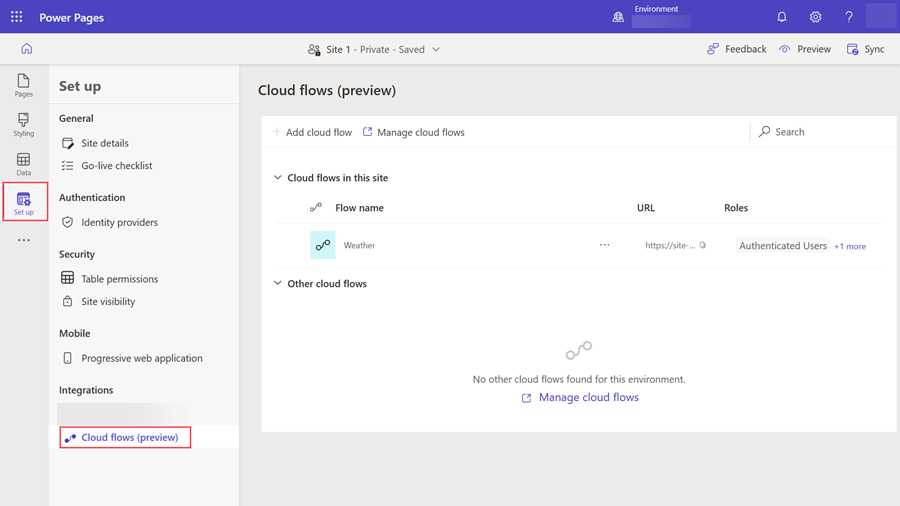
导航到设置工作区。
在应用集成下,选择云端流。
选择 + 添加云端流。
搜索获取当前天气流。
在“角色”下选择 + 添加角色。
选择匿名用户角色。
选择添加。
复制 URL。
备注
这是用于连接到关联云端流的唯一 URL。 稍后您将使用此 URL 来调用当前天气流。
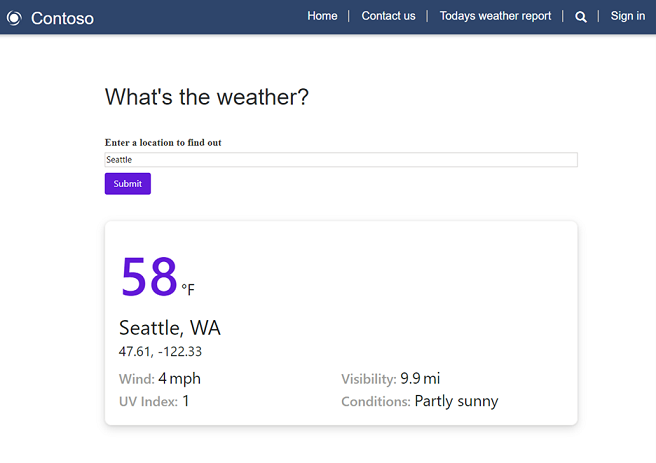
步骤 3:创建一个页面来显示 MSN 天气数据
创建流并将其附加到 Power Pages 站点后,您现在可以使用 JavaScript 从控制事件调用流。
选择页面工作区。
选择 + 页面。
将页面命名为“今天天气预报”。
选择编辑代码打开 Visual Studio Code。
粘贴此代码:
    <style>
        div.weatherdetail {
            border: 1px solid #F3F2F1;
            border-radius: 12px;
            box-shadow: 0px 1.2px 3.6px rgba(0, 0, 0, 0.1), 0px 6.4px 14.4px rgba(0, 0, 0, 0.13);
            padding: 24px;
        }
        .weather label {
            font-family: 'Nunito';
            font-style: normal;
            font-weight: 600;
            font-size: 18px;
            color: #323130;
        }
        .weather button {
            font-family: 'Segoe UI';
            padding: 8px 16px;
            font-size: 16px;
            background-color: #6219D9;
            color: white;
            border: none;
            border-radius: 4px;
            cursor: pointer;
            outline: none;
        }
        div.weather {
            display: flex;
            flex-direction: column;
            align-items: flex-start;
            padding: 100px;
            gap: 36px;
            width: 840px;
        }
        span.temperature {
            font-family: Segoe UI;
            font-size: 96px;
            font-style: normal;
            font-weight: 600;
            color: #6219d9;
        }
        span.weatherinfov1 {
            font-family: Segoe UI;
            font-size: 28px;
            font-style: normal;
            font-weight: 400;
            color: #201f1e;
        }
        span.weatherinfov2 {
            font-family: Segoe UI;
            font-size: 24px;
            font-style: normal;
            font-weight: 600;
            color: #a19f9d;
        }
    </style>

    <div class="row sectionBlockLayout text-left" style="display: flex; flex-wrap: wrap; margin: 0px; min-height: auto; padding: 8px;">
        <div class="container" style="display: flex; flex-wrap: wrap;">
            <div class="col-md-12 columnBlockLayout weather" style="flex-grow: 1; display: flex; flex-direction: column; min-width: 310px; word-break: break-word; padding: 0 180px; margin: 60px 0px;">
                <h1>What's the weather?</h1>
                <form id="cityForm">
                    <label for="locationInput">Enter a location to find out</label>
                    <br>
                    <input type="text" style="width: 840px; border: 1px solid #D2D0CE;" id="locationInput" required />
                    <p>
                    <p>
                        <button type="submit">Submit</button>
                    </p>
                </form>
                <div id="weatherdetail" class="weatherdetail" style="display: none;width: 840px">
                    <div>
                        <div>
                            <span class="temperature" id="temperature"> </span>
                            <span class="weatherinfov1" id="temperature_units"></span>
                        </div>
                        <div>
                            <span class="weatherinfov1" style="font-size: 36px;" id="location"> </span>
                            <br>
                            <span class="weatherinfov1" style="font-size: 24px;" id="cordinates"></span>
                            <p>
                        </div>
                    </div>
                    <div style="display: flex;">
                        <div style="flex: 1;">
                            <span class="weatherinfov2">Wind: </span>
                            <span class="weatherinfov1" id="windspeed"></span>
                            <span class="weatherinfov1" id="speed_units"> </span>
                        </div>
                        <div style="flex: 1;">
                            <span class="weatherinfov2">Visibility: </span>
                            <span class="weatherinfov1" id="visibility"></span>
                            <span class="weatherinfov1" id="distance_units"></span>
                        </div>
                    </div>
                    <div style="display: flex;">
                        <div style="flex: 1;">
                            <span class="weatherinfov2">UV Index: </span>
                            <span class="weatherinfov1" id="uv"></span>
                        </div>
                        <div style="flex: 1;">
                            <span class="weatherinfov2">Conditions: </span>
                            <span class="weatherinfov1" id="condition"></span>
                        </div>
                    </div>
                </div>
            </div>
        </div>
    </div>

    <script>
        document.getElementById("cityForm").addEventListener("submit", function (event) {
            event.preventDefault(); // Prevent form submission
            var weatherDiv = document.getElementById("weatherdetail");
            weatherDiv.style.display = "none";

            var location = document.getElementById("locationInput").value;

            var _url = "<Cloud flow URL>";

          var data = {};
          data["Location"] = location;

            var payload = {};
            payload.eventData = JSON.stringify(data);
            shell
                .ajaxSafePost({
                    type: "POST",
                    url: _url,
                    data: payload
                })
                .done(function (response) {
                    const result = JSON.parse(response);
                    document.getElementById("temperature").innerHTML = result["temperature"];
                    document.getElementById("windspeed").innerHTML = result["wind_speed"];
                    document.getElementById("visibility").innerHTML = result["visibility_distance"];
                    document.getElementById("uv").innerHTML = result["uv_index"];
                    document.getElementById("location").innerHTML = result["location"];
                    document.getElementById("condition").innerHTML = result["conditions"];
                    document.getElementById("temperature_units").innerHTML = result["temperature_units"];
                    document.getElementById("speed_units").innerHTML = result["speed_units"];
                    document.getElementById("distance_units").innerHTML = result["distance_units"];
                    document.getElementById("cordinates").innerHTML = parseFloat(result["latitude"]).toFixed(2) + ', ' + parseFloat(result["longitude"]).toFixed(2);
                    weatherDiv.style.display = "block";
                })
                .fail(function () {
                    alert("failed");
                });
        });
    </script>
将 URL 替换为您在上一步中复制的 URL。
选择 CTRL + S 保存代码。
在设计工作室中选择同步。
步骤 4:测试流集成
要测试流集成功能:
选择预览打开站点。
在位置文本框中输入邮政编码或城市。
选择提交按钮。