WRF 是用于天气预测的数字计算软件。 它支持并行计算。 当内置 DM (Distributed-Memory 并行度)模式时,它本质上是一个 MPI 程序。 在实践中,人们在群集中运行 WRF。
本文介绍如何使用 HPC Pack 运行 WRF,包括创建 Linux 群集、生成 WRF(WRF 的数据预处理模块)、WRF 及其依赖库,以及执行 WRF 作业。 HPC Pack 的节点管理和作业管理功能可帮助你简化流程并提高效率。
先决条件
准备 Linux 计算节点。 可以使用 ARM 模板部署新的 Linux 群集,或者只需在现有群集的群集管理器中添加 Linux 节点。 请注意,如果工作负荷需要 RDMA 网络,则应确保 VM 部署在同一虚拟机规模集或可用性集中,并且
Compute Node Image应为后缀HPC,Compute Node VM Size应位于 H 系列 中,以便 VM 能够支持 RDMA。选项 1:对 Linux 工作负荷使用 单头节点群集 部署新的 Linux 群集。
选项 2:在现有群集的群集管理器中,添加新的 IaaS 节点模板,并使用模板添加新节点。 请注意,群集可以是 Windows 工作负载或 Linux 工作负载的群集。
部署节点后,必须为其创建特定组。 这在以下部分中的 clusrun 命令中非常有用,以确保这些命令不会在与 WRF 相关的节点上运行。 在这里,我们将为新添加的节点创建
WRFNodes。
准备系统环境。应确保系统具有 gfortran 编译器,以及 gcc 和 cpp。 还需要 csh、perl 和 sh 的脚本语言,因为 WRF 生成系统使用用这些语言编写的脚本作为用户界面的顶级脚本。 WRF 的官方 网站 提供了对编译器相互兼容的测试,脚本语言在系统上正常运行。
在主目录下创建新文件夹
WRFModel/Tests,下载测试文件并使用 clusrun 运行测试。clusrun /nodegroup:WRFNodes "wget https://www2.mmm.ucar.edu/wrf/OnLineTutorial/compile_tutorial/tar_files/Fortran_C_tests.tar; mkdir -p ~/WRFModel/Tests; tar -xf Fortran_C_tests.tar -C ~/WRFModel/Tests;"&&clusrun /nodegroup:WRFNodes "cd ~/WRFModel/Tests;gfortran TEST_1_fortran_only_fixed.f;./a.out;gfortran TEST_2_fortran_only_free.f90;./a.out;gcc TEST_3_c_only.c;./a.out;gcc -c -m64 TEST_4_fortran+c_c.c;gfortran -c -m64 TEST_4_fortran+c_f.f90;gfortran -m64 TEST_4_fortran+c_f.o TEST_4_fortran+c_c.o;./a.out;./TEST_csh.csh;./TEST_perl.pl;./TEST_sh.sh;"
下载并生成 WRF
设置环境变量
在编译 WRF 或任何库之前,必须设置这些生成文件编译器选项。
名字 价值 CC gcc CXX g++ FC gfortran FCFLAGS -m64 F77 gfortran FFLAGS -m64 在主目录下创建新文件夹
WRFModel/Build_WRF/Libraries,并将其用作包含将安装不同库的位置的父目录。 将其值设置为环境变量DIR。使用 clusrun 实现上述所有目标。
clusrun /nodegroup:WRFNodes "mkdir -p ~/WRFModel/Build_WRF/LIBRARIES;sed -i '$a export DIR=~/WRFModel/Build_WRF/LIBRARIES \nexport CC=gcc \nexport CXX=g++ \nexport FC=gfortran \nexport FCFLAGS=-m64 \nexport F77=gfortran \nexport FFLAGS=-m64' ~/.profile;source ~/.profile"
下载并编译 MPICH
原则上,MPI-2 标准的任何实现都应使用 WRF 的分布式内存并行模式。 然而,MPICH 是 WRF 的官方 网站 建议的。 需要下载并生成 MPICH,然后将 MPICH 的
bin文件夹添加到PATH。使用 clusrun 实现上述所有目标。
clusrun /nodegroup:WRFNodes "cd ~/WRFModel/Build_WRF/LIBRARIES;wget https://www2.mmm.ucar.edu/wrf/OnLineTutorial/compile_tutorial/tar_files/mpich-3.0.4.tar.gz; tar xzvf mpich-3.0.4.tar.gz;cd mpich-3.0.4;./configure --prefix=`echo $(dirname $PWD)`/mpich;make;make install;sed -i '$a export PATH=$DIR/mpich/bin:$PATH' ~/.profile;source ~/.profile"
下载和编译库
在编译 WRF 之前,应安装各种依赖库。
NetCDF用作数组计算的基础。zlib、libpng和Jasper是编译具有 GRIB2 功能的 WPS 所必需的压缩库。下载并编译
NetCDF。 然后,将其bin文件夹添加到PATH,并在NETCDF添加环境变量。 使用 clusrun 来实现这些目的。clusrun /nodegroup:WRFNodes "cd ~/WRFModel/Build_WRF/LIBRARIES;wget https://www2.mmm.ucar.edu/wrf/OnLineTutorial/compile_tutorial/tar_files/netcdf-4.1.3.tar.gz; tar zxvf netcdf-4.1.3.tar.gz;cd netcdf-4.1.3;./configure --prefix=`echo $(dirname $PWD)`/netcdf --disable-dap --disable-netcdf-4 --disable-shared;make;make install;sed -i '$a export PATH=$DIR/netcdf/bin:$PATH \nexport NETCDF=$DIR/netcdf' ~/.profile;source ~/.profile"下载并编译
zlib。 然后LDFLAGS和CPPFLAGS设置生成文件编译器选项。 使用 clusrun 来实现这些目的。clusrun /nodegroup:WRFNodes "cd ~/WRFModel/Build_WRF/LIBRARIES;wget https://www2.mmm.ucar.edu/wrf/OnLineTutorial/compile_tutorial/tar_files/zlib-1.2.11.tar.gz; tar xzvf zlib-1.2.11.tar.gz;cd zlib-1.2.11;./configure --prefix=`echo $(dirname $PWD)`/grib2;make;make install;sed -i '$a export LDFLAGS=-L$DIR/grib2/lib \nexport CPPFLAGS=-I$DIR/grib2/include \nexport LD_LIBRARY_PATH=$DIR/grib2/lib:$LD_LIBRARY_PATH ' ~/.profile;source ~/.profile"使用 clusrun 下载和编译
libpng。clusrun /nodegroup:WRFNodes "cd ~/WRFModel/Build_WRF/LIBRARIES;wget https://www2.mmm.ucar.edu/wrf/OnLineTutorial/compile_tutorial/tar_files/libpng-1.2.50.tar.gz; tar xzvf libpng-1.2.50.tar.gz;cd libpng-1.2.50;./configure --prefix=`echo $(dirname $PWD)`/grib2;make;make install;"下载并编译
Jasper。 然后,JASPERLIB添加环境变量,并相应地JASPERINC=。 使用 clusrun 来实现这些目的。clusrun /nodegroup:WRFNodes "cd ~/WRFModel/Build_WRF/LIBRARIES;wget https://www2.mmm.ucar.edu/wrf/OnLineTutorial/compile_tutorial/tar_files/jasper-1.900.1.tar.gz; tar xzvf jasper-1.900.1.tar.gz;cd jasper-1.900.1;./configure --prefix=`echo $(dirname $PWD)`/grib2;make;make install;sed -i '$a export JASPERLIB=$DIR/grib2/lib \nexport JASPERINC=$DIR/grib2/include' ~/.profile;source ~/.profile"构造库后,需要验证库是否能够与要用于 WPS 和 WRF 生成的编译器一起使用。 使用 WRF 的 网站提供的测试。
clusrun /nodegroup:WRFNodes "wget https://www2.mmm.ucar.edu/wrf/OnLineTutorial/compile_tutorial/tar_files/Fortran_C_NETCDF_MPI_tests.tar; tar -xf Fortran_C_NETCDF_MPI_tests.tar -C ~/WRFModel/Tests;"&&clusrun /nodegroup:WRFNodes "source ~/.profile;cd ~/WRFModel/Tests;cp ~/WRFModel/Build_WRF/LIBRARIES/netcdf/include/netcdf.inc .;gfortran -c 01_fortran+c+netcdf_f.f;gcc -c 01_fortran+c+netcdf_c.c;gfortran 01_fortran+c+netcdf_f.o 01_fortran+c+netcdf_c.o -L ~/WRFModel/Build_WRF/LIBRARIES/netcdf/lib -lnetcdff -lnetcdf;./a.out;mpif90 -c 02_fortran+c+netcdf+mpi_f.f;mpicc -c 02_fortran+c+netcdf+mpi_c.c;mpif90 02_fortran+c+netcdf+mpi_f.o 02_fortran+c+netcdf+mpi_c.o -L ~/WRFModel/Build_WRF/LIBRARIES/netcdf/lib -lnetcdff -lnetcdf;mpirun ./a.out"
下载和编译 WRF 和 WPS
在
Build_WRF下,从 Github 克隆 WRF 和 WPS 的源代码。clusrun /nodegroup:WRFNodes "cd ~/WRFModel/Build_WRF;git clone https://github.com/wrf-model/WRF;git clone https://github.com/wrf-model/WPS"编译 WRF。 在编译之前,需要配置使用的编译器以及要生成 WRF 的方式。 由于我们将在 DM 模式下生成 WRF,因此请选择 选项 34(gfortran compiler with gcc(dmpar))和嵌套选项应为“basic”。
WRF 采用配置中的交互模式,因此通过 SSH(群集管理器 -> 资源管理 -> 节点操作 -> 远程桌面/SSH) 登录到节点,并手动运行配置程序和编译。
source ~/.profile;
cd ~/WRFModel/Build_WRF/WRF;
./configure #Here, you choose the compile option you want
./compile em_real >& log.compile #The compilation should take about 20-30 minutes
通过运行
ls -ls main/*.exe检查编译是否成功,应会看到:wrf.exe real.exe ndown.exe tc.exe编译 WPS。 同样,需要配置编译器。 请选择 选项 1(串行,由 WRF 官方网站推荐)。 WPS 占用的 CPU 较少,可以作为单个处理器作业运行。
通过 SSH 登录到节点,运行配置程序并编译。
source ~/.profile;
cd ~/WRFModel/Build_WRF/WPS;
./configure #Here, you choose the compile option you want
./compile >& log.compile #The compilation should take a few minutes
如果编译成功,WPS 顶级目录中应有 3 个可执行文件。
geogrid.exe -> geogrid/src/geogrid.exe
ngrib.exe -> ungrib/src/ungrib.exe
metgrid.exe -> metgrid/src/metgrid.exe
运行 WRF 工作负荷
为 WRF 作业准备示例数据
在本文中,我们使用飓风马修的单一域案例。 有关背景的详细信息,请参阅此 链接。
下载 静态地理数据 和 实时数据。 尽管可以通过
clusrun下载每个节点上的示例数据,但为了节省网络带宽,建议仅在一个节点上执行下载,配置 NFS 群集并通过 NFS 服务共享数据。在服务器端:
下载数据:
mkdir -p ~/WRFModel/Build_WRF/DATA;
cd ~/WRFModel/Build_WRF/DATA;
wget https://www2.mmm.ucar.edu/wrf/src/wps_files/geog_high_res_mandatory.tar.gz; #Static geography data
tar -xzvf geog_high_res_mandatory.tar.gz
wget https://www2.mmm.ucar.edu/wrf/TUTORIAL_DATA/matthew_1deg.tar.gz #Real time data
tar -xf matthew_1deg.tar.gz
运行
sudo apt install nfs-kernel-server以安装 nfs 服务器。 然后,通过sudo systemctl status nfs-server检查服务的状态。 如果服务处于活动状态,请修改/etc/exports以配置允许哪些客户端访问共享文件夹DATA。/home/hpcadmin/WRFModel/Build_WRF/DATA [client hostname1](rw,sync,no_subtree_check) ... /home/hpcadmin/WRFModel/Build_WRF/DATA [client hostnamen](rw,sync,no_subtree_check)运行
sudo exportfs -arv使更改生效,并showmount -e检查导出列表。在客户端:
安装 nfs 客户端,装载共享文件夹,并添加一行以在 Linux 系统启动时自动装载共享文件夹
/etc/fstab。 为节点创建节点组WRF-NFSClients,并使用 clusrun 来实现所有目标。clusrun /nodegroup:WRF-NFSClients "sudo apt install nfs-common -y;mkdir -p ~/WRFModel/Build_WRF/DATA;cd ~/WRFModel/Build_WRF;sudo mount [server hostname]:/home/hpcadmin/WRFModel/Build_WRF/DATA DATA;sudo sed -i '$a [server hostname]:/home/hpcadmin/WRFModel/Build_WRF/DATA /home/hpcadmin/WRFModel/Build_WRF/DATA nfs defaults,_netdev 0 0' /etc/fstab"
注意
- 请避免在 WRF 工作负荷中使用 SMB 共享目录,因为静态地理数据包含名为“CON”的子文件夹,这是 Windows 保留文件名之一。
- 在此演示中,我们将数据下载到一个节点
DATA目录,该目录与WPS和WRF目录相同。 对于工作,请根据需要选择适当的 NFS 服务器节点和目录,并确保目录下有足够的剩余空间。 静态地理数据的大小为 29G。 HBv2 系列的 OS 磁盘为 64G,临时 数据磁盘的大小为 480 + 960G。 如果需要将数据下载到 OS 磁盘,可以 扩展附加到 Windows 虚拟机的虚拟硬盘。
使用 clusrun 为数据目录设置环境变量
WRFDATADIR。clusrun /nodegroup:WRFNodes "sed -i '$a export WRFDATADIR=~/WRFModel/Build_WRF/DATA' ~/.profile;source ~/.profile"
编辑设置文件
WPS 和 WRF 利用各种变量来定义数据格式、计算的时间和空间范围等。有关所有变量的详细说明,请参阅以下链接:WPS,WRF。
下表列出了如何修改 WPS 的设置文件 namelist.wps 使其适合我们的案例研究。 请注意,对于具有多个值的变量,只能修改第一个值,因为在单个域中,我们只关心第一个域。
| 变量名称 | 默认值 | 新值 |
|---|---|---|
| max_dom | 2 | 1 |
| start_date | '2019-09-04_12:00:00','2019-09-04_12:00:00' | '2016-10-06_00:00:00' |
| end_date | '2019-09-06_12:00:00','2019-09-04_12:00:00' | '2016-10-08_00:00:00' |
| interval_seconds | 10800 | 21600 |
| e_we | 150,220 | 91 |
| e_sn | 130,214 | 100 |
| dx | 15000 | 27000 |
| dy | 15000 | 27000 |
| map_proj | “lambert” | “mercator” |
| ref_lat | 33.00 | 28.00 |
| ref_lon | -79.00 | -75.00 |
| stand_lon | -79.00 | -75.00 |
| geog_data_path | '/glade/work/wrfhelp/WPS_GEOG/' | “$WRFDATADIR/WPS_GEOG” |
使用 clusrun 执行修改。 还可以上传自己的设置文件,将其下载到节点并替换默认设置文件。
clusrun /nodegroup:WRFNodes "source ~/.profile;sed -i -e 's/max_dom = 2/max_dom = 1/g' -e 's/2019-09-04_12:00:00/2016-10-06_00:00:00/g' -e 's/2019-09-06_00:00:00/2016-10-08_00:00:00/g' -e 's/interval_seconds = 10800/interval_seconds = 21600/g' -e 's/e_we = 150, 220/e_we = 91/g' -e 's/e_sn = 130, 214/e_sn = 100/g' -e 's/dx = 15000/dx = 27000/g' -e 's/dy = 15000/dy = 27000/g' -e """s/map_proj = 'lambert'/map_proj = 'mercator'/g""" -e 's/ref_lat = 33.00/ref_lat = 28.00/g' -e 's/ref_lon = -79.00/ref_lon = -75.00/g' -e 's/stand_lon = -79.0/stand_lon = -75.0/g' -e """s#/glade/work/wrfhelp/WPS_GEOG/#$WRFDATADIR/WPS_GEOG#g""" ~/WRFModel/Build_WRF/WPS/namelist.wps;"
下表列出了如何修改 WRF 的设置文件 namelist.input 使其适合我们的案例研究。 请注意,对于具有多个值的变量,只能修改第一个值,因为在单个域中,我们只关心第一个域。
| 变量名称 | 默认值 | 新值 |
|---|---|---|
| run_hours | 36 | 48 |
| start_year | 2019,2019 | 2016 |
| start_month | 09,09 | 10 |
| start_day | 04,04 | 06 |
| start_hour | 12,12 | 00 |
| end_year | 2019,2019 | 2016 |
| end_month | 09,09 | 10 |
| end_day | 06,06 | 08 |
| interval_seconds | 10800 | 21600 |
| history_interval | 60,60 | 180 |
| restart_interval | 7200 | 1440 |
| time_step | 90 | 150 |
| max_dom | 2 | 1 |
| e_we | 150,220 | 91 |
| e_sn | 130,214 | 100 |
| num_metgrid_levels | 34 | 32 |
| dx | 15000 | 27000 |
| dy | 15000 | 27000 |
使用 clusrun 执行修改。 还可以上传自己的设置文件,将其下载到节点并替换默认设置文件。
clusrun /nodegroup:WRFNodes "sed -i -e 's/max_dom = 2/max_dom = 1/g' -e 's/run_hours = 36/run_hours = 48/g' -e 's/start_year = 2019, 2019/start_year = 2016/g' -e 's/start_month = 09, 09/start_month = 10/g' -e 's/start_day = 04, 04/start_day = 06/g' -e 's/start_hour = 12, 12/start_hour = 00/g' -e 's/end_year = 2019, 2019/end_year = 2016/g' -e 's/end_month = 09, 09/end_month = 10/g' -e 's/end_day = 06, 06/end_day = 08/g' -e 's/interval_seconds = 10800/interval_seconds = 21600/g' -e 's/history_interval = 60, 60/history_interval = 180/g' -e 's/restart_interval = 7200/restart_interval = 1440/g' -e 's/time_step = 90/time_step = 150/g' -e 's/max_dom = 2/max_dom = 1/g' -e 's/e_we = 150, 220/e_we = 91/g' -e 's/e_sn = 130, 214/e_sn = 100/g' -e 's/num_metgrid_levels = 34/num_metgrid_levels = 32/g' -e 's/dx = 15000/dx = 27000/g' -e 's/dy = 15000/dy = 27000/g' ~/WRFModel/Build_WRF/WRF/test/em_real/namelist.input"
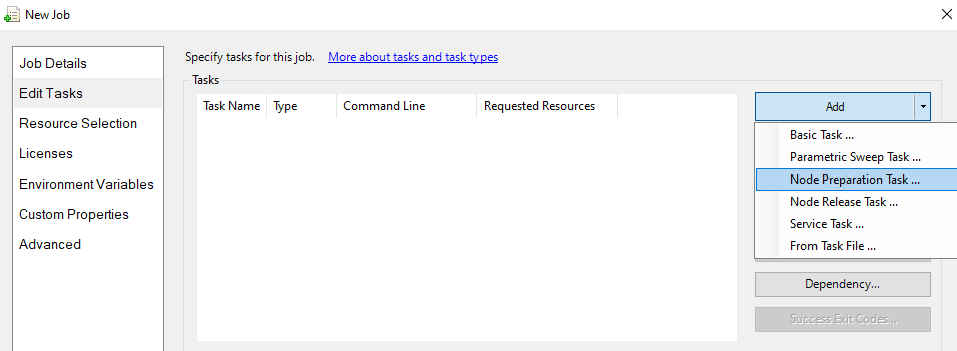
创建作业以执行模拟
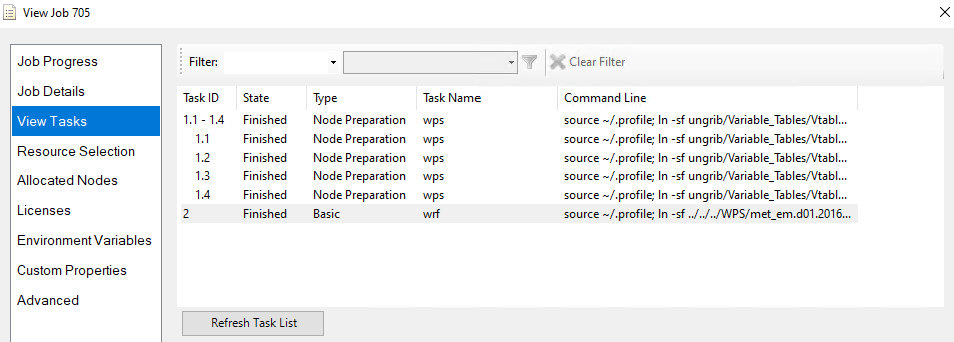
创建作业并添加 2 个具有依赖性的任务。
| 任务 ID | 任务名称 | 类型 | 节点 | 核心 | Workdir | 命令 |
|---|---|---|---|---|---|---|
| 1 | wps | NodePrep | 无 | 无 | source ~/.profile; ln -sf ungrib/Variable_Tables/Vtable.GFS Vtable; ./link_grib.csh $WRFDATADIR/matthew/fnl; ./ungrib.exe; ./geogrid.exe; ./metgrid.exe |
~/WRFModel/Build_WRF/WPS /name:wps |
| 2 | wrf | 基本 | 4 | 64 | source ~/.profile; ln -sf ../../../WPS/met_em.d01.2016-10* .; mpirun -iface ib0 -np %CORE_NUMBER% -f $CCP_MPI_HOSTFILE ./real.exe; mpirun -iface ib0 -np %CORE_NUMBER% -f $CCP_MPI_HOSTFILE ./wrf.exe; mkdir -p $WRFDATADIR/results/matthew; cp wrfout_d01_2016-10-0* $WRFDATADIR/results/matthew; cp wrfrst_d01_2016-10-0* $WRFDATADIR/results/matthew; |
~/WRFModel/Build_WRF/WRF/test/em_real |
在 task1 中,我们通过运行 WPS 的三个子模块来处理数据预处理任务:ungrib、geogrid 和 metgrid。 由于预处理结果是 WRF 模拟的输入,因此它应存在于参与 WRF 作业的每个节点上。 因此,我们将任务添加为节点准备任务,使其在每个节点上执行。
在 task2 中,运行 MPI 程序 real.exe 和 wrf.exe 来执行并行计算,并将输出文件复制到
results/matthew共享文件夹下的DATA文件夹中。 在mpirun命令中-iface指定要用于进程之间通信的网络接口。-np指定 mamy 如何处理 MPI 程序。 在此演示中,我们使用 64 个进程,即所需节点的每个核心。-f指定包含节点列表的文件名。 有关的信息,请参阅此 。
使用命令实现上述所有操作:
set NODE_NUMBER=4
set CORE_NUMBER=64
job new /numnodes:%NODE_NUMBER%
job add !! /workdir:~/WRFModel/Build_WRF/WPS /name:wps /type:NodePrep "source ~/.profile; ln -sf ungrib/Variable_Tables/Vtable.GFS Vtable; ./link_grib.csh ../DATA/matthew/fnl; ./ungrib.exe; ./geogrid.exe; ./metgrid.exe"
job add !! /workdir:~/WRFModel/Build_WRF/WRF/test/em_real /name:wrf /numnodes:%NODE_NUMBER% /requirednodes:[nodelist] "source ~/.profile; ln -sf ../../../WPS/met_em.d01.2016-10* .; mpirun -iface ib0 -np %CORE_NUMBER% -f $CCP_MPI_HOSTFILE ./real.exe; mpirun -iface ib0 -np %CORE_NUMBER% -f $CCP_MPI_HOSTFILE ./wrf.exe; mkdir -p $WRFDATADIR/results/matthew; cp wrfout_d01_2016-10-0* $WRFDATADIR/results/matthew"
job submit /id:!! /jobname:WRF