Python 是一种脚本语言,常用于系统自动化和机器学习 (ML)。 可以在 python.org 上了解有关 Python 的详细信息。
在 x64 或 x86 上使用 Python
若要在 Windows IoT Core 上安装 Python,请执行以下操作:
下载 Python NuGet 包,然后使用 PowerShell 安装这些文件。
$python_zip = "https://globalcdn.nuget.org/packages/python.3.7.4.nupkg"
if($env:PROCESSOR_ARCHITECTURE -ieq "x86") {
    $python_zip = "https://www.nuget.org/api/v2/package/pythonx86/3.7.4"
}
Invoke-WebRequest $python_zip -OutFile c:\data\python.zip
Expand-Archive C:\data\python.zip -DestinationPath c:\python_temp
move C:\python_temp\tools c:\python
rd C:\python_temp -Recurse -Force
del C:\data\python.zip
将 Python 添加到系统路径。
cmd /c 'setx PATH "%PATH%";c:\python;c:\python\scripts /M'
$env:Path += ";c:\python;c:\python\scripts"
确保已安装 pip 的最新版本
python -m pip install --upgrade pip
在 Windows IoT Core ARM32 上使用 Python
若要获取适用于 Windows 的 Python,需要自行生成二进制文件。
生成适用于 ARM32 的 Python。 分支必须是 3.8 版或更高版本。
git clone https://github.com/python/cpython
cd cpython
git checkout 3.8
pcbuild\build.bat -p ARM --no-tkinter
生成适用于 Windows IoT 核心版 ARM32 的 Python .zip 文件。 必须使用相同版本的 Python 来运行 PC/layout。 此步骤生成适用于 x86 的 Python,并使用它来生成 .zip 文件。 如果希望标准库测试包含在 .zip 文件中,请添加
--include-tests参数。REM Build Python for x86 to use for building the .zip file. pcbuild\build.bat pcbuild\win32\python.exe PC/layout -vv -s "." -b ".\PCBuild\arm32" -t ".\PCBuild\temp" --preset-iot --include-venv --zip ".\PCBuild\arm32\zip\python.zip" net use P: \\[ip address]\c$ /user:administrator copy .\PCBuild\arm32\zip\python.zip P:\data使用 PowerShell 提取设备上的 .zip 文件,并将 Python 添加到系统路径。
Expand-Archive C:\data\python.zip -DestinationPath c:\python
cmd /c 'setx PATH "%PATH%";c:\python;c:\python\scripts /M'
$env:Path += ";c:\python;c:\python\scripts"
验证
print('Hello World')是否正常工作。python -c "print('Hello World!');quit()"
在 Windows IoT Core ARM64 上使用 Python
若要获取适用于 Windows 的 Python,需要自行生成二进制文件。
克隆适用于 ARM32 的 Python,并运行
get_externals。 分支必须是 3.8 版或更高版本。git clone https://github.com/python/cpython cd cpython git checkout 3.8 pcbuild\get_externals.bat cd ..克隆并生成 libffi。
git clone https://github.com/libffi/libffi
set LIBFFI_SOURCE=%CD%\libffi

REM Visual Studio 2015 or greater with ARM64 tools installed is required to build Python
REM the location of VCVARSALL may differ on your machine
set VCVARSALL="C:\Program Files (x86)\Microsoft Visual Studio\2019\Enterprise\VC\Auxiliary\Build\vcvarsall.bat"

cd cpython
if exist c:\cygwin\bin\sh.exe (
    call pcbuild\prepare_libffi.bat -arm64
) else (
    call pcbuild\prepare_libffi.bat -arm64 --install-cygwin
)
if not exist externals\libffi\arm64\libffi-7.dll echo ERROR: libffi not built! & exit /b 1
生成适用于 ARM64 的 Python。
pcbuild\build.bat -p ARM64 --no-tkinter生成适用于 Windows IoT 核心版 ARM64 的 Python .zip 文件。 必须使用相同版本的 Python 来运行 PC/layout。 此步骤生成适用于 x86 的 Python,并使用它来生成 .zip 文件。 如果希望标准库测试包含在 .zip 文件中,请添加
--include-tests参数。REM Build Python for x86 to use for building the .zip file. pcbuild\build.bat REM Map drive to device and copy files using PC/layout net use P: \\[ip address]\c$ /user:administrator pcbuild\win32\python.exe PC/layout -vv -s "." -b ".\PCBuild\arm64" -t ".\PCBuild\temp" --preset-iot --include-venv --copy P:\python将 Python 添加到系统路径。
setx PATH "%PATH%";c:\python;c:\python\scripts /M
set PATH=%PATH%;c:\python;c:\python\scripts
验证
print('Hello World')是否正常工作。python -c "print('Hello World!');quit()"
试用 Azure IoT 中心 Python SDK v2 - 预览版
首先安装 SDK。
python -m pip install azure-iot-device在
pip install的输出中可能有错误:Download error on https://pypi.org/simple/pbr/。 如果出现此错误,请继续执行下面的步骤,否则请跳到Set up an IoT Hub and create a Device Identity:在你喜爱的浏览器中导航到
https://pypi.org/simple/pbr/。 检查网站的证书并注意到它是由DigiCert颁发的。创建名为
c:\test的目录。在桌面 Windows 计算机上从命令提示符运行
certmgr.msc。在树视图中导航到
Trusted Root Certification Authorities。 展开该节点,然后选择Certificates。在右窗格中找到
DigiCert High Assurance EV Root,右键单击并选择“All Tasks”>“Export”。 请注意,有多个DigiCert证书,请通过尝试每个证书(一次一个)来识别此证书。在弹出的对话框中,单击
Next。选择
DER encoded binary X.509 (.CER)(这应该是默认值),然后单击Next。在
File name:编辑框中键入c:\test\DigiCert High Assurance EV Root.cer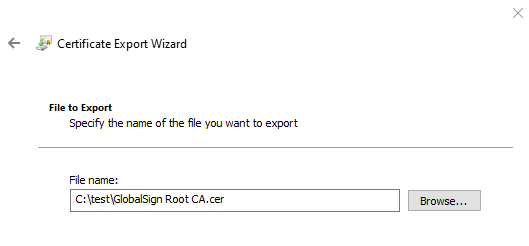
单击
Next。单击
Finish。在台式计算机上运行以下命令以将
c:\test\DigiCert High Assurance EV Root.cer复制到设备:net use X: \\host\c$ /user:host\administrator md X:\test copy "c:\test\GlobalSign Root CA.cer" X:\test在设备上,使用 PowerShell 将证书导入根存储。
certmgr -add "c:\test\DigiCert High Assurance EV Root.cer" -s root -r localMachine -c
certmgr -add "c:\test\GlobalSign Root CA.cer" -s root -r localMachine -c
再次尝试安装
azure-iot-devicepython -m pip install azure-iot-device --no-color在
pip install的输出中可能有错误:Download error for https://files.pythonhosted.org/。 如果未出现此错误,请跳到Set up an IoT Hub and create a Device Identity在你喜爱的浏览器中导航到
https://files.pythonhosted.org/。 检查网站的证书并注意到它是由GlobalSign颁发的。重复上述步骤,以便从桌面计算机中导出
GlobalSign Root CA证书,并将其导入到设备。再次尝试安装
azure-iot-device。
设置 IoT 中心并创建设备标识
安装 Azure CLI(或使用 Azure Cloud Shell)并使用它来创建 Azure IoT 中心。
az iot hub create --resource-group <your resource group> --name <your IoT Hub name>- 请注意,此操作可能需要几分钟时间。
将 IoT 扩展添加到 Azure CLI,然后注册设备标识
az extension add --name azure-cli-iot-ext
az iot hub device-identity create --hub-name <your IoT Hub name> --device-id <your device id>
使用 Azure CLI 检索设备连接字符串
az iot hub device-identity show-connection-string --device-id <your device id> --hub-name <your IoT Hub name>它应采用以下格式:
HostName=<your IoT Hub name>.azure-devices.net;DeviceId=<your device id>;SharedAccessKey=<some value>
发送简单的遥测消息
使用 Azure CLI 开始监视 IoT 中心上的遥测数据
az iot hub monitor-events --hub-name <your IoT Hub name> --output table在设备上,将设备连接字符串设置为名为
IOTHUB_DEVICE_CONNECTION_STRING的环境变量。REM NOTE: there are no quotes set IOTHUB_DEVICE_CONNECTION_STRING=<your connection string here>复制 simple_send_d2c_message py 并在设备上运行它。
cmd /c "if not exist c:\test md c:\test"
REM copy simple_send_d2c_message.py from https://github.com/Azure/azure-iot-sdk-python-preview/blob/master/azure-iot-device/samples/simple_send_d2c_message.py to c:\test on the device
python c:\test\simple_send_d2c_message.py
在 Windows IoT Core 上的 x64 docker 容器中使用 Python
下载最新的 docker,并安装文件。
Invoke-WebRequest https://master.dockerproject.org/windows/x86_64/docker.zip -OutFile c:\data\docker.zip
Expand-Archive c:\data\docker.zip -DestinationPath c:\data
move c:\data\docker\docker*exe c:\windows\system32
Remove-Item c:\data\docker -Recurse -Force
dockerd --register-service
net start docker
创建 Dockerfile
# escape = `
FROM mcr.microsoft.com/windows/nanoserver:1809-amd64

# Get Python
ADD "https://globalcdn.nuget.org/packages/python.3.7.4.nupkg" .\temp\py.zip

COPY test test
COPY certmgr.exe c:\windows\system32

# need admin for setx and certmgr
USER ContainerAdministrator

# Extract Python
RUN tar -xf c:\temp\py.zip -C c:\temp && `
    move c:\temp\tools c:\ && `
    ren tools python && `
    RD c:\temp /s/q && `
    setx PATH "%PATH%";c:\python;c:\python\scripts /M

RUN dir c:\test\*.cer /s/b > c:\test\certs.txt && `
    for /f "delims==" %i in (c:\test\certs.txt) do certmgr -add "%i" -s root -r localMachine -c < c:\test\1.txt

USER ContainerUser

RUN python -m pip install --upgrade pip && `
    python -m pip install azure-iot-device

CMD cmd /k c:\test\start.cmd
将 Dockerfile 复制到设备上的 c:\docker。 此外,将所有证书复制到 P:\docker\test。 1.txt 是一个文件,其中包含数字 1 和一个回车符。
net use P: \\[device IP address]\c$ /user:administrator
md P:\docker\test
copy Dockerfile P:\docker
copy AppCertificates\*.cer P:\docker\test
copy 1.txt P:\docker\test
使用 SSH 连接到设备。 远程 PowerShell 对于交互式 docker 会话不起作用。
docker build --isolation==process . -t python
docker run --isolation==process python
输出 hello world
python -c "print('Hello Python in Containers!')"请参阅上面的 Azure IoT SDK 指导内容以便测试云到设备的消息。