本部分介绍如何在 Xamarin.Android 中实现本地通知。 本部分介绍了 Android 通知的各种 UI 元素,并讨论了与创建和显示通知相关的 API。
本地通知概述
Android 提供两个系统控制的区域,用于向用户显示通知图标和通知信息。 首次发布通知时,通知图标会显示在通知区域中,如以下屏幕截图所示:

若要获取有关通知的详细信息,用户可以打开通知抽屉(此操作将展开每个通知图标以显示通知内容),并执行与通知关联的任何操作。 以下屏幕截图显示了与上面显示的通知区域相对应的通知抽屉:

Android 通知使用两种类型的布局:
基本布局:一种紧凑、固定的展示格式。
展开布局:可以扩大并显示更多信息的展示格式。
以下各节介绍了这些布局类型(以及如何创建它们)。
注意
本指南重点介绍 Android 支持库中的 NotificationCompat API。 这些 API 将确保与 Android 4.0(API 级别 14)的最大后向兼容性。
基本布局
所有 Android 通知都基于基本布局格式生成,至少包括以下元素:
通知图标,表示发出通知的应用(即发起应用)或通知类型(如果应用支持不同类型的通知)。
通知标题或发送方的名称(如果通知是个人消息)。
通知消息。
时间戳。
下图显示了这些元素:

基本布局的高度限制为 64 个与密度无关的像素 (dp)。 默认情况下,Android 会创建此基本通知样式。
(可选)通知也可以显示表示应用程序或发件人照片的大图标。 在 Android 5.0 及更高版本中的通知中使用大图标时,小通知图标会显示为大图标上的红点提醒:

从 Android 5.0 开始,通知也可以显示在锁屏界面上:

用户可以双击锁屏上的通知,解锁设备并跳转到发出该通知的应用,也可轻扫以消除通知。 应用可以设置通知的可见性级别,以控制锁屏界面上显示的内容,用户可以选择是否允许在锁屏通知中显示敏感内容。
Android 5.0 引入了一种高优先级通知显示格式:“浮动”。 浮动通知会从屏幕顶部向下滑动并停留几秒钟,然后返回到通知区域:

浮动通知使系统 UI 能够将重要信息放在用户面前,而不会中断当前正在运行的活动的状态。
Android 支持通知元数据,因此可以智能地对通知进行排序和显示。 通知元数据还控制通知在锁屏界面和“浮动”格式上的显示方式。 应用程序可以设置以下类型的通知元数据:
优先级:优先级确定通知的显示方式和时间。 例如,在 Android 5.0 中,高优先级通知显示为浮动通知。
可见性:指定在锁定的屏幕上显示通知时要显示多少通知内容。
类别:告知系统如何在各种情况下处理通知,例如当设备处于“勿扰”模式时。
注意
可见性和类别是在 Android 5.0 中引入的,在早期版本的 Android 中不可用。 从 Android 8.0 开始,通知通道用于控制向用户显示通知的方式。
展开布局
从 Android 4.1 开始,可以使用展开布局样式来配置通知,这样用户就能够扩展通知的高度以查看更多内容。 例如,以下示例展示了收缩模式下的展开布局通知:

当此通知展开时,它会显示完整的消息:
Android 支持用于单事件通知的三种展开布局样式:
大文本:在收缩模式下,显示消息第一行的摘要,后跟两个句点。 在展开模式下,显示整个消息(如上面的示例所示)。
收件箱:在收缩模式下,显示新邮件数量。 在展开模式下,显示收件箱中的第一封电子邮件或邮件列表。
图像:在收缩模式下,仅显示消息文本。 在展开模式下,显示文本和图像。
“基本通知之外”部分(后文)会介绍如何创建大文本、收件箱和图像通知。
通知通道
从 Android 8.0(Oreo 开始),可以使用通知通道功能为要显示的每种通知类型创建用户可自定义的通道。 你可以使用通知通道对通知进行分组,让发布到某个通道的所有通知都表现出相同的行为。 例如,某个通道适用于需要立即注意的通知,或某个“更安静”的通道用于单独推送信息性消息。
随 Android Oreo 一起安装的 YouTube 应用列出了两个通知类别:下载通知和常规通知:

每个类别都对应一个通知通道。 YouTube 应用实施下载通知通道和常规通知通道。 用户可以点击“下载通知”,其中显示了应用的下载通知通道的设置屏幕:

在此屏幕中,用户可以执行以下操作来修改下载通知通道的行为:
将重要性级别设置为“紧急”、“高”、“中”或“低”,用于配置声音和视觉中断级别。
打开或关闭通知圆点。
打开或关闭呼吸灯。
在锁屏界面上显示或隐藏通知。
替代“勿扰”设置。
常规通知通道具有类似的设置:

请注意,你对通知通道与用户交互的方式没有绝对控制权。用户可以修改设备上的任何通知通道的设置,如上面的屏幕截图所示。 但是,你可以配置默认值(后文将说明)。 如这些示例所示,利用新的通知通道功能,你可以为用户提供对各种通知的细化控制。
通知创建
若要在 Android 中创建通知,请使用 Xamarin.Android.Support.v4 NuGet 包中的 NotificationCompat.Builder 类。 此类可用于在旧版 Android 上创建和发布通知。
还讨论了 NotificationCompat.Builder。
NotificationCompat.Builder 提供用于设置通知中各种选项的方法,例如:
内容包括标题、消息文本和通知图标。
通知的样式,如大文本、收件箱或图像样式。
通知的优先级:最低、低、默认、高或最高。 在 Android 8.0 及更高版本上,优先级通过通知通道设置。
锁屏界面上通知的可见性:公开、私密或机密。
帮助 Android 分类和筛选通知的类别元数据。
一个可选意向,表示点击通知时要启动的活动。
发布通知的通知通道(Android 8.0 及更高版本)的 ID。
在生成器中设置这些选项后,将生成包含设置的通知对象。 若要发布通知,请将此通知对象传递给通知管理器。 Android 提供 NotificationManager 类,该类负责发布通知并向用户显示通知。 可以从任何上下文(例如活动或服务)获取对此类的引用。
创建通知通道
在 Android 8.0 上运行的应用必须为其通知创建通知通道。 通知通道需要以下三条信息:
- 将标识通道的包的唯一 ID 字符串。
- 将向用户显示的通道的名称。 名称必须介于 1 到 40 个字符之间。
- 通道的重要性。
应用需要检查正在运行的 Android 版本。 运行低于 Android 8.0 版本的设备不应创建通知通道。 以下是一个在活动中创建通知通道的方法示例:
void CreateNotificationChannel()
{
    if (Build.VERSION.SdkInt < BuildVersionCodes.O)
    {
        // Notification channels are new in API 26 (and not a part of the
        // support library). There is no need to create a notification
        // channel on older versions of Android.
        return;
    }

    var channelName = Resources.GetString(Resource.String.channel_name);
    var channelDescription = GetString(Resource.String.channel_description);
    var channel = new NotificationChannel(CHANNEL_ID, channelName, NotificationImportance.Default)
                  {
                      Description = channelDescription
                  };

    var notificationManager = (NotificationManager) GetSystemService(NotificationService);
    notificationManager.CreateNotificationChannel(channel);
}
每次创建活动时,都应创建通知通道。 对于 CreateNotificationChannel 方法,应在活动的 OnCreate 方法中调用通知通道。
创建和发布通知
若要在 Android 中生成通知,请执行以下步骤:
实例化
NotificationCompat.Builder对象。对
NotificationCompat.Builder对象调用各种方法来设置通知选项。调用
NotificationCompat.Builder对象的 Build 方法,实例化通知对象。调用通知管理器的 Notify 方法,发布通知。
必须至少为每个通知提供以下信息:
小图标(大小为 24x24 dp)
简短标题
通知的文本
下面的代码示例展示了如何用 NotificationCompat.Builder 生成基本通知。 请注意,NotificationCompat.Builder 方法支持方法链接。也就是说,每个方法返回生成器对象,以便您可以使用上一个方法调用的结果来调用下一个方法调用:
// Instantiate the builder and set notification elements:
NotificationCompat.Builder builder = new NotificationCompat.Builder(this, CHANNEL_ID)
    .SetContentTitle ("Sample Notification")
    .SetContentText ("Hello World! This is my first notification!")
    .SetSmallIcon (Resource.Drawable.ic_notification);

// Build the notification:
Notification notification = builder.Build();

// Get the notification manager:
NotificationManager notificationManager =
    GetSystemService (Context.NotificationService) as NotificationManager;

// Publish the notification:
const int notificationId = 0;
notificationManager.Notify (notificationId, notification);
在此示例中,将实例化一个名为 builder 的新 NotificationCompat.Builder 对象,以及要使用的通知通道的 ID。 设置通知的标题和文本,并从 Resources/drawable/ic_notification.png 加载通知图标。 调用通知生成器的 Build 方法后,系统会使用这些设置创建通知对象。 下一步是调用通知管理器的 Notify 方法。 若要定位通知管理器,请调用 GetSystemService,如上所示。
Notify 方法接受两个参数:通知标识符和通知对象。 通知标识符是标识应用程序通知的唯一整数。 在此示例中,通知标识符设置为零 (0),但是在生产应用程序中,需要为每个通知提供唯一标识符。 在 Notify 调用中重用上一个标识符值会导致最后一个通知被覆盖。
此代码在 Android 5.0 设备上运行时,会生成类似于以下示例的通知:

通知图标显示在通知的左侧。这个被圆圈包围的“i”的图像具有 alpha 通道,可让 Android 在其背后绘制灰色圆形背景。 你还可以提供没有 alpha 通道的图标。 若要将照片图像显示为图标,请参阅本主题后文中的“大图标格式”。
时间戳会自动完成设置,但你可以通过调用通知生成器的 SetWhen 方法替代此设置。 例如,下面的代码示例将时间戳设置为当前时间:
builder.SetWhen (Java.Lang.JavaSystem.CurrentTimeMillis());
启用声音和振动
如果希望在发布通知时播放声音,可以调用通知生成器的 SetDefaults 方法并传入 NotificationDefaults.Sound 标记:
// Instantiate the notification builder and enable sound:
NotificationCompat.Builder builder = new NotificationCompat.Builder(this, CHANNEL_ID)
    .SetContentTitle ("Sample Notification")
    .SetContentText ("Hello World! This is my first notification!")
    .SetDefaults (NotificationDefaults.Sound)
    .SetSmallIcon (Resource.Drawable.ic_notification);
对 SetDefaults 的此调用将导致设备在发布通知时播放声音。 如果希望设备振动而非播放声音,则可以将 NotificationDefaults.Vibrate 传递给 SetDefaults.;如果希望设备播放声音并振动,可以将这两个标记传递给 SetDefaults:
builder.SetDefaults (NotificationDefaults.Sound | NotificationDefaults.Vibrate);
如果在未指定要播放的声音的情况下启用声音,Android 将使用默认的系统通知声音。 但是,可以通过调用通知生成器的 SetSound 方法更改要播放的声音。 例如,若要在发布通知时播放警报声音(而不是默认通知声音),可以从 RingtoneManager 获取警报声音的 URI 并将其传递给 SetSound:
builder.SetSound (RingtoneManager.GetDefaultUri(RingtoneType.Alarm));
或者,可以将系统默认的铃声用于通知:
builder.SetSound (RingtoneManager.GetDefaultUri(RingtoneType.Ringtone));
创建通知对象后,可以在通知对象上设置通知属性(而不是通过 NotificationCompat.Builder 方法提前配置这些属性)。 例如,可以直接修改通知的 Defaults 属性的位标记,而不是通过调用 SetDefaults 方法来启用通知振动:
// Build the notification:
Notification notification = builder.Build();

// Turn on vibrate:
notification.Defaults |= NotificationDefaults.Vibrate;
本示例让设备在发布通知时振动。
更新通知
如果要在通知发布后更新通知的内容,可以重复使用现有 NotificationCompat.Builder 对象来创建新的通知对象,并使用上一个通知的标识符发布此通知。 例如:
// Update the existing notification builder content:
builder.SetContentTitle ("Updated Notification");
builder.SetContentText ("Changed to this message.");

// Build a notification object with updated content:
notification = builder.Build();

// Publish the new notification with the existing ID:
notificationManager.Notify (notificationId, notification);
在此示例中,现有 NotificationCompat.Builder 对象用于创建具有不同标题和消息的新通知对象。
新通知对象使用上一个通知的标识符发布,这会更新以前发布的通知的内容:

重复使用上一个通知的正文 - 在通知抽屉中显示通知时,只有通知的标题和文本发生更改。 标题文本从“Sample Notification”(示例通知)更改为“Updated Notification”(更新的通知),消息文本从“Hello World! This is my first notification!”(你好,世界!这是我的第一条通知!)更改为“Changed to this message”。
在执行以下三项操作的任意一个之前,通知将保持可见:
用户关闭通知(或点击“全部清除”)。
应用程序调用
NotificationManager.Cancel,传入发布通知时分配的唯一通知 ID。应用程序调用
NotificationManager.CancelAll。
有关更新 Android 通知的详细信息,请参阅《修改通知》。
从通知启动活动
在 Android 中,通知通常与操作相关联,操作是用户点击通知时启动的活动。 此活动可以驻留在另一个应用程序中,甚至可以驻留在另一个任务中。 若要向通知添加操作,请创建 PendingIntent 对象并将 PendingIntent 与通知相关联。 PendingIntent 是一种特殊类型的意向,允许接收方应用程序使用发送方应用程序的权限运行预定义的代码片段。 当用户点击通知时,Android 将启动由 PendingIntent 指定的活动。
以下代码片段展示了如何使用 PendingIntent(将启动发起应用的活动)来创建通知,MainActivity:
// Set up an intent so that tapping the notifications returns to this app:
Intent intent = new Intent (this, typeof(MainActivity));

// Create a PendingIntent; we're only using one PendingIntent (ID = 0):
const int pendingIntentId = 0;
PendingIntent pendingIntent =
    PendingIntent.GetActivity (this, pendingIntentId, intent, PendingIntentFlags.OneShot);

// Instantiate the builder and set notification elements, including pending intent:
NotificationCompat.Builder builder = new NotificationCompat.Builder(this, CHANNEL_ID)
    .SetContentIntent (pendingIntent)
    .SetContentTitle ("Sample Notification")
    .SetContentText ("Hello World! This is my first action notification!")
    .SetSmallIcon (Resource.Drawable.ic_notification);

// Build the notification:
Notification notification = builder.Build();

// Get the notification manager:
NotificationManager notificationManager =
    GetSystemService (Context.NotificationService) as NotificationManager;

// Publish the notification:
const int notificationId = 0;
notificationManager.Notify (notificationId, notification);
此代码与上一部分中的通知代码非常相似,区别只在于向通知对象添加了一个 PendingIntent。 在此示例中,PendingIntent 先与发起应用的活动相关联,然后再传递给通知生成器的 SetContentIntent 方法。 PendingIntentFlags.OneShot 标记将传递给 PendingIntent.GetActivity 方法,以便 PendingIntent 只使用一次。 运行此代码时,系统将显示以下通知:

点击此通知后,用户会返回到发起活动。
在生产应用中,当用户按下通知活动中的“返回”按钮时,你的应用必须处理返回堆栈(如果你不熟悉 Android 任务和返回堆栈,请参阅《任务和返回堆栈》)。
在大多数情况下,从通知活动返回后,用户应从应用返回主屏幕。 若要管理返回堆栈,应用需使用 TaskStackBuilder 类创建一个带返回堆栈的 PendingIntent。
另一个在实际使用时的注意事项是,发起通知的活动可能需要将数据发送到通知活动。 例如,通知可能提示收到短信,通知活动(消息查看屏幕)要求此消息的 ID 向用户显示此消息。 创建 PendingIntent 的活动可以使用 Intent.PutExtra 方法向意向添加数据(例如字符串),以便将此数据传递给通知活动。
下面的代码示例展示了如何用 TaskStackBuilder 管理返回堆栈,并包括如何将单个消息字符串发送到 SecondActivity 通知活动的示例:
// Setup an intent for SecondActivity:
Intent secondIntent = new Intent (this, typeof(SecondActivity));

// Pass some information to SecondActivity:
secondIntent.PutExtra ("message", "Greetings from MainActivity!");

// Create a task stack builder to manage the back stack:
TaskStackBuilder stackBuilder = TaskStackBuilder.Create(this);

// Add all parents of SecondActivity to the stack:
stackBuilder.AddParentStack (Java.Lang.Class.FromType (typeof (SecondActivity)));

// Push the intent that starts SecondActivity onto the stack:
stackBuilder.AddNextIntent (secondIntent);

// Obtain the PendingIntent for launching the task constructed by
// stackbuilder. The pending intent can be used only once (one shot):
const int pendingIntentId = 0;
PendingIntent pendingIntent =
    stackBuilder.GetPendingIntent (pendingIntentId, PendingIntentFlags.OneShot);

// Instantiate the builder and set notification elements, including
// the pending intent:
NotificationCompat.Builder builder = new NotificationCompat.Builder(this, CHANNEL_ID)
    .SetContentIntent (pendingIntent)
    .SetContentTitle ("Sample Notification")
    .SetContentText ("Hello World! This is my second action notification!")
    .SetSmallIcon (Resource.Drawable.ic_notification);

// Build the notification:
Notification notification = builder.Build();

// Get the notification manager:
NotificationManager notificationManager =
    GetSystemService (Context.NotificationService) as NotificationManager;

// Publish the notification:
const int notificationId = 0;
notificationManager.Notify (notificationId, notification);
在此代码示例中,应用由两个活动组成:MainActivity(包含上述通知代码)和 SecondActivity(用户点击通知后看到的屏幕)。 运行此代码时,会显示一个简单的通知(类似于前面的示例)。 点击通知后,用户会跳转到 SecondActivity 屏幕:
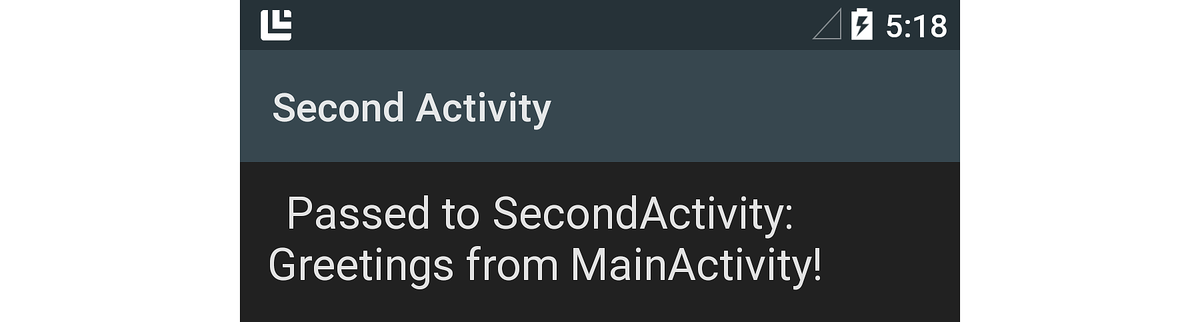
通过以下代码行在 SecondActivity 中检索字符串消息(传递到意向的 PutExtra 方法中):
// Get the message from the intent:
string message = Intent.Extras.GetString ("message", "");
检索到的此消息“Greetings from MainActivity!”(来自 MainActivity 的问候!)显示在 SecondActivity 屏幕中,如上方屏幕截图所示。 当用户在 SecondActivity 按“返回”按钮时,会离开应用,然后返回到启动应用前的屏幕。
有关创建挂起意向的详细信息,请参阅 PendingIntent。
基本通知之外
通知默认为 Android 中的简单基本布局格式,但可以通过调用其他 NotificationCompat.Builder 方法来增强此基本格式。 在本部分中,你将了解如何向通知添加大照片图标,并通过示例了解如何创建展开布局通知。
大图标格式
Android 通知通常显示发起通知的应用的图标(在通知左侧)。 但是,通知可以显示图像或照片(大图标),而不是标准小图标。 例如,消息应用可以显示发件人的照片,而不是应用图标。
下面是 Android 5.0 基本通知的一个例子,它仅显示小应用图标:

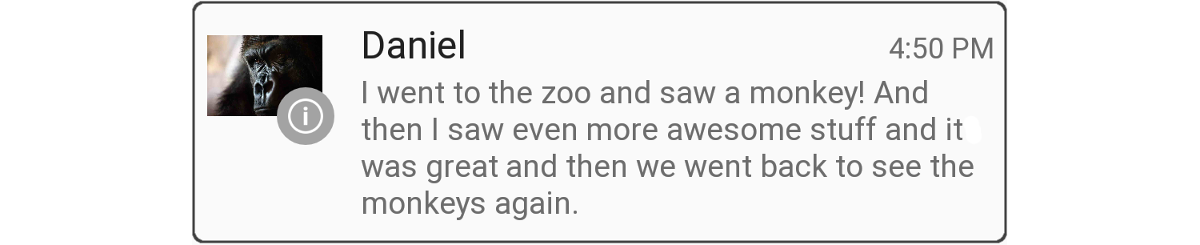
下面是通过修改来显示大图标后的通知屏幕截图,它使用从 Xamarin 代码 Monkey 的图像创建的图标:
![]()
请注意,当以大图标格式显示通知时,小应用图标将显示为大图标右下角的提醒。
若要在通知中将图像用作大图标,请调用通知生成器的 SetLargeIcon 方法并传入图像的位图。 与 SetSmallIcon 不同,SetLargeIcon 仅接受位图。 若要将图像文件转换为位图,请使用 BitmapFactory 类。 例如:
builder.SetLargeIcon (BitmapFactory.DecodeResource (Resources, Resource.Drawable.monkey_icon));
此示例代码在 Resources/drawable/monkey_icon.png打开图像文件,将其转换为位图,并将生成的位图传递给 NotificationCompat.Builder。 通常,源图像分辨率大于小图标,但不会大很多。 太大的图像可能会导致不必要的大小调整操作,这些操作可能会延迟通知的发布。
大文本样式
大文本样式是用于在通知中显示长消息的展开布局模板。 与所有展开布局通知一样,大文本通知最初以紧凑的展示格式显示:

在此格式中,仅显示消息的摘要,以两个句点终止。 当用户向下拖动通知时,通知消息会完全展开:
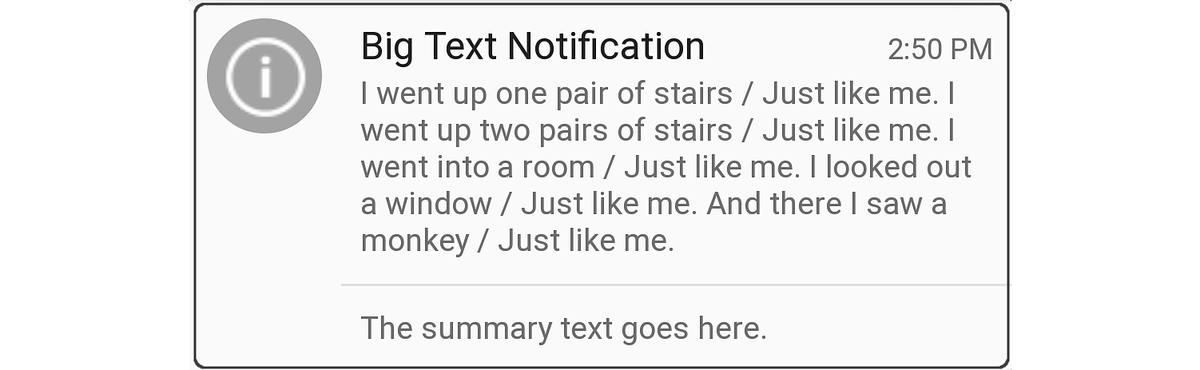
此展开布局格式还包括通知底部的摘要文本。 大文本通知的最大高度为 256 dp。
若要创建大文本通知,可以像以前一样实例化 NotificationCompat.Builder 对象,然后将 BigTextStyle 对象实例化并添加到 NotificationCompat.Builder 对象。 下面是一个示例:
// Instantiate the Big Text style:
Notification.BigTextStyle textStyle = new Notification.BigTextStyle();

// Fill it with text:
string longTextMessage = "I went up one pair of stairs.";
longTextMessage += " / Just like me. ";
//...
textStyle.BigText (longTextMessage);

// Set the summary text:
textStyle.SetSummaryText ("The summary text goes here.");

// Plug this style into the builder:
builder.SetStyle (textStyle);

// Create the notification and publish it ...
在此示例中,消息文本和摘要文本存储在 BigTextStyle 对象 (textStyle) 中,然后再传递给 NotificationCompat.Builder.
图像样式
图像样式(也称为大图片样式)是一种展开通知格式,可用于在通知正文中显示图像。 例如,屏幕截图应用或照片应用可以使用图像通知样式向用户提供捕获的最后一张图像的通知。 请注意,图像通知的最大高度为 256 dp。Android 将在可用内存的限制内调整图像的大小,以适应此最大高度限制。
与所有展开布局通知一样,图像通知首先以紧凑格式显示,其中显示随附消息文本的摘要:

当用户向下拖动图像通知时,通知会展开以显示图像。 例如,下面是上一通知的展开版本:
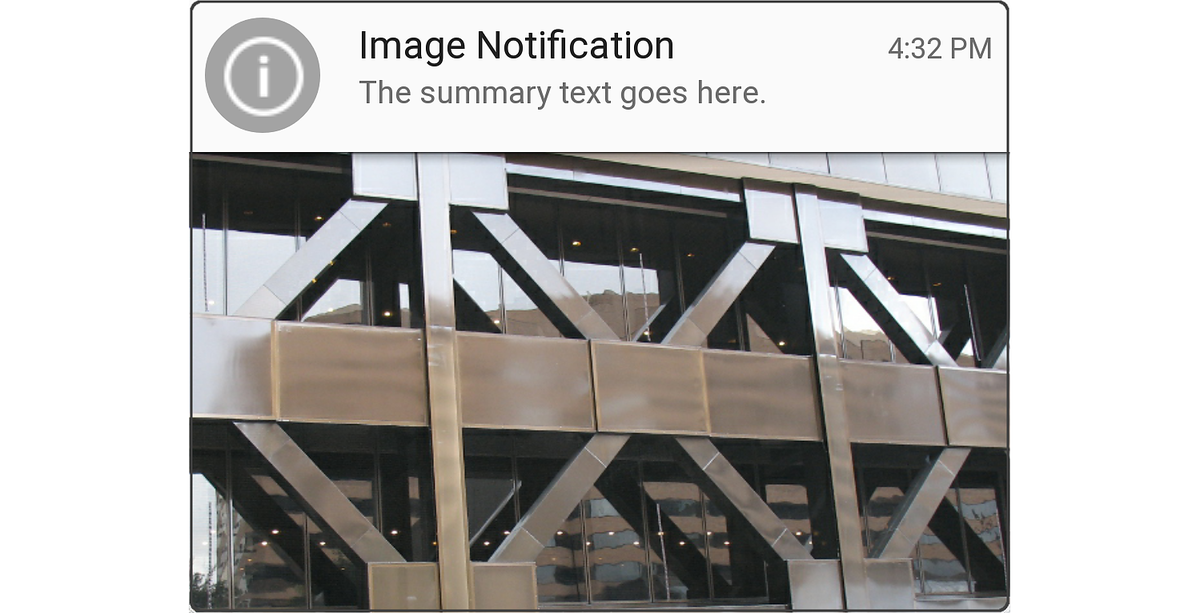
请注意,当通知以紧凑格式显示时,它将显示通知文本(传递给通知生成器的 SetContentText 方法的文本,如前文所示)。 但是,当通知展开以显示图像时,它会在图像上方显示摘要文本。
若要创建图像通知,可以像以前一样实例化 NotificationCompat.Builder 对象,然后创建 BigPictureStyle 对象并将其插入 NotificationCompat.Builder 对象。 例如:
// Instantiate the Image (Big Picture) style:
Notification.BigPictureStyle picStyle = new Notification.BigPictureStyle();

// Convert the image to a bitmap before passing it into the style:
picStyle.BigPicture (BitmapFactory.DecodeResource (Resources, Resource.Drawable.x_bldg));

// Set the summary text that will appear with the image:
picStyle.SetSummaryText ("The summary text goes here.");

// Plug this style into the builder:
builder.SetStyle (picStyle);

// Create the notification and publish it ...
与 NotificationCompat.Builder 的 SetLargeIcon 方法一样,BigPictureStyle 的 BigPicture 方法需要你要在通知正文中显示的图像的位图。 在此示例中,BitmapFactory 的 DecodeResource 方法读取位于 Resources/drawable/x_bldg.png 的图像文件,并将其转换为位图。
你还可以显示未打包为资源的图像。 例如,以下示例代码从本地 SD 卡加载图像,并将其显示在图像通知中:
// Using the Image (Big Picture) style:
Notification.BigPictureStyle picStyle = new Notification.BigPictureStyle();

// Read an image from the SD card, subsample to half size:
BitmapFactory.Options options = new BitmapFactory.Options();
options.InSampleSize = 2;
string imagePath = "/sdcard/Pictures/my-tshirt.jpg";
picStyle.BigPicture (BitmapFactory.DecodeFile (imagePath, options));

// Set the summary text that will appear with the image:
picStyle.SetSummaryText ("Check out my new T-Shirt!");

// Plug this style into the builder:
builder.SetStyle (picStyle);

// Create notification and publish it ...
在此示例中,加载位于 /sdcard/Pictures/my-tshirt.jpg 的图像文件,将其调整为原始大小的一半,然后转换为位图,以便在通知中使用:

如果事先不知道图像文件的大小,最好在异常处理程序中包装对 BitmapFactory.DecodeFile 的调用。如果图像太大导致 Android 无法调整其大小,可能会引发 OutOfMemoryError 异常。
有关加载和解码大型位图图像的详细信息,请参阅《高效加载大型位图》。
收件箱样式
收件箱格式是一个展开布局模板,用于在通知正文中显示单独的文本行(如电子邮件收件箱摘要)。 收件箱格式通知首先以紧凑格式显示:

当用户向下拖动通知时,它会展开并显示电子邮件摘要,如以下屏幕截图所示:
若要创建收件箱通知,可以像以前一样实例化 NotificationCompat.Builder 对象,并将 InboxStyle 对象添加到 NotificationCompat.Builder。 下面是一个示例:
// Instantiate the Inbox style:
Notification.InboxStyle inboxStyle = new Notification.InboxStyle();
// Set the title and text of the notification:
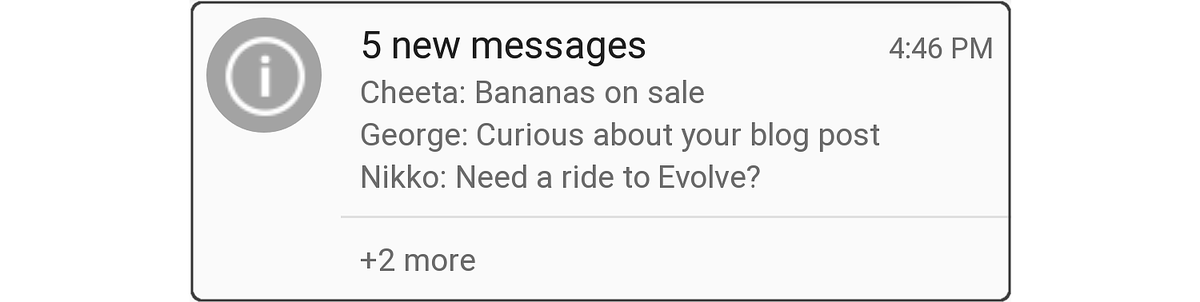
builder.SetContentTitle ("5 new messages");
builder.SetContentText ("chimchim@xamarin.com");
// Generate a message summary for the body of the notification:
inboxStyle.AddLine ("Cheeta: Bananas on sale");
inboxStyle.AddLine ("George: Curious about your blog post");
inboxStyle.AddLine ("Nikko: Need a ride to Evolve?");
inboxStyle.SetSummaryText ("+2 more");
// Plug this style into the builder:
builder.SetStyle (inboxStyle);
若要向通知正文添加新的文本行,请调用 InboxStyle 对象的 Addline 方法(收件箱通知的最大高度为 256 dp)。 请注意,与大文本样式不同,收件箱样式支持通知正文中的单个文本行。
还可以将收件箱样式用于需要以展开格式显示单个文本行的任何通知。 例如,收件箱通知样式可用于将多个挂起通知合并到一个摘要通知中。可以使用新的通知内容行更新单个收件箱样式通知(请参阅上文的更新通知),而不是生成基本上相似的新通知的连续流。
配置元数据
NotificationCompat.Builder 包括可调用并用于设置通知的元数据的方法,例如优先级、可见性和类别。 Android 使用此信息以及用户首选项设置来确定通知的显示方式和时间。
优先级设置
在 Android 7.1 及之前版本上运行的应用需要直接在通知本身上设置优先级。 通知的优先级设置确定发布通知时的两个结果:
通知相较于其他通知出现的位置。 例如,在通知抽屉中,高优先级通知显示在低优先级通知上方,无论这两种通知何时发布。
通知是否以浮动通知格式(Android 5.0 及更高版本)显示。 只有高优先级通知和最高优先级通知才会显示为浮动通知。
Xamarin.Android 定义了以下用于设置通知优先级的枚举:
NotificationPriority.Max:向用户发出紧急或严重情况(例如,传入呼叫、逐向导航或紧急警报)警报。 在 Android 5.0 及更高版本的设备上,最高优先级通知以浮动格式显示。NotificationPriority.High:向用户通知重要事件(如收到重要电子邮件或实时聊天消息)。 在 Android 5.0 及更高版本的设备上,高优先级通知以浮动格式显示。NotificationPriority.Default:向用户通知中等重要性的情况。NotificationPriority.Low:用于需要通知用户的非紧急信息(例如软件更新提醒或社交网络更新)。NotificationPriority.Min:用于用户仅在查看通知时注意到的背景信息(例如位置或天气信息)。
若要设置通知的优先级,请调用 NotificationCompat.Builder 对象的 SetPriority 方法,传入优先级级别。 例如:
builder.SetPriority (NotificationPriority.High);
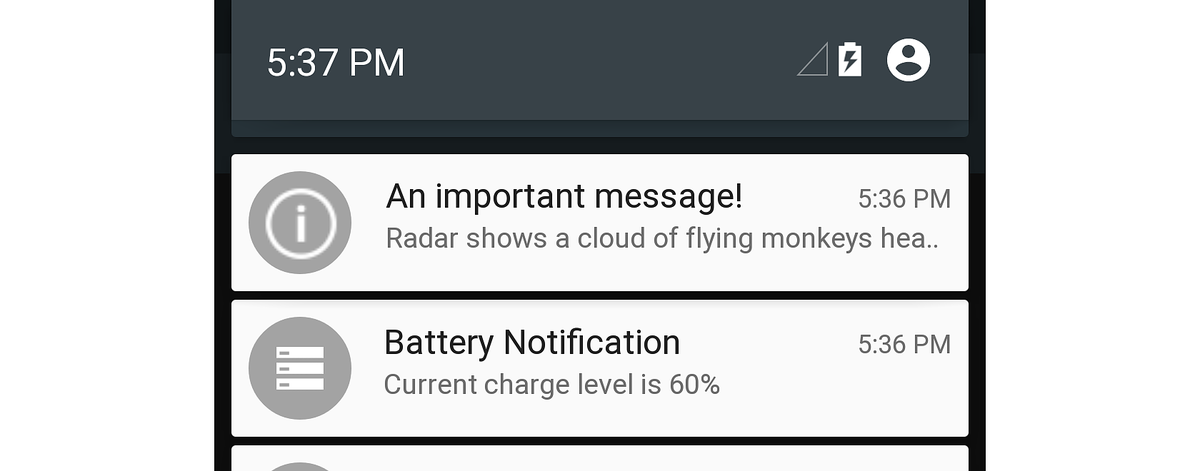
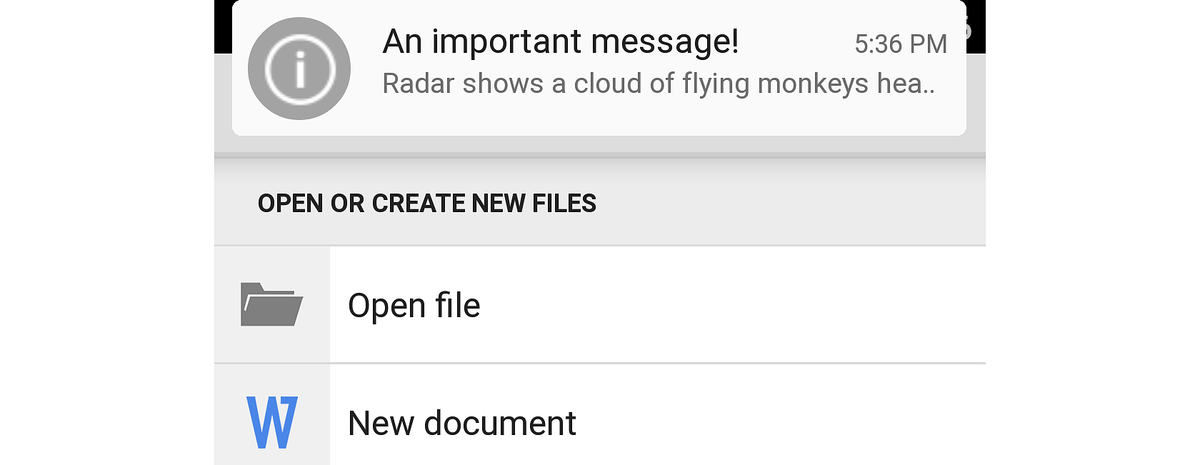
在以下示例中,高优先级通知“An important message!”(重要消息!)显示在通知抽屉顶部:
由于这是高优先级通知,该通知也显示为 Android 5.0 中用户当前活动屏幕上方的浮动通知:
在下一个示例中,低优先级的“Thought for the day”(每日警句)通知显示在高优先级的电量通知下方:
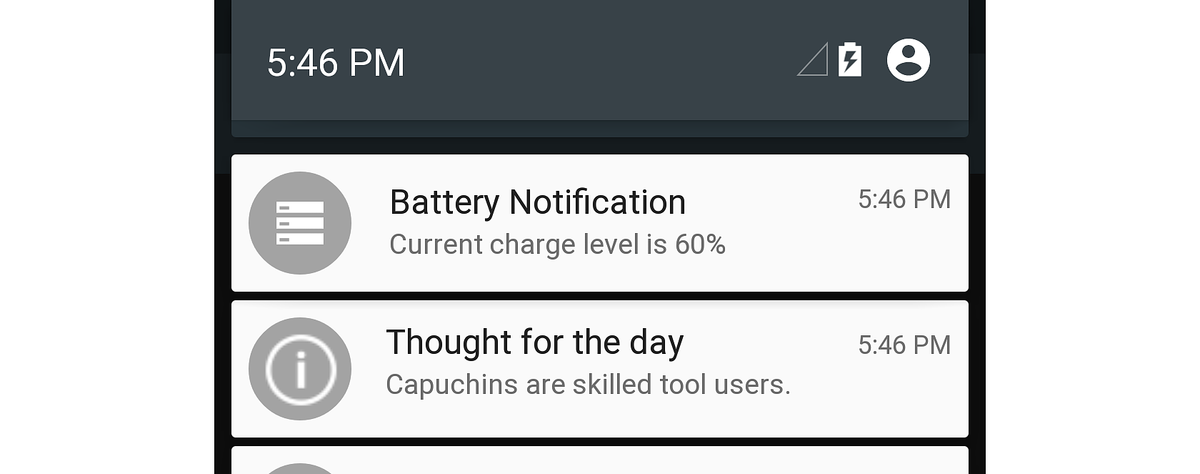
由于“Thought for the day”通知是低优先级通知,因此 Android 不会以浮动格式显示它。
注意
在 Android 8.0 及更高版本上,通知通道和用户设置的优先级将确定通知的优先级。
可见性设置
从 Android 5.0 开始,可见性设置可用于控制安全锁屏上显示多少通知内容。 Xamarin.Android 定义以下枚举来设置通知可见性:
NotificationVisibility.Public:在安全锁屏界面上显示通知的完整内容。NotificationVisibility.Private:仅在安全锁屏界面上显示重要信息(例如通知图标和发布通知的应用的名称),通知的其余详细信息将隐藏。 所有通知默认为NotificationVisibility.Private。NotificationVisibility.Secret:安全锁屏上不显示任何内容,甚至不显示通知图标。 通知内容仅在用户解锁设备后可见。
若要设置通知的可见性,应用需调用 NotificationCompat.Builder 对象的 SetVisibility 方法,并传入可见性设置。 例如,下方对 SetVisibility 的调用发出通知 Private:
builder.SetVisibility (NotificationVisibility.Private);
发布 Private 通知后,安全锁屏上仅显示应用的名称和图标。 用户会看到“解锁设备以查看此通知”,而不是具体的通知消息:

在此示例中,NotificationsLab 是发起通知的应用的名称。 仅当锁屏处于安全状态(即通过 PIN、模式或密码进行保护)时,才会显示通知的此修订版本。如果锁屏不处于安全状态,则锁屏界面上提供通知的完整内容。
类别设置
从 Android 5.0 开始,预定义的类别可用于排列和筛选通知。 Xamarin.Android 为这些类别提供以下枚举:
Notification.CategoryCall:来电。Notification.CategoryMessage:收到的短信。Notification.CategoryAlarm:警报条件或计时器过期。Notification.CategoryEmail:收到的电子邮件。Notification.CategoryEvent:日历事件。Notification.CategoryPromo:促销消息或广告。Notification.CategoryProgress:后台操作的进度。Notification.CategorySocial:社交网络更新。Notification.CategoryError:后台操作或身份验证过程失败。Notification.CategoryTransport:媒体播放更新。Notification.CategorySystem:保留供系统使用(系统或设备状态)。Notification.CategoryService:表示后台服务正在运行。Notification.CategoryRecommendation:与当前正在运行的应用相关的建议消息。Notification.CategoryStatus:设备的信息。
对通知进行排序时,通知的优先级优先于其类别设置。 例如,即使通知属于 Promo 类别,高优先级通知也会显示为浮动通知。 若要设置通知的类别,请调用 NotificationCompat.Builder 对象的 SetCategory 方法,并传入类别设置。 例如:
builder.SetCategory (Notification.CategoryCall);
“勿扰”功能(Android 5.0 中的新增功能)根据类别筛选通知。 例如,“设置”中的“勿扰”界面允许用户不显示来电和消息通知:
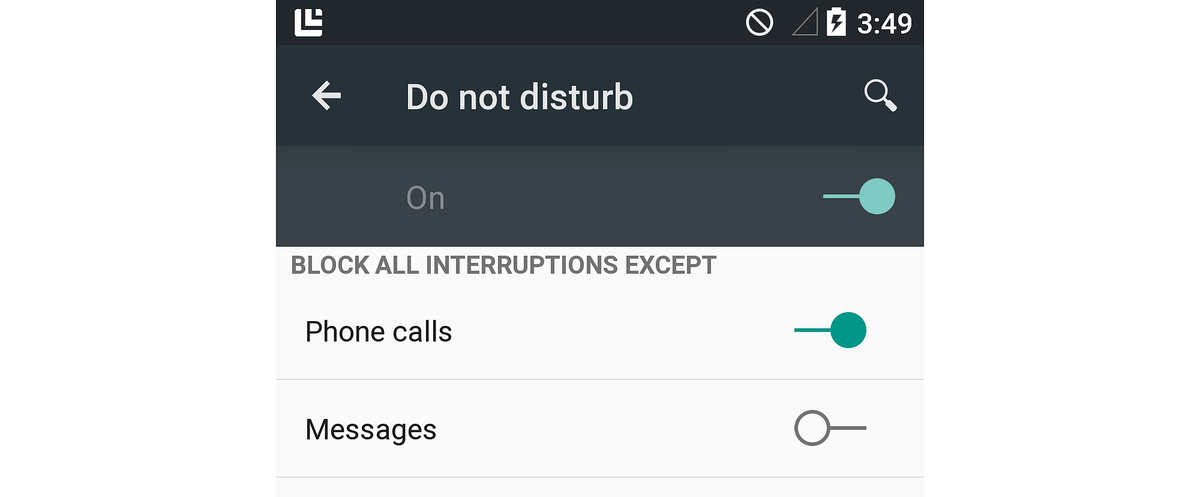
当用户将“勿扰”设置为阻止除电话呼叫之外的所有干扰(如上方屏幕截图所示)时,Android 允许在设备处于“勿扰”Notification.CategoryCall模式时显示 类别设置的通知。 请注意,不会在“勿扰”模式下阻止 Notification.CategoryAlarm 通知。
通知样式
若要创建包含 NotificationCompat.Builder 的“大文本”、“图像”或“收件箱”样式通知,应用必须使用兼容这些样式的版本。 例如,若要使用“大文本”样式,请实例化 NotificationCompat.BigTextstyle:
NotificationCompat.BigTextStyle textStyle = new NotificationCompat.BigTextStyle();

// Plug this style into the builder:
builder.SetStyle (textStyle);
同样,应用可以分别将 NotificationCompat.InboxStyle 和 NotificationCompat.BigPictureStyle 用于“收件箱”和“图像”样式。
通知优先级和类别
NotificationCompat.Builder 支持 SetPriority 方法(从 Android 4.1 开始可用)。 但是,SetCategory 方法不受 NotificationCompat.Builder 支持,因为类别是 Android 5.0 中引入的新通知元数据系统的一部分。
若要支持较旧版本的 Android(其中 SetCategory 不可用),代码可以在运行时检查 API 级别,以便在 API 级别等于或大于 Android 5.0(API 级别 21)时有条件地调用 SetCategory:
if (Android.OS.Build.VERSION.SdkInt >= Android.OS.BuildVersionCodes.Lollipop) {
    builder.SetCategory (Notification.CategoryEmail);
}
在此示例中,应用的目标框架设置为 Android 5.0,最低 Android 版本设置为 Android 4.1(API 级别 16)。 由于 SetCategory 在 API 级别 21 及更高级别中可用,因此此示例代码仅会在可用时调用 SetCategory。当 API 级别小于 21 时,它不会调用 SetCategory。
锁屏可见性
由于 Android 在 Android 5.0(API 级别 21)之前不支持锁屏通知,因此 NotificationCompat.Builder 不支持 SetVisibility 方法。 如上文对 SetCategory 的解释,代码可以在运行时检查 API 级别,并仅在可用时调用 SetVisiblity:
if (Android.OS.Build.VERSION.SdkInt >= Android.OS.BuildVersionCodes.Lollipop) {
    builder.SetVisibility (Notification.Public);
}
总结
本文介绍了如何在 Android 中创建本地通知。 它介绍了通知剖析,介绍了如何使用 NotificationCompat.Builder 创建通知,如何设置大图标、大文本、图像和收件箱格式的通知样式,如何设置通知元数据设置(如优先级、可见性和类别)以及如何从通知启动活动。 本文还介绍了这些通知设置如何使用 Android 5.0 中引入的新的浮动、锁屏和勿扰功能。 最后,我们介绍了如何使用 NotificationCompat.Builder 来维护与早期版本的 Android 的通知兼容性。
有关为 Android 设计通知的指南,请参阅通知。