本文介绍如何在 Xamarin.Mac 应用程序中使用警告。 其中介绍了如何从 C# 代码创建和显示警报以及响应用户交互。
在 Xamarin.Mac 应用程序中使用 C# 和 .NET 时,你可以访问的警报与使用 Objective-C 和 Xcode 的开发人员可访问的警报相同。
警报是一种特殊类型的对话框,在发生严重问题(例如错误)或警告(例如准备删除文件)时出现。 由于警报是一个对话框,因此也需要用户响应才能将其关闭。
本文将介绍在 Xamarin.Mac 应用程序中使用警报的基础知识。
警报简介
警报是一种特殊类型的对话框,在发生严重问题(例如错误)或警告(例如准备删除文件)时出现。 由于警报会扰乱用户(因为必须先将其关闭,然后用户才能继续执行任务),因此除非绝对必要,否则请避免显示警报。
Apple 建议以下原则:
- 不要单纯出于向用户提供信息的目的使用警报。
- 不要针对常见的、不可撤消的操作显示警报。 这种情况可能会导致数据丢失。
- 如果某种情况值得发出警报,请避免使用任何其他 UI 元素或方法来显示警报。
- 慎用“小心”图标。
- 在警报消息中清晰、简洁地描述警报情景。
- 默认按钮名称应与警报消息中描述的操作相对应。
有关详细信息,请参阅 Apple OS X 人机界面准则的警报部分
警报剖析
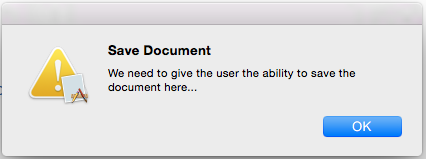
如上所述,当发生严重问题时应向应用程序的用户显示警报,或者在可能丢失数据的情况下(例如关闭未保存的文件)发出警告。 在 Xamarin.Mac 中,警报是用 C# 代码创建的,例如:
var alert = new NSAlert () {
  AlertStyle = NSAlertStyle.Critical,
  InformativeText = "We need to save the document here...",
  MessageText = "Save Document",
};
alert.RunModal ();
上面的代码显示一条警报,其中应用程序图标叠加在警告图标、标题、警告消息和单个“确定”按钮上:
Apple 提供了多个可用于自定义警报的属性:
- AlertStyle 将警报类型定义为以下值之一:
- Warning - 用于向用户发出当前已发生或即将发生的不严重事件的警告。 这是默认样式。
- Informational - 用于向用户发出当前已发生或即将发生的事件的警告。 目前,Warning 和 Informational 之间没有明显的差别
- Critical - 用于向用户发出即将发生的事件(例如删除文件)造成的严重后果的警告。 应慎用这种类型的警报。
- MessageText - 这是警报的主要消息或标题,应快速向用户定义情景。
- InformativeText - 这是警报的正文,应在其中清楚地定义情景并向用户提供可行的选项。
- Icon - 用于向用户显示自定义图标。
- HelpAnchor 和 ShowsHelp - 用于将警报绑定到应用程序 HelpBook 并显示警报的帮助。
- Buttons - 默认情况下,警报只显示“确定”按钮,但使用“按钮”集合可以根据需要添加更多选项。
- ShowsSuppressionButton - 如果
true显示了复选框,用户可以使用该复选框来抑制触发警报的事件发生之后继续发出的警报。 - AccessoryView - 用于将另一个子视图附加到警报以提供额外信息,例如添加用于输入数据的文本字段。 如果设置新的或修改现有的 AccessoryView,则需要调用
Layout()方法来调整警报的视觉布局。
显示警报
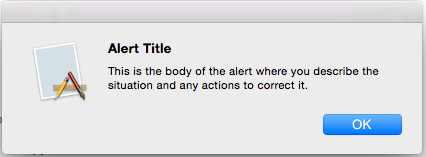
可以通过两种不同的方式显示警报:自由浮动或表单形式。 以下代码以自由浮动形式显示警报:
var alert = new NSAlert () {
  AlertStyle = NSAlertStyle.Informational,
  InformativeText = "This is the body of the alert where you describe the situation and any actions to correct it.",
  MessageText = "Alert Title",
};
alert.RunModal ();
如果运行此代码,将显示以下内容:
以下代码显示与表单相同的警报:
var alert = new NSAlert () {
  AlertStyle = NSAlertStyle.Informational,
  InformativeText = "This is the body of the alert where you describe the situation and any actions to correct it.",
  MessageText = "Alert Title",
};
alert.BeginSheet (this);
如果运行此代码,将显示以下内容:
使用警报按钮
默认情况下,警报仅显示“确定”按钮。 不过,你并不局限于此,可以通过将额外的按钮追加到“按钮”集合来创建这些按钮。 以下代码创建一条显示“OK”、“Cancel”和“Maybe”按钮的自由浮动警报:
var alert = new NSAlert () {
  AlertStyle = NSAlertStyle.Informational,
  InformativeText = "This is the body of the alert where you describe the situation and any actions to correct it.",
  MessageText = "Alert Title",
};
alert.AddButton ("Ok");
alert.AddButton ("Cancel");
alert.AddButton ("Maybe");
var result = alert.RunModal ();
添加的第一个按钮是默认按钮,如果用户按 Enter 键,该按钮就会激活。 返回的值将是一个整数,表示用户按下的按钮。 在本例中,将返回以下值:
- OK - 1000。
- Cancel - 1001。
- Maybe - 1002。
如果运行该代码,将显示以下内容:
下面是与表单相同的警报的代码:
var alert = new NSAlert () {
  AlertStyle = NSAlertStyle.Informational,
  InformativeText = "This is the body of the alert where you describe the situation and any actions to correct it.",
  MessageText = "Alert Title",
};
alert.AddButton ("Ok");
alert.AddButton ("Cancel");
alert.AddButton ("Maybe");
alert.BeginSheetForResponse (this, (result) => {
  Console.WriteLine ("Alert Result: {0}", result);
});
如果运行此代码,将显示以下内容:
重要
不应在警报中添加三个以上的按钮。
显示抑制按钮
如果警报的 ShowSuppressButton 属性为 true,则警报将显示一个复选框,用户可以使用该复选框来抑制触发警报的事件发生之后继续发出的警报。 以下代码显示一条带有抑制按钮的自由浮动警报:
var alert = new NSAlert () {
  AlertStyle = NSAlertStyle.Informational,
  InformativeText = "This is the body of the alert where you describe the situation and any actions to correct it.",
  MessageText = "Alert Title",
};
alert.AddButton ("Ok");
alert.AddButton ("Cancel");
alert.AddButton ("Maybe");
alert.ShowsSuppressionButton = true;
var result = alert.RunModal ();
Console.WriteLine ("Alert Result: {0}, Suppress: {1}", result, alert.SuppressionButton.State == NSCellStateValue.On);
如果 alert.SuppressionButton.State 的值为 NSCellStateValue.On,则表示用户已选中“抑制”复选框,否则未选中。
如果运行该代码,将显示以下内容:
下面是与表单相同的警报的代码:
var alert = new NSAlert () {
  AlertStyle = NSAlertStyle.Informational,
  InformativeText = "This is the body of the alert where you describe the situation and any actions to correct it.",
  MessageText = "Alert Title",
};
alert.AddButton ("Ok");
alert.AddButton ("Cancel");
alert.AddButton ("Maybe");
alert.ShowsSuppressionButton = true;
alert.BeginSheetForResponse (this, (result) => {
  Console.WriteLine ("Alert Result: {0}, Suppress: {1}", result, alert.SuppressionButton.State == NSCellStateValue.On);
});
如果运行此代码,将显示以下内容:
添加自定义子视图
警报有一个 AccessoryView 属性,该属性可用于进一步自定义警报,并添加“文本字段”之类的元素来提供用户输入。 以下代码创建一条包含所添加的文本输入字段的自由浮动警报:
var input = new NSTextField (new CGRect (0, 0, 300, 20));

var alert = new NSAlert () {
AlertStyle = NSAlertStyle.Informational,
InformativeText = "This is the body of the alert where you describe the situation and any actions to correct it.",
  MessageText = "Alert Title",
};
alert.AddButton ("Ok");
alert.AddButton ("Cancel");
alert.AddButton ("Maybe");
alert.ShowsSuppressionButton = true;
alert.AccessoryView = input;
alert.Layout ();
var result = alert.RunModal ();
Console.WriteLine ("Alert Result: {0}, Suppress: {1}", result, alert.SuppressionButton.State == NSCellStateValue.On);
此处的关键行是 var input = new NSTextField (new CGRect (0, 0, 300, 20));,它用于创建一个新的文本字段,我们将在其中添加警报。 alert.AccessoryView = input; 将文本字段附加到警报并调用 Layout() 方法,只有这样,才能调整警报大小以适合新的子视图。
如果运行该代码,将显示以下内容:
下面是与表单相同的警报:
var input = new NSTextField (new CGRect (0, 0, 300, 20));

var alert = new NSAlert () {
  AlertStyle = NSAlertStyle.Informational,
  InformativeText = "This is the body of the alert where you describe the situation and any actions to correct it.",
  MessageText = "Alert Title",
};
alert.AddButton ("Ok");
alert.AddButton ("Cancel");
alert.AddButton ("Maybe");
alert.ShowsSuppressionButton = true;
alert.AccessoryView = input;
alert.Layout ();
alert.BeginSheetForResponse (this, (result) => {
  Console.WriteLine ("Alert Result: {0}, Suppress: {1}", result, alert.SuppressionButton.State == NSCellStateValue.On);
});
如果运行此代码,将显示以下内容:
总结
本文详细介绍了如何在 Xamarin.Mac 应用程序中使用警报。 我们了解了警报的不同类型和用途、如何创建和自定义警报,以及如何在 C# 代码中使用警报。


