在 SharePoint 外接程序模型中,你习惯通过创建 UI 扩展来扩展功能区栏和 ECB (编辑控制块) 菜单的列表视图和库。 在新SharePoint 框架可以通过创建所谓的 ListView 命令集来实现相同的结果。
在本文中,可以找到有关如何将现有 UI 扩展转换为 ListView 命令集的详细信息。
如果愿意,可以watch以下视频,而不是阅读整篇文章,你仍然可以将其视为更详细的参考。

注意
若要详细了解如何创建SharePoint 框架 ListView 命令集,请阅读文档生成第一个 ListView 命令集扩展。
将 UI 扩展转换为 ListView 命令集
假设你有一个 UI 扩展,用于在文档库的命令栏中呈现自定义按钮,以及将自定义菜单项添加到同一库的 ECB 菜单。 我们还假设你希望仅针对文档库显示按钮和 ECB 菜单项,并且仅当用户仅选择一个文档时。 UI 扩展将显示一个页面,其中包含有关所选文件的详细信息。 在以下 screeshot 中,在 SharePoint 经典 UI 中扩展当前所选文档的 ECB 菜单时,可以看到使用 SharePoint 外接程序模型生成的 UI 扩展的 UI。
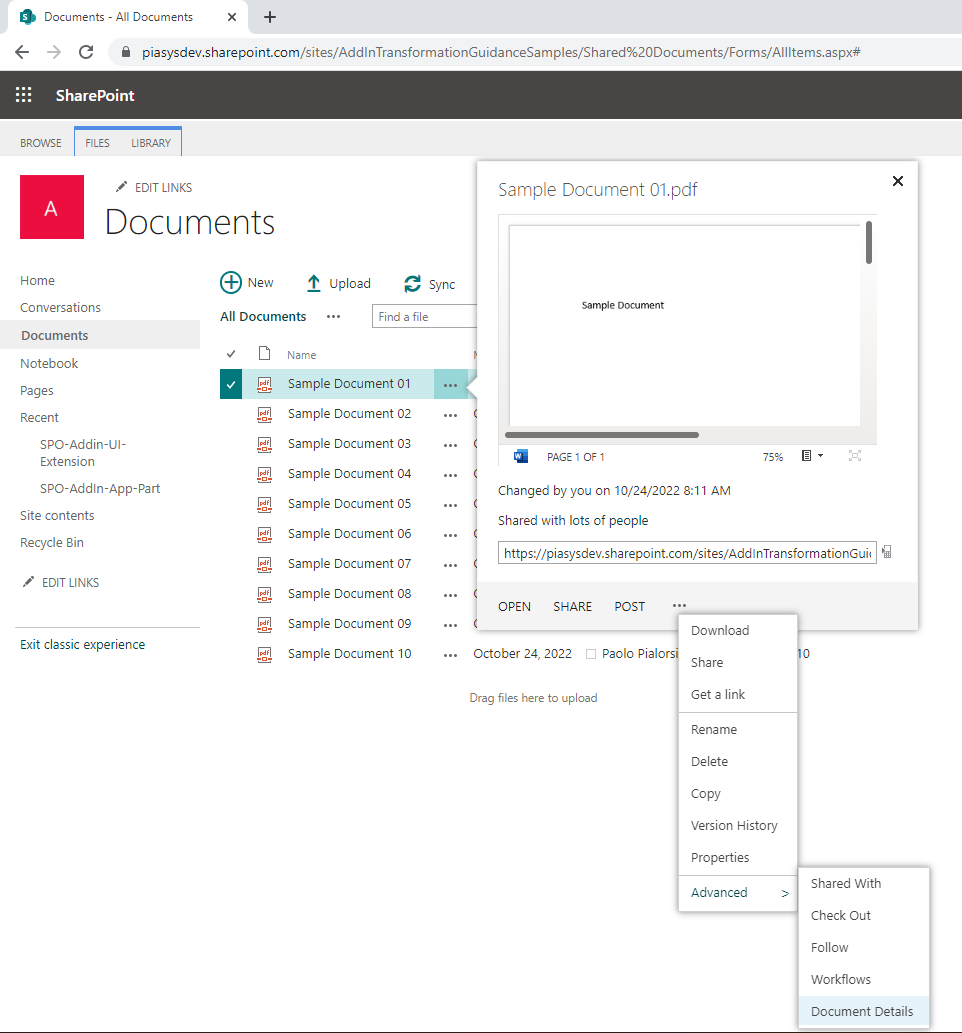
在下一个 screesh 中,在 SharePoint 经典 UI 中扩展文档库的功能区时,可以看到使用 SharePoint 外接程序模型生成的 UI 扩展的 UI。

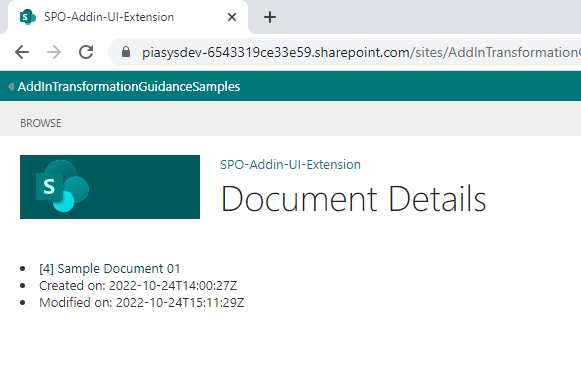
最后,在以下屏幕截图中,当显示所选文档的详细信息时,可以看到 UI 扩展的实际 UI。
现在,你想要将自定义转换为使用 SharePoint 框架 生成的新式 ListView 命令集。
要从中迁移的 SharePoint 外接程序模型解决方案
在以下代码摘录中,可以看到使用 JavaScript 代码生成的 UI 扩展的实际实现。
var hostweburl;
var appweburl;
var clientContext;
var hostweb;
var documentsLibrary;
var libraryId;
var itemId;

// This code runs when the DOM is ready and creates a context object which is
// needed to use the SharePoint object model
$(document).ready(function () {
    hostweburl = decodeURIComponent(getQueryStringParameter("SPHostUrl"));
    appweburl = decodeURIComponent(getQueryStringParameter("SPAppWebUrl"));
    libraryId = decodeURIComponent(getQueryStringParameter("SPListId"));
    itemId = decodeURIComponent(getQueryStringParameter("SPListItemId"));

    if (libraryId !== 'undefined' && itemId !== 'undefined') {
        var scriptbase = hostweburl + "/_layouts/15/";
        $.getScript(scriptbase + "SP.RequestExecutor.js", execCrossDomainRequest);
    }
});

// Make the actual request for the document using the cross-domain Request Executor
function execCrossDomainRequest() {

    var itemUri = appweburl +
        "/_api/SP.AppContextSite(@target)/web/lists/GetById('" + libraryId + "')/Items(" + itemId + ")?$select=ID,Title,Created,Modified,ServerRedirectedEmbedUrl&@target='" + hostweburl + "'";

    console.log(itemUri);

    var executor = new SP.RequestExecutor(appweburl);

    // First request, to retrieve the form digest
    executor.executeAsync({
        url: itemUri,
        method: "GET",
        headers: { "Accept": "application/json; odata=verbose" },
        success: function (data) {
            var jsonObject = JSON.parse(data.body);
            console.log(jsonObject);
            var document = jsonObject.d;
            showDocumentDetails(document);
        },
        error: function (data, errorCode, errorMessage) {
            var errMsg = "Error retrieving the document details: " + errorMessage;
            $("#error").text(errMsg);
            $("#error").show();
        }
    });
}

// In case of successful retrieval of the document
function showDocumentDetails(document) {
    $("#document").empty();

    if (document !== undefined) {

        var docId = document.ID;
        var docTitle = document.Title;
        var docCreated = document.Created;
        var docModified = document.Modified;
        var docUrl = document.ServerRedirectedEmbedUrl;

        $("#document").append('<ul>');
        $("#document").append('<li><a href="' + docUrl + '">[' + docId + '] ' + docTitle + '</a></li>');
        $("#document").append('<li>Created on: ' + docCreated + '</li>');
        $("#document").append('<li>Modified on: ' + docModified + '</li>');
        $("#document").append('</ul>');
    }
}

function getQueryStringParameter(paramToRetrieve) {
    var params =
        document.URL.split("?")[1].split("&");
    var strParams = "";
    for (var i = 0; i < params.length; i = i + 1) {
        var singleParam = params[i].split("=");
        if (singleParam[0] == paramToRetrieve)
            return singleParam[1];
    }
}
可以看到,代码完全基于客户端代码 (JavaScript) ,并且依赖于 SharePoint JavaScript 对象模型来检索对当前应用程序网站的引用,它通过 SP 从应用程序站点中执行。RemoteExecutor 对 REST API 调用进行建模,以从主机站点读取目标文档属性。 检索文件属性后,此示例通过动态生成的 HTML 元素集显示基本文档详细信息。
然后,在 XML 元素文件中定义用于呈现 ECB 菜单项的 UI 扩展,该文件依赖于 SharePoint 功能框架的 CustomAction 元素,并使用以下语法。
<?xml version="1.0" encoding="utf-8"?>
<Elements xmlns="http://schemas.microsoft.com/sharepoint/">
<CustomAction Id="8d267eab-0cc9-4abf-88fd-25e320f1202f.ShowDocumentDetailsMenuItem"
RegistrationType="List"
RegistrationId="101"
Location="EditControlBlock"
Sequence="10001"
Title="Document Details">
<!--
Update the Url below to the page you want the custom action to use.
Start the URL with the token ~remoteAppUrl if the page is in the
associated web project, use ~appWebUrl if page is in the app project.
-->
<UrlAction Url="~appWebUrl/Pages/Default.aspx?{StandardTokens}&SPListItemId={ItemId}&SPListId={ListId}" />
</CustomAction>
</Elements>
请注意,自定义元素声明扩展针对类型 101 列表 (即文档库) 通过 RegistrationType 和 RegistrationId 属性。 它还声明自定义操作 的位置 是目标列表或库的 EditControlBlock 。
同样,自定义功能区命令是使用另一个 XML 元素文件定义的,该文件仍依赖于 SharePoint 功能框架的 CustomAction 元素,其语法如下。
<?xml version="1.0" encoding="utf-8"?>
<Elements xmlns="http://schemas.microsoft.com/sharepoint/">
<CustomAction Id="f453c11a-3ee4-4247-b520-107b80c79892.ShowDocumentDetailsCommand"
RegistrationType="List"
RegistrationId="101"
Location="CommandUI.Ribbon"
Sequence="10001"
Title="Invoke 'ShowDocumentDetailsCommand' action">
<CommandUIExtension>
<!--
Update the UI definitions below with the controls and the command actions
that you want to enable for the custom action.
-->
<CommandUIDefinitions>
<CommandUIDefinition Location="Ribbon.Documents.Manage.Controls._children">
<Button Id="Ribbon.Documents.Manage.ShowDocumentDetailsCommandButton"
Alt="Document Details"
Sequence="100"
Command="Invoke_ShowDocumentDetailsCommandButtonRequest"
LabelText="Document Details"
TemplateAlias="o1"
Image32by32="_layouts/15/images/placeholder32x32.png"
Image16by16="_layouts/15/images/placeholder16x16.png" />
</CommandUIDefinition>
</CommandUIDefinitions>
<CommandUIHandlers>
<CommandUIHandler Command="Invoke_ShowDocumentDetailsCommandButtonRequest"
CommandAction="~appWebUrl/Pages/Default.aspx?{StandardTokens}&SPListItemId={SelectedItemId}&SPListId={SelectedListId}"/>
</CommandUIHandlers>
</CommandUIExtension >
</CustomAction>
</Elements>
最后一个元素文件声明了另一个自定义操作,该操作仍面向文档库 (RegistrationType = “List” 和 RegistrationId = 101) 现在使用 Location 值为 CommandUI.Ribbon ,并通过 CommandUIExtension 元素定义功能区命令。
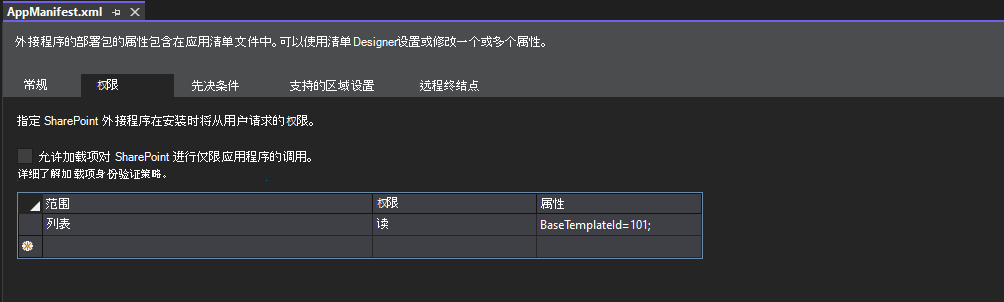
为了正常工作,SharePoint 外接程序模型解决方案需要对其AppManifest.xml文件中定义的库 (BaseTemplate=101 ) 读取权限。 在以下 screeshot 中,可以看到 AppManifest.xml 文件的配置。
创建SharePoint 框架解决方案
现在,让我们创建一个新的 SharePoint 框架 解决方案,用于转换以前的 SharePoint 外接程序模型解决方案。
首先,你需要搭建SharePoint 框架解决方案的基架,因此启动命令提示符或终端窗口,创建一个文件夹,并从新创建的文件夹内运行以下命令。
重要
为了能够遵循演示的过程,需要在开发环境中安装SharePoint 框架。 阅读文档设置SharePoint 框架开发环境,可以找到有关如何设置环境的详细说明。
yo @microsoft/sharepoint
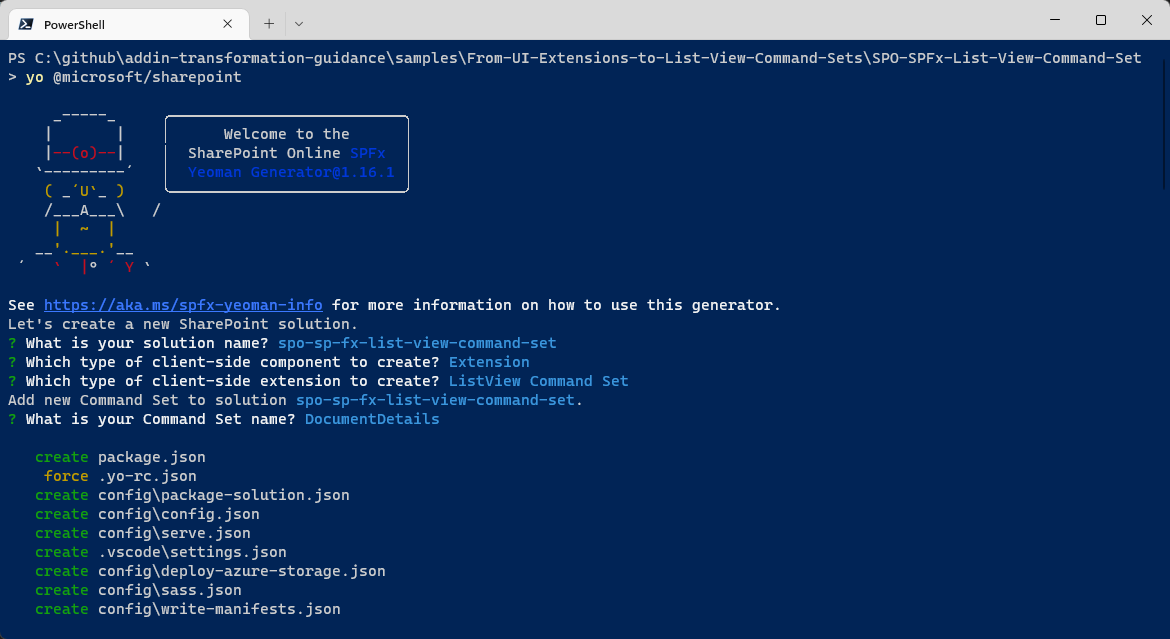
按照提示为新式 ListView 命令集搭建解决方案基架。 具体而言,在工具提示时做出以下选择:
- 解决方案名称是什么? spo-sp-fx-list-view-command-set
- 要创建哪种类型的客户端组件? Extension
- 要创建哪种类型的客户端扩展? 列表视图命令集
- 命令集名称是什么? DocumentDetails
根据上述答案,你决定创建名为 spo-sp-fx-list-view-command-set 的解决方案,其中将有一个名为 DocumentDetails 的 ListView 命令集类型的自定义扩展。
基架工具将为你生成新的SharePoint 框架解决方案。 完成后,只需使用喜欢的代码编辑器打开当前文件夹即可。 但是,在打开解决方案之前,需要添加一个包,以便更轻松、更美观地呈现扩展的 UI。 事实上,你将通过运行以下命令来引用 MGT (Microsoft Graph 工具包) 组件库和 React 框架:
npm install @microsoft/mgt-spfx @microsoft/mgt-react react@17.0.1 react-dom@17.0.1 --save
npm install @types/react@17.0.45 @types/react-dom@17.0.17 --save-dev
事实上,默认情况下,SharePoint 框架 ListView 命令集的基架解决方案不包括React包,由你选择将它们添加到解决方案中。
注意
Microsoft Graph 工具包是一组组件,用于加快客户端解决方案(包括SharePoint 框架解决方案)UI 的呈现速度。 此示例解决方案中不强制使用它,但它是加快学习和开发过程的简单方法。 阅读 Microsoft Graph 工具包概述文档可以找到有关 MGT 的详细信息,并了解如何将 MGT 与阅读 Microsoft Graph 工具包的文档SharePoint 框架库SharePoint 框架集成。
现在可以在喜欢的代码编辑器中打开解决方案。 如果你最喜欢的代码编辑器是 Microsoft Visual Studio Code,只需运行以下命令:
code .
在下图中,可以看到生成的SharePoint 框架解决方案的轮廓。
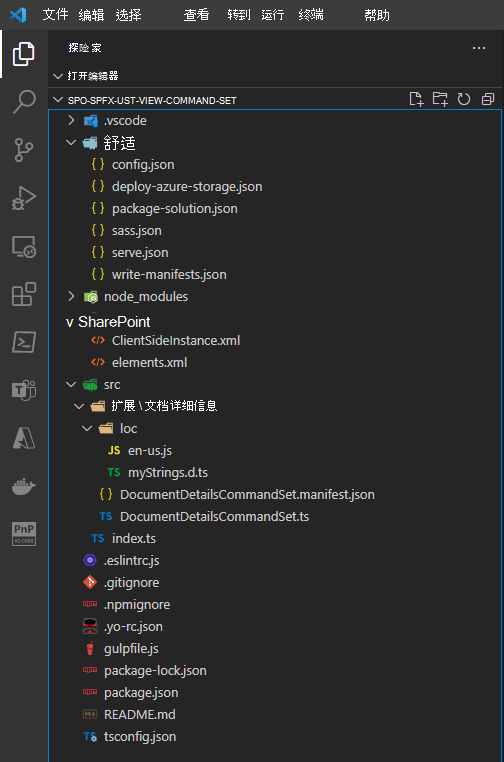
要开始main文件是 src\extensions\documentDetails 文件夹下的 DocumentDetailsCommandSet.ts。 该文件基于 TypeScript 语法,这是SharePoint 框架使用的语法。
import { Log } from '@microsoft/sp-core-library';
import {
  BaseListViewCommandSet,
  Command,
  IListViewCommandSetExecuteEventParameters,
  ListViewStateChangedEventArgs
} from '@microsoft/sp-listview-extensibility';
import { Dialog } from '@microsoft/sp-dialog';

/**
 * If your command set uses the ClientSideComponentProperties JSON input,
 * it will be deserialized into the BaseExtension.properties object.
 * You can define an interface to describe it.
 */
export interface IDocumentDetailsCommandSetProperties {
  // This is an example; replace with your own properties
  sampleTextOne: string;
  sampleTextTwo: string;
}

const LOG_SOURCE: string = 'DocumentDetailsCommandSet';

export default class DocumentDetailsCommandSet extends BaseListViewCommandSet<IDocumentDetailsCommandSetProperties> {

  public onInit(): Promise<void> {
    Log.info(LOG_SOURCE, 'Initialized DocumentDetailsCommandSet');

    // initial state of the command's visibility
    const compareOneCommand: Command = this.tryGetCommand('COMMAND_1');
    compareOneCommand.visible = false;

    this.context.listView.listViewStateChangedEvent.add(this, this._onListViewStateChanged);

    return Promise.resolve();
  }

  public onExecute(event: IListViewCommandSetExecuteEventParameters): void {
    switch (event.itemId) {
      case 'COMMAND_1':
        Dialog.alert(`${this.properties.sampleTextOne}`).catch(() => {
          /* handle error */
        });
        break;
      case 'COMMAND_2':
        Dialog.alert(`${this.properties.sampleTextTwo}`).catch(() => {
          /* handle error */
        });
        break;
      default:
        throw new Error('Unknown command');
    }
  }

  private _onListViewStateChanged = (args: ListViewStateChangedEventArgs): void => {
    Log.info(LOG_SOURCE, 'List view state changed');

    const compareOneCommand: Command = this.tryGetCommand('COMMAND_1');
    if (compareOneCommand) {
      // This command should be hidden unless exactly one row is selected.
      compareOneCommand.visible = this.context.listView.selectedRows?.length === 1;
    }

    // TODO: Add your logic here

    // You should call this.raiseOnChage() to update the command bar
    this.raiseOnChange();
  }
}
上面所示的代码摘录显示了 DocumentDetailsCommandSet.ts 文件的main代码摘录。
首先,可以注意到扩展声明为名称为 DocumentDetailsCommandSet 的 TypeScript 类,该类继承自基类型 BaseListViewCommandSet<IDocumentDetailsCommandSetProperties>。
BaseListViewCommandSet 类型由 SharePoint 框架 的基库提供,而接口 IDocumentDetailsCommandSetProperties 是在 Web 部件类声明之前定义的,并且它定义了自定义扩展的配置属性(如果有)。
在 Extension 的 OnInit 方法中,代码尝试检索对具有唯一名称 COMMAND_1的自定义命令扩展的引用。 如果命令存在,代码会将它隐藏为其初始状态。
// initial state of the command's visibility
const compareOneCommand: Command = this.tryGetCommand('COMMAND_1');
compareOneCommand.visible = false;
在此之后,会注册一个事件处理程序,用于处理目标列表或库视图的任何视图状态更改。
this.context.listView.listViewStateChangedEvent.add(this, this._onListViewStateChanged);
如果当前视图发生任何更改,事件处理程序将验证是否选择了一项或一个文档。 如果是这种情况,代码在 UI 中显示 命令。
private _onListViewStateChanged = (args: ListViewStateChangedEventArgs): void => {
  Log.info(LOG_SOURCE, 'List view state changed');

  const compareOneCommand: Command = this.tryGetCommand('COMMAND_1');
  if (compareOneCommand) {
    // This command should be hidden unless exactly one row is selected.
    compareOneCommand.visible = this.context.listView.selectedRows?.length === 1;
  }

  // TODO: Add your logic here

  // You should call this.raiseOnChage() to update the command bar
  this.raiseOnChange();
}
最后,源代码定义了一个 onExecute 方法,该方法提供扩展的实际实现。
  public onExecute(event: IListViewCommandSetExecuteEventParameters): void {
    switch (event.itemId) {
      case 'COMMAND_1':
        Dialog.alert(`${this.properties.sampleTextOne}`).catch(() => {
          /* handle error */
        });
        break;
      case 'COMMAND_2':
        Dialog.alert(`${this.properties.sampleTextTwo}`).catch(() => {
          /* handle error */
        });
        break;
      default:
        throw new Error('Unknown command');
    }
  }
调用 onExecute 方法时, event.itemId 属性定义用户调用的命令的唯一名称,你可以相应地实现扩展业务逻辑。 自动生成的代码只会在浏览器中显示对话框警报。
你可能想知道在扩展代码中声明 COMMAND_1 的位置。 它实际上是在名为 DocumentDetailsCommandSet.manifest.json 的清单文件中定义的,该文件在扩展的同一文件夹中可用。 在以下代码摘录中,可以看到基架清单。
{
  "$schema": "https://developer.microsoft.com/json-schemas/spfx/command-set-extension-manifest.schema.json",

  "id": "1602bb8e-cc1d-4417-ba7a-cc1b1d7d7022",
  "alias": "DocumentDetailsCommandSet",
  "componentType": "Extension",
  "extensionType": "ListViewCommandSet",

  // The "*" signifies that the version should be taken from the package.json
  "version": "*",
  "manifestVersion": 2,

  // If true, the component can only be installed on sites where Custom Script is allowed.
  // Components that allow authors to embed arbitrary script code should set this to true.
  // https://support.office.com/en-us/article/Turn-scripting-capabilities-on-or-off-1f2c515f-5d7e-448a-9fd7-835da935584f
  "requiresCustomScript": false,

  "items": {
    "COMMAND_1": {
      "title": { "default": "Command One" },
      "iconImageUrl": "icons/request.png",
      "type": "command"
    },
    "COMMAND_2": {
      "title": { "default": "Command Two" },
      "iconImageUrl": "icons/cancel.png",
      "type": "command"
    }
  }
}
可以看到,清单的初始部分声明,我们将定义扩展类型为 “扩展”的组件,其扩展类型为 ListViewCommandSet。 此外,清单还通过使用 GUID 声明组件的唯一 ID 。 最重要的是,有一个名为 “项 ”的部分,其中定义了实际命令。 在基架清单中,可以看到有两个命令 (COMMAND_1 和 COMMAND_2) 及其标题的定义、图标图像 URL 和始终是 命令的类型。
解决方案的最后一个重要文件是在解决方案的 sharepoint\assets 文件夹下定义的 elements.xml 文件。 可在此处查看自动生成的文件的内容:
<?xml version="1.0" encoding="utf-8"?>
<Elements xmlns="http://schemas.microsoft.com/sharepoint/">
<CustomAction
Title="DocumentDetails"
RegistrationId="100"
RegistrationType="List"
Location="ClientSideExtension.ListViewCommandSet.CommandBar"
ClientSideComponentId="1602bb8e-cc1d-4417-ba7a-cc1b1d7d7022"
ClientSideComponentProperties="{"sampleTextOne":"One item is selected in the list.", "sampleTextTwo":"This command is always visible."}">
</CustomAction>
</Elements>
有趣的是,它仍然是一个基于 SharePoint 功能框架的文件,就像使用 SharePoint 外接程序模型生成的 UI 扩展一样。 但是,自定义操作设置现在略有不同。 仍有一些属性(如 RegistrationId 和 RegistrationType )用于定义扩展的 targe。 还有 一个 Location 属性,其新值面向 ClientSideExtension.ListViewCommandSet.CommandBar,这意味着扩展将在目标视图的命令栏中呈现。
SharePoint 框架 ListView 命令集中此属性的可用选项包括:
- ClientSideExtension.ListViewCommandSet.CommandBar:在命令栏中显示扩展。
- ClientSideExtension.ListViewCommandSet.ContextMenu:在 ECB 菜单中显示扩展。
- ClientSideExtension.ListViewCommandSet:在命令栏和 ECB 菜单中显示扩展。
但是,也有一些新属性:
- ClientSideComponentId:定义要呈现的扩展的唯一 ID,并映射到我们在前面讨论的清单文件中定义的 id 属性。
- ClientSideComponentProperties:定义扩展的自定义配置属性(如果有)。 它是一个包含 JSON 序列化对象的字符串,该对象表示声明扩展 (的自定义属性的接口实例,在此示例中,接口为 IDocumentDetailsCommandSetProperties) 。
生成实际SharePoint 框架 ListView 命令集
现在,你已大致了解了解决方案,接下来生成实际的 ListView 命令集以提供文档详细信息功能,从而转换旧的 SharePoint 外接程序模型 UI 扩展。
首先,编辑清单文件,并将其内容替换为以下文件。
{
  "$schema": "https://developer.microsoft.com/json-schemas/spfx/command-set-extension-manifest.schema.json",

  "id": "1602bb8e-cc1d-4417-ba7a-cc1b1d7d7022",
  "alias": "DocumentDetailsCommandSet",
  "componentType": "Extension",
  "extensionType": "ListViewCommandSet",

  // The "*" signifies that the version should be taken from the package.json
  "version": "*",
  "manifestVersion": 2,

  // If true, the component can only be installed on sites where Custom Script is allowed.
  // Components that allow authors to embed arbitrary script code should set this to true.
  // https://support.office.com/en-us/article/Turn-scripting-capabilities-on-or-off-1f2c515f-5d7e-448a-9fd7-835da935584f
  "requiresCustomScript": false,

  "items": {
    "DOC_DETAILS": {
      "title": { "default": "Document Details" },
      "iconImageUrl": "data:image/png;base64,iVBORw0KGgoAAAANSUhEUgAAAFwAAABcCAYAAADj79JYAAAAA...AASUVORK5CYII=",
      "type": "command"
    }
  }
}
更新后的清单只声明一个命令,唯一名称 为DOC_DETAILS,标题为“文档详细信息”,并带有自定义图标图像 URL。 实际上,图像不是 URL,而是 Base64 编码的图像,以便不依赖于外部文件。 为简单起见,在代码摘录中,将缩短 Base64 图像。
现在,通过在 Location 属性中提供 ClientSideExtension.ListViewCommandSet 的值,更新元素文件以在命令栏和 ECB 菜单中显示 ListView 命令集。 此外,删除 ClientSideComponentProperties 属性的内容,因为示例扩展不需要任何自定义属性。 在这里,可以看到新的元素文件。
<?xml version="1.0" encoding="utf-8"?>
<Elements xmlns="http://schemas.microsoft.com/sharepoint/">
    <CustomAction
        Title="DocumentDetails"
        RegistrationId="100"
        RegistrationType="List"
        Location="ClientSideExtension.ListViewCommandSet"
        ClientSideComponentId="1602bb8e-cc1d-4417-ba7a-cc1b1d7d7022"
        ClientSideComponentProperties="">
    </CustomAction>
</Elements>
接下来,我们将通过更新 DocumentDetailsCommandSet.ts 文件来更新 ListView 命令集的实际实现。 首先,将命令唯一名称替换为清单中定义的新名称。 因此,请将 COMMAND_1 替换为 onInit、onExecute 和 _onListViewStateChanged 方法中的DOC_DETAILS,并删除与COMMAND_2扩展相关的任何逻辑(不再存在)。
在扩展的新SharePoint 框架实现中,你将依赖 SharePoint 框架 Dialog Framework 来呈现一个漂亮的对话框窗口,该窗口将嵌入 MGT 组件以显示有关所选文件的详细信息。
注意
有关利用SharePoint 框架对话框框架的更多详细信息,请阅读将自定义对话框与SharePoint 框架扩展配合使用文档。
注意
可以通过阅读 Microsoft Graph 工具包中的文件组件来详细了解 MGT 的文件组件。
现在,创建一个新的文件夹结构 src\documentDetails\components\documentDetailsDialog,用于包含名为 DocumentDetailsDialog.tsx 的新React组件文件。 在同一个新文件夹中,还创建另一个名为 IDocumentDetailsDialogProps.ts 的文件,用于定义对话框窗口的配置属性。 在以下代码摘录中,可以看到定义对话框属性的接口的定义。
export interface IDocumentDetailsDialogProps {
    tenantName: string;
    siteId: string;
    webId: string;
    driveId: string;
    itemId: string;
    onClose: () => Promise<void>;
}
字符串类型的属性集通过 tenantName、siteId、webId、driveId 和 itemId 定义指向 Microsoft Graph 中文档的指针。 最后一个 属性定义一个方法,该方法将用于处理对话框窗口的关闭。 它是一种异步方法, () Promise<void> 没有返回值。
在以下代码摘录中,可以找到对话框组件的实现。
import * as React from 'react';
import * as ReactDOM from 'react-dom';
import { IDocumentDetailsDialogProps } from './IDocumentDetailsDialogProps';

import { BaseDialog, IDialogConfiguration } from '@microsoft/sp-dialog';
import {
    DefaultButton,
    DialogFooter,
    DialogContent
} from 'office-ui-fabric-react';

import { File } from '@microsoft/mgt-react/dist/es6/spfx';

class DocumentDetailsDialogContent extends
    React.Component<IDocumentDetailsDialogProps, {}> {

    public render(): JSX.Element {
        return (<div>
            <DialogContent
                title="Document Details"
                onDismiss={this.props.onClose}>

            <div>
                    <File siteId={`${this.props.tenantName},${this.props.siteId},${this.props.webId}`}
                        driveId={this.props.driveId} itemId={this.props.itemId} />
            </div>
            <DialogFooter>
                <DefaultButton text="Close"
                    title="Close" onClick={this.props.onClose} />
            </DialogFooter>
        </DialogContent>
    </div>);
    }
}

export default class DocumentDetailsDialog extends BaseDialog {

    /**
     * Constructor for the dialog window
     */
    constructor(public tenantName: string,
        public siteId: string, public webId: string,
        public driveId: string, public itemId: string) {
        super({isBlocking: true});
    }

    public render(): void {
        ReactDOM.render(<DocumentDetailsDialogContent
                tenantName={this.tenantName}
                siteId={this.siteId}
                webId={this.webId}
                driveId={this.driveId}
                itemId={this.itemId}
                onClose={this._close}
            />,
            this.domElement);
    }

    public getConfig(): IDialogConfiguration {
      return {
        isBlocking: true
      };
    }

    private _close = async (): Promise<void> => {
        ReactDOM.unmountComponentAtNode(this.domElement);
        await this.close();
    }
}
main类型是 DocumentDetailsDialog 类,这也是文件的默认导出。 它继承自 BaseDialog,这是SharePoint 框架 Dialog Framework () @microsoft/sp-dialog 中定义的类型。
对话框类的公共构造函数接受通过 Microsoft Graph 面向所选文件所需的所有属性。 render 方法只需创建名为 DocumentDetailsDialogContent 的 React 组件的实例,该组件就在对话框类之前定义。 在对话框类中,还可以找到 _close 方法的定义,该方法用于关闭对话框并卸载React分配的资源。
DocumentDetailsDialogContent 组件是一个非常普通的 React 组件,它呈现 File MGT 的组件,并提供用于关闭对话框的“关闭”按钮。
DocumentDetailsDialog 组件在 ListView 命令集的 onExecute 方法中实例化。 此外,MGT 库通过注册其全局提供程序(依赖于从 @microsoft/mgt-spfx导入的类型)在 类的 onInit 方法中初始化。 在以下代码摘录中,可以看到更新的 DocumentDetailsCommandSet.ts 文件。
import { Providers, SharePointProvider } from '@microsoft/mgt-spfx';
import { Log } from '@microsoft/sp-core-library';
import {
  BaseListViewCommandSet,
  Command,
  IListViewCommandSetExecuteEventParameters,
  ListViewStateChangedEventArgs
} from '@microsoft/sp-listview-extensibility';
import DocumentDetailsDialog from './components/documentDetailsDialog/DocumentDetailsDialog';

const LOG_SOURCE: string = 'DocumentDetailsCommandSet';

export default class DocumentDetailsCommandSet extends BaseListViewCommandSet<{}> {

  public onInit(): Promise<void> {
    Log.info(LOG_SOURCE, 'Initialized DocumentDetailsCommandSet');

    // Initialize MGT
    if (!Providers.globalProvider) {
      Providers.globalProvider = new SharePointProvider(this.context);
    }

    // initial state of the command's visibility
    const compareOneCommand: Command = this.tryGetCommand('DOC_DETAILS');
    compareOneCommand.visible = false;

    this.context.listView.listViewStateChangedEvent.add(this, this._onListViewStateChanged);

    return Promise.resolve();
  }

  public async onExecute(event: IListViewCommandSetExecuteEventParameters): Promise<void> {
    switch (event.itemId) {
      case 'DOC_DETAILS': {
        const tenantName: string = this.context.pageContext.site.absoluteUrl.substring(8,
          this.context.pageContext.site.absoluteUrl.indexOf('/', 8));
        const siteId: string = this.context.pageContext.site.id.toString();
        const webId: string = this.context.pageContext.web.id.toString();

        const spItemUrl: string = event.selectedRows[0].getValueByName(".spItemUrl");
        const driveId: string = spItemUrl.substring(spItemUrl.indexOf('drives/') + 7, spItemUrl.indexOf('items'));
        const itemId: string = spItemUrl.substring(spItemUrl.indexOf('items/') + 6, spItemUrl.indexOf('?'));

        await this._showDocumentDetailsDialog(
          tenantName, siteId, webId,
          driveId, itemId);
        break;
      }
      default:
        throw new Error('Unknown command');
    }
  }

  private _onListViewStateChanged = (args: ListViewStateChangedEventArgs): void => {
    Log.info(LOG_SOURCE, 'List view state changed');

    const compareOneCommand: Command = this.tryGetCommand('DOC_DETAILS');
    if (compareOneCommand) {
      // This command should be hidden unless exactly one row is selected.
      compareOneCommand.visible = this.context.listView.selectedRows?.length === 1;
    }

    // You should call this.raiseOnChage() to update the command bar
    this.raiseOnChange();
  }

  private _showDocumentDetailsDialog = async (tenantName: string,
      siteId: string, webId: string,
      driveId: string, itemId: string): Promise<void> => {
    const documentsDetailsDialog = new DocumentDetailsDialog(tenantName, siteId, webId, driveId, itemId);
    await documentsDetailsDialog.show();
  }
}
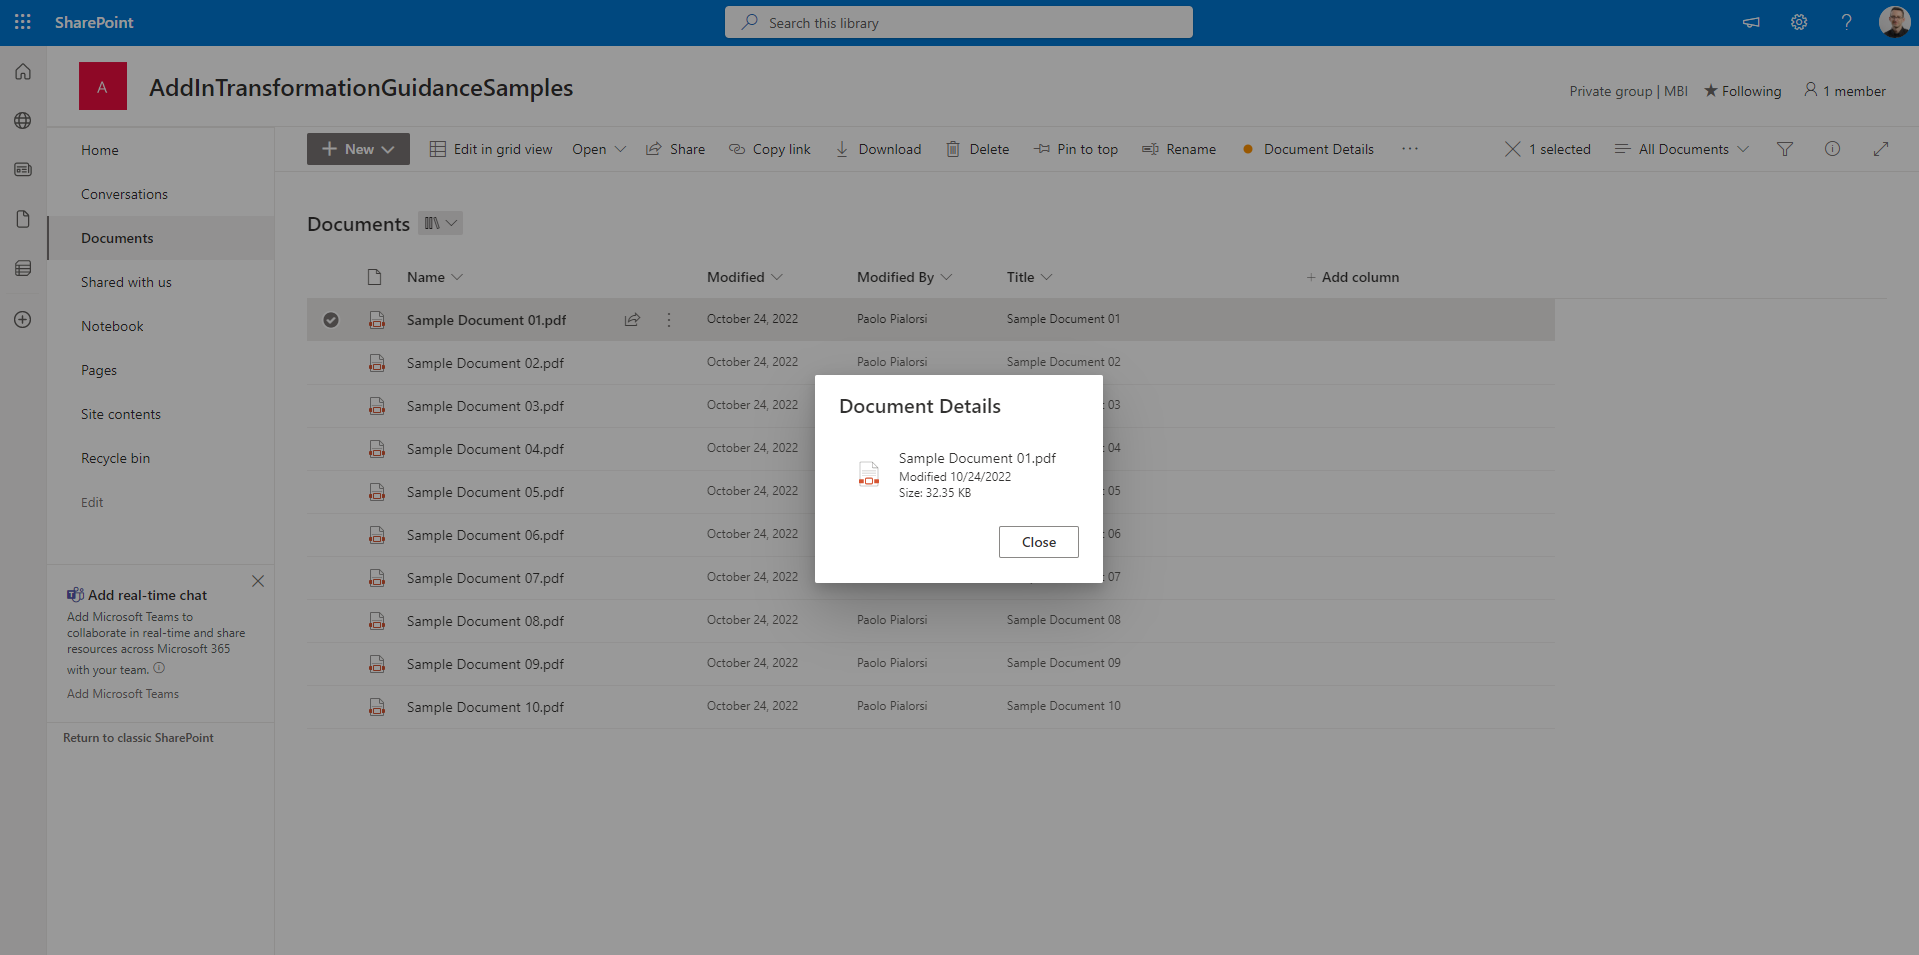
另请注意,在此修订的实现中, onExecute 方法定义为异步方法。 在以下屏幕截图中,可以在示例 SharePoint 文档库中看到 ListView 命令集的输出。
建议的内容
有关本主题的其他信息,请参阅以下文档: