客户端 Web 部件是在 SharePoint 页面的上下文中运行的客户端组件。 可将客户端 Web 部件部署到支持SharePoint 框架的 SharePoint 环境。 还可以使用新式 JavaScript Web 框架、工具和库来生成它们。
客户端 Web 部件支持:
- 使用 HTML 和 JavaScript 生成。
- SharePoint Online 和本地环境。
注意
请务必先设置开发环境,再执行本文中的步骤。
还可以通过观看 Microsoft 365 平台社区 (PnP) YouTube 频道上的此视频来按照以下步骤操作:
新建 Web 部件项目
为项目创建新的项目目录,将当前文件夹更改为该目录。
通过从你创建的新目录中运行 Yeoman SharePoint 生成器来创建新项目:
yo @microsoft/sharepoint
Yeoman SharePoint 生成器将提示你一系列问题。 对于所有问题,接受默认选项,以下问题除外:
- 要创建哪种类型的客户端组件? WebPart
- Web 部件的名称是什么?:HelloWorld
- 要使用哪个模板?: 无框架
此时,Yeoman) 创建 (文件夹 & 文件的项目基架,并通过运行 npm install来安装所需的依赖项。 这通常需要 1-3 分钟时间,具体取决于 Internet 连接。
当项目基架和依赖项安装完成后,Yeoman 将显示以下类似消息,表明操作成功:
_=+#####!
###########|       .-----------------------------------.
###/    (##|(@)    |          Congratulations!         |
###  ######|   \   |   Solution webpart-1 is created.  |
###/   /###|   (@) |  Run gulp serve to play with it!  |
#######  ##|   /   '-----------------------------------'
###     /##|(@)
###########|
**=+####!
重要
运行 npm install 命令时,NPM 可能会在安装依赖项期间显示警告和错误消息。 可以放心地忽略这些日志警告 & 错误消息。
NPM 可能会在进程结束时显示一条有关运行 npm audit 的消息。 请不要运行此命令,因为它将升级可能未由 SharePoint 框架测试的程序包和嵌套依赖项。
有关任何错误故障排除的信息,请参阅已知问题。
使用常用的代码编辑器
由于 SharePoint 客户端解决方案基于 HTML/TypeScript,因此可使用任何支持客户端开发的代码编辑器来生成 Web 部件,例如:
SharePoint 框架文档中的步骤和示例使用的是 Visual Studio Code。 Visual Studio Code (VS Code) 是 Microsoft 提供的轻型源代码编辑器,功能十分强大,可以在桌面上运行。 VS Code 适用于 Windows、macOS 和 Linux。 其中内置了对 JavaScript、TypeScript、Node.js 的支持,且生态系统中包含多种适用于其他语言(如 C++、C#、Python 和 PHP)的扩展。
预览 Web 部件
可以在 SharePoint 托管工作台中预览和测试客户端 Web 部件,而无需将解决方案部署到 SharePoint。 这是通过启动本地 Web 服务器来完成的,托管工作台可以使用 gulp 任务服务加载文件。
默认情况下,客户端工具链使用 HTTPS 终结点。 设置开发环境过程的一部分包括信任本地环境的工具链中包含的开发 SSL证书。 这是必需的,因此你的浏览器将信任证书。
重要
必须信任开发人员证书。 这是一次性过程,并且只有当你在新工作站上运行第一个 SharePoint 框架项目时才是必需的。 无需对每个 SharePoint 框架项目执行此操作。
如果你不信任开发人员证书,请遵循本页上概述的步骤:设置开发环境:信任自签名开发人员证书。
更新项目的托管工作台 URL
使用 gulp 任务 服务时,默认情况下,它将启动具有项目中指定的专用托管工作台 URL 的浏览器。 新项目中托管工作台的默认 URL 指向无效的 URL。
找到并打开项目中的文件./config/serve.json。
找到属性
initialPage:{ "$schema": "https://developer.microsoft.com/json-schemas/core-build/serve.schema.json", "port": 4321, "https": true, "initialPage": "https://enter-your-SharePoint-site/_layouts/workbench.aspx" }将
enter-your-SharePoint-site域更改为要用于测试 SharePoint 租户和网站的 URL。 例如:https://contoso.sharepoint.com/sites/devsite/_layouts/workbench.aspx。
提示
还可以通过将 nobrowser 参数包含到 gulp serve 命令来启动本地 Web 服务器,而无需启动浏览器。 例如,你可能不希望修改所有项目中的 serve.json 文件,而是使用书签启动托管工作台。
gulp serve --nobrowser
启动本地 Web 服务器 & ,启动托管的工作台
假设已安装 & 受信任的开发人员证书,请在控制台中执行以下命令来生成和预览 Web 部件:
gulp serve
此命令将执行一系列 gulp 任务,以创建并启动托管终结点 localhost:4321 和 localhost:5432 的本地 Web 服务器。 然后,它将打开默认浏览器,并在本地开发环境中加载托管的工作台预览 Web 部件。
gulp serve
Build target: DEBUG
[12:13:24] Using gulpfile d:\pnp\helloworld-webpart\gulpfile.js
[12:13:24] Starting 'serve'...
[12:13:24] Starting gulp
[12:13:24] Starting subtask 'spfx-serve'...
[12:13:24] [spfx-serve] To load your scripts, use this query string: ?debug=true&noredir=true&debugManifestsFile=https://localhost:4321/temp/manifests.js
[12:13:25] Starting server...
[12:13:25] Finished subtask 'spfx-serve' after 1.24 s
[12:13:25] Starting subtask 'pre-copy'...
[12:13:26] Finished subtask 'pre-copy' after 533 ms
[12:13:26] Starting subtask 'copy-static-assets'...
[12:13:26] Starting subtask 'sass'...
[12:13:26] Server started https://localhost:4321
[12:13:26] LiveReload started on port 35729
[12:13:26] Running server
[12:13:26] Opening https://sppnp.sharepoint.com/_layouts/workbench.aspx using the default OS app
SharePoint 客户端开发工具使用 gulp 作为任务运行程序,以处理如下生成过程任务:
- 将 TypeScript 文件转译为 JavaScript。
- 将 SASS 文件编译为 CSS。
- 捆绑和缩小 JavaScript 与 CSS 文件。
VS Code 内置对 gulp 和其他任务运行程序的支持。 在 Windows 上按 CTRL+SHIFT+B 或在 macOS 上按 CMD+SHIFT+B,调试并预览 Web 部件。
SharePoint Workbench 是开发人员设计图面,可方便用户快速预览和测试 Web 部件,而无需在 SharePoint 中部署它们。 SharePoint Workbench 包括客户端页面和客户端画布,用户可以在其中添加、删除和测试仍处于开发阶段的 Web 部件。
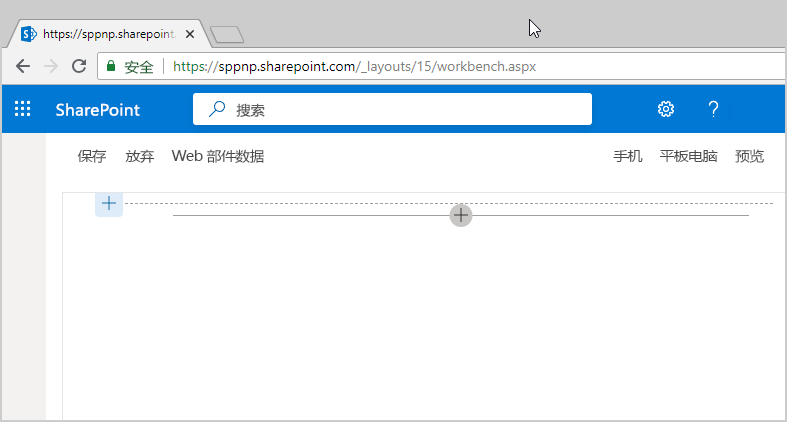
使用 SharePoint Workbench 预览并测试 Web 部件
要添加 HelloWorld Web 部件,请选择“添加”图标(将鼠标悬停在某个部分上时会出现此图标,如上图所示)。 这会打开工具箱,其中显示可供添加的 Web 部件列表。 此列表包括“HelloWorld”Web 部件,以及本地开发环境中的其他 Web 部件。
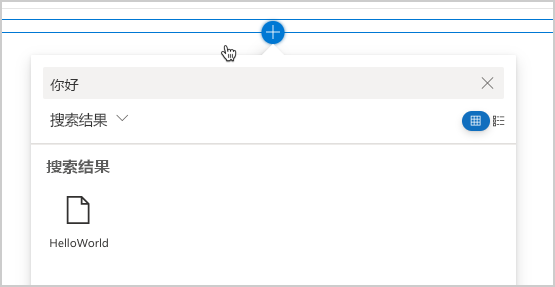
选择“HelloWorld”,将 Web 部件添加到页面:
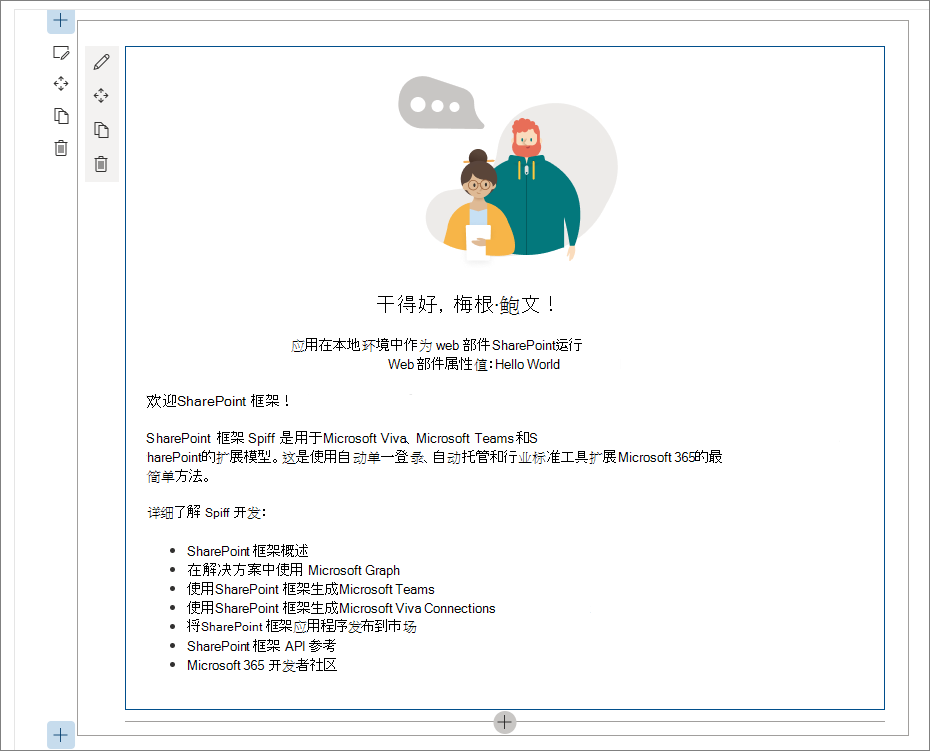
恭喜你! 刚刚将第一个客户端 Web 部件添加到了客户端页面。
选择 Web 部件最左侧的铅笔图标,调出 Web 部件属性窗格。
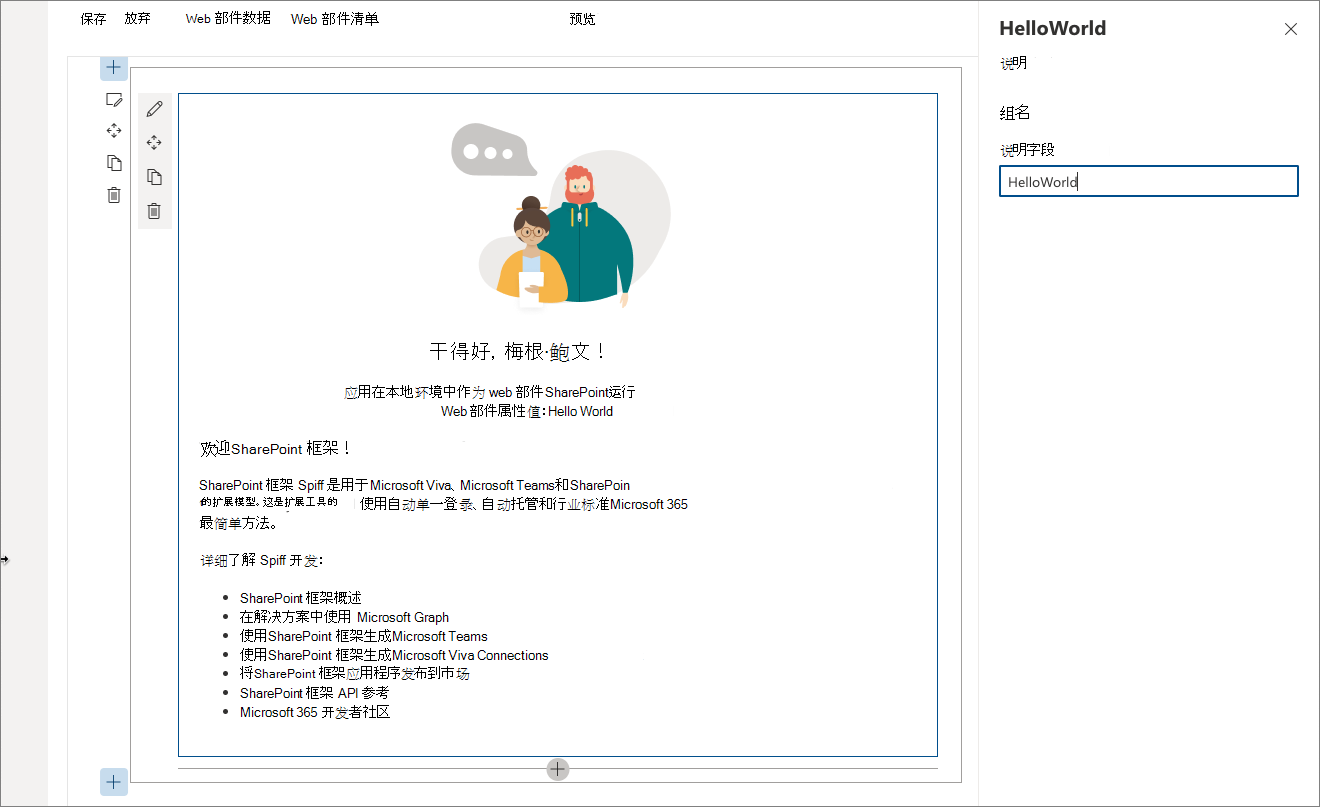
你可以在属性窗格中定义属性,以便自定义 Web 部件。 属性窗格由客户端驱动,并在 SharePoint 中提供一致的设计。
将 Description 文本框中的文本修改为 Client-side web parts are awesome!
请注意,Web 部件中的文本也会随着键入更改。
属性窗格的功能之一是配置其更新行为,可设置为反应模式或非反应模式。 默认情况下,更新行为是反应模式,可方便用户在编辑属性的同时查看所做的更改。 如果行为是反应模式,所做的更改会立即保存。
Web 部件项目结构
使用Visual Studio Code浏览 Web 部件项目结构
在控制台中,通过终止进程来停止本地 Web 服务器。 在 Windows 或 macOS 上选择 CTRL+C。
输入以下命令,在 VS Code(或常用编辑器)中打开 Web 部件项目:
code .
注意
如果执行此命令时出现错误,则需要安装 PATH 中的代码命令。
TypeScript 是生成 SharePoint 客户端 Web 部件的主要语言。 TypeScript 是键入的 JavaScript 超集,它编译为纯 JavaScript。 SharePoint 客户端开发工具使用 TypeScript 类、模块和接口生成,可帮助开发者生成可靠的客户端 Web 部件。
以下是项目中的一些关键文件。
Web 部件类
“src\webparts\helloworld”文件夹中的“HelloWorldWebPart.ts”定义了 Web 部件的主入口点。 Web 部件类 HelloWorldWebPart 扩展了 BaseClientSideWebPart。 所有客户端 Web 部件都应扩展 BaseClientSideWebPart 类,将它定义为有效 Web 部件。
BaseClientSideWebPart 实现构建 Web 部件至少所需的功能。 此类还提供了许多参数,用于验证并访问只读属性,如 displayMode、Web 部件 properties、Web 部件 context、Web 部件 instanceId、Web 部件 domElement等。
请注意,Web 部件类的定义为接受属性类型 IHelloWorldWebPartProps。
此属性类型在 HelloWorldWebPart.ts 文件中的 HelloWorldWebPart 类前面被定义为接口。
export interface IHelloWorldWebPartProps {
  description: string;
}
此属性定义用于为 Web 部件定义自定义属性类型,稍后将在属性窗格部分进行介绍。
Web 部件呈现方法
应呈现 Web 部件的 DOM 元素位于 render() 方法中。 此方法用于在该 DOM 元素内呈现 Web 部件。 在 HelloWorld Web 部件中,DOM 元素设置为 DIV。
public render(): void {
  this.domElement.innerHTML = `
  <section class="${styles.helloWorld} ${!!this.context.sdks.microsoftTeams ? styles.teams : ''}">
    <div class="${styles.welcome}">
      <img alt="" src="${this._isDarkTheme ? require('./assets/welcome-dark.png') : require('./assets/welcome-light.png')}" class="${styles.welcomeImage}" />
      <h2>Well done, ${escape(this.context.pageContext.user.displayName)}!</h2>
      <div>${this._environmentMessage}</div>
      <div>Web part property value: <strong>${escape(this.properties.description)}</strong></div>
    </div>
    <div>
      <h3>Welcome to SharePoint Framework!</h3>
      <p>
      The SharePoint Framework (SPFx) is a extensibility model for Microsoft Viva, Microsoft Teams and SharePoint. It's the easiest way to extend Microsoft 365 with automatic Single Sign On, automatic hosting and industry standard tooling.
      </p>
      <h4>Learn more about SPFx development:</h4>
        <ul class="${styles.links}">
          <li><a href="https://aka.ms/spfx" target="_blank">SharePoint Framework Overview</a></li>
          <li><a href="https://aka.ms/spfx-yeoman-graph" target="_blank">Use Microsoft Graph in your solution</a></li>
          <li><a href="https://aka.ms/spfx-yeoman-teams" target="_blank">Build for Microsoft Teams using SharePoint Framework</a></li>
          <li><a href="https://aka.ms/spfx-yeoman-viva" target="_blank">Build for Microsoft Viva Connections using SharePoint Framework</a></li>
          <li><a href="https://aka.ms/spfx-yeoman-store" target="_blank">Publish SharePoint Framework applications to the marketplace</a></li>
          <li><a href="https://aka.ms/spfx-yeoman-api" target="_blank">SharePoint Framework API reference</a></li>
          <li><a href="https://aka.ms/m365pnp" target="_blank">Microsoft 365 Developer Community</a></li>
        </ul>
    </div>
  </section>`;
}
这种模型非常灵活,以便你可以将 Web 部件内置到任意 JavaScript 框架中,并将其加载到 DOM 元素中。
配置 Web 部件属性窗格
属性窗格在 HelloWorldWebPart 类中进行定义。 需要在 getPropertyPaneConfiguration 属性中定义属性窗格。
定义属性后,可以使用 this.properties.<property-value> 在 Web 部件中访问它们,如 render() 方法中所示:
<div>Web part property value: <strong>${escape(this.properties.description)}</strong></div>
请注意,为了确保字符串有效,正在对属性值执行 HTML 转义。 若要详细了解如何使用属性窗格和属性窗格字段类型,请参阅让 SharePoint 客户端 Web 部件成为可配置部件。
现在,向属性窗格添加其他一些属性:复选框、下拉列表和开关。 首先,从框架中导入各自的属性窗格字段。
滚动到文件顶部,并从 @microsoft/sp-property-pane 将以下内容添加到 import 节:
PropertyPaneCheckbox,
PropertyPaneDropdown,
PropertyPaneToggle
完整的导入部分如下所示:
import {
  IPropertyPaneConfiguration,
  PropertyPaneTextField,
  PropertyPaneCheckbox,
  PropertyPaneDropdown,
  PropertyPaneToggle
} from '@microsoft/sp-property-pane';
将 Web 部件属性更新为包含新属性。 这会将字段映射到类型化对象。
将“IHelloWorldWebPartProps”
IHelloWorldWebPartProps接口替换为以下代码。export interface IHelloWorldWebPartProps { description: string; test: string; test1: boolean; test2: string; test3: boolean; }保存文件。
将
getPropertyPaneConfiguration()方法替换为以下代码,用于添加新属性窗格字段,并将这些字段映射到各自的类型化对象。protected getPropertyPaneConfiguration(): IPropertyPaneConfiguration { return { pages: [ { header: { description: strings.PropertyPaneDescription }, groups: [ { groupName: strings.BasicGroupName, groupFields: [ PropertyPaneTextField('description', { label: 'Description' }), PropertyPaneTextField('test', { label: 'Multi-line Text Field', multiline: true }), PropertyPaneCheckbox('test1', { text: 'Checkbox' }), PropertyPaneDropdown('test2', { label: 'Dropdown', options: [ { key: '1', text: 'One' }, { key: '2', text: 'Two' }, { key: '3', text: 'Three' }, { key: '4', text: 'Four' } ]}), PropertyPaneToggle('test3', { label: 'Toggle', onText: 'On', offText: 'Off' }) ] } ] } ] }; }向 Web 部件 properties 添加属性后,你现在可以访问这些属性,就像之前访问
description属性一样。查找以下行:
<div>Web part property value: <strong>${escape(this.properties.description)}</strong></div>在前面提到的行后面添加以下内容:
<p>${escape(this.properties.test)}</p>
<p>${this.properties.test1}</p>
<p>${escape(this.properties.test2)}</p>
<p>${this.properties.test3}</p>
若要设置属性默认值,必须更新 Web 部件清单的
properties属性包。打开 HelloWorldWebPart.manifest.json 并将
properties修改为:"properties": { "description": "HelloWorld", "test": "Multi-line text field", "test1": true, "test2": "2", "test3": true }
此时,Web 部件属性窗格包含这些属性默认值。
Web 部件清单
HelloWorldWebPart.manifest.json 文件定义了 Web 部件元数据,如版本、ID、显示名称、图标和说明。 每个 Web 部件都必须包含此清单。
{
"$schema": "https://developer.microsoft.com/json-schemas/spfx/client-side-web-part-manifest.schema.json",
"id": "fbcf2c6a-7df9-414c-b3f5-37cab6bb1280",
"alias": "HelloWorldWebPart",
"componentType": "WebPart",
// The "*" signifies that the version should be taken from the package.json
"version": "*",
"manifestVersion": 2,
// If true, the component can only be installed on sites where Custom Script is allowed.
// Components that allow authors to embed arbitrary script code should set this to true.
// https://support.office.com/article/Turn-scripting-capabilities-on-or-off-1f2c515f-5d7e-448a-9fd7-835da935584f
"requiresCustomScript": false,
"supportedHosts": ["SharePointWebPart", "TeamsPersonalApp", "TeamsTab", "SharePointFullPage"],
"preconfiguredEntries": [{
"groupId": "5c03119e-3074-46fd-976b-c60198311f70", // Other
"group": { "default": "Other" },
"title": { "default": "HelloWorld" },
"description": { "default": "HelloWorld description" },
"officeFabricIconFontName": "Page",
"properties": {
  "description": "HelloWorld",
  "test": "Multi-line text field",
  "test1": true,
  "test2": "2",
  "test3": true
}
}]
}
至此,已引入新属性。请运行以下命令,确保再次通过本地开发环境托管 Web 部件。 这还会确保正确应用之前的更改。
gulp serve
后续步骤
恭喜!已成功运行首个 Hello World Web 部件!
至此,Web 部件已在运行。在下一主题将 Web 部件连接到 SharePoint 中,可以继续生成 Hello World Web 部件。 将使用相同的 HelloWorld Web 部件项目,并添加与 SharePoint 列表 REST API 进行交互的功能。 请注意,gulp serve 命令仍在控制台窗口或 Visual Studio Code(如果使用它作为编辑器)中运行。 浏览下一篇文章时,可以继续让它运行。