适用于: 2013
2013  2016 2019 Subscription Edition SharePoint in Microsoft 365
从 SharePoint Server 2013 升级到 SharePoint Server 2016 时,必须使用数据库附加升级,这意味着仅升级环境的内容,而不升级配置设置。 配置新的 SharePoint Server 2016 环境后,可以将内容和服务应用程序数据库从 SharePoint Server 2013 环境复制到 SharePoint Server 2016 环境。 使用备份和还原过程复制数据库,还可以选择在 SharePoint Server 2013 环境中将数据库设置为只读,以便用户可以继续访问其信息,但不能更改它。 本文包含复制数据库要执行的步骤。
升级过程的第 2 阶段:将数据库复制到新的服务器场
|
|
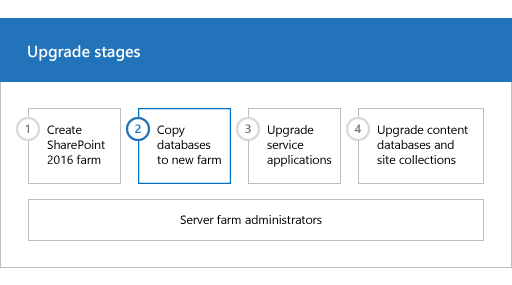
这是将 SharePoint Server 2013 数据和网站升级到 SharePoint Server 2016 的过程中的第二个阶段。 此过程包括下列必须按顺序完成的阶段: 为数据库附加升级创建 SharePoint Server 2016 场。 将数据库复制到新服务器场以升级到 SharePoint Server 2016 (此阶段) 将服务应用程序升级到 SharePoint Server 2016。 将内容数据库升级到 SharePoint Server 2016。 有关整个过程的概述,请参阅 SharePoint Server 2016 的升级过程概述。 |
开始之前
复制数据库之前,请阅读以下信息并执行所有建议的操作。
确保用于复制数据库的帐户有权访问 SharePoint Server 2013 和 SharePoint Server 2016 环境中的SQL Server Management Studio,并且有权访问可从这两个环境访问以存储数据库副本的网络位置。
确保用于将数据库设置为只读和读写的帐户是要升级的内容数据库的 db_owner 固定数据库角色的成员。
在备份数据库之前,检查并修复所有数据库一致性错误。
确保适当的 Service Pack 或更新已应用于您的 2013 环境。 如果在环境中使用远程博客存储 (RBS) ,则必须在环境中运行 SharePoint Server 2013,然后才能开始升级过程。
将早期版本的数据库设置为只读
若要保持用户对原始环境的访问权限,请在备份数据库之前将 SharePoint Server 2013 数据库设置为只读。 即使不想长期保持访问权限,也可以将数据库设置为只读,以确保捕获备份中的所有数据,以便还原和升级环境的当前状态,而无需进行其他更改。 如果数据库设置为只读,用户可以继续查看内容。 但是,他们无法添加或更改内容。
注意
此时不要将搜索数据库设置为只读。 在准备好升级搜索服务应用程序之前,最好不要中断搜索体验。 在将 SharePoint Server 2013 数据和网站升级到 SharePoint Server 2016) 的过程中, (升级 服务应用程序 时,将处理这些数据库。
重要
在 SharePoint Server 2013 环境中执行此步骤。
使用 SQL Server 工具将数据库设置为只读的具体步骤
确认执行此过程的用户帐户是数据库的 db_owner 固定数据库角色的成员。
In SQL Server Management Studio, in Object Explorer, connect to an instance of the Database Engine, expand the server, and then expand Databases.
Find the database that you want to configure to be read-only, right-click the database, and then click Properties.
在“ 数据库属性” 对话框中的 “选择页 ”部分,单击“ 选项”。
In the details pane, under Other options, in the State section, next to Database Read-Only, click the arrow, and then select True.
可以使用 Transact-SQL 配置 READ_ONLY 数据库可用性选项。 有关如何使用 ALTER DATABASE 语句的 SET 子句的详细信息,请参阅 设置数据库选项。
使用 SQL Server 工具备份 SharePoint Server 2013 数据库
在 SQL Server Management Studio 中备份数据库。 数据库的备份副本可确保您的数据在您必须重新启用原始服务器场时处于安全状态,并且该备份副本是数据库附加升级所必需的。 对 SharePoint Server 2013 服务器场中的以下数据库重复此过程:
所有内容数据库(默认数据库名称:WSS_Content_ ID)
以下服务应用程序数据库:
| 服务应用程序 | 默认数据库名称 |
|---|---|
| Business Data Connectivity |
BDC_Service_DB_ ID |
| 托管元数据 |
Managed Metadata Service_ ID |
| PerformancePoint |
PerformancePoint Service Application_ ID |
| Secure Store |
Secure_Store_Service_DB_ ID |
您无需备份配置或管理内容数据库,因为您在设置 SharePoint Server 2016 服务器场时会重新创建这些数据库。 不支持升级配置或管理内容数据库以及管理中心网站集。
完成此过程后,您便已创建只读内容数据库的备份。
重要
在 SharePoint Server 2013 环境中执行此步骤。
使用 SQL Server 工具备份数据库的具体步骤
确认执行此过程的用户帐户是数据库的 db_owner 固定数据库角色的成员。
In Management Studio, in Object Explorer, connect to an instance of the Database Engine, expand the server, and then expand Databases.
Right-click the database that you want to back up, point to Tasks, and then click Back Up.
此时将显示“ 备份数据库 ”对话框。
在“源”区域的“数据库”框中验证数据库名称。
在“备份类型”框中,选择“完全”。
Under Backup component, select Database.
In the Backup set area, in the Name box, either accept the backup set name that is suggested or type a different name for the backup set.
In the Destination area, specify the type of backup destination by selecting Disk or Tape, and then specify a destination. 若要创建其他目标,请单击“添加”。
单击“确定”开始备份过程。
重复上述过程,备份 SharePoint Server 2013 在你的环境中使用的所有内容和相应的服务应用程序数据库。
将备份文件复制到 SharePoint Server 2016 环境
将前面过程中创建的备份文件从 SharePoint Server 2013 环境复制到 SharePoint Server 2016 环境。
还原数据库的备份副本
配置新的 SharePoint Server 2016 服务器场后,可以将数据库的备份副本还原为 SQL Server。 先还原一个数据库,确认还原已起作用,然后再还原其他数据库。
重要
[!重要说明] 请务必将原始备份的副本留作预备,以防升级失败,并且您必须解决问题并重试。 > 在 SharePoint Server 2016 环境中执行此步骤。
使用 SQL Server 工具还原数据库的备份副本的具体步骤
确认执行此过程的用户帐户是数据库的 db_owner 固定数据库角色的成员。
在连接到 SQL Server 2014 数据库引擎的相应实例后,在对象资源管理器中展开服务器名称。
Right-click Databases, and then click Restore Database.
此时会显示 “还原数据库 ”对话框。
在“ 还原数据库 ”对话框的“ 常规 ”页上,在“到数据库”列表中键入要还原 的数据库 的名称。
提示
[!提示] 在键入已还原的数据库的名称时,无需使用原始名称。 若要将数据库名称从带较长 GUID 的名称更改为较短且更友好的名称,这将是一个进行此更改的机会。 此外,请务必更改文件系统(MDF 和 LDF 文件)中的数据库名称和日志文件名以使其相匹配。
In the To a point in time text box, keep the default (Most recent possible).
To specify the source and location of the backup sets to restore, click From device, and then use the ellipsis ( ...) to select the backup file.
在“ 指定备份 ”对话框的“ 备份媒体 ”框中,确保选择了 “文件 ”。
在“备份位置”区域中,单击“添加”。
在“ 查找备份文件 ”对话框中,选择要还原的文件,单击“ 确定”,然后在“ 指定备份 ”对话框中,单击“ 确定”。
在“还原数据库”对话框中的“选择要还原的备份集”网格下,选择最近完整备份旁边的“还原检查”框。
在“还原数据库”对话框中的“选项”页上的“还原选项”下,选择“覆盖现有数据库检查框。
单击“确定”开始还原过程。
将数据库设置为读-写
您无法升级设置为只读的数据库。 您必须先在 SharePoint Server 2016 服务器场中将数据库设置回读写,然后才能附加和升级数据库。
重要
[!重要说明] 在 SharePoint Server 2016 环境中执行此步骤。
使用 SQL Server 工具将数据库设置为读写的具体步骤
In SQL Server Management Studio, in Object Explorer, connect to an instance of the Database Engine, expand the server, and then expand Databases.
Select the database that you want to configure to be read-write, right-click the database, and then click Properties.
在“ 数据库属性” 对话框中的 “选择页 ”部分,单击“ 选项”。
In the details pane, under Other options, in the State section, next to Database Read-Only, click the arrow, and then select False.
|
|
这是将 SharePoint Server 2013 数据和网站升级到 SharePoint Server 2016 的过程中的第二个阶段。 下一阶段: 将服务应用程序升级到 SharePoint Server 2016 有关整个过程的概述,请参阅 SharePoint Server 2016 的升级过程概述。 |
另请参阅
概念
创建 SharePoint Server 2016 场以执行数据库附加升级