在 SharePoint 模式下安装第一个 Report Server
适用范围:![]() SQL Server Reporting Services (2016)
SQL Server Reporting Services (2016) ![]() Power BI 报表服务器
Power BI 报表服务器 ![]() SharePoint
SharePoint
本主题中的过程将指导你完成以 SharePoint 模式在单服务器上安装 Reporting Services。 涉及的步骤包括运行 SQL Server 安装向导以及使用 SharePoint 管理中心的配置任务。 本主题还可用于更新现有安装的单独过程,例如创建 Reporting Services 服务应用程序。
注意
自 SQL Server 2016 之后,不再提供 Reporting Services 与 SharePoint 的集成这一功能。 SQL Server 2017 之后,Power View 支持不再可用。
有关将更多 Reporting Services 服务器添加到现有场的信息,请参阅以下内容:
单服务器安装对于开发和测试场景很有用,但不建议用于生产环境。
单服务器部署示例
单服务器安装对于开发和测试场景很有用,但不建议将单服务器用于生产环境。 单服务器环境是指 SharePoint 和 Reporting Services 组件安装在同一台计算机上的一台计算机。 本主题不涉及具有多个 Reporting Services 服务器的扩展环境。
以下关系图阐明了属于单服务器 Reporting Services 部署的一部分的组件。
注意
对于 SharePoint 2016,已将 Excel Services 移至 Office Online Server 且无法用在单个服务器部署中。 必须将 Office Online Server 部署到不同服务器。 有关详细信息,请参阅 Office Online Server 概述 和 配置 Excel 联机管理设置。
| 组件 | 说明 |
|---|---|
| (1) | 从 SQL Server 安装安装的 SharePoint 服务。 可以创建一个或多个 Reporting Services 服务应用程序。 |
| (2) | 用于 SharePoint 产品的 Reporting Services 外接程序在 SharePoint Server 上提供用户界面组件。 |
| (3) | 供 Power View 和 Power Pivot 使用的 Excel Service 应用程序。 这在 SharePoint 2016 单服务器部署中不可用。 需要 Office Online Server 。 |
| (4) | Power Pivot 服务应用程序。 |

提示
有关更复杂的部署实例,请参阅 SharePoint 中 SQL Server BI 功能的部署拓扑。
安装帐户
本部分介绍在 SharePoint 模式下用于主要 Reporting Services 部署步骤的帐户和权限。
安装并注册 Reporting Services 服务:
- 在 SharePoint 模式下安装 Reporting Services 过程中使用的当前帐户(称为“安装”帐户)需要具有本地计算机的管理权限。 如果在安装 SharePoint 后安装 Reporting Services 并且“安装”帐户也是 SharePoint 场管理员组的成员,Reporting Services 安装将为你注册 Reporting Services 服务。 如果在安装 SharePoint 之前安装 Reporting Services 或者“安装”帐户不是场管理员组的成员,则需手动注册该服务。 请参见 步骤 2:注册并启动 Reporting Services SharePoint 服务。
创建 Reporting Services 服务应用程序
在安装并注册 Reporting Services 服务后,创建一个或多个 Reporting Services 服务应用程序。 “SharePoint 场服务帐户”需要暂时成为本地管理员组的成员才能创建 Reporting Services 服务应用程序。 有关 SharePoint 2013 帐户权限的详细信息,请参阅 SharePoint 2013 中的帐户权限和安全设置 (https://technet.microsoft.com/library/cc678863.aspx);对于 SharePoint 2016,请参阅 SharePoint 2016 中的帐户权限和安全设置。
根据最佳安全做法,SharePoint 场管理员帐户不应同时作为本地操作系统管理员帐户。 如果您在安装过程中向本地管理员组中添加场管理员帐户,建议您在安装完成后从本地管理员组中删除该帐户。
步骤 1:在 SharePoint 模式下安装 Reporting Services 报表服务器
此步骤在 SharePoint 模式下安装 Reporting Services 报表服务器以及用于 SharePoint 产品的 Reporting Services 外接程序。 根据已在您的计算机上安装的项,您可能不会看到在下面的步骤中介绍的某些安装页。
重要
对于 SharePoint 2016,Reporting Services 将安装在其上的 SharePoint 服务器需要具有“自定义”服务器角色 。 Reporting Services 将在不处于“自定义”角色中的 SharePoint 服务器上成功部署,但在下一次 SharePoint 维护时段期间,MinRole 将停止 Reporting Services 服务,因为它检测到 SharePoint 集成模式中的 Reporting Services 不指示对其他任何 SharePoint 服务器角色的支持。 Reporting Services 服务应用程序仅支持“自定义”角色 。
注意
如果你打算同时在 Share Point 2016 上安装 Power Pivot 服务,请在安装 Reporting Services 之前安装。 Power Pivot 服务仅能安装在处于“自定义”角色中的 SharePoint 服务器上 。
将自定义服务器角色应用于 SharePoint 2016 服务器
注意
这不适用于 SharePoint 2013。
登录到打算安装 Reporting Services 的 SharePoint 服务器。
以管理员身份启动 SharePoint 2016 命令行管理程序。
可以右键单击“SharePoint 2016 命令行管理程序”,然后选择“以管理员身份运行”。
在 PowerShell 命令提示符中,运行以下命令。
注意
确保指定正确的 SharePoint 服务器名称。
Set-SPServer SERVERNAME -Role Custom应该可以看见一条“已计划计时器作业”的响应。 需等待作业执行。
使用以下命令验证服务器的已分配角色。
Get-SPServer SERVERNAME“角色”应列出“自定义” 。
安装 Reporting Services
运行 SQL Server 安装向导 (Setup.exe)。
在向导的左侧选择“安装”,然后选择“全新 SQL Server 独立安装或向现有安装添加功能” 。
如果看到“产品密钥”页,请键入密钥或接受 Enterprise Evaluation 版本的默认密钥 。
选择“下一页”。
如果您看到许可条款页,则查看并接受许可条款。 对于你同意发送功能使用情况数据来帮助改进产品功能和支持,Microsoft 深表感谢。
选择“下一页”。
建议选择“使用 Microsoft 更新检查更新(推荐)” 。 此为可选项。
选择“下一页”。
在“安装安装程序文件”页上,根据你的计算机上已安装的内容,可能会看到以下消息:
“一个或多个受影响的文件具有挂起的操作。 安装过程完成后,必须重新启动计算机。”
选择“下一页”。
如果看到“安装规则” 页。 查看任何警告或妨碍安装的问题。 然后,选择“下一步” 。
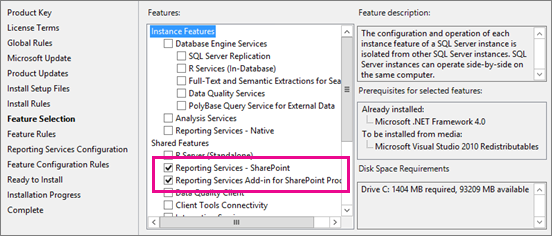
在 “功能选择” 页中,选择以下选项:
Reporting Services - SharePoint
用于 SharePoint 产品的 Reporting Services 外接程序。
(可选)还可以选择“数据库引擎服务”以提供完整的环境,但是你应有托管 SharePoint 数据库的 SQL Server 数据库引擎实例 。
选择下一步。
如果您已选择“数据库引擎服务”,请在 “实例配置” 页上接受 MSSQLSERVER 的默认实例,然后单击 “下一步” 。
 与以前的 Reporting Services 体系结构一样,Reporting Services SharePoint 服务体系结构不是基于 SQL Server“实例”的。
如果您看到 “服务器配置” 页,则键入相应的凭据。 如果要使用 Reporting Services 数据警报或订阅功能,则需要将 SQL Server 代理的“启动类型”更改为“自动” 。 根据已在计算机上安装的项,您可能不会看到 “服务器配置” 页。
选择“下一页”。
如果选择了“数据库引擎服务”,你将看到“数据库引擎配置”页,请将相应的帐户添加到 SQL 管理员列表,然后选择“下一步”。
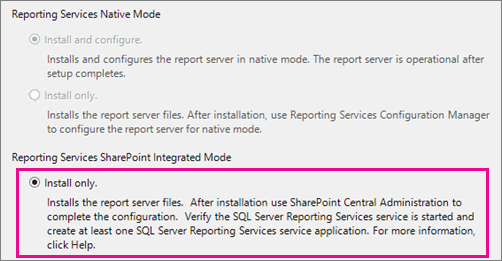
在 “Reporting Services 配置” 页上,您应该看到 “仅安装” 选项处于选中状态。 此选项将安装报表服务器文件,但不会为 Reporting Services 配置 SharePoint 环境。
备注
SQL Server 安装完成后,您需要按照本主题的其他章节的内容配置 SharePoint 环境。 这包括安装 Reporting Services 共享服务和创建 Reporting Services 服务应用程序。
查看任何警告,然后在“功能配置规则”页上选择“下一步”(在停留此页面的情况下)。
在“准备安装”页上,查看安装摘要 。 该摘要将包含一个 “Reporting Services SharePoint 模式” 子节点,该节点将显示 SharePointFilesOnlyMode的值。 选择“安装” 。
安装将需要几分钟时间。 你将看到“完成”页,其中列出了功能以及各功能的状态。 您可能会看到一个信息对话框,指示计算机需要重新启动。
步骤 2:注册并启动 Reporting Services SharePoint 服务

注意
如果要安装到现有 SharePoint 场,则不需要完成本节中的步骤。 当你在本文档的上一节中运行 SQL Server 安装向导时,就已经安装并启动了 Reporting Services SharePoint 服务。
下面是需要手动注册 Reporting Services 服务的常见原因。
在安装 SharePoint 之前已安装 Reporting Services SharePoint 模式。
用于安装 Reporting Services SharePoint 模式的帐户不是 SharePoint 场管理员组的成员。 有关详细信息,请参阅 Setup accounts部分。
在执行 SQL Server 安装向导的过程中已安装了必需的文件,但需要将服务注册到 SharePoint 场中。
以下步骤将指导你完成打开 SharePoint 命令行管理程序并运行 PowerShell cmdlet:
选择“开始”按钮
选择“Microsoft SharePoint 2016 产品”或“Microsoft SharePoint 2013 产品”组。
右键单击“SharePoint 2016 命令行管理程序”或“SharePoint 2013 命令行管理程序”,选择“以管理员身份运行” 。
注意
在标准 Windows PowerShell 窗口中无法识别 SharePoint 命令。 使用“SharePoint 命令行管理程序” 。
运行以下 PowerShell 命令安装 Reporting Services SharePoint 服务。 命令成功完成后会在 Management Shell 中显示一个新行。 当命令成功完成时,不会向 Management Shell 返回任何消息 :
Install-SPRSService运行以下 PowerShell 命令安装 Reporting Services 服务代理。 命令成功完成后会在 Management Shell 中显示一个新行。 当命令成功完成时,不会向 Management Shell 返回任何消息 :
Install-SPRSServiceProxy运行以下 PowerShell 命令以启动服务,或者查看下面的注释以了解有关从 SharePoint 管理中心启动服务的说明:
get-spserviceinstance -all |where {$_.TypeName -like "SQL Server Reporting*"} | Start-SPServiceInstance重要
如果您看到与以下内容类似的错误消息:
> Install-SPRSService : The term 'Install-SPRSService' **isn't recognized** as the name of a cmdlet, function, script file, or operable program. Check the spelling of the name, or if a path was included, verify that the path is correct and try again.你位于 Windows PowerShell 中而不是 SharePoint 命令行管理程序中,或尚未安装 Reporting Services SharePoint 模式。 有关 Reporting Services 和PowerShell 的详细信息,请参阅用于 Reporting Services SharePoint 模式的 PowerShell cmdlet。
您也可以通过 SharePoint 管理中心(而不是通过运行第三个 PowerShell 命令)来启动服务。 以下步骤还用于验证服务是否正在运行。
在 SharePoint 管理中心的 “系统设置” 组中,单击 “管理服务器上的服务” 。
找到 “SQL Server Reporting Services 服务” ,然后在“操作”列中单击 “启动” 。
Reporting Services 服务的状态将从 “已停止” 更改为 “已启动” 。 如果 Reporting Services 服务不在列表中,则使用 PowerShell 安装该服务。
注意
如果 Reporting Services 服务停留在“正在启动”状态,并且未更改为“已启动”,则验证是否已在 Windows 服务器管理器中启动“SharePoint 2013 管理”服务 。
步骤 3:创建 Reporting Services 服务应用程序
本节提供你在查看现有服务应用程序的情况下,用于创建服务应用程序的步骤和属性说明。
在 SharePoint 管理中心的“应用程序管理”组中,选择“管理服务应用程序” 。
在 SharePoint 功能区中,选择“新建”按钮。
在“新建”菜单中,选择“SQL Server Reporting Services 服务应用程序”。
重要
如果 Reporting Services 选项没有出现在列表中,则表明 Reporting Services 共享服务尚未安装。 查看上一节,了解如何使用 PowerShell cmdlt 安装 Reporting Services 服务。
在 “创建 SQL Server Reporting Services 服务应用程序” 页中,输入应用程序的名称。 如果要创建多个 Reporting Services 服务应用程序,则一个描述性名称或命名约定将帮助你组织管理操作。
在 “应用程序池” 部分中,为该应用程序创建一个新应用程序池(推荐)。 如果您将相同的名称用于应用程序池和服务应用程序,则可能会使您正在进行的管理更加容易。 这可能还会受到你将创建的服务应用程序的数目以及是否需要在单个应用程序池中使用若干应用程序的影响。 请参阅 SharePoint Server 文档,了解有关应用程序池管理的建议和最佳做法。
为该应用程序池选择或创建一个安全帐户。 请确保指定一个域用户帐户。 通过域用户帐户,可以使用 SharePoint 的托管帐户功能,从而使您可以在一个位置中更新密码和帐户信息。 如果您计划扩展部署以便包括将在同一标识下运行的附加服务实例,则域帐户也是必需的。
在 “数据库服务器” 中,您可以使用当前服务器或选择其他 SQL Server。
在 “数据库名称” 中,默认值是
ReportingService_<guid>,这是唯一的数据库名称。 如果您键入一个新值,请键入唯一值。 这是您要专为服务应用程序创建的新数据库。在 “数据库身份验证” 中,默认值是 “Windows 身份验证”。 如果您选择 “SQL 身份验证” ,请参阅 SharePoint 文档以便了解有关如何在 SharePoint 部署中使用此身份验证类型的最佳做法。
在 “Web 应用程序关联” 部分中,选择要设置为供当前 Reporting Services 服务应用程序访问的 Web 应用程序。 可以将一个 Reporting Services 服务应用程序与一个 Web 应用程序相关联。 如果所有当前 Web 应用程序均已与一个 Reporting Services 服务应用程序相关联,将显示警告消息。
选择“确定”。
用于创建服务应用程序的过程可能会需要几分钟才能完成。 当它完成时,将显示确认消息和一个指向“预配订阅和警报”页的链接。 如果要使用 Reporting Services 订阅功能或数据警报功能,请完成此设置步骤。 有关详细信息,请参阅用于 SSRS 服务应用程序的设置订阅和警报。
有关使用 PowerShell 创建 Reporting Services 服务应用程序的信息,请参阅:
步骤 4:激活 Power View 网站集功能。
Power View(用于 Microsoft SharePoint 产品的 SQL Server 2016 Reporting Services 加载项的一项功能)是一个网站集功能。 将自动为根网站集和安装 Reporting Services 外接程序后创建的网站集激活该功能。 如果你计划使用 Power View,请验证已激活该功能。
如果在安装 SharePoint Server 后安装用于 SharePoint 产品的 Reporting Services 外接程序,则将仅为根网站集激活 Report Server 集成功能和 Power View 集成功能。 对于其他网站集,请手动激活这些功能。
激活或验证 Power View 网站集功能
对于 SharePoint 2013,下面的步骤假定你的 SharePoint 站点已为 2013 体验版本进行了配置。
打开浏览器找到所需的 SharePoint 网站。 例如 https://<servername>/sites/bi
选择“设置”
 。
。选择“网站设置”。
在“网站集管理”组中,选择“网站集功能” 。
在列表中找到 “Power View 集成功能” 。
选择“激活”。 功能状态将更改为 “活动” 。
将对每个网站集完成此过程。 有关详细信息,请参阅 在 SharePoint 中激活报表服务器和 Power View 集成功能。
等同于步骤 1-4 的 Windows PowerShell 脚本
本节中的 PowerShell 脚本等同于完成前面几节中的步骤 1 - 4。 此脚本将完成以下操作:
安装 Reporting Services 服务和服务代理,然后启动该服务。
创建名为“Reporting Services”的服务代理。
创建名为“Reporting Services 应用程序”的 Reporting Services 服务应用程序。
启用网站集的 Power View 功能。
参数
更新服务代理的 -Account 。 该帐户在 SharePoint 场中必须是一个托管服务帐户。 有关详细信息,请参阅 SharePoint 主题 规划 SharePoint 2013 中的管理和服务帐户。
更新服务应用程序的 -DatabaseServer 参数。 此参数是数据库引擎实例
更新希望 Power View 功能启用的站点的 -url 参数。
若要使用该脚本,请执行以下操作:
使用管理权限打开 Windows PowerShell。
将以下代码复制到脚本窗口。
更新以上部分中描述的三个参数,然后运行该脚本。
#This script Configures SQL Server Reporting Services SharePoint mode

$starttime=Get-Date
write-host -foregroundcolor DarkGray StartTime>> $starttime

Write-Host -ForegroundColor Green "Import the SharePoint PowerShell snappin"
Add-PSSnapin Microsoft.Sharepoint.PowerShell -EA 0

Write-Host -ForegroundColor Green "Install SSRS Service and Service Proxy, and start the service"
Write-Host -ForegroundColor Green ">>>>>>>>>>>>>>>>>>>>>>>>>>>>>>>>>>>>>>>>>>>>>>>>>>>>>>>>>>>>>>>>>>>>>>>>>>>>>>>"

    Write-Host -ForegroundColor Green "Install the Reporting Services Shared Service"
    Install-SPRSService

    Write-Host -ForegroundColor Green " Install the Reporting Services Service Proxy"
    Install-SPRSServiceProxy

    # Get the ID of the RS Service Instance and start the service
    Write-Host -ForegroundColor Green "Start the Reporting Services Service"
    $RS = Get-SPServiceInstance | Where {$_.TypeName -eq "SQL Server Reporting Services Service"}
    Start-SPServiceInstance -Identity $RS.Id.ToString()

    # Wait for the Reporting Services Service to start...
    $Status = Get-SPServiceInstance $RS.Id.ToString()
    While ($Status.Status -ne "Online")
    {
        Write-Host -ForegroundColor Green "SSRS Service Not Online...Current Status = " $Status.Status
        Start-Sleep -Seconds 2
        $Status = Get-SPServiceInstance $RS.Id.ToString()
    }

$time=Get-Date
write-host -foregroundcolor DarkGray StartTime>> $starttime
write-host -foregroundcolor DarkGray $time

Write-Host -ForegroundColor Green "Create a new application pool and Reporting Services service application"
Write-Host -ForegroundColor Green ">>>>>>>>>>>>>>>>>>>>>>>>>>>>>>>>>>>>>>>>>>>>>>>>>>>>>>>>>>>>>>>>>>>>>>>>>>>>>>>"
Write-Host -ForegroundColor Green "Create a new application pool"
#!!!! update "-Account" with an existing Managed Service Account
New-SPServiceApplicationPool -Name "Reporting Services" -Account "<domain>\User name>"
$appPool = Get-SPServiceApplicationPool "Reporting Services"

Write-Host -ForegroundColor Green " Create the Reporting Services Service Application"
#!!!! Update "-DatabaseServer", an instance of the SQL Server database engine
$rsService = New-SPRSServiceApplication -Name "Reporting Services Application" -ApplicationPool $appPool -DatabaseName "Reporting_Services_Application" -DatabaseServer "<server name>"

Write-Host -ForegroundColor Green "Create the Reporting Services Service Application Proxy"
$rsServiceProxy = New-SPRSServiceApplicationProxy -Name "Reporting Services Application Proxy" -ServiceApplication $rsService

Write-Host -ForegroundColor Green "Associate service application proxy to default web site and grant web applications rights to SSRS application pool"
Write-Host -ForegroundColor Green ">>>>>>>>>>>>>>>>>>>>>>>>>>>>>>>>>>>>>>>>>>>>>>>>>>>>>>>>>>>>>>>>>>>>>>>>>>>>>>>"
# Associate the Reporting Services Service Applicatoin Proxy to the default web site...
Get-SPServiceApplicationProxyGroup -default | Add-SPServiceApplicationProxyGroupMember -Member $rsServiceProxy

$time=Get-Date
write-host -foregroundcolor DarkGray StartTime>> $starttime
write-host -foregroundcolor DarkGray $time

Write-Host -ForegroundColor Green "Enable the PowerView and reportserver site features"
Write-Host -ForegroundColor Green ">>>>>>>>>>>>>>>>>>>>>>>>>>>>>>>>>>>>>>>>>>>>>>>>>>>>>>>>>>>>>>>>>>>>>>>>>>>>>>>"
#!!!! update "-url"  of the site where you want the features enabled
Enable-SPfeature -identity "powerview" -Url https://server/sites/bi
Enable-SPfeature -identity "reportserver" -Url https://server/sites/bi

####To Verify, you can run the following:
#Get-SPRSServiceApplication
#Get-SPServiceApplicationPool | where {$_.name -like "reporting*"}
#Get-SPRSServiceApplicationProxy
其他配置
本部分介绍在大多数 SharePoint 部署中很重要的其他配置步骤。
配置 Excel Services 和 Power Pivot
若要在 SharePoint 中的 Excel 2016 或 Excel 2013 工作薄中查看 Power View 报表,则需要配置 Excel Services 以在 Power Pivot 模式下使用 Analysis Services 服务器。
对于 SharePoint 2016,需要配置 Office Online Server 以使用 Excel Services。 有关详细信息,请参阅以下白皮书。
在 SharePoint 2016 中部署 SQL Server 2016 PowerPivot 和 Power View
在多层 SharePoint 2016 场中部署 SQL Server 2016 PowerPivot 和 Power View
对于 SharePoint 2016,你需要创建并配置一个 Excel Services 应用程序。 有关详细信息,请参阅以下主题:
在 Power Pivot 模式下安装 Analysis Services 中的“为 Analysis Services 集成配置 Excel Services”部分。
此外,Reporting Services 服务应用程序使用的应用程序池安全帐户必须是 Analysis Services 服务器上的管理员。
预配订阅和警报
Reporting Services 订阅和数据警报功能可能要求配置 SQL Server 代理权限。 如果您看到指示“需要 SQL Server 代理”的错误消息,而您已验证 SQL Server 代理正在运行,则应更新权限。 您可以在“创建服务应用程序成功”页上单击链接 “设置订阅和警报” ,以便转到其他页来设置 SQL Server 代理。 如果你的部署是跨计算机边界的部署(例如,当 SQL Server 数据库实例位于其他计算机上时),会需要此设置步骤。 有关详细信息,请参阅用于 SSRS 服务应用程序的设置订阅和警报
为 SSRS 服务应用程序配置电子邮件
Reporting Services 数据警报功能会在电子邮件中发送警报。 若要发送电子邮件,可能需要配置 Reporting Services 服务应用程序,并可能需要修改该服务应用程序的电子邮件传递扩展插件。 如果计划将电子邮件传递扩展插件用于 Reporting Services 订阅功能,则需要进行电子邮件设置。 有关详细信息,请参阅为 Reporting Services 服务应用程序配置电子邮件(SharePoint 2013 和 SharePoint 2016)。
将 Reporting Services 内容类型添加到内容库
Reporting Services 提供预定义的内容类型,用于管理共享数据源 (.rsds) 文件和报表生成器报表定义 (.rdl) 文件。 将“报表生成器报表”和“报表数据源”内容类型添加到库中将启用“新建”命令,以便创建对应类型的新文档。 有关详细信息,请参阅 向 SharePoint 库添加 Reporting Services 内容类型。
激活报表服务器文件同步功能
如果用户经常直接将已发布的报表项上载到 SharePoint 文档库,则 “报表服务器文件同步” 站点级别功能将很有用。 文件同步功能将更频繁地将报表服务器目录与文档库中的项进行同步。 有关详细信息,请参阅 在 SharePoint 管理中心中激活报表服务器文件同步功能。
验证安装
以下是验证 Reporting Services SharePoint 模式部署的建议步骤和过程。
请参阅验证主题 Verify a Reporting Services Installation中的 SharePoint 部分。
在 SharePoint 文档库中,创建一个仅包含文本框的基本 Reporting Services 报表,例如标题。 该报表不包含任何数据源或数据集。 目标是确认您能打开报表生成器,生成基本报表,以及预览该报表。
将报表保存到文档库并从库中运行该报表。 有关使用报表生成器创建报表的详细信息,请参阅 启动报表生成器(报表生成器)。
相关内容
反馈
即将发布:在整个 2024 年,我们将逐步淘汰作为内容反馈机制的“GitHub 问题”,并将其取代为新的反馈系统。 有关详细信息,请参阅:https://aka.ms/ContentUserFeedback。
提交和查看相关反馈