练习 - 创建并运行基本管道
重要
需要自己的 Azure 订阅才能完成本练习,并且可能会产生费用。 如果还没有 Azure 订阅,请在开始前创建一个免费帐户。
你需要自动将更新部署到玩具公司的网站。 首先,在 Azure DevOps 中创建一个基本管道。
通过学习本练习,你将能够:
- 创建 Azure DevOps 组织和项目。
- 创建一个基本管道。
- 执行基本管道。
在 Azure DevOps 中创建项目
在浏览器中,转到 dev.azure.com。 登录或创建新帐户。
如果要创建新帐户,请按照提示创建一个 Azure DevOps 组织。 然后 Azure DevOps 会提示你创建一个新项目。 继续执行下一步,以设置项目。
如果登录到现有的 Azure DevOps 组织,请选择“新建项目”以创建新项目。
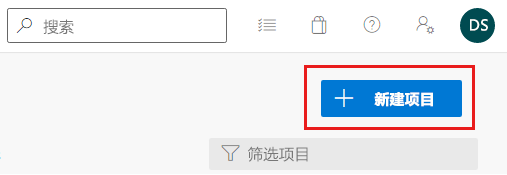
在“创建项目以开始使用”窗格中,输入新项目的以下详细信息:
- 项目名称:使用有意义但简称的名称。 在本练习中,输入toy-website。
- 说明:输入项目用途的说明。 在本练习中,输入 Toy 公司网站。
- 可见性:可以使用 Azure DevOps 创建公共和专用存储库。 在这种情况下,存储库应是专用的,因为公司网站文件应仅由组织中的人员访问。 可以稍后向其他用户授予访问权限。
你的项目配置应如下例所示:
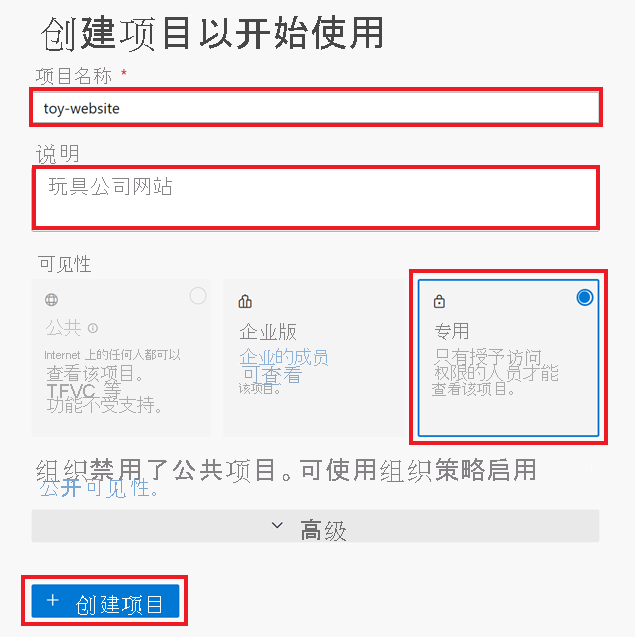
选择“创建项目”。
克隆存储库
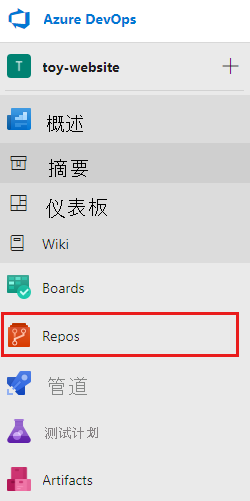
在“欢迎使用”窗格或资源菜单中,选择“Repos”。
如果使用的是 macOS,则需要提供特定密码才能克隆 Git 存储库。 选择“生成 Git 凭据”,然后将显示的用户名和密码复制到安全的位置。
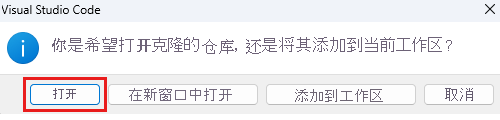
在“克隆到计算机”部分中,选择“在 VS Code 中克隆”。 如果系统提示你允许 Visual Studio Code 打开,请选择打开。
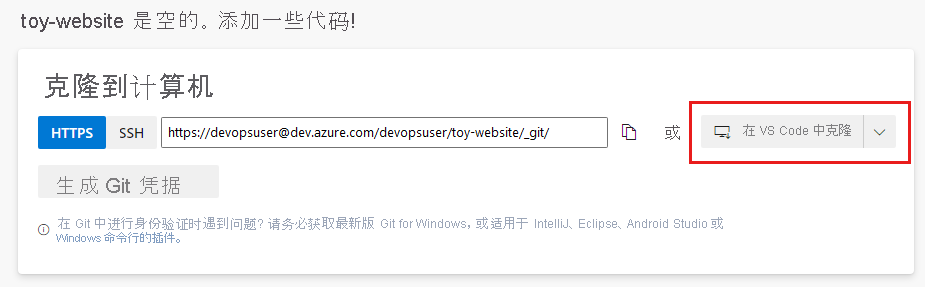
如果出现一个对话框,提示允许扩展打开存储库 URI,请选择“打开”。
在本地设备上创建用于此存储库的文件夹,然后选择“选择作为存储库位置”。
如果这是你第一次使用此存储库,系统会提示你登录。
在 Windows 上,请输入您在此次练习中早先用于登录 Azure DevOps 的相同凭据。
对于 macOS,请输入刚才生成的 Git 用户名和密码。
Visual Studio Code 会提示你打开存储库。 选择“打开”。
安装 Azure Pipelines 扩展
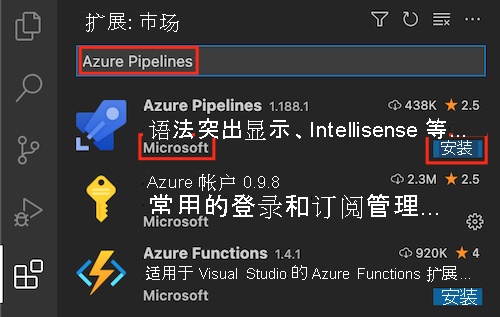
Microsoft 发布了一个适用于 Visual Studio Code 的 Azure Pipelines 扩展。 该扩展可帮助你编写管道 YAML 文件。 最好安装此扩展,以便在工作时验证 YAML 文件。
在 Visual Studio Code 中,选择“查看”>扩展”(快捷方式为 Ctrl+Shift+X)。
在“搜索”框中,输入“Azure Pipelines”,然后选择 Microsoft 发布的 Azure Pipelines 扩展。 选择“安装” 。
创建 YAML 管道定义
现在已创建组织、项目和存储库,接下来可以创建一个基本管道定义。
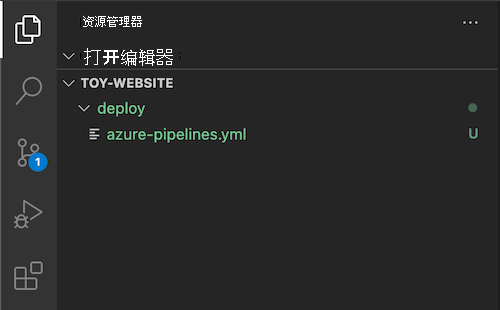
在 Visual Studio Code 中,打开“资源管理器”。
在“资源管理器”中,将鼠标悬停在 TOY-WEBSITE 项目文件夹上,然后选择“新建文件夹”图标。 将该文件夹命名为“deploy”。
选择 deploy 文件夹,并在 TOY-WEBSITE 项目中选择“新建文件”图标。 将该文件命名为 azure-pipelines.yml。
YML 文件在主面板中打开。 将以下管道定义代码粘贴到文件中:
trigger: none

pool:
  vmImage: ubuntu-latest

jobs:
- job:
  steps:
  - script: echo Hello world!
    displayName: 'Placeholder step'
保存对该文件所做的更改。
在 Visual Studio Code 中,通过选择终端>新建终端 打开终端窗口。
终端窗口通常在屏幕的下半部分打开。
若要将 azure-pipelines.yml 文件提交并推送到 Git 存储库,请将此代码粘贴到终端面板中,然后按 Enter。
git add deploy/azure-pipelines.yml
git commit -m "Add initial pipeline definition"
git push
在 Azure Pipelines 中设置管道
你已创建了管道定义。 接下来,你将向 Azure Pipelines 注册管道。
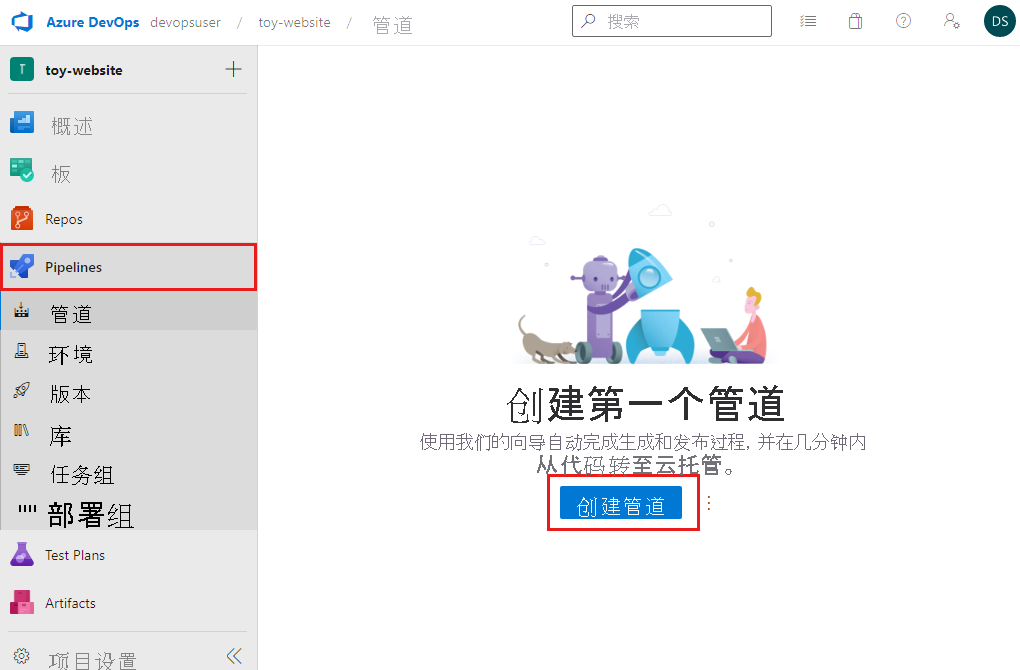
在 Azure DevOps 会话的资源菜单中,选择“管道”,然后在“创建第一个管道”窗格中,选择“创建管道”。
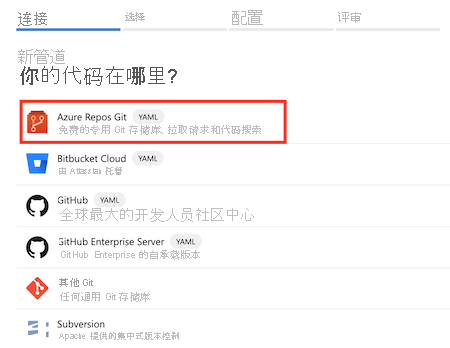
在“连接”选项卡的“你的代码在哪里?”窗格上,选择“Azure Repos Git”。
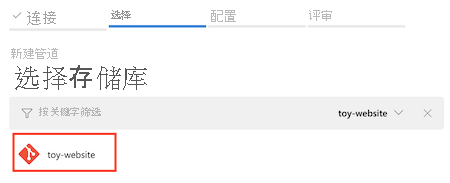
在“选择”选项卡的“选择存储库”窗格上,选择“toy-website”。
在“配置”选项卡的“配置管道”窗格上,选择“现有 Azure Pipelines YAML 文件”。

在“选择现有 YAML 文件”窗格的“路径”下拉列表中,选择 /deploy/azure-pipelines.yml,然后选择“继续”。

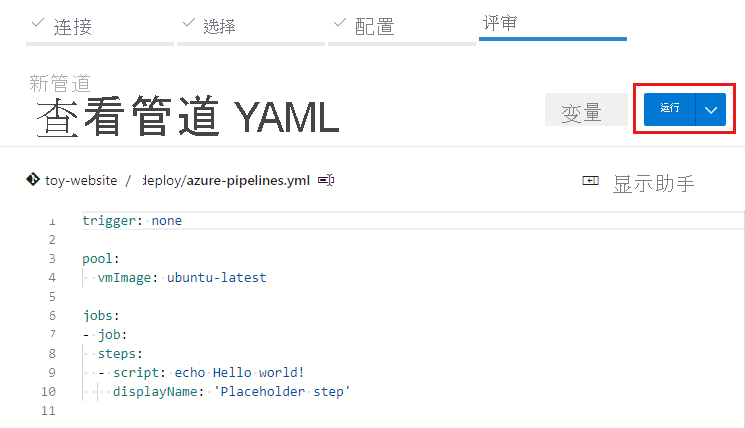
“查看”选项卡的“查看管道 YAML”窗格将 YAML 管道定义显示为新管道。
提示
Azure Pipelines Web 界面提供了一个用于管理管道定义的编辑器。 在本模块中,你将使用 Visual Studio Code 中的定义文件,但你可以探索 Azure Pipelines 编辑器,了解其工作原理。
选择“运行”。
Azure Pipelines 创建管道并启动首次运行。
验证管道运行
重要
如果这是你第一次在此 Azure DevOps 组织中使用 pipelines,可能会看到一条错误消息,内容为:
未购买或授予托管并行。
为了防止滥用,Azure DevOps 要求新组织在免费使用 Microsoft 托管的管道代理之前获得批准。
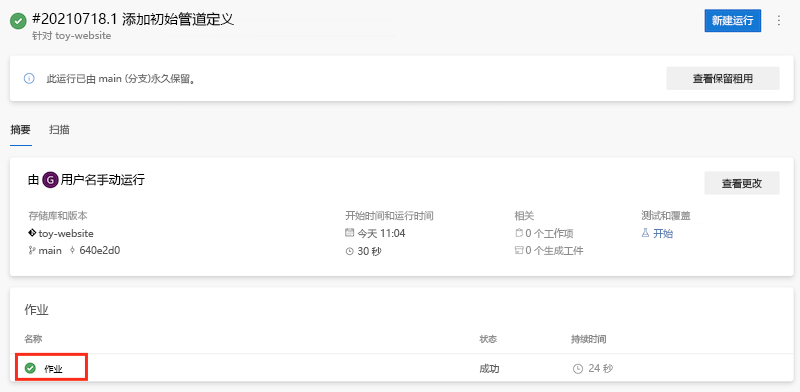
管道运行开始时,页面会显示有关运行的信息。
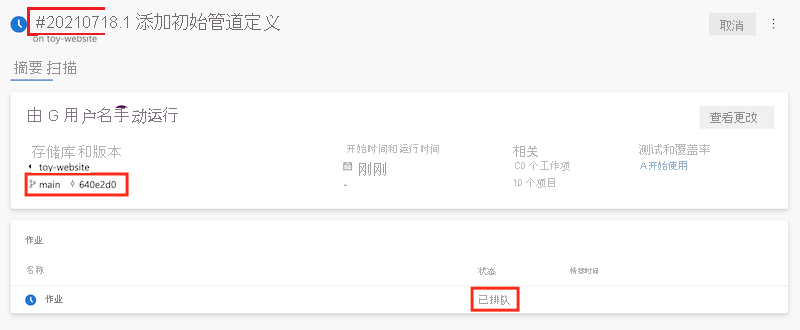
每个管道运行都包含一个标识符。 你可以使用此标识符帮助你找到特定管道运行。
作业状态最初显示为“已排队”。 管道可能不会立即启动。 作业将添加到代理的队列中。 代理可用时,Azure Pipelines 会分配代理并启动作业。 然后作业状态变为正在运行。
该页面包括分支名称和相关运行所使用的 Git 提交的标识符。 此信息表示管道使用的存储库内容的版本。
刷新页面,直到作业状态更改为“成功”。 然后在“作业”下选择“作业”。
作业信息页显示了管道运行步骤的日志。 “占位符步骤”列在左侧菜单中的步骤中。
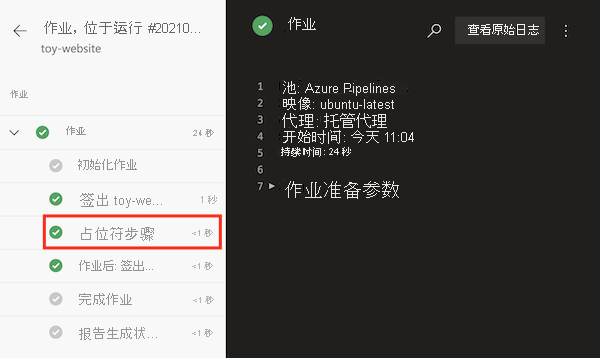
作业中的步骤列表包括未创建的步骤。 这些步骤由 Azure Pipelines 自动创建。 在某些组织中,可能还会看到组织自动包含在所有管道中的步骤。 可以选择任何步骤来查看该步骤的日志文件。
选择“Checkout toy-website@main to s”。
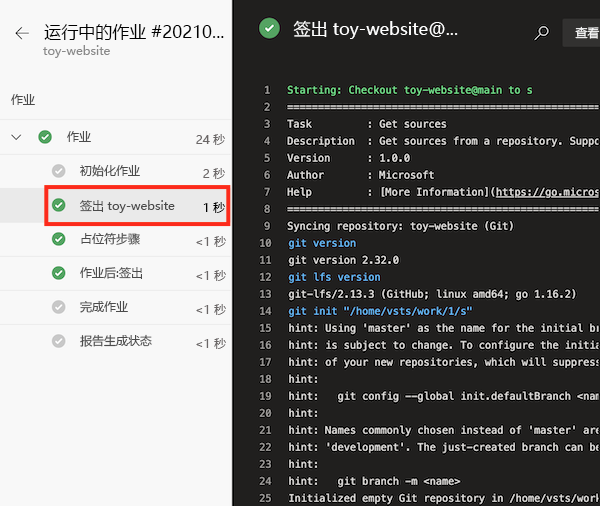
每个步骤的日志都提供有关管道运行期间发生的具体情况的详细信息。 如果需要诊断管道问题,日志信息非常有用。 你无法直接访问执行你步骤的代理。
在本例中,存储库的内容已从 Azure Repos 下载到代理的文件系统。
选择“占位符步骤”。
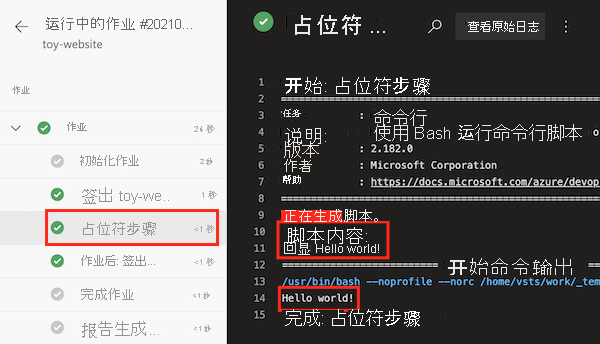
此步骤的日志包括在管道的 YAML 文件中创建脚本时的内容以及运行脚本的
Hello world!文本输出。
将管道执行链接到提交
最好了解如何将管道运行交叉引用到运行所包含的提交。 将管道运行链接到提交有助于跟踪部署历史记录并诊断问题。 Azure DevOps 提供了几种将管道运行链接到提交的方法。 在此过程中,您需要手动查看提交历史记录。
若要返回到存储库概述,请在 DevOps 资源菜单中,选择“Repos”“提交”>。
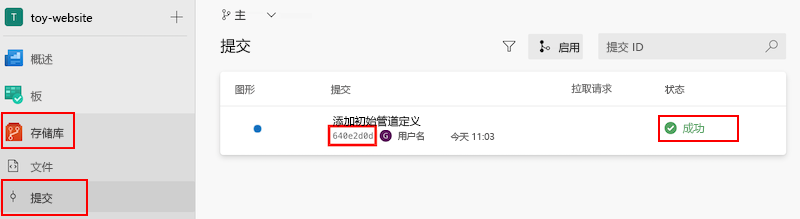
提交标识符与在管道运行中记录的提交标识符相同。 另外,Azure Pipelines 还会显示与提交关联的管道运行的状态。
选择此提交。 已更改的文件列表和提交的更改以绿色突出显示,表明所有文本都是新的。