练习 - 使用 API 插件创建声明性代理
使用作扩展声明性代理允许它实时检索和更新存储在外部系统中的数据。 使用 API 插件,可以通过外部系统的 API 连接到外部系统,以检索和更新信息。
下载初学者项目
首先下载示例项目。 在 Web 浏览器中:
- 导航到 https://github.com/microsoft/learn-declarative-agent-api-plugin-typescript。
- 如果你有 GitHub 帐户:
选择“ 使用此模板 ”下拉列表,然后从菜单中选择 “创建新存储库”。
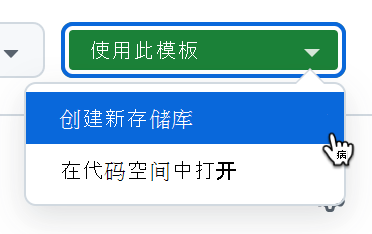
从可用所有者列表中,选择你的帐户。
将存储库命名 为 da-ristorante-api。
使用“创建存储库”按钮确认 创建存储库 。
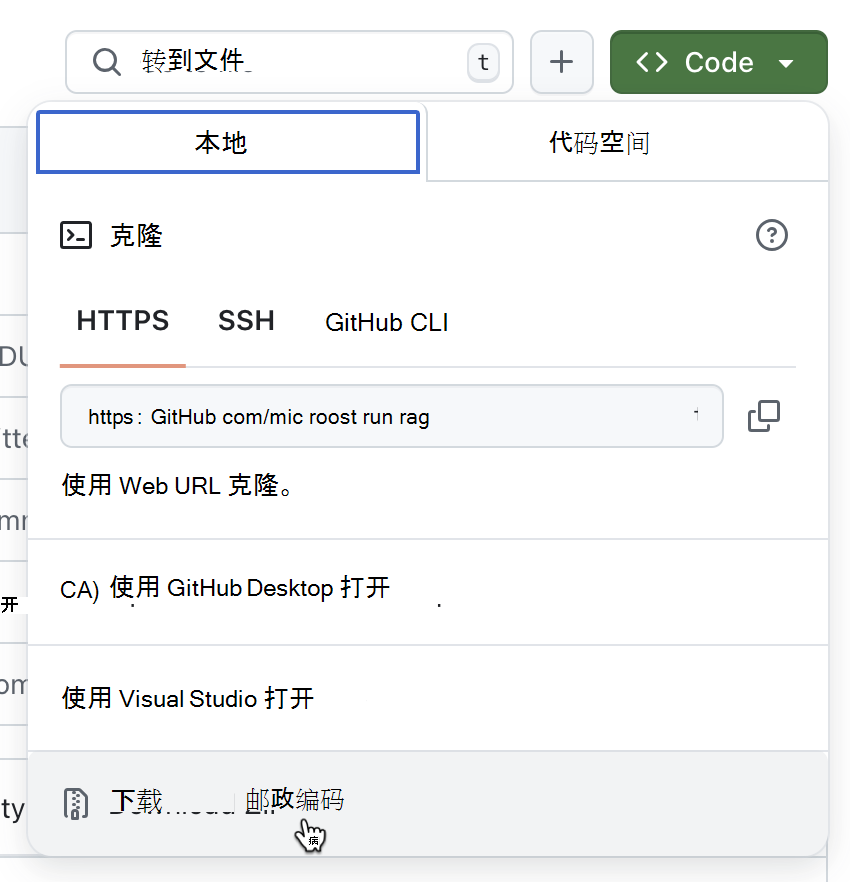
等待 GitHub 创建存储库。 然后,复制存储库 URL。
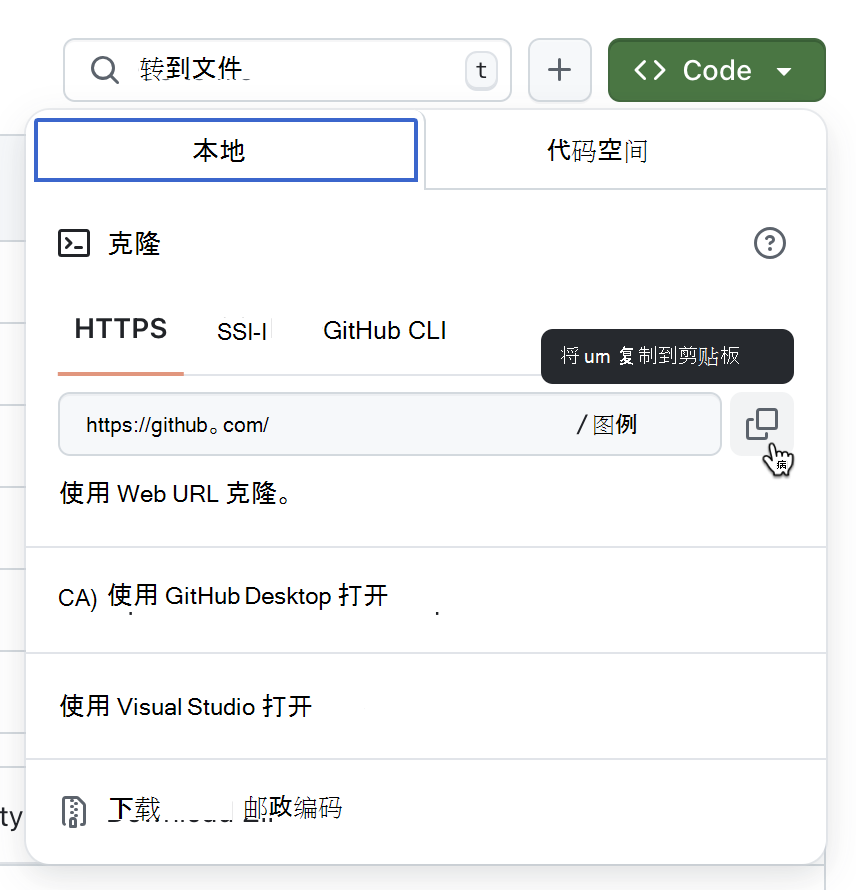
打开命令行。
在命令行中,将工作目录更改为要将项目存储在磁盘上的位置。
使用以下命令克隆存储库:
git clone https://github.com/your-user/your-repo。在 Visual Studio Code 中打开克隆的文件夹。
- 如果没有 GitHub 帐户:
以 ZIP 的形式下载存储库内容。
提取磁盘上的 ZIP 内容。
在 Visual Studio Code 中打开文件夹。


示例项目是一个 Microsoft 365 代理工具包项目,其中包括声明性代理和在 Azure Functions 上运行的匿名 API。 声明性代理与使用 Microsoft 365 Agents Toolkit 新建的声明性代理相同。 API 属于一家虚构的意大利餐厅,允许你浏览今天的菜单和下单。
检查 API 定义
首先,查看意大利餐厅 API 的 API 定义。
在 Visual Studio Code:
在 资源管理器 视图中,打开 appPackage/apiSpecificationFile/ristorante.yml 文件。 该文件是一个 OpenAPI 规范,用于描述意大利餐厅的 API。
找到 servers.url 属性
servers:
  - url: http://localhost:7071/api
    description: Il Ristorante API server
请注意,在本地运行 Azure Functions 时,它指向与标准 URL 匹配的本地 URL。
找到 路径 属性,其中包含两个作:用于检索当前菜单的 /dishes 和用于下单 的 /orders 。
重要
请注意,每个作都包含 operationId 属性,该属性唯一标识 API 规范中的作。 Copilot 要求每个作具有唯一的 ID,以便知道它应该为特定的用户提示调用哪个 API。
检查 API 实现
接下来,查看在本练习中使用的示例 API。
在 Visual Studio Code:
在 “资源管理器” 视图中,打开 src/data.json 文件。 该文件包含意大利餐厅的虚构菜单项。 每道菜包括:
- 名字
- 描述
- 链接到图像,
- 价格
- 在哪个课程中提供,
- 类型 (菜或饮料) ,
- (可选)过敏原列表
在本练习中,API 使用此文件作为其数据源。
接下来,展开 src/functions 文件夹。 请注意两个名为 dishes.ts 和 placeOrder.ts 的文件。 这些文件包含 API 规范中定义的两个作的实现。
打开 src/functions/dishes.ts 文件。 请花点时间查看 API 的工作原理。 它首先从 src/functions/data.json 文件加载示例数据。
import data from "../data.json";接下来,它会在不同的查询字符串参数中查找调用 API 的客户端可能传递的筛选器。
const course = req.query.get('course');
const allergensString = req.query.get('allergens');
const allergens: string[] = allergensString ? allergensString.split(",") : [];
const type = req.query.get('type');
const name = req.query.get('name');
根据请求中指定的筛选器,API 会筛选数据集并返回响应。
接下来,检查用于下达 src/functions/placeOrder.ts 文件中定义的订单的 API。 API 从引用示例数据开始。 然后,它定义客户端在请求正文中发送的订单的形状。
interface OrderedDish {
  name?: string;
  quantity?: number;
}

interface Order {
  dishes: OrderedDish[];
}
当 API 处理请求时,它首先检查请求是否包含正文以及它是否具有正确的形状。 否则,它会拒绝请求并显示“400 错误请求”错误。
let order: Order | undefined;
try {
  order = await req.json() as Order | undefined;
}
catch (error) {
  return {
    status: 400,
    jsonBody: { message: "Invalid JSON format" },
  } as HttpResponseInit;
}

if (!order.dishes || !Array.isArray(order.dishes)) {
  return {
    status: 400,
    jsonBody: { message: "Invalid order format" }
  } as HttpResponseInit;
}
接下来,API 将请求解析为菜单上的菜,并计算总价格。
let totalPrice = 0;
const orderDetails = order.dishes.map(orderedDish => {
  const dish = data.find(d => d.name.toLowerCase().includes(orderedDish.name.toLowerCase()));
  if (dish) {
    totalPrice += dish.price * orderedDish.quantity;
    return {
      name: dish.name,
      quantity: orderedDish.quantity,
      price: dish.price,
    };
  }
  else {
    context.error(`Invalid dish: ${orderedDish.name}`);
    return null;
  }
});
重要
请注意 API 如何要求客户端按其名称的一部分(而不是 ID)来指定菜。 这是有意的,因为大型语言模型比数字更好地处理单词。 此外,在调用 API 下订单之前,Copilot 将菜的名称作为用户的提示的一部分随时可用。 如果 Copilot 必须按其 ID 引用某个菜,则首先需要检索需要其他 API 请求以及 Copilot 现在无法执行的作。
API 准备就绪后,它将返回包含总价格、制造订单 ID 和状态的响应。
const orderId = Math.floor(Math.random() * 10000);

return {
  status: 201,
  jsonBody: {
    order_id: orderId,
    status: "confirmed",
    total_price: totalPrice,
  }
} as HttpResponseInit;
生成插件定义
下一步是将插件定义添加到项目。 插件定义包含以下信息:
- 插件可以执行的作。
- 它期望和返回的数据的形状是什么。
- 声明性代理必须如何调用基础 API。
添加基本插件定义结构
在 Visual Studio Code:
在 appPackage 文件夹中,添加名为 ai-plugin.json 的新文件。
粘贴以下内容:
{
  "$schema": "https://developer.microsoft.com/json-schemas/copilot/plugin/v2.1/schema.json",
  "schema_version": "v2.1",
  "namespace": "ilristorante",
  "name_for_human": "Il Ristorante",
  "description_for_human": "See the today's menu and place orders",
  "description_for_model": "Plugin for getting the today's menu, optionally filtered by course and allergens, and placing orders",
  "functions": [
  ],
  "runtimes": [
  ],
  "capabilities": {
    "localization": {},
    "conversation_starters": []
  }
}
该文件包含 API 插件的基本结构,其中包含有关人类和模型的说明。 description_for_model包括有关插件可以执行哪些作的详细信息,以帮助代理了解何时应考虑调用它。
保存所做的更改。
定义函数
API 插件定义映射到 API 规范中定义的 API作的一个或多个函数。 每个函数都包含名称和说明,以及指示代理如何向用户显示数据的响应定义。
定义用于检索菜单的函数
首先定义一个函数以检索有关当前菜单的信息。
在 Visual Studio Code:
打开 appPackage/ai-plugin.json 文件。
在 函数 数组中,添加以下代码片段:
{
  "name": "getDishes",
  "description": "Returns information about the dishes on the menu. Can filter by course (breakfast, lunch or dinner), name, allergens, or type (dish, drink).",
  "capabilities": {
    "response_semantics": {
      "data_path": "$.dishes",
      "properties": {
        "title": "$.name",
        "subtitle": "$.description"
      }
    }
  }
}
首先定义一个函数,该函数从 API 规范调用 getDishes 作。 接下来,提供函数说明。 此说明很重要,因为 Copilot 使用它来确定要针对用户的提示调用哪个函数。
在 response_semantics 属性中,指定 Copilot 应如何显示它从 API 接收的数据。 由于 API 返回有关在 菜 属性中菜单上的菜的信息,因此将 data_path 属性设置为
$.dishesJSONPath 表达式。接下来,在 properties 部分中,映射 API 响应中的哪些属性表示标题、说明和 URL。 因为在这种情况下,菜没有 URL,所以你只映射 标题 和 说明。
完整的代码片段如下所示:
{
  "$schema": "https://developer.microsoft.com/json-schemas/copilot/plugin/v2.1/schema.json",
  "schema_version": "v2.1",
  "namespace": "ilristorante",
  "name_for_human": "Il Ristorante",
  "description_for_human": "See the today's menu and place orders",
  "description_for_model": "Plugin for getting the today's menu, optionally filtered by course and allergens, and placing orders",
  "functions": [
    {
      "name": "getDishes",
      "description": "Returns information about the dishes on the menu. Can filter by course (breakfast, lunch or dinner), name, allergens, or type (dish, drink).",
      "capabilities": {
        "response_semantics": {
          "data_path": "$.dishes",
          "properties": {
            "title": "$.name",
            "subtitle": "$.description"
          }
        }
      }
    }
  ],
  "runtimes": [
  ],
  "capabilities": {
    "localization": {},
    "conversation_starters": []
  }
}
保存所做的更改。
定义一个函数以下订单
接下来,定义一个函数来下订单。
在 Visual Studio Code:
打开 appPackage/ai-plugin.json 文件。
在 函数 数组的末尾,添加以下代码片段:
{
  "name": "placeOrder",
  "description": "Places an order and returns the order details",
  "capabilities": {
    "response_semantics": {
      "data_path": "$",
      "properties": {
        "title": "$.order_id",
        "subtitle": "$.total_price"
      }
    }
  }
}
首先引用 ID placeOrder 的 API作。 然后,提供 Copilot 用于将此函数与用户的提示匹配的说明。 接下来,指示 Copilot 如何返回数据。 下面是 API 下订单后返回的数据:
{ "order_id": 6532, "status": "confirmed", "total_price": 21.97 }由于要显示的数据直接位于响应对象的根目录中,因此设置data_path,该data_path$指示 JSON 对象的顶部节点。 定义标题以显示订单编号及其价格的副标题。
完整文件如下所示:
{
  "$schema": "https://developer.microsoft.com/json-schemas/copilot/plugin/v2.1/schema.json",
  "schema_version": "v2.1",
  "namespace": "ilristorante",
  "name_for_human": "Il Ristorante",
  "description_for_human": "See the today's menu and place orders",
  "description_for_model": "Plugin for getting the today's menu, optionally filtered by course and allergens, and placing orders",
  "functions": [
    {
      "name": "getDishes",
      "description": "Returns information about the dishes on the menu. Can filter by course (breakfast, lunch or dinner), name, allergens, or type (dish, drink).",
      ...trimmed for brevity
    },
    {
      "name": "placeOrder",
      "description": "Places an order and returns the order details",
      "capabilities": {
        "response_semantics": {
          "data_path": "$",
          "properties": {
            "title": "$.order_id",
            "subtitle": "$.total_price"
          }
        }
      }
    }
  ],
  "runtimes": [
  ],
  "capabilities": {
    "localization": {},
    "conversation_starters": []
  }
}
保存所做的更改。
定义运行时
定义要调用的函数后,下一步是指示它应如何调用它们。 可以在插件定义的 运行时 部分中执行此作。
在 Visual Studio Code:
打开 appPackage/ai-plugin.json 文件。
在运行时数组中,添加以下代码:
{
  "type": "OpenApi",
  "auth": {
    "type": "None"
  },
  "spec": {
    "url": "apiSpecificationFile/ristorante.yml"
  },
  "run_for_functions": [
    "getDishes",
    "placeOrder"
  ]
}
首先指示 Copilot 提供有关 API (类型的 OpenAPI 信息 :OpenApi) 调用,并且它是匿名的, (auth.type: None) 。 接下来,在 “规范 ”部分中,指定项目中 API 规范的相对路径。 最后,在 run_for_functions 属性中,列出属于此 API 的所有函数。
完整文件如下所示:
{
  "$schema": "https://developer.microsoft.com/json-schemas/copilot/plugin/v2.1/schema.json",
  "schema_version": "v2.1",
  "namespace": "ilristorante",
  "name_for_human": "Il Ristorante",
  "description_for_human": "See the today's menu and place orders",
  "description_for_model": "Plugin for getting the today's menu, optionally filtered by course and allergens, and placing orders",
  "functions": [
    {
      "name": "getDishes",
      ...trimmed for brevity
    },
    {
      "name": "placeOrder",
      ...trimmed for brevity
    }
  ],
  "runtimes": [
    {
      "type": "OpenApi",
      "auth": {
        "type": "None"
      },
      "spec": {
        "url": "apiSpecificationFile/ristorante.yml"
      },
      "run_for_functions": [
        "getDishes",
        "placeOrder"
      ]
    }
  ],
  "capabilities": {
    "localization": {},
    "conversation_starters": []
  }
}
保存所做的更改。
将插件定义连接到声明性代理
生成完 API 插件定义后,下一步是将其注册到声明性代理。 当用户与声明性代理交互时,它会根据定义的 API 插件匹配用户的提示,并调用相关函数。
在 Visual Studio Code:
打开 appPackage/declarativeAgent.json 文件。
在 instructions 属性之后,添加以下代码片段:
"actions": [
  {
    "id": "menuPlugin",
    "file": "ai-plugin.json"
  }
]
使用此代码片段,可将声明性代理连接到 API 插件。 为插件指定唯一 ID,并指示代理可在何处找到插件的定义。
完整文件如下所示:
{
  "$schema": "https://developer.microsoft.com/json-schemas/copilot/declarative-agent/v1.0/schema.json",
  "version": "v1.0",
  "name": "Declarative agent",
  "description": "Declarative agent created with Microsoft 365 Agents Toolkit",
  "instructions": "$[file('instruction.txt')]",
  "actions": [
    {
      "id": "menuPlugin",
      "file": "ai-plugin.json"
    }
  ]
}
保存所做的更改。
更新声明性代理信息和指令
在本练习中构建的声明性代理可帮助用户浏览当地意大利餐厅的菜单并下订单。 若要针对此方案优化代理,请更新其名称、说明和说明。
在 Visual Studio Code:
- 更新声明性代理信息:
- 打开 appPackage/declarativeAgent.json 文件。
- 将 name 属性的值更新为 Il Ristorante。
- 将 描述 属性的值更新为 从舒适的办公桌上订购最美味的意大利菜肴和饮料。
- 保存更改。
- 更新声明性代理的说明:
打开 appPackage/instruction.txt 文件。
将其内容替换为:
You are an assistant specialized in helping users explore the menu of an Italian restaurant and place orders. You interact with the restaurant's menu API and guide users through the ordering process, ensuring a smooth and delightful experience. Follow the steps below to assist users in selecting their desired dishes and completing their orders:

### General Behavior:
- Always greet the user warmly and offer assistance in exploring the menu or placing an order.
- Use clear, concise language with a friendly tone that aligns with the atmosphere of a high-quality local Italian restaurant.
- If the user is browsing the menu, offer suggestions based on the course they are interested in (breakfast, lunch, or dinner).
- Ensure the conversation remains focused on helping the user find the information they need and completing the order.
- Be proactive but never pushy. Offer suggestions and be informative, especially if the user seems uncertain.

### Menu Exploration:
- When a user requests to see the menu, use the `GET /dishes` API to retrieve the list of available dishes, optionally filtered by course (breakfast, lunch, or dinner).
  - Example: If a user asks for breakfast options, use the `GET /dishes?course=breakfast` to return only breakfast dishes.
- Present the dishes to the user with the following details:
  - Name of the dish
  - A tasty description of the dish
  - Price in € (Euro) formatted as a decimal number with two decimal places
  - Allergen information (if relevant)
  - Don't include the URL.

### Beverage Suggestion:
- If the order does not already include a beverage, suggest a suitable beverage option based on the course.
- Use the `GET /dishes?course={course}&type=drink` API to retrieve available drinks for that course.
- Politely offer the suggestion: *"Would you like to add a beverage to your order? I recommend [beverage] for [course]."*

### Placing the Order:
- Once the user has finalized their order, use the `POST /order` API to submit the order.
  - Ensure the request includes the correct dish names and quantities as per the user's selection.
  - Example API payload:

    ```json
    {
      "dishes": [
        {
          "name": "frittata",
          "quantity": 2
        },
        {
          "name": "cappuccino",
          "quantity": 1
        }
      ]
    }
    ```

### Error Handling:
- If the user selects a dish that is unavailable or provides an invalid dish name, respond gracefully and suggest alternative options.
  - Example: *"It seems that dish is currently unavailable. How about trying [alternative dish]?"*
- Ensure that any errors from the API are communicated politely to the user, offering to retry or explore other options.
请注意,在说明中,我们定义了代理的一般行为,并指示它的能力。 我们还提供了有关下订单的特定行为的说明,包括 API 所需的数据形状。 我们包括此信息,以确保代理按预期工作。
保存更改。
- 若要帮助用户了解他们可以将代理用于哪些用途,请添加对话初学者:
打开 appPackage/declarativeAgent.json 文件。
在 instructions 属性之后,添加名为 conversation_starters 的新属性:
"conversation_starters": [
  {
    "text": "What's for lunch today?"
  },
  {
    "text": "What can I order for dinner that is gluten-free?"
  }
]
完整文件如下所示:
{
  "$schema": "https://developer.microsoft.com/json-schemas/copilot/declarative-agent/v1.0/schema.json",
  "version": "v1.0",
  "name": "Il Ristorante",
  "description": "Order the most delicious Italian dishes and drinks from the comfort of your desk.",
  "instructions": "$[file('instruction.txt')]",
  "conversation_starters": [
    {
      "text": "What's for lunch today?"
    },
    {
      "text": "What can I order for dinner that is gluten-free?"
    }
  ],
  "actions": [
    {
      "id": "menuPlugin",
      "file": "ai-plugin.json"
    }
  ]
}
保存所做的更改。
更新 API URL
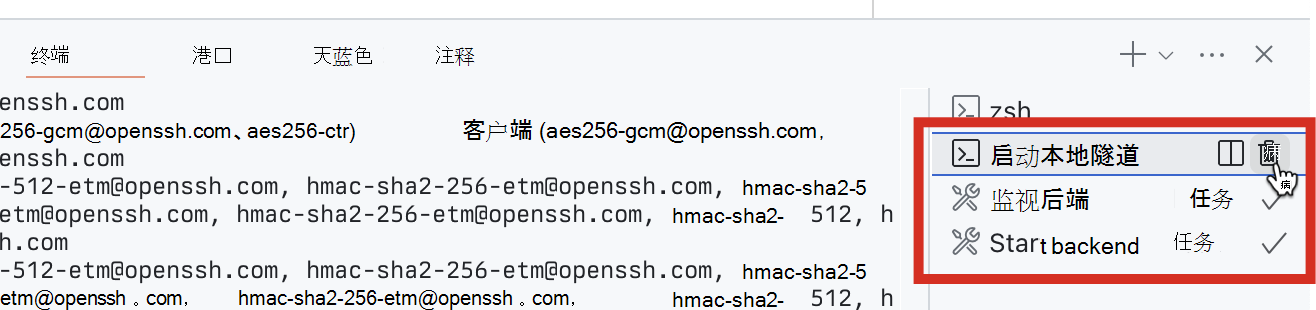
在测试声明性代理之前,需要在 API 规范文件中更新 API 的 URL。 现在,URL 设置为 http://localhost:7071/api ,Azure Functions在本地运行时使用的 URL。 但是,由于你希望 Copilot 从云中调用 API,因此需要向 Internet 公开 API。 Microsoft 365 代理工具包通过创建开发隧道通过 Internet 自动公开本地 API。 每次开始调试项目时,Microsoft 365 Agents Toolkit 都会启动一个新的开发隧道,并将其 URL 存储在 OPENAPI_SERVER_URL 变量中。 可以看到 Microsoft 365 代理工具包如何启动隧道并将其 URL 存储在 .vscode/tasks.json 文件中的 启动本地隧道 任务中:
{
  // Start the local tunnel service to forward public URL to local port and inspect traffic.
  // See https://aka.ms/teamsfx-tasks/local-tunnel for the detailed args definitions.
  "label": "Start local tunnel",
  "type": "teamsfx",
  "command": "debug-start-local-tunnel",
  "args": {
    "type": "dev-tunnel",
    "ports": [
      {
        "portNumber": 7071,
        "protocol": "http",
        "access": "public",
        "writeToEnvironmentFile": {
          "endpoint": "OPENAPI_SERVER_URL", // output tunnel endpoint as OPENAPI_SERVER_URL
        }
      }
    ],
    "env": "local"
  },
  "isBackground": true,
  "problemMatcher": "$teamsfx-local-tunnel-watch"
}
若要使用此隧道,需要更新 API 规范以使用 OPENAPI_SERVER_URL 变量。
在 Visual Studio Code:
打开 appPackage/apiSpecificationFile/ristorante.yml 文件。
将 servers.url 属性的值更改为 ${{OPENAPI_SERVER_URL}}/api。
更改的文件如下所示:
openapi: 3.0.0
info:
  title: Il Ristorante menu API
  version: 1.0.0
  description: API to retrieve dishes and place orders for Il Ristorante.
servers:
  - url: ${{OPENAPI_SERVER_URL}}/api
    description: Il Ristorante API server
paths:
  ...trimmed for brevity
保存所做的更改。
API 插件已完成并与声明性代理集成。 继续在 智能 Microsoft 365 Copilot 副驾驶® 中测试代理。
在 智能 Microsoft 365 Copilot 副驾驶® 中使用 API 插件测试声明性代理
最后一步是在 智能 Microsoft 365 Copilot 副驾驶® 中使用 API 插件测试声明性代理。
在 Visual Studio Code:
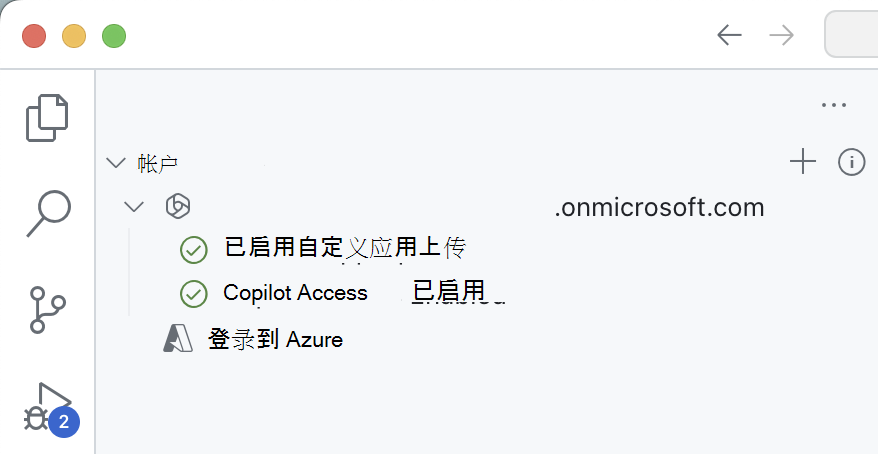
从 活动栏中,选择 “Microsoft 365 代理工具包”。
在“帐户”部分中,确保已使用 智能 Microsoft 365 Copilot 副驾驶® 登录到 Microsoft 365 租户。
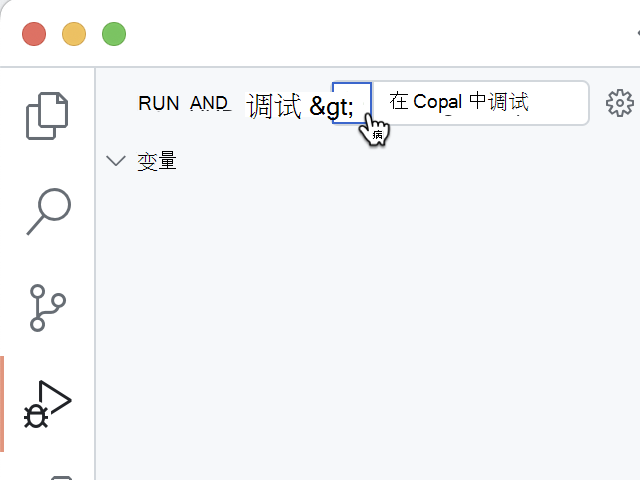
在 活动栏中,选择 “运行并调试”。
选择“ 在 Copilot 中调试 ”配置,并使用“开始调试”按钮 开始调试 。
Visual Studio Code生成项目并将其部署到 Microsoft 365 租户,并打开一个新的 Web 浏览器窗口。


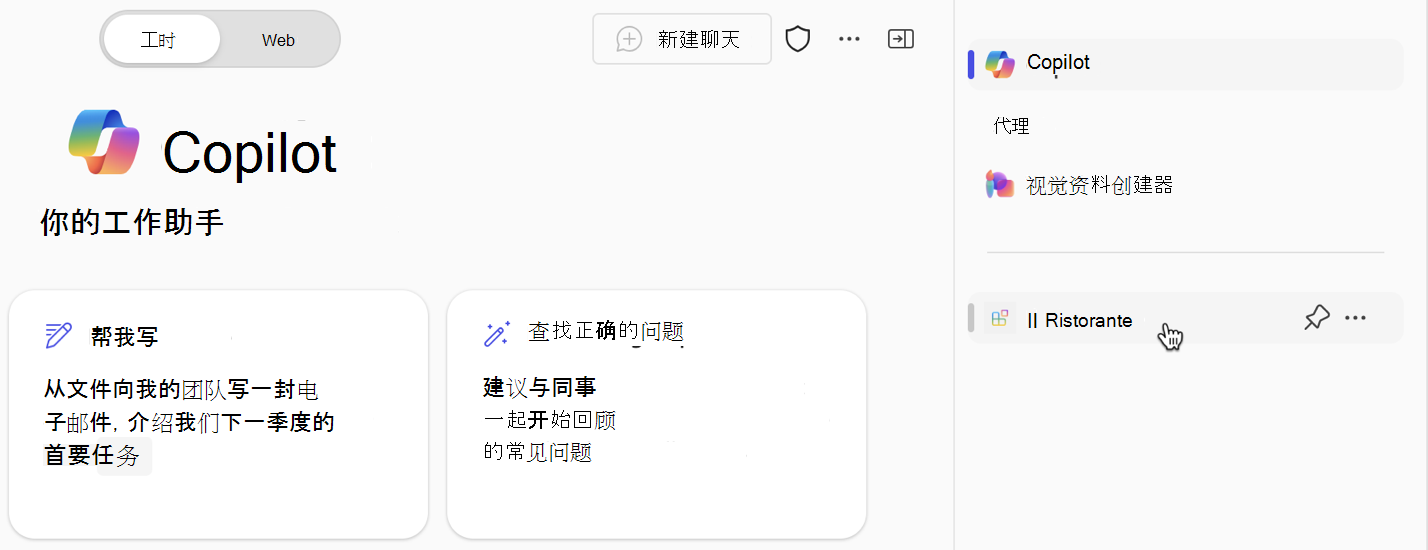
在 Web 浏览器中:
出现提示时,使用属于 Microsoft 365 租户的帐户使用 智能 Microsoft 365 Copilot 副驾驶® 登录。
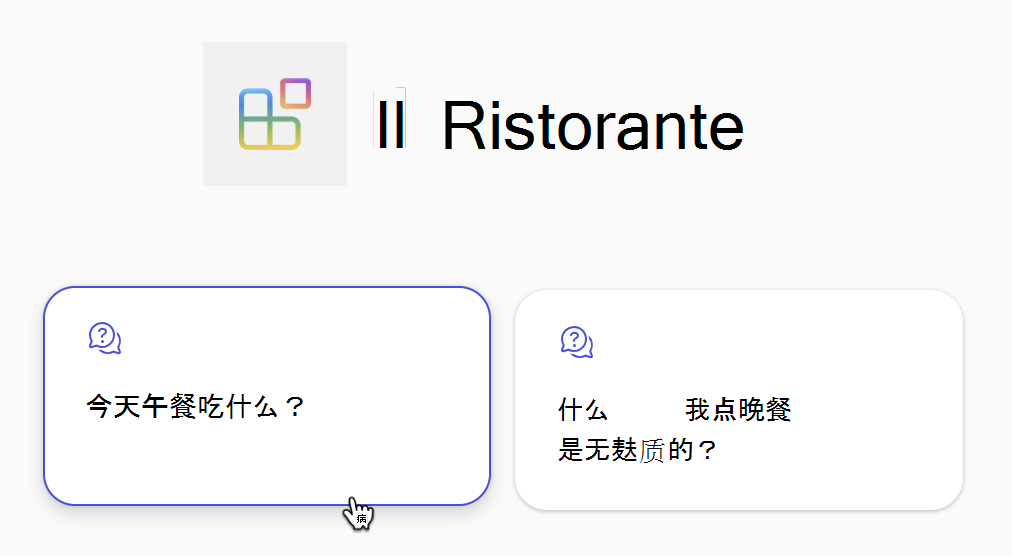
从侧边栏中,选择“ Il Ristorante”。
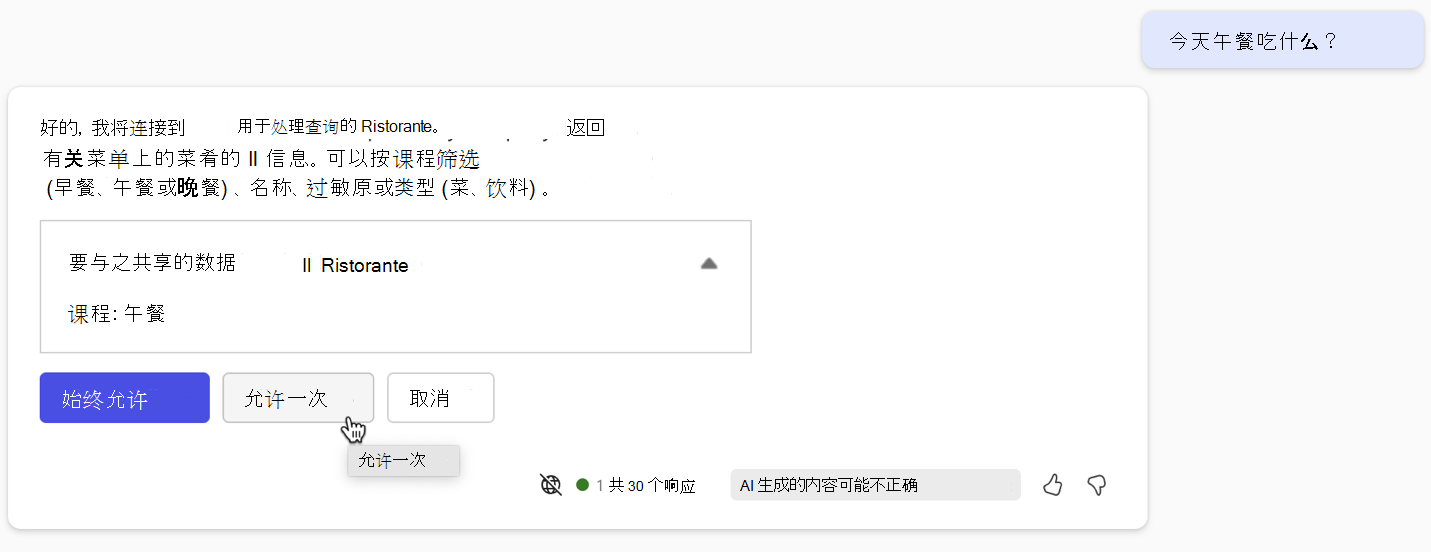
选择 “今天午餐是什么?” 对话启动器并提交提示。
出现提示时,检查代理发送到 API 的数据,并使用 “允许一次 ”按钮进行确认。
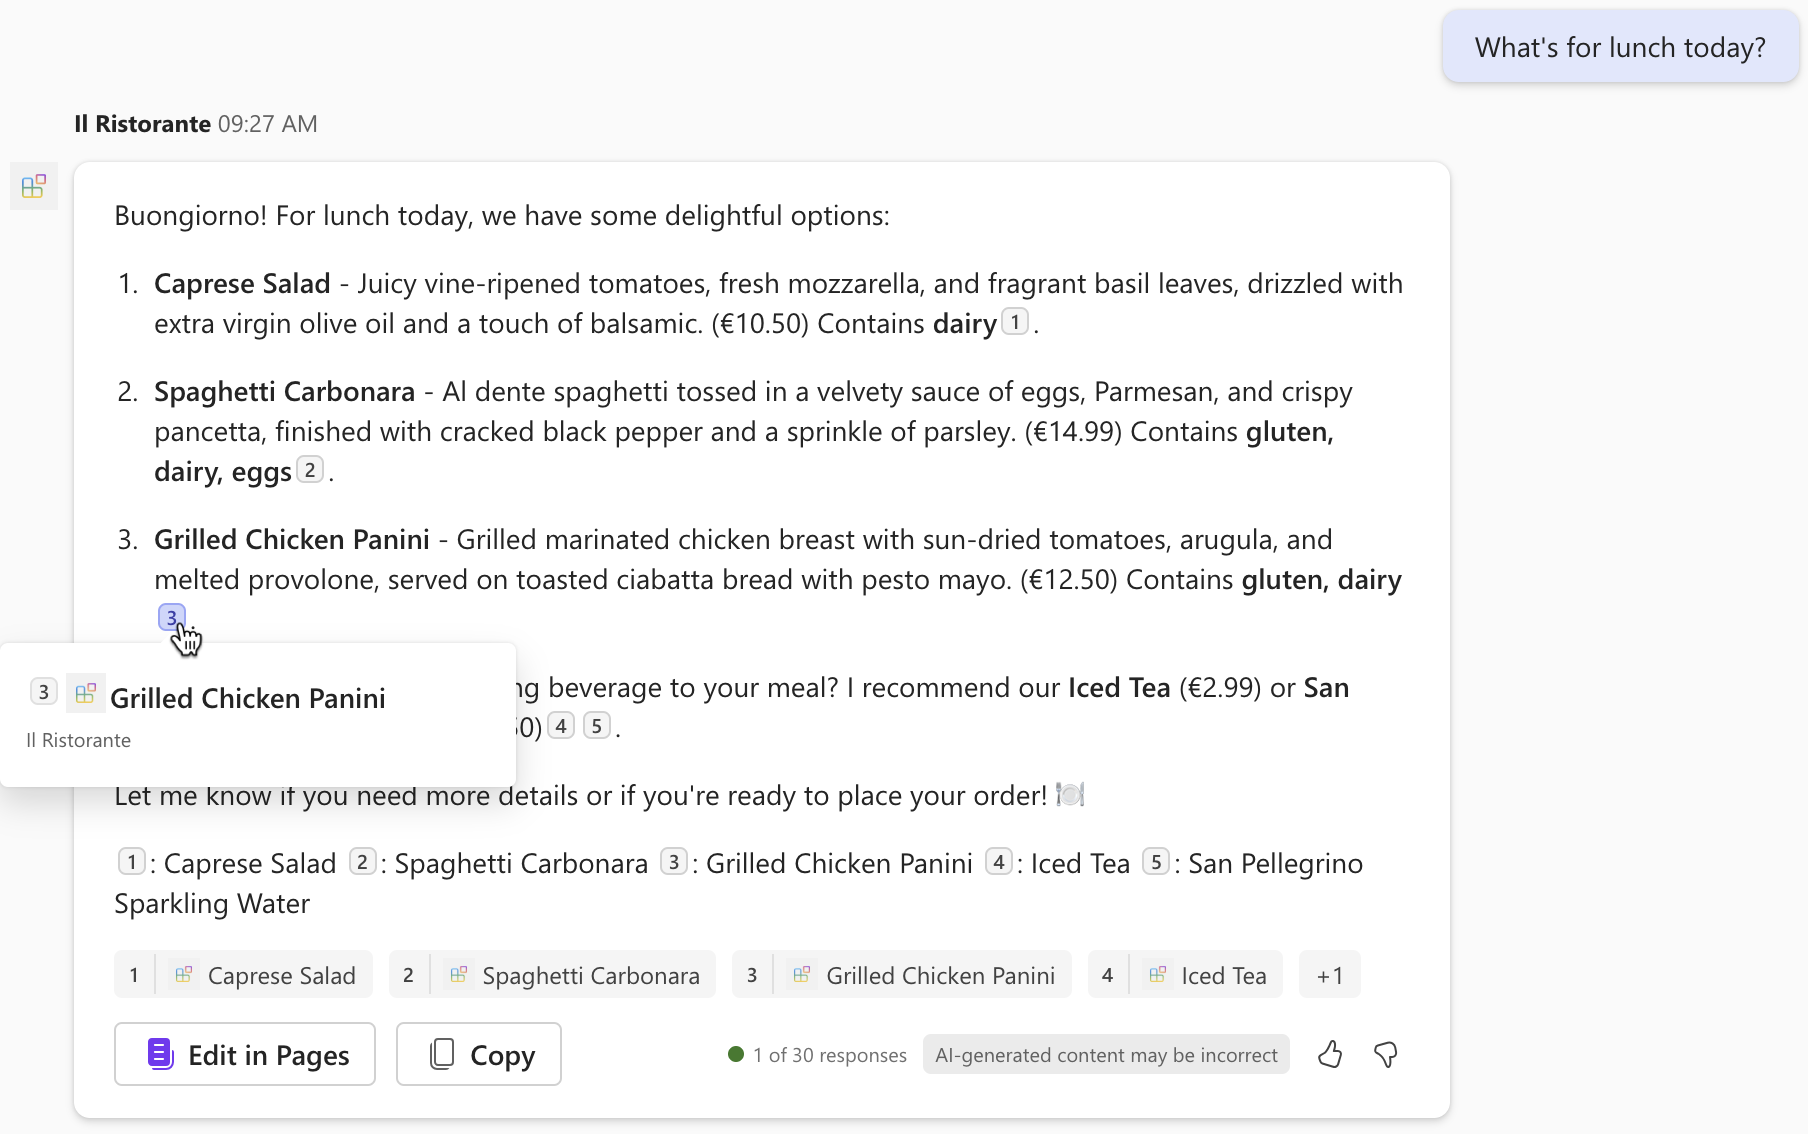
等待代理响应。 请注意,虽然它显示从 API 检索的信息的引文,但弹出窗口仅显示菜的标题。 它不显示任何其他信息,因为 API 插件不定义自适应卡片模板。
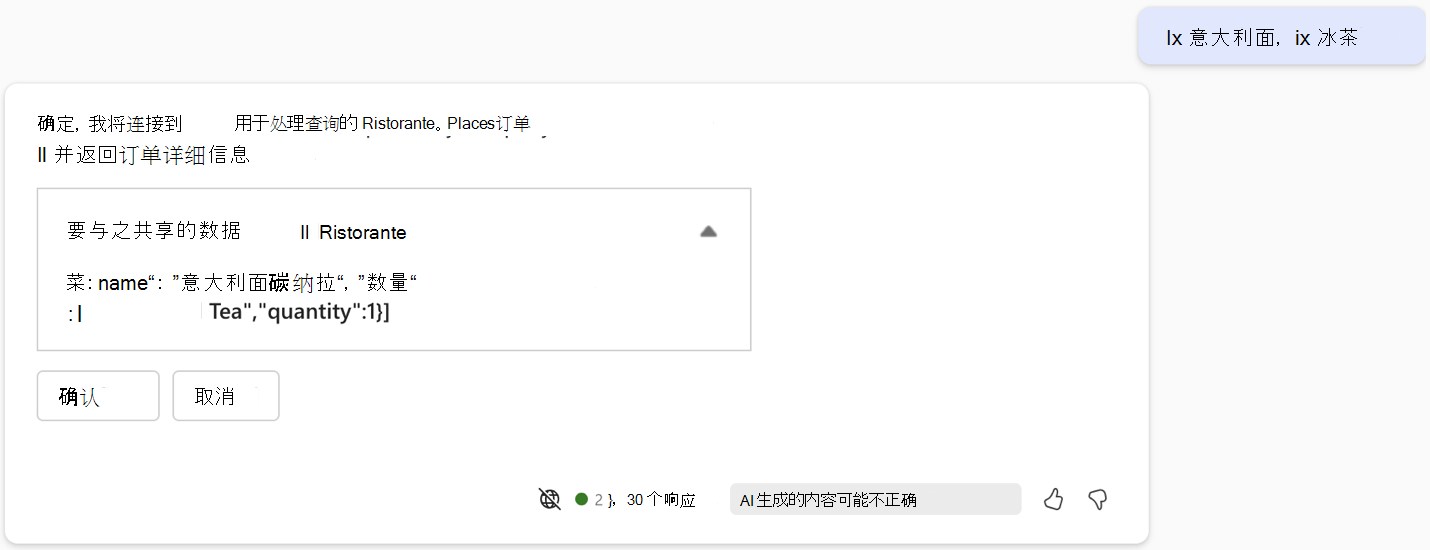
通过在提示文本框中键入订单: 1x 意大利面,1x冰茶 并提交提示。
检查代理发送到 API 的数据,然后使用 “确认 ”按钮继续。
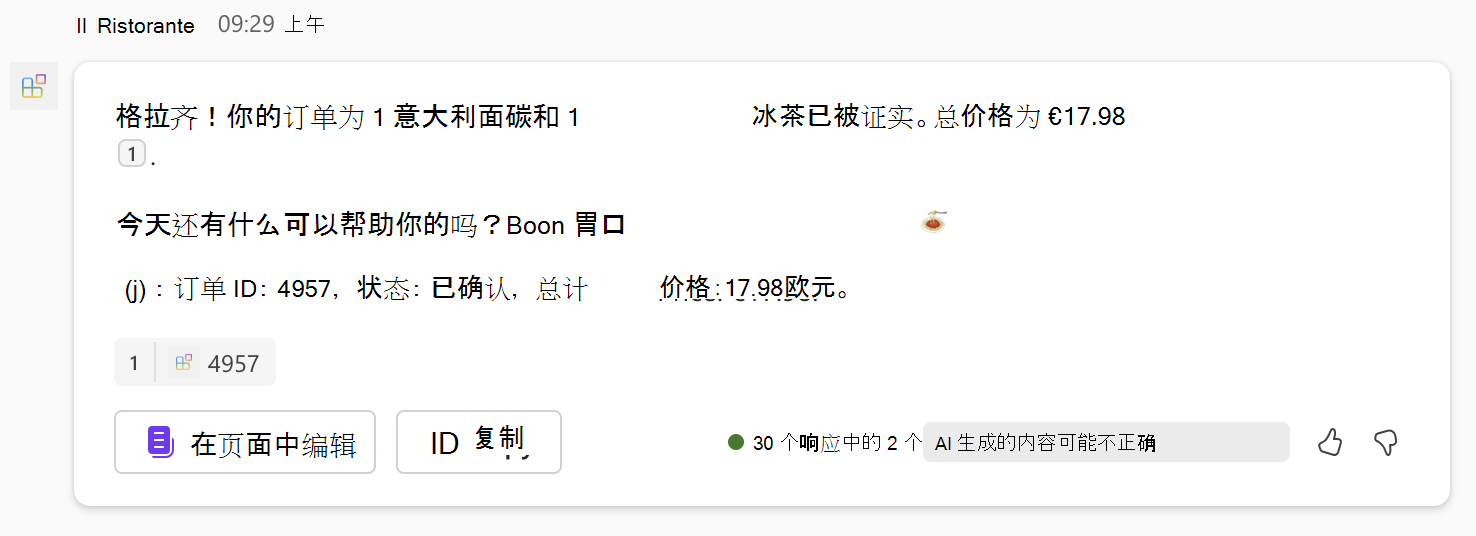
等待代理下订单并返回订单摘要。 再次请注意,代理以纯文本形式显示订单摘要,因为它没有自适应卡片模板。
返回Visual Studio Code并停止调试。
切换到“ 终端 ”选项卡并关闭所有活动终端。