练习 - 创建管道
此时,Mara 已为 Space Game 网站定义了生成配置。 现在,轮到你了,你要做的是创建管道并制作第一个生成工件。
如你所见,Mara 使用 YAML 文件定义生成。 创建管道时,进程会提示你提供 YAML 文件。 项目还没有此文件。
如果没有为项目提供初始 YAML 文件,Azure Pipelines 可根据你的应用类型为你创建一个该文件。 在这里,你将生成一个 ASP.NET Core 应用,但 Azure Pipelines 也为其他项目类型(包括 Java、Go 等)提供了入门生成配置。
创建管道
在 Azure DevOps 中,转到你的项目。
从项目页或左窗格中选择“Pipelines”。
选择“创建管道(如果这不是项目中的第一个管道,则选择“新建管道”)。
在“Connect”选项卡上,选择“GitHub”。
系统出现提示时,请输入 GitHub 凭据。
在“Select”选项卡上,选择“mslearn-tailspin-spacegame-web”存储库。
若要安装 Azure Pipelines 应用,系统可能会将你重定向到 GitHub。 如果是这样,请滚动到底部,选择“批准并安装”。
在“Configure”选项卡上,选择“ASP.NET Core”。
注意
如果看不到此选项,请选择“Show more”。 不要选择“ASP.NET Core (.NET Framework)”。
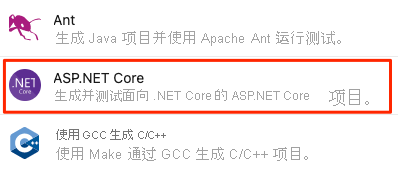 在提供的应用程序类型列表中找到 ASP.NET Core 的屏幕截图。
注意
如果存储库具有
azure-pipelines.yml根级别的文件,Azure DevOps 可能会跳过 “配置” 步骤。 若要解决此问题,请删除或重命名该文件。记下“Review”选项卡上的初始生成配置。
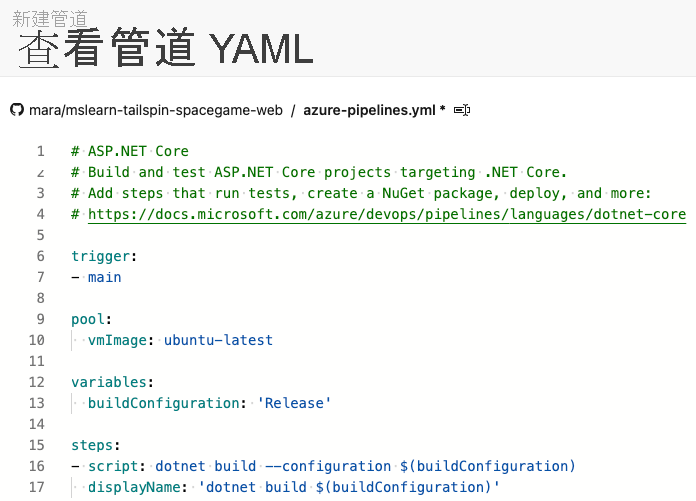 显示初始生成配置的 Azure Pipelines 的屏幕截图。
这是 Azure DevOps 根据你的应用类型 ASP.NET Core 为你提供的一个非常基本的配置。 默认配置使用 Microsoft 托管代理。
将文本
vmImage: ubuntu-latest替换为name: Default(如果在设置 Codespaces 存储库机密时指定了其他池,则替换为代理池的名称)。在“Review”选项卡上,选择“Save and run”。 若要将更改提交到 GitHub 并启动管道,请选择“直接提交到主分支”,然后再次选择“保存并运行”。 如果系统提示使用
This pipeline needs permission to access a resource before this run can continue之类的消息授予权限,请选择“查看”并按照提示允许访问。
监视管道运行
在“Jobs”下选择“Job”。 接下来,跟踪生成过程的每个步骤。 若要在生成完成后查看文本文件形式的作业输出,还可以选择“查看原始日志”。
如果管道无法快速启动,请验证 Codespaces 是否仍在运行。 Codespaces 将在 30 分钟后关闭,可能需要重新启动。
如果管道状态仍为“已排队”,并且片刻后未转换为“正在运行”,请检查并行作业并请求免费授权。 如果你无权访问并行作业,可以使用 Codespaces 启动模块。
在此处你可看到生成定义创建的步骤。 它会准备 VM、从 GitHub 提取最新源代码,然后生成应用。
 显示初始生成配置的输出的 Azure Pipelines 屏幕截图。
此配置是一个很好的开始,因为现在有了添加生成任务的位置。 你仍然需要对其进行更新以满足 Tailspin 团队的需求,例如缩小 JavaScript 和 CSS 文件。
提示
查看电子邮件。 你可能已收到包含运行结果的生成通知。 可以使用这些通知让团队成员了解生成的完成时间以及各项生成的成败。
添加生成任务
现在,你已拥有可用的生成过程,可以开始添加生成任务。
请注意,当前使用的是 main 分支。 若要保留你的工作,现在需要创建一个名为 build-pipeline 的分支。 分支提供了一个试验的地方,生成任务可以在其中完全正常运行,而不会影响团队的其他成员。
可以直接从 Azure Pipelines 向 azure-pipelines.yml 添加生成任务。 Azure Pipelines 将更改直接提交到分支。 在此处,你将在本地更改 azure-pipelines.yml,并将更改推送或上传到 GitHub。 这样做可以练习 Git 技能。 推送更改时,查看管道自动生成应用。
在实际操作中,你可能会一次添加一个生成任务,推送所做的更改,并查看生成运行情况。 在这里,你将一次添加我们之前标识的所有生成任务。
注意
你即将运行一些 Git 命令。 如果不太熟悉 Git,也无需担心。 我们将演示具体的操作步骤。 还会在未来的模块中详细介绍 Git 相关内容。
在 Visual Studio Code 中,转到集成终端。 确保转到存储库中的
main分支,然后完成这些步骤。运行以下
git pull命令,从 GitHub 提取最新更改并更新main分支。git pull origin main从输出中可以看到,Git 提取了一个名为 azure-pipelines.yml 的文件。 这是 Azure Pipelines 为你创建的起始管道配置。 设置管道时,Azure Pipelines 会将此文件添加到 GitHub 存储库。
运行
git checkout命令,创建名为build-pipeline的分支:git checkout -B build-pipeline在 Visual Studio Code 中,按如下所示更改 azure-pipelines.yml:
trigger:
- '*'

pool:
  name: 'Default' # Replace Default with the name of your agent pool if you used a different pool

variables:
  buildConfiguration: 'Release'

steps:
- task: UseDotNet@2
  displayName: 'Use .NET SDK 6.x'
  inputs:
    packageType: sdk
    version: '6.x'

- task: Npm@1
  displayName: 'Run npm install'
  inputs:
    verbose: false

- script: './node_modules/.bin/node-sass Tailspin.SpaceGame.Web/wwwroot --output Tailspin.SpaceGame.Web/wwwroot'
  displayName: 'Compile Sass assets'

- task: gulp@1
  displayName: 'Run gulp tasks'

- script: 'echo "$(Build.DefinitionName), $(Build.BuildId), $(Build.BuildNumber)" > buildinfo.txt'
  displayName: 'Write build info'
  workingDirectory: Tailspin.SpaceGame.Web/wwwroot

- task: DotNetCoreCLI@2
  displayName: 'Restore project dependencies'
  inputs:
    command: 'restore'
    projects: '**/*.csproj'

- task: DotNetCoreCLI@2
  displayName: 'Build the project - Release'
  inputs:
    command: 'build'
    arguments: '--no-restore --configuration Release'
    projects: '**/*.csproj'
trigger: - '*' pool: vmImage: ubuntu-latest variables: buildConfiguration: 'Release' steps: - task: UseDotNet@2 displayName: 'Use .NET SDK 6.x' inputs: packageType: sdk version: '6.x' - task: Npm@1 displayName: 'Run npm install' inputs: verbose: false - script: './node_modules/.bin/node-sass Tailspin.SpaceGame.Web/wwwroot --output Tailspin.SpaceGame.Web/wwwroot' displayName: 'Compile Sass assets' - task: gulp@1 displayName: 'Run gulp tasks' - script: 'echo "$(Build.DefinitionName), $(Build.BuildId), $(Build.BuildNumber)" > buildinfo.txt' displayName: 'Write build info' workingDirectory: Tailspin.SpaceGame.Web/wwwroot - task: DotNetCoreCLI@2 displayName: 'Restore project dependencies' inputs: command: 'restore' projects: '**/*.csproj' - task: DotNetCoreCLI@2 displayName: 'Build the project - Release' inputs: command: 'build' arguments: '--no-restore --configuration Release' projects: '**/*.csproj'在
steps部分下,可以看到映射到我们之前标识的每个脚本命令的生成任务。Azure Pipelines 提供了映射到许多常见生成活动的内置生成任务。 例如,
DotNetCoreCLI@2任务映射到dotnet命令行实用工具。 管道使用DotNetCoreCLI@2两次:一次用于还原或安装项目的依赖项,一次用于生成项目。请注意,并非所有生成活动都映射到内置任务。 例如,没有任何内置任务运行 node-sass 实用工具或将生成信息写入到文本文件。 若要运行常规系统命令,请使用
CmdLine@2或script任务。 该管道使用script任务,因为它是CmdLine@2的常见快捷方式。在将有关生成的信息写入文件的生成步骤中,请注意以下元素:
$(Build.DefinitionName)$(Build.BuildId)$(Build.BuildNumber)
这些元素是系统提供的内置变量,可在管道中使用:
$(Build.DefinitionName)是生成管道的名称。 例如“SpaceGame-Web-CI”。$(Build.BuildId)是已完成的生成的数字标识符,例如 115。$(Build.BuildNumber)是已完成的生成的名称。 可以配置格式,但默认情况下,生成号包括当前日期,后跟当天的生成号。 例如,生成号为“20190329.1”。
也可以定义自己的变量,此操作很快就可以完成。
你可能还注意到第一个生成步骤是
UseDotNet@2任务。 Mara 记得生成脚本没有安装所需的生成工具。 尽管生成代理附带了多个 .NET SDK 版本,但此任务使管道作者能够轻松指定需要在生成代理上使用的版本。在集成终端中运行以下 Git 命令将 azure-pipelines.yml 添加到索引,提交更改,并将更改推送到 GitHub。 这些步骤类似于之前执行的步骤。
提示
请记住在运行这些 Git 命令之前保存 azure-pipelines.yml。
git add azure-pipelines.yml
git commit -m "Add build tasks"
git push origin build-pipeline
这一次,将
build-pipeline分支(而不是main分支)推送到 GitHub。将分支推送到 GitHub 会触发 Azure Pipelines 中的生成过程。
在 Azure Pipelines 中,转到生成。 为此,请在页面一侧选择“Pipelines”,然后选择你的管道。 你会看到提交消息,还会看到生成正在使用
build-pipeline分支中的代码运行。 显示运行历史记录(包括最近推送到 GitHub 的分支)的 Azure Pipelines 屏幕截图。
提示
如果没有立即看到该生成,请稍等片刻或刷新页面。
选择生成,然后选择“作业”并在生成任务运行时跟踪它们。
例如,运行
gulp@1任务以执行缩小 JavaScript 和 CSS 资产的 gulp 任务时会发生以下情况: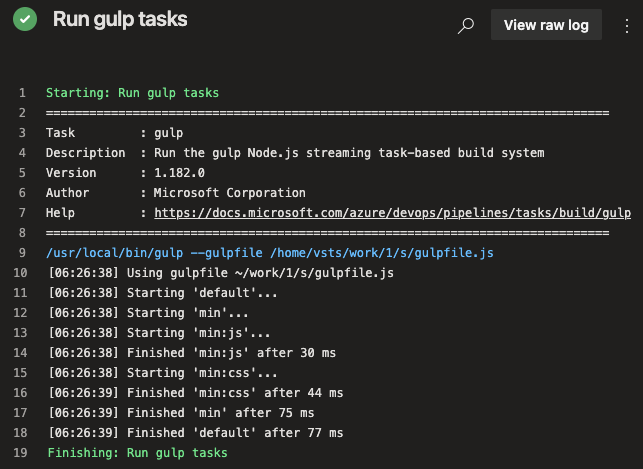 跟踪 Azure Pipelines 中的 gulp 任务的屏幕截图。
如果任何步骤失败,你都会在输出中看到错误,以便诊断和修复失败。
之前,你运行了更小的生成配置。 这一次,生成任务完成后,你可看到生成应用所需的一组更完整的任务。
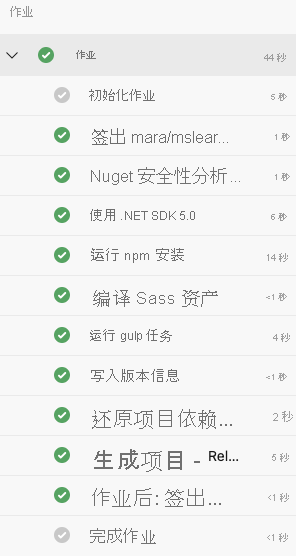 显示生成任务完整列表的 Azure Pipelines 屏幕截图。
完成生成任务后,请选择任意步骤来查看生成的总体进度。 可以从此处跳转到生成日志或 GitHub 上的相关更改。
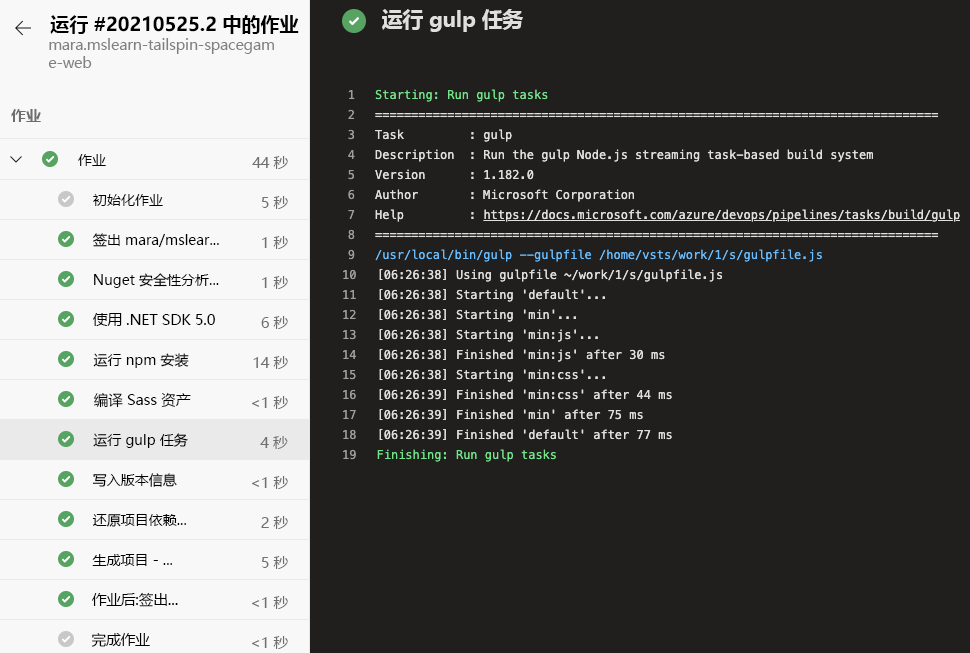 显示生成任务完整列表的 Azure Pipelines 屏幕截图。已选中“运行 gulp 任务”。