练习 - 创建和使用模块
你的任务是向公司网站添加内容分发网络 (CDN),以便发布玩具袋熊。 但是,公司中的其他团队已经告诉你不需要 CDN。 在此练习中,你将为网站和 CDN 创建模块,并将这些模块添加到一个模板中。
在此过程中,你将:
- 为应用程序添加一个模块。
- 创建使用该模块的 Bicep 模板。
- 为 CDN 添加另一个模块。
- 将 CDN 模块添加到模板,并使其成为可选。
- 将模板部署到 Azure。
- 查看部署历史记录。
注释
本练习可选做。 若要完成本练习,则需要在开始之前创建 Azure 订阅。 如果没有 Azure 帐户或不想暂时创建一个帐户,可以通读说明,以便了解所显示的信息。
本练习使用适用于 Visual Studio Code 的 Bicep 扩展。 请务必在 Visual Studio Code 中安装此扩展。
注释
需要使用资源组来完成本练习中的步骤。 可以使用已创建的资源组,也可以专门为此练习创建新的资源组。 如果选择创建新的资源组,这样就可以更轻松地清理完成练习时创建的任何资源。 如果没有现有资源组或想要为此练习创建新的资源组,可以按照 使用 Azure 门户和 Azure 资源管理器 中的步骤管理资源组,使用 Azure 门户创建资源组,或者可以使用 Azure CLI 通过 Azure CLI 创建资源组,按照 “管理 Azure 资源组 ”中的步骤作。
注释
在本练习中,请将示例中的 myResourceGroupName 替换为现有资源组的名称或为此练习创建的资源组的名称。
创建空白 Bicep 文件
打开 Visual Studio Code。
新建一个名为 main.bicep 的文件。
保存空文件,以便 Visual Studio Code 加载 Bicep 工具。
你可以选择“文件”“另存为”,也可以在 Windows 上选择 >(在 macOS 上则选择 ⌘+S)。 请务必记住保存文件的位置。 例如,你需要创建一个“模板”文件夹来将其存储在其中。
为应用程序创建一个模块
在你创建 main.bicep 文件的同一文件夹中,创建一个名为“模块”的新文件夹。 在“模块”文件夹中,创建一个名为 app.bicep 的文件。 保存文件。
将以下内容添加到 app.bicep 文件中:
@description('The Azure region into which the resources should be deployed.')
param location string

@description('The name of the App Service app.')
param appServiceAppName string

@description('The name of the App Service plan.')
param appServicePlanName string

@description('The name of the App Service plan SKU.')
param appServicePlanSkuName string

resource appServicePlan 'Microsoft.Web/serverfarms@2024-04-01' = {
  name: appServicePlanName
  location: location
  sku: {
    name: appServicePlanSkuName
  }
}

resource appServiceApp 'Microsoft.Web/sites@2024-04-01' = {
  name: appServiceAppName
  location: location
  properties: {
    serverFarmId: appServicePlan.id
    httpsOnly: true
  }
}

@description('The default host name of the App Service app.')
output appServiceAppHostName string = appServiceApp.properties.defaultHostName
此文件部署 Azure 应用服务计划和应用。 请注意,此模块非常通用。 它不包含有关资源名称或应用服务计划的 SKU 的任何假设。 这使你可以轻松地将模块重复用于不同的部署。
保存对文件所做的更改。
将模块添加到 Bicep 模板
此处,首先将“应用”模块添加到 Bicep 模板。
打开 main.bicep 文件。
将以下参数和变量添加到该文件:
@description('The Azure region into which the resources should be deployed.')
param location string = 'westus3'

@description('The name of the App Service app.')
param appServiceAppName string = 'toy-${uniqueString(resourceGroup().id)}'

@description('The name of the App Service plan SKU.')
param appServicePlanSkuName string = 'F1'

var appServicePlanName = 'toy-product-launch-plan'
因为这是你打算为玩具网站部署的模板,所以这是一个更具体的模板。 应用服务计划名称定义为一个变量。 SKU 参数具有一个适用于玩具发布网站的默认值。
在参数下,创建一个空行。 现在,键入“应用”模块定义的第一行:
module app 'modules/app.bicep' = {键入时,请注意,Visual Studio Code 的 Bicep 扩展可帮助你构建模块声明。 键入模块的路径并键入等号 (
=) 字符时,会出现一个弹出菜单,其中有几个选项。在弹出菜单中,选择“所需属性”:

完成模块声明:
module app 'modules/app.bicep' = {
  name: 'toy-launch-app'
  params: {
    appServiceAppName: appServiceAppName
    appServicePlanName: appServicePlanName
    appServicePlanSkuName: appServicePlanSkuName
    location: location
  }
}
在文件底部定义输出:
@description('The host name to use to access the website.')
output websiteHostName string = app.outputs.appServiceAppHostName
保存对文件所做的更改。
为内容分发网络创建模块
在“模块”文件夹中,创建一个名为 cdn.bicep 的文件。 保存文件。
将以下内容添加到 cdn.bicep 文件中:
@description('The host name (address) of the origin server.')
param originHostName string

@description('The name of the CDN profile.')
param profileName string = 'cdn-${uniqueString(resourceGroup().id)}'

@description('The name of the CDN endpoint')
param endpointName string = 'endpoint-${uniqueString(resourceGroup().id)}'

@description('Indicates whether the CDN endpoint requires HTTPS connections.')
param httpsOnly bool

var originName = 'my-origin'

resource cdnProfile 'Microsoft.Cdn/profiles@2024-09-01' = {
  name: profileName
  location: 'global'
  sku: {
    name: 'Standard_Microsoft'
  }
}

resource endpoint 'Microsoft.Cdn/profiles/endpoints@2024-09-01' = {
  parent: cdnProfile
  name: endpointName
  location: 'global'
  properties: {
    originHostHeader: originHostName
    isHttpAllowed: !httpsOnly
    isHttpsAllowed: true
    queryStringCachingBehavior: 'IgnoreQueryString'
    contentTypesToCompress: [
      'text/plain'
      'text/html'
      'text/css'
      'application/x-javascript'
      'text/javascript'
    ]
    isCompressionEnabled: true
    origins: [
      {
        name: originName
        properties: {
          hostName: originHostName
        }
      }
    ]
  }
}

@description('The host name of the CDN endpoint.')
output endpointHostName string = endpoint.properties.hostName
此文件部署两个资源:CDN 配置文件和 CDN 终结点。
保存对文件所做的更改。
将模块添加到主 Bicep 模板
打开 main.bicep 文件。
在
appServicePlanSkuName参数下,添加以下参数:@description('Indicates whether a CDN should be deployed.') param deployCdn bool = true在
app模块定义下,定义cdn模块:module cdn 'modules/cdn.bicep' = if (deployCdn) { name: 'toy-launch-cdn' params: { httpsOnly: true originHostName: app.outputs.appServiceAppHostName } }请注意,该模块是有条件的:仅当
deployCdn参数的值设置为true时才会部署该模块。 另请注意,模块的originHostName参数会设置为appServiceAppHostName模块的app输出的值。更新主机名称输出,使其选择正确的主机名。 部署 CDN 时,你希望将 CDN 终结点的名称作为主机名。
output websiteHostName string = deployCdn ? cdn.outputs.endpointHostName : app.outputs.appServiceAppHostName保存对文件所做的更改。
验证 Bicep 文件
完成上述所有更改后,main.bicep 文件应如以下示例所示:
@description('The Azure region into which the resources should be deployed.')
param location string = 'westus3'
@description('The name of the App Service app.')
param appServiceAppName string = 'toy-${uniqueString(resourceGroup().id)}'
@description('The name of the App Service plan SKU.')
param appServicePlanSkuName string = 'F1'
@description('Indicates whether a CDN should be deployed.')
param deployCdn bool = true
var appServicePlanName = 'toy-product-launch-plan'
module app 'modules/app.bicep' = {
name: 'toy-launch-app'
params: {
appServiceAppName: appServiceAppName
appServicePlanName: appServicePlanName
appServicePlanSkuName: appServicePlanSkuName
location: location
}
}
module cdn 'modules/cdn.bicep' = if (deployCdn) {
  name: 'toy-launch-cdn'
  params: {
    httpsOnly: true
    originHostName: app.outputs.appServiceAppHostName
  }
}
@description('The host name to use to access the website.')
output websiteHostName string = deployCdn ? cdn.outputs.endpointHostName : app.outputs.appServiceAppHostName
如果不是,请复制示例或调整模板以与该示例一致。
将 Bicep 模板部署到 Azure
若要将此模板部署到 Azure,你需要从 Visual Studio Code 终端登录到 Azure 帐户。 请确保已安装 Azure CLI 工具。
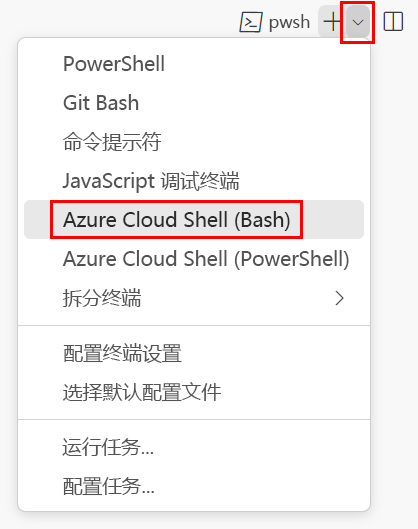
在“终端”菜单中,选择“新终端”。 终端窗口通常在屏幕的下半部分打开。
如果终端窗口在右侧显示 bash,则表示已打开正确的 shell。 或者,如果你在右侧看到 bash shell 图标,则可以选择它来启动 shell。

如果出现“bash”以外的 shell,请选择 shell 下拉箭头,然后选择“Git Bash”。
在终端中,转到保存模板的目录。 例如,如果将模板保存到 templates 文件夹,则可以使用以下命令:
cd templates
安装 Bicep
运行以下命令以确保具有最新版本的 Bicep:
az bicep install && az bicep upgrade
使用 Azure CLI 登录到 Azure
在 Visual Studio Code 终端中,运行以下命令登录到 Azure:
az login在打开的浏览器中,登录到 Azure 帐户。
Visual Studio Code 终端显示与此帐户关联的订阅列表。
在列表中,找到要用于本练习的订阅。
如果您在登录时错过了列表,可以使用以下代码片段重新列出您的订阅。
az account list --output table为在此会话中运行的所有 Azure CLI 命令设置默认订阅。
az account set --subscription "Your Subscription Name or ID"
将模板部署到 Azure
从 Visual Studio Code 的终端运行以下代码,以将 Bicep 模板部署到 Azure。 此过程可能需要一两分钟才能完成,然后你会看到部署成功。
az deployment group create --name main --template-file main.bicep
终端中将显示状态 Running...。
若要将此模板部署到 Azure,从 Visual Studio Code 终端登录到 Azure 帐户。 请确保 已安装 Azure PowerShell。
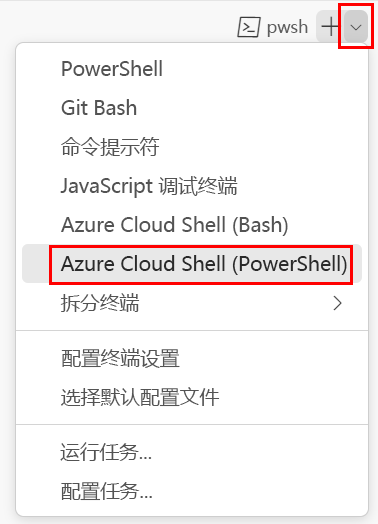
在“终端”菜单中,选择“新终端”。 终端窗口通常在屏幕的下半部分打开。
如果终端窗口在右侧显示 pwsh 或 powershell,则表示已打开正确的 shell。 或者,如果你在右侧看到 PowerShell shell 图标,则可以选择它来启动 shell。

如果出现“pwsh”和“powershell”以外的 shell,请选择 shell 下拉箭头,然后选择“PowerShell”。
在终端中,转到保存模板的目录。 例如,如果将模板保存到 templates 文件夹,则可以使用以下命令:
Set-Location -Path templates
安装 Bicep CLI
若要从 Azure PowerShell 中使用 Bicep,请安装 Bicep CLI。
使用 Azure PowerShell 登录到 Azure
在 Visual Studio Code 终端中,运行以下命令登录到 Azure:
Connect-AzAccount在打开的浏览器中,登录到 Azure 帐户。
运行以下命令获取要用于此练习的订阅的 ID:
Get-AzSubscription订阅 ID 位于第二列。 复制第二列。 它看起来像 aaaa0a0a-bb1b-cc2c-dd3d-eeeeee4e4e4e4e。
为在此会话中运行的所有 Azure PowerShell 命令设置默认订阅。
Set-AzContext -SubscriptionId {Your subscription ID}
将模板部署到 Azure
在终端中使用以下 Azure PowerShell 命令将模板部署到 Azure。 这可能需要一两分钟才能完成,然后你会看到部署成功。
New-AzResourceGroupDeployment -Name main -TemplateFile main.bicep
查看部署历史记录
登录到 Azure 门户 ,并确保使用相应的订阅:
- 选择页面右上角的头像。
- 选择“切换目录”。 在列表中,选择相应的目录。
在左侧面板上,选择“资源组”。
选择 myResourceGroupName。
在左侧菜单中,选择“设置”下的“部署”。

列出了三个部署。
选择“main”部署并展开“部署详细信息”。
请注意,这两个模块都将列出,它们的类型显示为
Microsoft.Resources/deployments。 由于在模板中还会引用这些模块的输出,因此它们将会列出两次。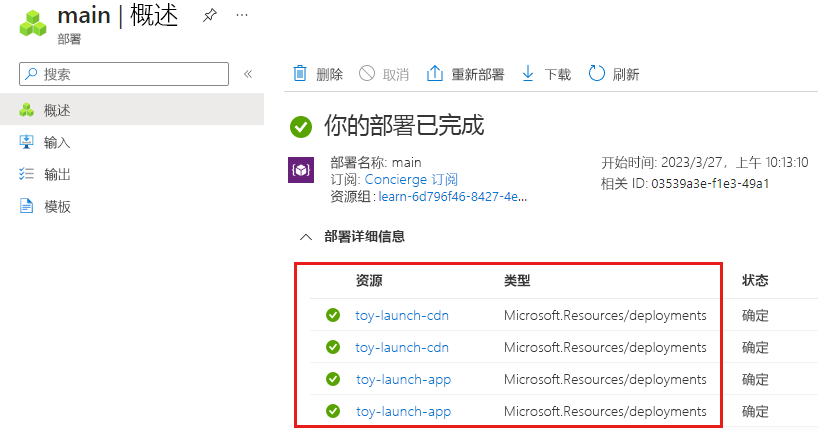
选择“toy-launch-cdn”和“toy-launch-app”部署,然后查看每个部署中部署的资源。 请注意,它们对应于各自模块中定义的资源。
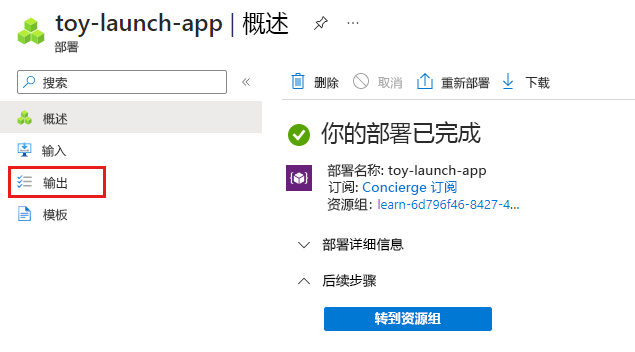
测试网站
选择“toy-launch-app”部署。
选择“输出”。
选择
appServiceAppHostName输出的复制按钮。在新的浏览器标签页上,尝试转到你上一步复制的地址。 地址应该以
https://开头。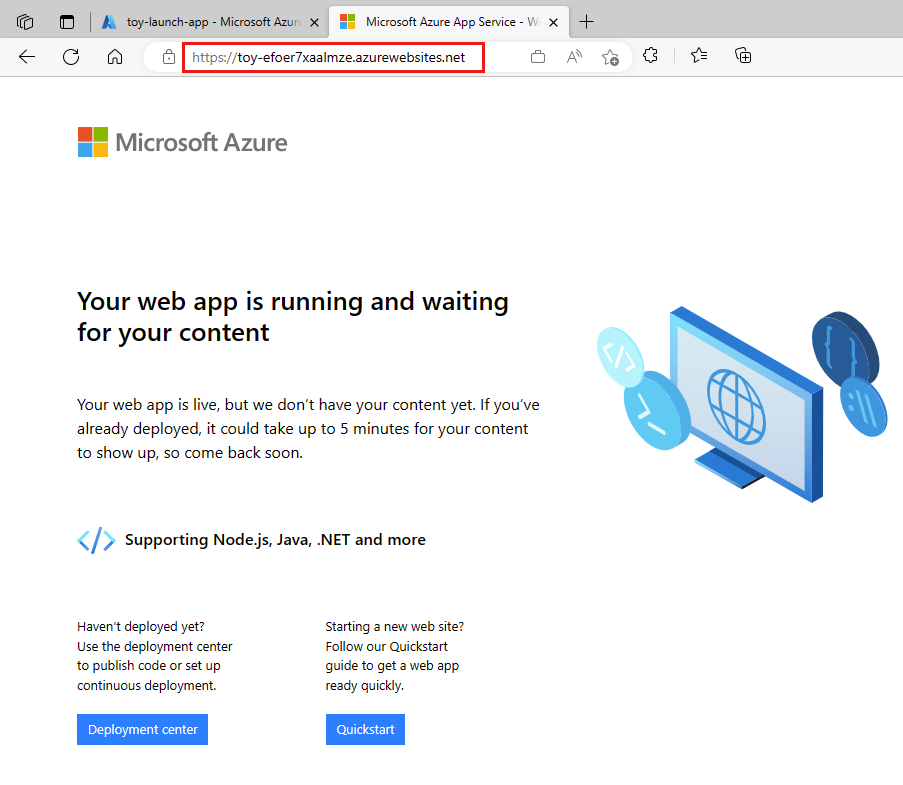
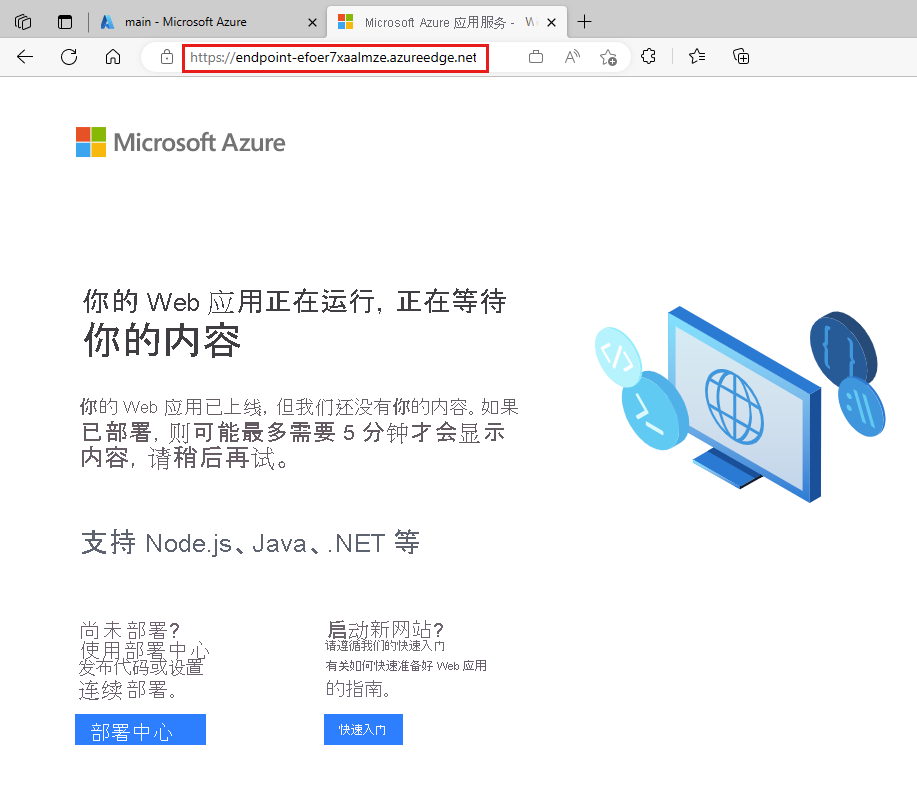
此时将显示应用服务欢迎页,其中显示你已成功部署应用。
转到 main 部署并选择“输出”。
复制
websiteHostName输出的值。 请注意,此主机名不一样,因为这是 Azure 内容分发网络主机名。在新的浏览器标签页上,尝试转到你上一步复制的主机名。 在地址开头添加
https://。CDN 终结点需要几分钟才能生效。 如果出现“找不到页面”错误,请等待几分钟,然后再次尝试粘贴链接。 此外,请确保已将
https://添加到 URL 的开头,以使用 HTTPS。当 CDN 终结点处于活动状态时,将显示相同的应用服务欢迎页。 这一次,它已通过 Azure 内容分发网络服务提供服务,这有助于提高网站性能。