练习 - 部署模型并使用终结点
我们的模型性能令人满意,因此,让我们来部署它!
有不同的部署选项。 选择的选项取决于你希望如何使用机器学习模型。 可以部署到终结点,也可以导出模型以部署到不同的平台。
我们将讨论如何部署到终结点并通过应用来使用模型。
部署到终结点
可以通过获取预测 URL 或在 Python 应用中使用 API 来部署到终结点。
获取“预测 URL”
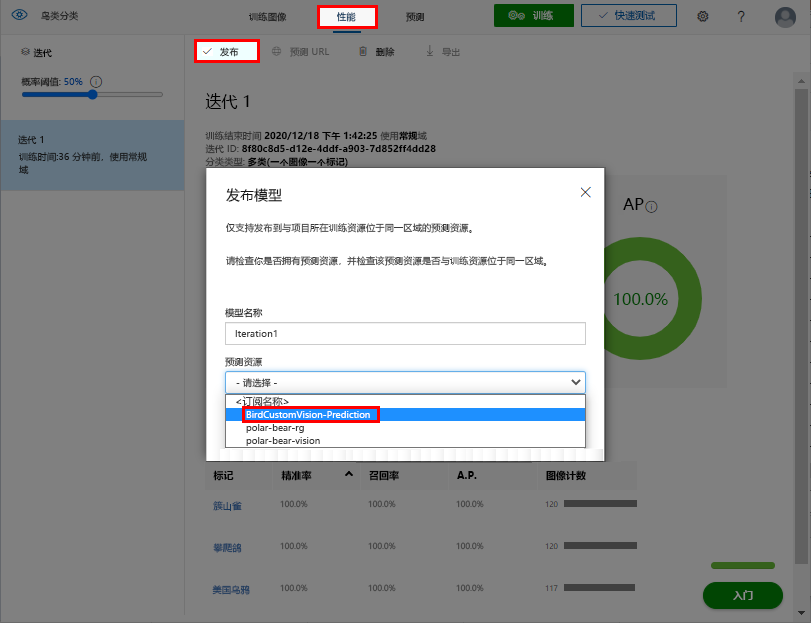
在自定义视觉门户的顶部菜单栏中,选择“性能”。
选择“发布”。
在“发布模型”中,选择“预测资源”,然后选择自定义视觉项目的预测名称。 选择“发布”。

在发布模型后,模型操作在自定义视觉门户中进行更改。
选择“预测 URL”选项卡。
在“如何使用预测 API”的“如果你有一个图像 URL”下的文本框中,复制并保存该值,然后选择“获取”。

在 Python 应用中使用 API
当模型经过训练且准确性令人满意时,就可以在应用中使用模型。
在 Azure 门户中,转到包含自定义视觉资源的资源组。 名为 <YourCustomVisionResourceName>-Prediction 的资源与原始资源组一起显示。

选择预测名称以打开“概述”页。 此页提供了资源链接,可帮助你详细了解如何调用 API 以从模型获取预测。
在“开始使用”下的部分 3 中,选择“Python 快速入门”链接。 此时,将在 Web 浏览器中打开适用于 Python 的 Azure AI 服务图像分类快速入门。

下面是在 Python 中调用预测 API 的示例代码。 有关完整代码,请参阅快速入门。
from azure.cognitiveservices.vision.customvision.prediction import CustomVisionPredictionClient

# Create variables for your resource; replace variables with valid values.
prediction_key = "<YourKey>"
endpoint = "<YourEndpoint>"
base_image_url = "<BasePathToImageFolder>"

# An example of a default iteration name is "Iteration1".
publish_iteration_name = "<PublishedIterationName>"

# You can find the project ID in the settings of the Custom Vision project in the portal.
project.id = "<CustomVisionProjectId>"

# Now, you have a trained endpoint that you can use to make a prediction.
prediction_credentials = ApiKeyCredentials(in_headers={"Prediction-key": prediction_key})

predictor = CustomVisionPredictionClient(endpoint, prediction_credentials)

with open(base_image_url + "images/Test/test_image.jpg", "rb") as image_contents:
    results = predictor.classify_image(
        project.id, publish_iteration_name, image_contents.read())

# Display the results.
for prediction in results.predictions:
    print("\t" + prediction.tag_name +
         ": {0:.2f}%".format(prediction.probability * 100))
发布到已发布的终结点时,将得到如下结果。 显示了对自定义视觉模型进行训练的每个标记的概率,按分数由高到低排序。 该模型仅可识别已训练其识别的鸟的类型。 如果你发布了未训练模型识别的鸟类图像,则该模型将预测新鸟的物种是已训练其识别的一个鸟类物种。
American Crow: 99.18%
Common Grackle: 25.34%
Red-tailed Hawk (Dark morph): 4.09%
Mourning Dove: 1.74%
American Robin (Adult): 0.92%
House Sparrow (Female): 0.40%
American Robin (Juvenile): 0.31%
Northern Cardinal (Adult Male): 0.24%
Tufted Titmouse: 0.04%
Blue Jay: 0.04%
House Sparrow (Male): 0.04%
Northern Cardinal (Female): 0.04%
Red-tailed Hawk (Light morph immature): 0.02%
American Goldfinch (Male): 0.02%
House Wren: 0.01%
American Goldfinch (Female): 0.01%
现在,你已经知道如何使用创建的机器学习模型了。 通过分析新数据,可以更好地记录鸟类习性,帮助保护鸟类栖息地并增加濒危鸟类的数量。 一切来自 Azure AI 自定义视觉的帮助!