练习 - 将 Lint 分析和验证阶段添加到管道
你已与你的团队交谈,并决定使用管道进一步自动执行部署。 你想要对部署的内容建立更多信心。
在此练习中,你将向管道添加验证阶段。 然后,在每个部署之前运行 Linter 和预检验证。
在此过程中,你将:
- 更新现有管道,以添加两个新阶段来对 Bicep 代码执行 Lint 分析和验证。
- 运行管道。
- 解决管道检测到的所有问题。
更新管道以准备阶段
首先,需要更新管道文件以定义一个阶段。 Azure Pipelines 会自动创建一个阶段,但由于你很快会添加更多阶段,因此需要更新管道以显式定义阶段。
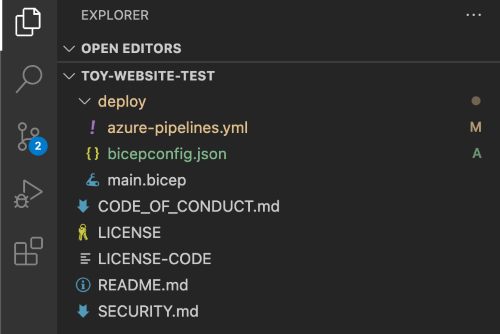
在 Visual Studio Code 中,打开 deploy 文件夹中的 azure-pipelines.yml 文件。
删除文件第 14 行到文件底部的所有内容。 请务必同时删除
jobs:行。在文件底部添加以下代码:
- stage: Lint
  jobs:
  - job: Deploy
    steps:
      - task: AzureResourceManagerTemplateDeployment@3
        name: Deploy
        displayName: Deploy to Azure
        inputs:
          connectedServiceName: $(ServiceConnectionName)
          deploymentName: $(Build.BuildNumber)
          location: $(DeploymentDefaultLocation)
          resourceGroupName: $(ResourceGroupName)
          csmFile: deploy/main.bicep
          overrideParameters: >
            -environmentType $(EnvironmentType)
提示
YAML 文件对缩进敏感。 无论是键入还是粘贴此代码,都请确保缩进正确。 在本练习的后面部分,你将看到完整的 YAML 管道定义,以便可以验证文件是否匹配。
将第 7 行上的池配置替换为以下行:
pool: Default
将 Lint 分析和验证阶段添加到管道
在
stages:行下方,添加 lint 分析阶段:jobs: - job: LintCode displayName: Lint code steps: - script: | az bicep build --file deploy/main.bicep name: LintBicepCode displayName: Run Bicep linter此阶段定义了一个步骤,该步骤运行
az bicep build命令来对 Bicep 文件执行 Lint 分析。在刚添加的行下面,添加验证阶段:
jobs:
- job: ValidateBicepCode
  displayName: Validate Bicep code
  steps:
    - task: AzureResourceManagerTemplateDeployment@3
      name: RunPreflightValidation
      displayName: Run preflight validation
      inputs:
        connectedServiceName: $(ServiceConnectionName)
        location: $(deploymentDefaultLocation)
        deploymentMode: Validation
        resourceGroupName: $(ResourceGroupName)
        csmFile: deploy/main.bicep
        overrideParameters: >
          -environmentType $(EnvironmentType)
此阶段定义了一个运行预检验证的步骤。 请注意,此步骤包含对服务连接的引用。 需要该引用,因为预检验证过程需要与 Azure 通信。
管道定义现在有 3 个阶段。 第一个是对 Bicep 文件运行 Linter,第二个是执行预检验证,第三个是执行到 Azure 的部署。
保存文件。
配置 Linter
默认情况下,Bicep linter 在检测到文件中的问题时会提供警告。 Azure Pipelines 不会将 Linter 警告视为应停止管道的问题。 若要自定义此行为,请创建一个名为 bicepconfig.json 的文件以重新配置 linter。
在 deploy 文件夹中添加一个新文件,并将其命名为 bicepconfig.json。
将以下代码复制到文件中:
{
  "analyzers": {
    "core": {
      "enabled": true,
      "verbose": true,
      "rules": {
        "adminusername-should-not-be-literal": {
          "level": "error"
        },
        "max-outputs": {
          "level": "error"
        },
        "max-params": {
          "level": "error"
        },
        "max-resources": {
          "level": "error"
        },
        "max-variables": {
          "level": "error"
        },
        "no-hardcoded-env-urls": {
          "level": "error"
        },
        "no-unnecessary-dependson": {
          "level": "error"
        },
        "no-unused-params": {
          "level": "error"
        },
        "no-unused-vars": {
          "level": "error"
        },
        "outputs-should-not-contain-secrets": {
          "level": "error"
        },
        "prefer-interpolation": {
          "level": "error"
        },
        "secure-parameter-default": {
          "level": "error"
        },
        "simplify-interpolation": {
          "level": "error"
        },
        "protect-commandtoexecute-secrets": {
          "level": "error"
        },
        "use-stable-vm-image": {
          "level": "error"
        }
      }
    }
  }
}
保存文件。
验证并提交管道定义
验证 azure-pipelines.yml 文件是否如下文件所示:
trigger:
  batch: true
  branches:
    include:
    - main

pool: Default

variables:
  - name: deploymentDefaultLocation
    value: westus3

stages:

- stage: Lint
  jobs:
  - job: LintCode
    displayName: Lint code
    steps:
      - script: |
          az bicep build --file deploy/main.bicep
        name: LintBicepCode
        displayName: Run Bicep linter

- stage: Validate
  jobs:
  - job: ValidateBicepCode
    displayName: Validate Bicep code
    steps:
      - task: AzureResourceManagerTemplateDeployment@3
        name: RunPreflightValidation
        displayName: Run preflight validation
        inputs:
          connectedServiceName: $(ServiceConnectionName)
          location: $(deploymentDefaultLocation)
          deploymentMode: Validation
          resourceGroupName: $(ResourceGroupName)
          csmFile: deploy/main.bicep
          overrideParameters: >
            -environmentType $(EnvironmentType)

- stage: Deploy
  jobs:
  - job: Deploy
    steps:
      - task: AzureResourceManagerTemplateDeployment@3
        name: Deploy
        displayName: Deploy to Azure
        inputs:
          connectedServiceName: $(ServiceConnectionName)
          deploymentName: $(Build.BuildNumber)
          location: $(DeploymentDefaultLocation)
          resourceGroupName: $(ResourceGroupName)
          csmFile: deploy/main.bicep
          overrideParameters: >
            -environmentType $(EnvironmentType)
如果看起来不一样,请更新它以匹配此示例,然后保存它。
通过在 Visual Studio Code 终端中运行以下命令来提交更改并将其推送到 Git 存储库:
git add .
git commit -m "Add lint and validation stages"
git push
推送后,Azure Pipelines 会立即启动新的管道运行。
查看管道运行
在 Azure DevOps 中,转到 Pipelines。
选择管道的最新运行。
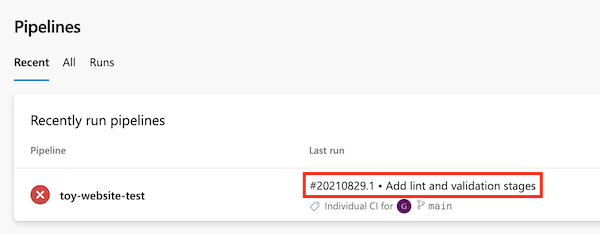
如果管道仍在运行,请等到运行完成。 虽然 Azure Pipelines 会使用最新状态自动更新页面,但仍建议偶尔刷新页面。
请注意,管道运行现在显示了你在 YAML 文件中定义的 3 个阶段。 另请注意,“Lint 分析”阶段失败。
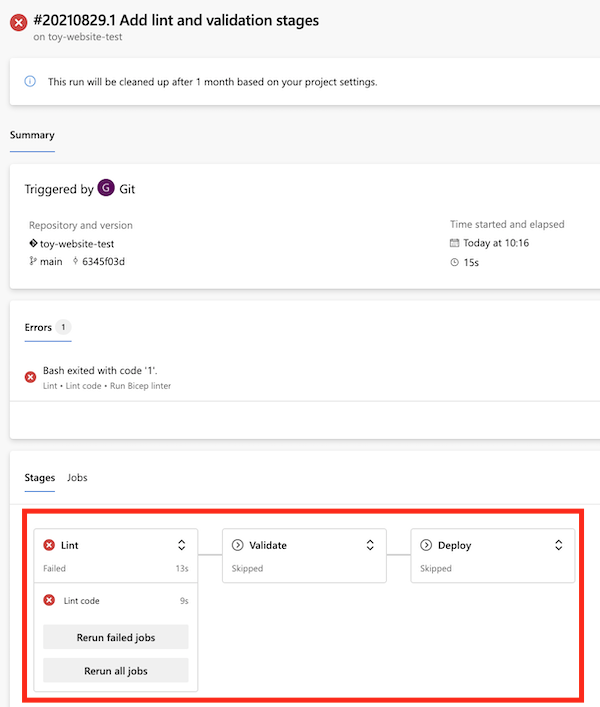
选择 Lint 阶段以查看更多详细信息。

选择“运行 Bicep Linter”步骤以查看管道日志。

请注意,显示的错误类似于以下错误:
错误 no-unused-params: 声明了参数 "storageAccountNameParam",但从未使用过该参数。
此错误表示 Linter 在 Bicep 文件中发现了规则冲突。

修复 Linter 错误
确定问题后,可以在 Bicep 文件中修复它。
在 Visual Studio Code 中,打开 deploy 文件夹中的 main.bicep 文件。
请注意,Bicep Linter 还检测到
storageAccountNameParam参数未使用。 Visual Studio Code 使用波浪线指示未使用的参数。 通常情况下,这一行会呈黄色以表示警告。 但由于你自定义了 bicepconfig.json 文件,因此 Linter 将代码视为错误,并以红色显示该行。 下面是代码行:param storageAccountNameParam string = uniqueString(resourceGroup().id)删除
storageAccountNameParam参数。保存文件。
通过在 Visual Studio Code 终端中运行以下命令来提交更改并将其推送到 Git 存储库:
git add .
git commit -m "Remove unused parameter"
git push
同样,Azure Pipelines 会自动触发管道的新运行。
再次查看管道运行
在 Azure DevOps 中,转到你的管道。
选择最近的运行。
等待管道运行完成。 尽管 Azure Pipelines 会自动更新具有最新状态的页面,但最好偶尔刷新页面。
请注意,“Lint 分析”阶段已成功完成,但现在“验证”阶段失败了。

选择 “验证 ”阶段以查看更多详细信息。
选择“运行预检验证”步骤以查看管道日志。

请注意,日志中显示的错误包括以下消息:
mystorageresourceNameSuffix 不是有效的存储帐户名称。 存储帐户名称的长度必须介于 3 到 24 个字符之间,并且只能使用数字和小写字母。
此错误表示存储帐户名称无效。

修复验证错误
你在 Bicep 文件中发现了另一个问题。 修复此问题的方法如下:
在 Visual Studio Code 中,打开 deploy 文件夹中的 main.bicep 文件。
查看
storageAccountName变量的定义:var appServiceAppName = 'toy-website-${resourceNameSuffix}' var appServicePlanName = 'toy-website' var applicationInsightsName = 'toywebsite' var logAnalyticsWorkspaceName = 'workspace-${resourceNameSuffix}' var storageAccountName = 'mystorageresourceNameSuffix'字符串内插配置不当。
请更新
storageAccountName变量以正确使用字符串插值。var storageAccountName = 'mystorage${resourceNameSuffix}'保存文件。
通过在 Visual Studio Code 终端中运行以下命令,提交更改并将其推送到 Git 存储库:
git add .
git commit -m "Fix string interpolation"
git push
查看成功的管道运行
在 Azure DevOps 中,转到你的管道。
选择最近的运行。
等待管道运行完成。 尽管 Azure Pipelines 会自动更新具有最新状态的页面,但最好偶尔刷新页面。
注释
如果收到一个错误,指出需要注册 Microsoft.Insights 资源提供程序,请参阅 解决资源提供程序注册错误。
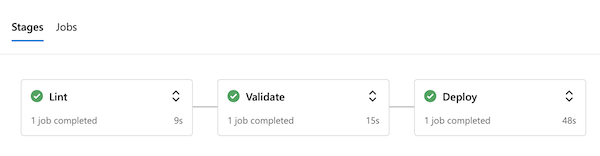
请注意,管道的所有三个阶段都已成功完成:
现在,您已经拥有一个流水线,可以在部署过程的早期成功检测到 Bicep 代码中的错误,并在没有错误的情况下将其部署到 Azure。