适用于: .NET Core 2.1、.NET Core 3.1、.NET 5
本文讨论如何使用 Docker 在 Windows 虚拟机(VM)上打开核心转储文件。
先决条件
若要完成本部分,应在任何文件夹中的 Windows VM 上复制至少一个核心转储文件。
本实验室的目标
你将了解如何使用 Docker 在另一个 Linux VM 上打开核心转储文件。
关于容器和 Docker
根据 Docker 的官方文档 , 容器 是打包代码及其所有依赖项的标准软件单元,以便应用程序从一个计算环境快速可靠地运行到另一个计算环境。 Docker 容器映像是一个轻型独立可执行软件包,其中包含运行应用程序所需的所有内容:代码、运行时、系统工具、系统库和设置。
简单地说,可以使用 Docker 容器来运行和部署应用程序。 可以从不同的 OS 映像(例如 Windows Core 或 Ubuntu)创建 Docker 容器。 在本练习中,你将创建一个 Ubuntu 容器来分析核心转储文件。
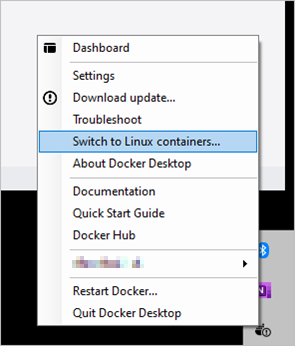
若要在 Windows VM 上创建和使用 Docker 容器,请安装 适用于 Windows 的 Docker Desktop。 链接的文章介绍了要求和安装步骤。 根据要求,Docker 对 Linux 容器使用适用于 Linux 的 Windows 子系统(WSL)。
注意
Docker 可以同时运行 Windows 和 Linux 容器,但不能同时运行。 因此,必须切换到 Linux 容器。
在继续操作之前,建议查看有关 Docker 的常见问题解答文章,以熟悉 Docker。
创建 dockerfile
在 Windows 上安装 Docker Desktop 后,需要 dockerfile。 dockerfile 只是一组用于创建容器的说明。 “dockerfile”文件名区分大小写,应全部小写,不带任何文件扩展名。
可以使用 RUN 命令在目标容器上运行命令。 例如,本节中的 dockerfile 显示可用于RUN mkdir /dumpsmkdir /dumps在目标容器 OS 上运行命令。
此示例演示 dockerfile 内容,可让你实现本部分的目标:使用最新的 Ubuntu 映像创建 Ubuntu 容器、安装最新的 dotnet SDK、更新 OS、安装 dotnet-dump 和 dotnet-symbol 工具、复制和提取转储文件,以及通过使用其中一个核心转储文件上的 dotnet-symbol 工具下载所需的文件。
注意
注释以磅号 (#) 开头。 为每个行提供了注释,以便你可以了解每个命令的作用。
# Install the latest Ubuntu container image
FROM ubuntu:latest

# Install the latest dotnet SDK
FROM mcr.microsoft.com/dotnet/core/sdk:latest AS tools-install

# Update the OS, the slash (\) means that the command continues on the next line
RUN apt-get update \
&& apt-get upgrade -y \
&& apt-get install -y

# Install the dotnet-dump and dotnet-symbol tools in the /dotnetcore-tools folder
RUN dotnet tool install --tool-path /dotnetcore-tools dotnet-dump
RUN dotnet tool install --tool-path /dotnetcore-tools dotnet-symbol

# Add the /dotnetcore-tools in the PATH environment variable to run the dotnet-dump and dotnet-symbol tools directly
ENV PATH="/dotnetcore-tools:${PATH}"

# Create a /dumps folder in the Linux container
RUN mkdir /dumps

# Copy the coredumps.tar.gz file from a Windows VM to the /dumps folder on a Linux VM
COPY ./coredumps.tar.gz /dumps/

# Extract the tar file to the /dumps folder
RUN tar -xf /dumps/coredumps.tar.gz -C /dumps

# Run dotnet-symbol against one of the core dump files to download the required files (such as symbols and DAC)
RUN dotnet-symbol --host-only --debugging ~/dumps/coredump.manual.1.11724
在包含coredumps.tar.gz存档文件的同一目录中创建名为 dockerfile 的文件。 请记住:文件名区分大小写,没有扩展名。
生成并运行 Docker 容器
同样,如果要运行 Windows 容器,则必须切换到 Docker 中的 Linux 容器。
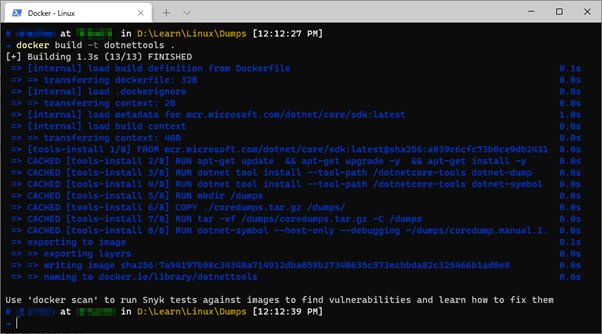
然后,打开命令提示符窗口,并更改为包含 coredumps.tar.gz 和 dockerfile 文件的文件夹。 若要生成 docker 容器,请运行 docker build -t dotnettools .。
注意
参数 -t 表示“tag”。运行 docker 容器时,将使用此标记名称。
命令末尾的句点(.)表示 Docker 生成命令将使用当前目录中的 dockerfile。
下面是生成命令的输出。 由于同一命令已多次运行,因此它将其内部缓存用于目标映像。 首次运行此命令时,它将下载必要的文件,然后缓存这些文件供以后使用。 首次运行命令时,生成映像可能需要一些时间。
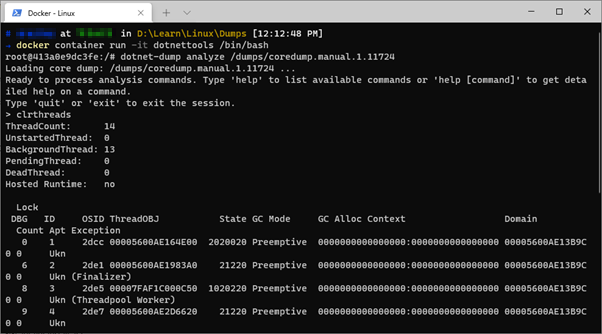
然后,使用 docker container run -it dotnettools /bin/bash 命令运行容器。

这就可以了。 现在,你位于新生成的 Linux 容器中。 其余部分与之前相同:将使用相同的 dotnet-dump 命令打开核心转储: dotnet-dump analyze /dumps/coredump.manual.1.11724 下面是用于生成训练系列的示例环境的结果。

可以运行 SOS 命令,例如 clrthreads显示托管线程。
现在,你已准备好使用 Docker 分析 Linux 容器中的核心转储文件。