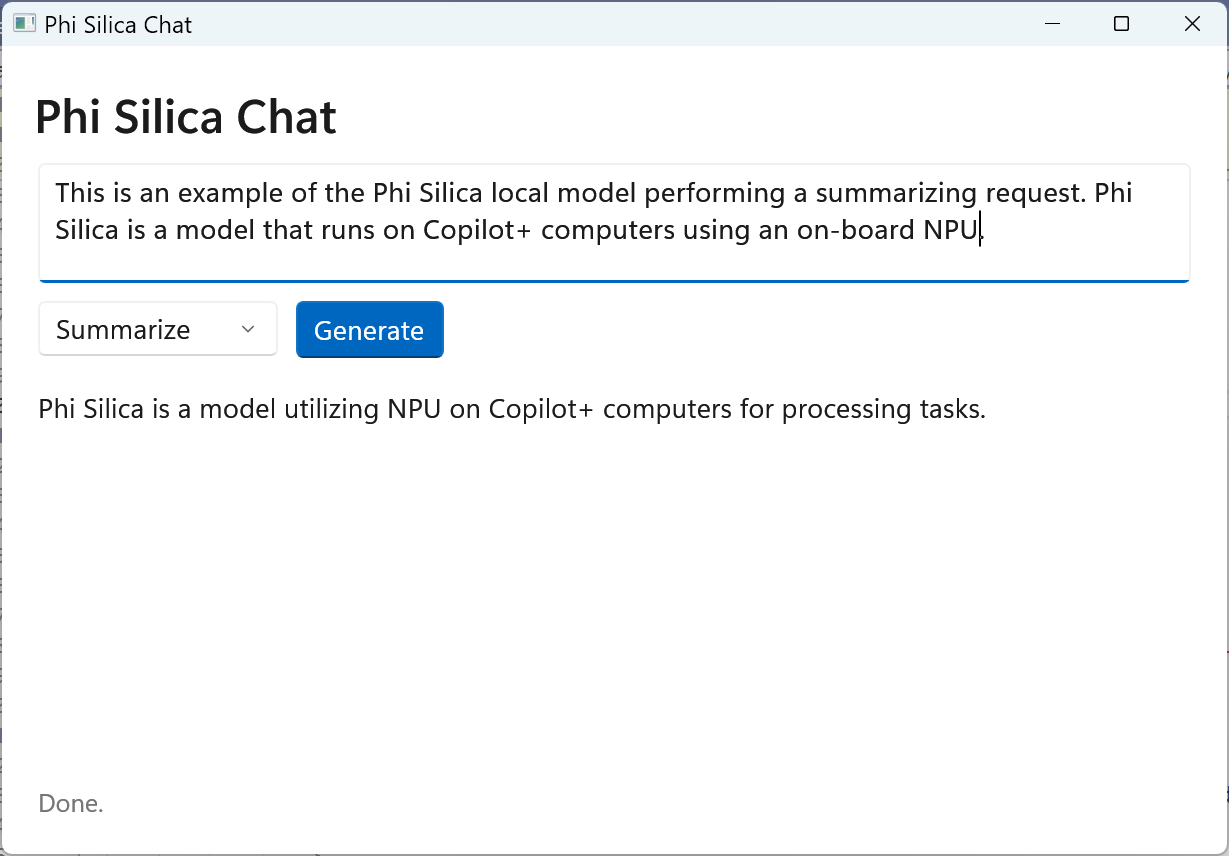
本教程构建了一个简单的 WinUI 3 桌面应用,该应用使用 Phi 硅 设备语言模型。 完成的应用允许你键入提示、选择技能(聊天、汇总或重写),并查看设备上本地生成的响应-无云调用、无 API 密钥。
重要
Phi Silica 需要 Copilot+ PC。 该模型在设备的 NPU 上运行,在标准电脑上不可用。 如果没有 Copilot+ 电脑,请参阅 Foundry Local 作为在任何新式 Windows 电脑上运行的替代方法。
重要
Phi 硅 API 是受限访问功能的一部分。 有关详细信息或请求解锁令牌,请使用 LAF 访问令牌请求表单。
注释
皮硅功能在中国不可用。
您将构建的内容
WinUI 3 应用,其中包含:
- 提示输入框
- 技能选择器(聊天/汇总/重写)
- 响应显示区域
- 模型加载时的状态反馈
先决条件
Copilot+ PC - NPU 加速所必需的。 请参阅 Copilot+ 电脑开发人员指南。
Windows 11 内部版本 26100 或更高版本 (25H2)- 在 Windows 搜索中进行检查
winver。已启用开发人员模式 - Windows 设置→系统→开发人员→开发人员模式。
安装了 Windows 应用程序开发工作负载的 Visual Studio 2022。 请参阅 所需的工作负载和组件。
Windows 应用 SDK 2.0 预览版 NuGet 包 -
Microsoft.WindowsAppSDK版本2.0.0-preview1。 你将在以下步骤中安装该程序。Phi 硅 LAF 解锁令牌——请使用上面的链接进行请求。 如果没有它,对 API 的调用将失败,并出现访问被拒绝错误。
提示: 在 Windows 终端中运行自动安装命令,在一个步骤中安装 Visual Studio 和 Windows 应用 SDK:
winget configure https://raw.githubusercontent.com/microsoft/winget-dsc/refs/heads/main/samples/Configuration%20files/Learn%20tutorials/Windows%20AI/learn_wcr.winget
步骤 1:创建项目
打开 Visual Studio。
选择创建新项目,搜索WinUI,然后选择空白应用,打包(WinUI 3 桌面版)。
将项目
PhiSilicaChat命名,选择一个位置,然后选择“ 创建”。在 解决方案资源管理器中,右键单击项目并选择 管理 NuGet 包。
选中 “包括预发行版”,搜索
Microsoft.WindowsAppSDK,选择版本2.0.0-preview1,然后单击“ 安装”。将生成配置设置为工具栏下拉列表中的 ARM64 。
在工具栏的启动配置文件下拉列表(播放按钮旁),选择 PhiSilicaChat (包) - 而不是未打包的配置文件。
重要
该
LanguageModelAPI 仅适用于 打包的 MSIX 应用。 如果意外运行解压缩的配置文件,GetReadyState()将失败并显示 COM 错误。 始终使用 MsixPackage 启动配置文件。
步骤 2:配置应用清单
应用需要 systemAIModels 功能以及最低 OS 版本 10.0.26100.0 才能访问 Phi Silica。
在 解决方案资源管理器中,右键单击
Package.appxmanifest并选择“ 查看代码”。找到开始
<Package标记,并将 整个<Package ...>开始标记替换为 此版本:<Package xmlns="http://schemas.microsoft.com/appx/manifest/foundation/windows10" xmlns:uap="http://schemas.microsoft.com/appx/manifest/uap/windows10" xmlns:rescap="http://schemas.microsoft.com/appx/manifest/foundation/windows10/restrictedcapabilities" xmlns:systemai="http://schemas.microsoft.com/appx/manifest/systemai/windows10" IgnorableNamespaces="uap rescap systemai">重要
声明
xmlns:systemai必须出现在开始标记中<Package>。 不在此处添加<systemai:Capability>的命名空间声明会导致“未声明前缀”解析错误。找到
<Dependencies>元素并完全替换它,需要将MinVersion提升到10.0.26100.0。 如果最低版本较低,Windows 会以无提示方式忽略systemai:Capability并GetReadyState()引发“应用未声明”:<Dependencies> <TargetDeviceFamily Name="Windows.Universal" MinVersion="10.0.26100.0" MaxVersionTested="10.0.26300.0" /> <TargetDeviceFamily Name="Windows.Desktop" MinVersion="10.0.26100.0" MaxVersionTested="10.0.26300.0" /> </Dependencies>找到
<Capabilities>元素并将其完全替换为:<Capabilities> <rescap:Capability Name="runFullTrust"/> <systemai:Capability Name="systemAIModels"/> </Capabilities>
步骤 3:配置项目文件
防止 Visual Studio 重写清单版本设置。
在 解决方案资源管理器中,右键单击 项目名称 (C# 图标位于解决方案正下方的顶级节点),然后选择 “编辑项目文件”。 这会直接在编辑器中打开
.csproj该文件 , 它不会在解决方案资源管理器中显示为文件。在
<PropertyGroup>元素内,添加:<AppxOSMinVersionReplaceManifestVersion>false</AppxOSMinVersionReplaceManifestVersion> <AppxOSMaxVersionTestedReplaceManifestVersion>false</AppxOSMaxVersionTestedReplaceManifestVersion>
步骤 4:生成 UI
将 MainWindow.xaml 的内容替换为以下内容:
<Window
    x:Class="PhiSilicaChat.MainWindow"
    xmlns="http://schemas.microsoft.com/winfx/2006/xaml/presentation"
    xmlns:x="http://schemas.microsoft.com/winfx/2006/xaml"
    Title="Phi Silica Chat">

    <Grid Margin="24" RowSpacing="12">
        <Grid.RowDefinitions>
            <RowDefinition Height="Auto"/>
            <RowDefinition Height="Auto"/>
            <RowDefinition Height="Auto"/>
            <RowDefinition Height="*"/>
            <RowDefinition Height="Auto"/>
        </Grid.RowDefinitions>

        <TextBlock Grid.Row="0" Text="Phi Silica Chat" Style="{StaticResource TitleTextBlockStyle}"/>

        <TextBox Grid.Row="1"
                 x:Name="PromptBox"
                 PlaceholderText="Enter your prompt here..."
                 AcceptsReturn="True"
                 MinHeight="80"
                 TextWrapping="Wrap"/>

        <StackPanel Grid.Row="2" Orientation="Horizontal" Spacing="12">
            <ComboBox x:Name="SkillSelector" SelectedIndex="0" MinWidth="160">
                <ComboBoxItem Content="Chat (no skill)"/>
                <ComboBoxItem Content="Summarize"/>
                <ComboBoxItem Content="Rewrite"/>
            </ComboBox>
            <Button x:Name="SendButton" Content="Generate" Click="OnSendClicked" Style="{StaticResource AccentButtonStyle}"/>
        </StackPanel>

        <ScrollViewer Grid.Row="3" VerticalScrollBarVisibility="Auto" Margin="0,8,0,0">
            <TextBlock x:Name="ResponseText"
                       TextWrapping="Wrap"
                       IsTextSelectionEnabled="True"
                       FontSize="14"/>
        </ScrollViewer>

        <TextBlock Grid.Row="4" x:Name="StatusText" Opacity="0.6" FontSize="12"/>
    </Grid>
</Window>
步骤 5:添加后台代码
注释
LanguageModelSkill枚举(Summarize,)Rewrite在 Windows 应用 SDK 的所有实验版本中不可用。 本教程使用 提示工程 来实现相同的结果 - 通过提示文本指示模型。 当技能 API 在稳定版本中可用时,可以将提示字符串构造替换为 new LanguageModelOptions { Skill = LanguageModelSkill.Summarize }。
将 MainWindow.xaml.cs 的内容替换为以下内容:
using Microsoft.UI.Xaml;
using Microsoft.UI.Xaml.Controls;
using Microsoft.Windows.AI;
using Microsoft.Windows.AI.Text;
using System;
using Windows.ApplicationModel;

namespace PhiSilicaChat;

public sealed partial class MainWindow : Window
{
    private LanguageModel? _languageModel;

    public MainWindow()
    {
        InitializeComponent();
        InitializeModelAsync();
    }

    private async void InitializeModelAsync()
    {
        SendButton.IsEnabled = false;
        StatusText.Text = "Checking model availability...";

        // Unlock the Limited Access Feature.
        // Replace these values with the token and attestation string provided by Microsoft.
        // Request your token at https://go.microsoft.com/fwlink/?linkid=2271232&c1cid=04x409
        var access = LimitedAccessFeatures.TryUnlockFeature(
            "com.microsoft.windows.ai.languagemodel",
            "YOUR_TOKEN_HERE",
            "YOUR_ATTESTATION_STRING_HERE");

        if (access.Status != LimitedAccessFeatureStatus.Available &&
            access.Status != LimitedAccessFeatureStatus.AvailableWithoutToken)
        {
            StatusText.Text = $"Feature access denied (LAF status: {access.Status}). Check your token.";
            return;
        }

        try
        {
            var readyState = LanguageModel.GetReadyState();

            if (readyState == AIFeatureReadyState.NotReady)
            {
                StatusText.Text = "Model not ready — installing. This may take a few minutes...";
                var ensureResult = await LanguageModel.EnsureReadyAsync();

                if (ensureResult.ExtendedError != null)
                {
                    StatusText.Text = $"Model installation failed: {ensureResult.ExtendedError.Message}";
                    return;
                }
            }
            else if (readyState == AIFeatureReadyState.NotSupportedOnCurrentSystem)
            {
                StatusText.Text = "Phi Silica is not supported on this device. A Copilot+ PC is required.";
                ResponseText.Text = "Phi Silica requires a Copilot+ PC with an NPU.\n\n" +
                                     "For on-device AI on any Windows PC, see Foundry Local:\n" +
                                     "https://learn.microsoft.com/windows/ai/foundry-local/get-started";
                return;
            }

            _languageModel = await LanguageModel.CreateAsync();
            StatusText.Text = "Model ready.";
            SendButton.IsEnabled = true;
        }
        catch (Exception ex)
        {
            StatusText.Text = $"Model init failed: {ex.Message}";
        }
    }

        if (readyState == AIFeatureReadyState.NotReady)
        {
            StatusText.Text = "Model not ready — installing. This may take a few minutes...";
            var ensureResult = await LanguageModel.EnsureReadyAsync();

            if (ensureResult.ExtendedError != null)
            {
                StatusText.Text = $"Model installation failed: {ensureResult.ExtendedError.Message}";
                return;
            }
        }
        else if (readyState == AIFeatureReadyState.NotSupportedOnCurrentSystem)
        {
            // This device does not have a compatible NPU or is not a Copilot+ PC.
            // Consider falling back to Foundry Local or an Azure OpenAI endpoint.
            StatusText.Text = "Phi Silica is not supported on this device. A Copilot+ PC is required.";
            ResponseText.Text = "Phi Silica requires a Copilot+ PC with an NPU.\n\n" +
                                 "For on-device AI on any Windows PC, see Foundry Local:\n" +
                                 "https://learn.microsoft.com/windows/ai/foundry-local/get-started";
            return;
        }

        _languageModel = await LanguageModel.CreateAsync();
        StatusText.Text = "Model ready.";
        SendButton.IsEnabled = true;
    }

    private async void OnSendClicked(object sender, RoutedEventArgs e)
    {
        if (_languageModel is null) return;

        string prompt = PromptBox.Text.Trim();
        if (string.IsNullOrEmpty(prompt)) return;

        SendButton.IsEnabled = false;
        ResponseText.Text = string.Empty;
        StatusText.Text = "Generating response...";

        try
        {
            string fullPrompt;
            int skillIndex = SkillSelector.SelectedIndex;

            if (skillIndex == 1)
            {
                // Summarize: inject an instruction into the prompt
                fullPrompt = $"Summarize the following text concisely:\n\n{prompt}";
            }
            else if (skillIndex == 2)
            {
                // Rewrite: inject an instruction into the prompt
                fullPrompt = $"Rewrite the following text to be clearer and more professional:\n\n{prompt}";
            }
            else
            {
                // Plain chat
                fullPrompt = prompt;
            }

            var result = await _languageModel.GenerateResponseAsync(fullPrompt);
            ResponseText.Text = result.Text;
            StatusText.Text = "Done.";
        }
        catch (Exception ex)
        {
            ResponseText.Text = $"Error: {ex.Message}";
            StatusText.Text = "An error occurred.";
        }
        finally
        {
            SendButton.IsEnabled = true;
        }
    }
}
步骤 6:添加 LAF 令牌
注释
什么是 LAF 令牌? 受限访问功能(LAF)令牌是 Microsoft 用于管控预发布或受控访问的 Windows API 的方式。 提交请求表单时,Microsoft通过电子邮件发送两个值:
-
令牌——一个简短的 base64 字符串(例如
xK9mP2nQrL8vZw==) -
证明字符串 - 句子的形式
"<id> has registered their use of <feature> with Microsoft and agrees to the terms of use."
这两个值 都特定于应用的程序包系列名称 , 它们不能在不同的应用中工作。 请将它们与收到时完全一致地粘贴到 TryUnlockFeature()。
Phi Silica 是一项限量访问功能。 在生成之前,请将占位符值 InitializeModelAsync 替换为实际标记和证明字符串。
提交 LAF 访问令牌请求表单。
收到令牌电子邮件时,请先通过执行以下操作来查找程序包系列名称: 首先部署应用程序一次(生成 → 部署解决方案),然后在 PowerShell 中运行。
Get-AppxPackage | Where-Object {$_.Name -like "*PhiSilicaChat*"} | Select-Object PackageFamilyName小窍门
如果项目
Identity Name是 GUID(新项目的默认值),请改为按该值搜索:Get-AppxPackage | Where-Object {$_.Name -like "*YOUR-GUID*"}使用软件包系列名称回复令牌电子邮件。 Microsoft将向你发送令牌值和证明字符串。
在
MainWindow.xaml.cs中,替换占位符值:LimitedAccessFeatures.TryUnlockFeature( "com.microsoft.windows.ai.languagemodel", "YOUR_TOKEN_HERE", // ← replace with token from email "YOUR_ATTESTATION_HERE"); // ← replace with full attestation string from email重要
令牌与应用的程序包系列名称绑定。 不要将其提交到公共存储库。
步骤 7:生成并运行
确认生成配置为 ARM64。
按 F5 生成并运行。
等待状态栏显示 “模型就绪”。
键入提示,选择技能,然后单击“ 生成”。
请尝试以下提示来测试每个技能:
| 技能 | 示例提示 |
|---|---|
| 聊天 | What are the differences between WinUI 3 and WPF? |
| 汇总 | 粘贴长篇文章或文档部分 |
| 重写 | make this formal: hey can u help me fix this bug |
故障排除
状态显示“此设备上不支持”
你的电脑要么不是 Copilot+ 电脑,要么不符合最低 Windows 版本(内部版本 26200+)。 检查 winver 并确认设备是否具有 NPU。
生成错误:找不到命名空间
确认 Microsoft.WindowsAppSDK1.8.250410001-experimental1 (或更高版本)已安装,并将生成设置为 ARM64 (而不是 x64 或 AnyCPU)。
API 返回访问被拒绝/E_ACCESSDENIED
Phi Silica API 需要有限访问功能解锁令牌。
通过 LAF 访问令牌请求表单请求一个。 在调用成功之前,必须先注册令牌。
EnsureReadyAsync 失败或卡住
检查