有两种不同的控件可促进 Windows 应用中的墨迹书写:InkCanvas 和 InkToolbar。
InkCanvas 控件提供基本的 Windows Ink 功能。 使用它可将笔输入渲染为墨迹笔划(使用默认颜色和粗细设置)或擦除笔划。
有关 InkCanvas 实现的详细信息,请参阅 Windows 应用中的笔和触笔交互。
作为完全透明的覆盖层,InkCanvas 不提供任何设置墨迹笔划属性的内置 UI。 如果要更改默认墨迹书写体验,让用户设置墨迹笔划属性并支持其他自定义墨迹书写功能,有两种选择:
在代码隐藏中,使用隐藏的已绑定 InkCanvas 的 InkPresenter 对象。
InkPresenter API 支持各种自定义墨迹书写体验。 有关更多详细信息,请参阅 Windows 应用中的笔和触笔交互。
将 InkToolbar 绑定到 InkCanvas。 InkToolbar 默认提供一套可自定义且可扩展的按钮,可以激活笔划大小、墨迹颜色和笔尖等与墨迹相关的功能。
本主题将讨论 InkToolbar。
重要 API:InkCanvas 类、InkToolbar 类、InkPresenter 类、Windows.UI.Input.Inking
默认 InkToolbar
工具栏默认包含用于绘图、擦除、突出显示和显示模具(标尺或量角器)的按钮。 其他设置和命令(例如墨迹颜色、笔划粗细、全部擦除等)根据功能在浮出控件中提供。
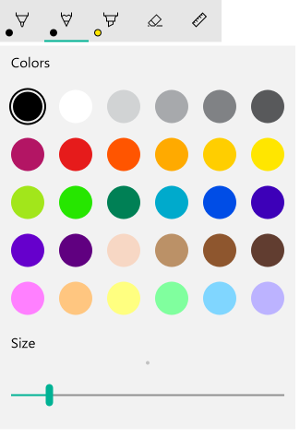
默认 Windows Ink 工具栏
要将默认 InkToolbar 添加到墨迹书写应用,只需将其放置在 InkCanvas 所在页面,并关联这两个控件。
- 在 MainPage.xaml 中,声明一个容器对象(在本示例中,我们使用 Grid 控件)作为墨迹书写表面。
- 将 InkCanvas 对象声明为容器的子级。 (InkCanvas 大小继承容器大小。)
- 声明 InkToolbar 并使用 TargetInkCanvas 属性将其绑定到 InkCanvas。
注意
确保在 InkCanvas 之后声明 InkToolbar。 否则,InkCanvas 覆盖层会将 InkToolbar 渲染为不可用。
<Grid Background="{ThemeResource ApplicationPageBackgroundThemeBrush}">
    <Grid.RowDefinitions>
        <RowDefinition Height="Auto"/>
        <RowDefinition Height="*"/>
    </Grid.RowDefinitions>
    <StackPanel x:Name="HeaderPanel" Orientation="Horizontal" Grid.Row="0">
        <TextBlock x:Name="Header"
                   Text="Basic ink sample"
                   Style="{ThemeResource HeaderTextBlockStyle}"
                   Margin="10,0,0,0" />
    </StackPanel>
    <Grid Grid.Row="1">
        <Image Source="Assets\StoreLogo.png" />
        <InkCanvas x:Name="inkCanvas" />
        <InkToolbar x:Name="inkToolbar"
          VerticalAlignment="Top"
          TargetInkCanvas="{x:Bind inkCanvas}" />
    </Grid>
</Grid>
基本自定义
在本部分中,我们将介绍一些基本的 Windows Ink 工具栏自定义方案。
指定位置和方向
将墨迹工具栏添加到应用时,可以接受工具栏的默认位置和方向,或根据需要设置应用或用户。
XAML
通过 VerticalAlignment、HorizontalAlignment 和 Orientation 属性显式指定工具栏的位置和方向 。
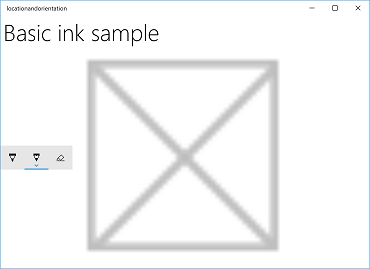
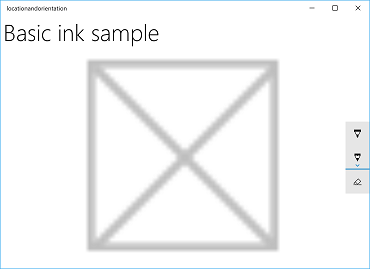
| 默认 | 显式 |
|---|---|
|
|
| Windows Ink 工具栏默认位置和方向 | Windows Ink 工具栏显式位置和方向 |
下面是在 XAML 中显式设置墨迹工具栏位置和方向的代码。
<InkToolbar x:Name="inkToolbar"
    VerticalAlignment="Center"
    HorizontalAlignment="Right"
    Orientation="Vertical"
    TargetInkCanvas="{x:Bind inkCanvas}" />
基于用户首选项或设备状态进行初始化
在某些情况下,你可能希望根据用户首选项或设备状态设置墨迹工具栏的位置和方向。 下面的示例演示了如何根据左手或右手书写首选项(通过设置 > 设备 > 笔 > 笔和 Windows Ink > 选择书写时使用哪只手指定)来设置墨迹工具栏的位置和方向。
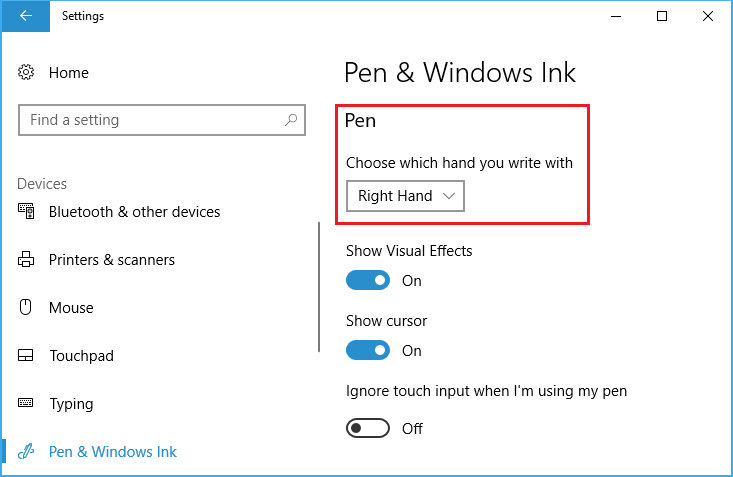
常用手设置
可以通过 Windows.UI.ViewManagement 的 HandPreference 属性查询此设置,并根据返回的值设置 HorizontalAlignment。 在此示例中,我们为左利手用户将工具栏放置在应用左侧,为右利手用户放置在右侧。
public MainPage()
{
    this.InitializeComponent();

    Windows.UI.ViewManagement.UISettings settings =
        new Windows.UI.ViewManagement.UISettings();
    HorizontalAlignment alignment =
        (settings.HandPreference ==
            Windows.UI.ViewManagement.HandPreference.LeftHanded) ?
            HorizontalAlignment.Left : HorizontalAlignment.Right;
    inkToolbar.HorizontalAlignment = alignment;
}
根据用户或设备状态动态调整
还可以使用绑定,从而可以根据用户首选项、设备设置或设备状态的更改来更新 UI。 在下面的示例中,我们在上一个示例的基础上演示如何使用绑定,ViewMOdel 对象和 INotifyPropertyChanged 接口,基于设备方向动态调整墨迹工具栏位置。
首先,让我们添加 ViewModel。
将新文件夹添加到项目并命名为 ViewModels。
将新类添加到 ViewModels 文件夹(在本示例中,我们称之为 InkToolbarSnippetHostViewModel.cs)。
注意
我们使用 Singleton 模式,因为在应用程序的生存期内,我们只需要一个此类型的对象
将
using System.ComponentModel命名空间添加到该文件:添加名为 Instance 的静态成员变量和名为 Instance 的静态只读属性。 将构造函数设为私有,以确保只能通过 Instance 属性访问此类。
注意
此类继承自 INotifyPropertyChanged 接口,该接口用于通知客户端(通常绑定客户端)属性值已更改。 我们将其用于处理对设备方向的更改(我们将扩展此代码并在后面的步骤中进一步说明)。
using System.ComponentModel;

namespace locationandorientation.ViewModels
{
    public class InkToolbarSnippetHostViewModel : INotifyPropertyChanged
    {
        private static InkToolbarSnippetHostViewModel instance;

        public static InkToolbarSnippetHostViewModel Instance
        {
            get
            {
                if (null == instance)
                {
                    instance = new InkToolbarSnippetHostViewModel();
                }
                return instance;
            }
        }
    }

    private InkToolbarSnippetHostViewModel() { }
}
向 InkToolbarSnippetHostViewModel 类添加两个布尔属性:LeftHandedLayout(与上一个仅适用于 XAML 的示例功能相同)和 PortraitLayout (设备的方向)。
注意
PortraitLayout 属性是可设置的,包括 PropertyChanged 事件的定义。
public bool LeftHandedLayout
{
    get
    {
        bool leftHandedLayout = false;
        Windows.UI.ViewManagement.UISettings settings =
            new Windows.UI.ViewManagement.UISettings();
        leftHandedLayout = (settings.HandPreference ==
            Windows.UI.ViewManagement.HandPreference.LeftHanded);
        return leftHandedLayout;
    }
}

public bool portraitLayout = false;
public bool PortraitLayout
{
    get
    {
        Windows.UI.ViewManagement.ApplicationViewOrientation winOrientation =
            Windows.UI.ViewManagement.ApplicationView.GetForCurrentView().Orientation;
        portraitLayout =
            (winOrientation ==
                Windows.UI.ViewManagement.ApplicationViewOrientation.Portrait);
        return portraitLayout;
    }
    set
    {
        if (value.Equals(portraitLayout)) return;
        portraitLayout = value;
        PropertyChanged?.Invoke(this, new PropertyChangedEventArgs("PortraitLayout"));
    }
}
现在,让我们向项目添加几个转换器类。 每个类都包含一个 Convert 对象,用于返回对齐值( HorizontalAlignment 或 VerticalAlignment)。
将新文件夹添加到项目并命名为 Converters。
将两个新类添加到 Converters 文件夹(在本示例中,我们命名为 HorizontalAlignmentFromHandednessConverter.cs 和 VerticalAlignmentFromAppViewConverter.cs)。
向各文件添加
using Windows.UI.Xaml和using Windows.UI.Xaml.Data命名空间。将每个类更改为
public并指定它使用 IValueConverter 接口。将 Convert 和 ConvertBack 方法添加到各文件,如下所示(我们未使用 ConvertBack 方法)。
- HorizontalAlignmentFromHandednessConverter 将墨迹工具栏放置在应用右侧供右利手用户使用,放置在应用左侧供左利手用户使用。
using System; using Windows.UI.Xaml; using Windows.UI.Xaml.Data; namespace locationandorientation.Converters { public class HorizontalAlignmentFromHandednessConverter : IValueConverter { public object Convert(object value, Type targetType, object parameter, string language) { bool leftHanded = (bool)value; HorizontalAlignment alignment = HorizontalAlignment.Right; if (leftHanded) { alignment = HorizontalAlignment.Left; } return alignment; } public object ConvertBack(object value, Type targetType, object parameter, string language) { throw new NotImplementedException(); } } }- VerticalAlignmentFromAppViewConverter 将墨迹工具栏放置应用的中心,供竖屏用户使用,放置在应用顶部供横屏用户使用(目的是提高可用性,但这只是用于演示的随意选择)。
using System;

using Windows.UI.Xaml;
using Windows.UI.Xaml.Data;

namespace locationandorientation.Converters
{
    public class VerticalAlignmentFromAppViewConverter : IValueConverter
    {
        public object Convert(object value, Type targetType,
            object parameter, string language)
        {
            bool portraitOrientation = (bool)value;
            VerticalAlignment alignment = VerticalAlignment.Top;
            if (portraitOrientation)
            {
                alignment = VerticalAlignment.Center;
            }
            return alignment;
        }

        public object ConvertBack(object value, Type targetType,
            object parameter, string language)
        {
            throw new NotImplementedException();
        }
    }
}
现在打开 MainPage.xaml.cs 文件。
- 将
using using locationandorientation.ViewModels添加到命名空间列表以将 ViewModel 关联起来。 - 将
using Windows.UI.ViewManagement添加到命名空间列表以便能够侦听设备方向的更改。 - 添加 WindowSizeChangedEventHandler 代码。
- 将视图的 DataContext 设置为 InkToolbarSnippetHostViewModel 类的单一实例。
using Windows.UI.Xaml; using Windows.UI.Xaml.Controls; using locationandorientation.ViewModels; using Windows.UI.ViewManagement; namespace locationandorientation { public sealed partial class MainPage : Page { public MainPage() { this.InitializeComponent(); Window.Current.SizeChanged += (sender, args) => { ApplicationView currentView = ApplicationView.GetForCurrentView(); if (currentView.Orientation == ApplicationViewOrientation.Landscape) { InkToolbarSnippetHostViewModel.Instance.PortraitLayout = false; } else if (currentView.Orientation == ApplicationViewOrientation.Portrait) { InkToolbarSnippetHostViewModel.Instance.PortraitLayout = true; } }; DataContext = InkToolbarSnippetHostViewModel.Instance; } } }- 将
接下来,打开 MainPage.xaml 文件。
将
xmlns:converters="using:locationandorientation.Converters"添加到Page元素以绑定到转换器。<Page x:Class="locationandorientation.MainPage" xmlns="http://schemas.microsoft.com/winfx/2006/xaml/presentation" xmlns:x="http://schemas.microsoft.com/winfx/2006/xaml" xmlns:local="using:locationandorientation" xmlns:converters="using:locationandorientation.Converters" xmlns:d="http://schemas.microsoft.com/expression/blend/2008" xmlns:mc="http://schemas.openxmlformats.org/markup-compatibility/2006" mc:Ignorable="d">添加
PageResources元素并指定对转换器的引用。<Page.Resources> <converters:HorizontalAlignmentFromHandednessConverter x:Key="HorizontalAlignmentConverter"/> <converters:VerticalAlignmentFromAppViewConverter x:Key="VerticalAlignmentConverter"/> </Page.Resources>添加 InkCanvas 和 InkToolbar 元素,并绑定 InkToolbar 的 VerticalAlignment 和 HorizontalAlignment 属性。
<InkCanvas x:Name="inkCanvas" />
<InkToolbar x:Name="inkToolbar"
            VerticalAlignment="{Binding PortraitLayout, Converter={StaticResource VerticalAlignmentConverter} }"
            HorizontalAlignment="{Binding LeftHandedLayout, Converter={StaticResource HorizontalAlignmentConverter} }"
            Orientation="Vertical"
            TargetInkCanvas="{x:Bind inkCanvas}" />
返回到 InkToolbarSnippetHostViewModel.cs 文件,将
PortraitLayout和LeftHandedLayout布尔属性添加到InkToolbarSnippetHostViewModel类,并支持在该属性值更改时重新绑定PortraitLayout。public bool LeftHandedLayout { get { bool leftHandedLayout = false; Windows.UI.ViewManagement.UISettings settings = new Windows.UI.ViewManagement.UISettings(); leftHandedLayout = (settings.HandPreference == Windows.UI.ViewManagement.HandPreference.LeftHanded); return leftHandedLayout; } } public bool portraitLayout = false; public bool PortraitLayout { get { Windows.UI.ViewManagement.ApplicationViewOrientation winOrientation = Windows.UI.ViewManagement.ApplicationView.GetForCurrentView().Orientation; portraitLayout = (winOrientation == Windows.UI.ViewManagement.ApplicationViewOrientation.Portrait); return portraitLayout; } set { if (value.Equals(portraitLayout)) return; portraitLayout = value; PropertyChanged?.Invoke(this, new PropertyChangedEventArgs("PortraitLayout")); } } #region INotifyPropertyChanged Members public event PropertyChangedEventHandler PropertyChanged; protected void OnPropertyChanged(string property) { PropertyChanged?.Invoke(this, new PropertyChangedEventArgs(property)); } #endregion
你现在应有了一个墨迹书写应用,它既适应用户的惯用手偏好,又动态响应用户设备的方向。
指定选中按钮

在初始化时选中铅笔按钮的 Windows Ink 工具栏
启动应用并初始化工具栏时,默认选中第一个(或最左侧)按钮。 在默认的 Windows Ink 工具栏中,是圆珠笔按钮。
由于框架定义了内置按钮的顺序,因此第一个按钮可能不是你想默认激活的笔或工具。
可以修改此默认行为,并在工具栏上指定选中按钮。
在本示例中,我们将在初始化默认工具栏时选中铅笔按钮并激活(而不是圆点笔)。
- 使用上一示例中适用于 InkCanvas 和 InkToolbar 的 XAML 声明。
- 在代码隐藏中,为 InkToolbar 对象的 Loaded 事件设置处理程序。
/// <summary>
/// An empty page that can be used on its own or navigated to within a Frame.
/// Here, we set up InkToolbar event listeners.
/// </summary>
public MainPage_CodeBehind()
{
    this.InitializeComponent();
    // Add handlers for InkToolbar events.
    inkToolbar.Loaded += inkToolbar_Loaded;
}
Loaded 事件中的处理程序:
- 获取对内置 InkToolbarPencilButton 的引用。
传递 GetToolButton 方法中的 InkToolbarTool.Pencil 对象,将返回 InkToolbarPencilButton 的 InkToolbarToolButton 对象。
- 将 ActiveTool 设置为上一步中返回的对象。
/// <summary>
/// Handle the Loaded event of the InkToolbar.
/// By default, the active tool is set to the first tool on the toolbar.
/// Here, we set the active tool to the pencil button.
/// </summary>
/// <param name="sender"></param>
/// <param name="e"></param>
private void inkToolbar_Loaded(object sender, RoutedEventArgs e)
{
    InkToolbarToolButton pencilButton = inkToolbar.GetToolButton(InkToolbarTool.Pencil);
    inkToolbar.ActiveTool = pencilButton;
}
指定内置按钮

初始化时具体包含的按钮
如前文所说,Windows Ink 工具栏包含一套默认的内置按钮。 这些按钮按以下顺序显示(从左到右):
在本示例中,我们仅使用内置的圆珠笔、铅笔和橡皮擦按钮初始化工具栏。
可以使用 XAML 或代码隐藏执行此操作。
XAML
修改第一个示例中的 InkCanvas 和 InkToolbar 的 XAML 声明。
- 添加 InitialControls 属性并将值设置为 “None”。 这会清除默认的内置按钮集合。
- 添加应用所需的 InkToolbar 按钮。 在这里,我们仅添加 InkToolbarBallpointPenButton、InkToolbarPencilButton 和 InkToolbarEraserButton。
注意
按钮会按框架定义的顺序添加到工具栏,而不是此处指定的顺序。
<Grid Background="{ThemeResource ApplicationPageBackgroundThemeBrush}">
    <Grid.RowDefinitions>
        <RowDefinition Height="Auto"/>
        <RowDefinition Height="*"/>
    </Grid.RowDefinitions>
    <StackPanel x:Name="HeaderPanel" Orientation="Horizontal" Grid.Row="0">
        <TextBlock x:Name="Header"
                   Text="Basic ink sample"
                   Style="{ThemeResource HeaderTextBlockStyle}"
                   Margin="10,0,0,0" />
    </StackPanel>
    <Grid Grid.Row="1">
        <Image Source="Assets\StoreLogo.png" />
        <!-- Clear the default InkToolbar buttons by setting InitialControls to None. -->
        <!-- Set the active tool to the pencil button. -->
        <InkCanvas x:Name="inkCanvas" />
        <InkToolbar x:Name="inkToolbar"
                    VerticalAlignment="Top"
                    TargetInkCanvas="{x:Bind inkCanvas}"
                    InitialControls="None">
            <!--
             Add only the ballpoint pen, pencil, and eraser.
             Note that the buttons are added to the toolbar in the order
             defined by the framework, not the order we specify here.
            -->
            <InkToolbarEraserButton />
            <InkToolbarBallpointPenButton />
            <InkToolbarPencilButton/>
        </InkToolbar>
    </Grid>
</Grid>
代码隐藏
- 使用第一个示例中 InkCanvas 和 InkToolbar 的 XAML 声明。
<Grid Background="{ThemeResource ApplicationPageBackgroundThemeBrush}">
    <Grid.RowDefinitions>
        <RowDefinition Height="Auto"/>
        <RowDefinition Height="*"/>
    </Grid.RowDefinitions>
    <StackPanel x:Name="HeaderPanel" Orientation="Horizontal" Grid.Row="0">
        <TextBlock x:Name="Header"
                   Text="Basic ink sample"
                   Style="{ThemeResource HeaderTextBlockStyle}"
                   Margin="10,0,0,0" />
    </StackPanel>
    <Grid Grid.Row="1">
        <Image Source="Assets\StoreLogo.png" />
        <InkCanvas x:Name="inkCanvas" />
        <InkToolbar x:Name="inkToolbar"
        VerticalAlignment="Top"
        TargetInkCanvas="{x:Bind inkCanvas}" />
    </Grid>
</Grid>
- 在代码隐藏中,为 InkToolbar 对象的 Loading 事件设置处理程序。
/// <summary>
/// An empty page that can be used on its own or navigated to within a Frame.
/// Here, we set up InkToolbar event listeners.
/// </summary>
public MainPage_CodeBehind()
{
    this.InitializeComponent();
    // Add handlers for InkToolbar events.
    inkToolbar.Loading += inkToolbar_Loading;
}
- 将 InitialControls 设置为 “None”。
- 为应用所需的按钮创建对象引用。 在这里,我们仅添加 InkToolbarBallpointPenButton、InkToolbarPencilButton 和 InkToolbarEraserButton。
注意
按钮会按框架定义的顺序添加到工具栏,而不是此处指定的顺序。
- 将按钮添加到 InkToolbar。
/// <summary>
/// Handles the Loading event of the InkToolbar.
/// Here, we identify the buttons to include on the InkToolbar.
/// </summary>
/// <param name="sender">The InkToolbar</param>
/// <param name="args">The InkToolbar event data.
/// If there is no event data, this parameter is null</param>
private void inkToolbar_Loading(FrameworkElement sender, object args)
{
    // Clear all built-in buttons from the InkToolbar.
    inkToolbar.InitialControls = InkToolbarInitialControls.None;

    // Add only the ballpoint pen, pencil, and eraser.
    // Note that the buttons are added to the toolbar in the order
    // defined by the framework, not the order we specify here.
    InkToolbarBallpointPenButton ballpoint = new InkToolbarBallpointPenButton();
    InkToolbarPencilButton pencil = new InkToolbarPencilButton();
    InkToolbarEraserButton eraser = new InkToolbarEraserButton();
    inkToolbar.Children.Add(eraser);
    inkToolbar.Children.Add(ballpoint);
    inkToolbar.Children.Add(pencil);
}
自定义按钮和墨迹书写功能
可以自定义和扩展 InkToolbar 提供的按钮集合(以及相关墨迹书写功能)。
InkToolbar 由两组不同的按钮类型组成:
- “工具”按钮组包含内置绘图、擦除和突出显示按钮。 此处添加了自定义笔和工具。
注意:功能选择相互排斥。
- 一组包含内置标尺按钮的“切换”按钮。 自定义切换按钮将添加到该组。
注意:功能相互不排斥,并且可以与其他活动工具同时使用。
根据应用程序和所需的墨迹书写功能,可以将以下任意按钮(与自定义墨迹功能绑定)添加到 InkToolbar:
- 自定义笔 - 由主机定义其墨迹调色板和笔尖属性(如形状、旋转和大小)的笔。
- 自定义工具 - 由主机应用定义的非笔工具。
- 自定义切换 - 将应用定义功能的状态设置为打开或关闭。 启用后,该功能可与活动工具结合使用。
注意:你无法更改内置按钮的显示顺序。 默认显示顺序为:圆珠笔、铅笔、荧光笔、橡皮擦和标尺。 自定义笔将追加到最后一个默认笔,在最后一个笔按钮和橡皮擦按钮之间添加自定义工具按钮,并在标尺按钮后添加自定义切换按钮。 (自定义按钮按指定的顺序添加。)
自定义笔
可以创建自定义笔(通过自定义笔按钮激活),并定义墨迹调色板和笔尖属性,例如形状、旋转和大小。
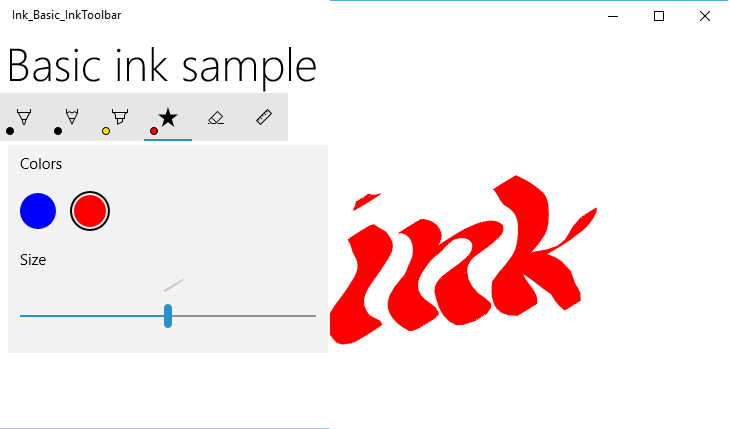
自定义书法笔按钮
在本示例中,我们定义了一个宽笔尖的自定义笔,用于启用基本的书法墨迹笔划。 我们还在按钮浮出控件处自定义了调色板中的一套笔刷。
代码隐藏
首先,定义自定义笔并在代码隐藏中指定绘图属性。 稍后我们将从 XAML 引用此自定义笔。
- 在解决方案资源管理器中右键单击项目,并依次选择“添加”->“新建项目”。
- 在“Visual C#”->“代码”下,添加新的类文件,并称它为 CalligraphicPen.cs。
- 在 Calligraphic.cs 中,将默认使用的块替换为以下内容:
using System.Numerics;
using Windows.UI;
using Windows.UI.Input.Inking;
using Windows.UI.Xaml.Controls;
using Windows.UI.Xaml.Media;
- 指定 CalligraphicPen 类派生自 InkToolbarCustomPen。
class CalligraphicPen : InkToolbarCustomPen
{
}
- 重写 CreateInkDrawingAttributesCore 以指定你自己的笔刷和笔划大小。
class CalligraphicPen : InkToolbarCustomPen
{
    protected override InkDrawingAttributes
      CreateInkDrawingAttributesCore(Brush brush, double strokeWidth)
    {
    }
}
- 创建 InkDrawingAttributes 对象,并设置笔尖形状、笔尖旋转、笔划大小和墨迹颜色。
class CalligraphicPen : InkToolbarCustomPen
{
    protected override InkDrawingAttributes
      CreateInkDrawingAttributesCore(Brush brush, double strokeWidth)
    {
        InkDrawingAttributes inkDrawingAttributes =
          new InkDrawingAttributes();
        inkDrawingAttributes.PenTip = PenTipShape.Circle;
        inkDrawingAttributes.Size =
          new Windows.Foundation.Size(strokeWidth, strokeWidth * 20);
        SolidColorBrush solidColorBrush = brush as SolidColorBrush;
        if (solidColorBrush != null)
        {
            inkDrawingAttributes.Color = solidColorBrush.Color;
        }
        else
        {
            inkDrawingAttributes.Color = Colors.Black;
        }

        Matrix3x2 matrix = Matrix3x2.CreateRotation(45);
        inkDrawingAttributes.PenTipTransform = matrix;

        return inkDrawingAttributes;
    }
}
XAML
接下来,我们在 MainPage.xaml 中添加对自定义笔的必要引用。
- 我们声明了一个本地页面资源字典,引用 CalligraphicPen.cs 中定义的自定义笔(
CalligraphicPen),以及自定义笔支持的笔刷集合(CalligraphicPenPalette)。
<Page.Resources>
    <!-- Add the custom CalligraphicPen to the page resources. -->
    <local:CalligraphicPen x:Key="CalligraphicPen" />
    <!-- Specify the colors for the palette of the custom pen. -->
    <BrushCollection x:Key="CalligraphicPenPalette">
        <SolidColorBrush Color="Blue" />
        <SolidColorBrush Color="Red" />
    </BrushCollection>
</Page.Resources>
- 然后将 InkToolbarCustomPenButton 的子元素添加到 InkToolbar。
自定义笔按钮包括页面资源中声明的两个静态资源引用:CalligraphicPen 和 CalligraphicPenPalette。
我们还指定了笔划大小滑块的范围(MinStrokeWidth、MaxStrokeWidth 和 SelectedStrokeWidth)、选中的笔刷(SelectedBrushIndex)和自定义笔按钮图标(SymbolIcon)。
<Grid Grid.Row="1">
    <InkCanvas x:Name="inkCanvas" />
    <InkToolbar x:Name="inkToolbar"
                VerticalAlignment="Top"
                TargetInkCanvas="{x:Bind inkCanvas}">
        <InkToolbarCustomPenButton
            CustomPen="{StaticResource CalligraphicPen}"
            Palette="{StaticResource CalligraphicPenPalette}"
            MinStrokeWidth="1" MaxStrokeWidth="3" SelectedStrokeWidth="2"
            SelectedBrushIndex ="1">
            <SymbolIcon Symbol="Favorite" />
            <InkToolbarCustomPenButton.ConfigurationContent>
                <InkToolbarPenConfigurationControl />
            </InkToolbarCustomPenButton.ConfigurationContent>
        </InkToolbarCustomPenButton>
    </InkToolbar>
</Grid>
自定义切换
可以创建自定义切换(通过自定义切换按钮激活)以将应用定义功能的状态设置为打开或关闭。 启用后,该功能可与活动工具结合使用。
在此示例中,我们定义了一个自定义切换按钮,用于启用触摸输入墨迹书写(触摸墨迹书写默认为关闭状态)。
注意
如果需要支持触摸墨迹书写,建议使用本例中指定的图标和 工具提示启用 CustomToggleButton。
触摸输入通常用于直接操作对象或应用 UI。 为了演示启用触摸墨迹书写前后的行为差异,我们将 InkCanvas 放置在 ScrollViewer 容器中,并将 ScrollViewer 的尺寸设置为小于 InkCanvas。
应用启动时,仅支持笔墨迹书写,用户可使用触摸平移或缩放墨迹书写图面。 启用触摸墨迹书写后,无法使用触摸输入平移墨迹书写图面或放大。
注意
请参阅适用于InkCanvas 和 InkToolbar 的 InkCanvas 控件 UX 指南。 以下建议与此示例相关:
- 活动笔能为 InkToolbar 和整体墨迹书写带来最好的体验。 但是,如果应用需要,则可以支持使用鼠标和触碰进行墨迹书写。
- 如果支持使用触控输入的墨迹书写,我们建议为切换按钮使用“Segoe MLD2 Assets”中的“ED5F”图标,并附带“触摸写入”工具提示。
XAML
- 首先,我们使用 Click 事件侦听器声明 InkToolbarCustomToggleButton元素,用于指定事件处理程序(Toggle_Custom)。
<Grid Background="{ThemeResource ApplicationPageBackgroundThemeBrush}">
    <Grid.RowDefinitions>
        <RowDefinition Height="Auto"/>
        <RowDefinition Height="*"/>
    </Grid.RowDefinitions>

    <StackPanel Grid.Row="0"
                x:Name="HeaderPanel"
                Orientation="Horizontal">
        <TextBlock x:Name="Header"
                   Text="Basic ink sample"
                   Style="{ThemeResource HeaderTextBlockStyle}"
                   Margin="10" />
    </StackPanel>

    <ScrollViewer Grid.Row="1"
                  HorizontalScrollBarVisibility="Auto"
                  VerticalScrollBarVisibility="Auto">

        <Grid HorizontalAlignment="Left" VerticalAlignment="Top">
            <Grid.RowDefinitions>
                <RowDefinition Height="Auto"/>
                <RowDefinition Height="*"/>
            </Grid.RowDefinitions>

            <InkToolbar Grid.Row="0"
                        Margin="10"
                        x:Name="inkToolbar"
                        VerticalAlignment="Top"
                        TargetInkCanvas="{x:Bind inkCanvas}">
                <InkToolbarCustomToggleButton
                x:Name="toggleButton"
                Click="CustomToggle_Click"
                ToolTipService.ToolTip="Touch Writing">
                    <SymbolIcon Symbol="{x:Bind TouchWritingIcon}"/>
                </InkToolbarCustomToggleButton>
            </InkToolbar>

            <ScrollViewer Grid.Row="1"
                          Height="500"
                          Width="500"
                          x:Name="scrollViewer"
                          ZoomMode="Enabled"
                          MinZoomFactor=".1"
                          VerticalScrollMode="Enabled"
                          VerticalScrollBarVisibility="Auto"
                          HorizontalScrollMode="Enabled"
                          HorizontalScrollBarVisibility="Auto">

                <Grid x:Name="outputGrid"
                      Height="1000"
                      Width="1000"
                      Background="{ThemeResource SystemControlBackgroundChromeWhiteBrush}">
                    <InkCanvas x:Name="inkCanvas"/>
                </Grid>

            </ScrollViewer>
        </Grid>
    </ScrollViewer>
</Grid>
代码隐藏
在前面的代码片段中,我们在自定义切换按钮上声明了一个 Click 事件侦听器和处理程序(Toggle_Custom),用于触摸墨迹书写(toggleButton)。 此处理程序只需通过 InkPresenter 的 InputDeviceTypes 属性对 CoreInputDeviceTypes.Touch 支持进行切换。
我们还使用 SymbolIcon 元素和 {x:Bind} 标记扩展为按钮指定了图标,将其绑定到代码隐藏文件定义的字段(TouchWritingIcon)。
以下代码片段包括 Click 事件处理程序和 TouchWritingIcon 的定义。
namespace Ink_Basic_InkToolbar
{
    /// <summary>
    /// An empty page that can be used on its own or navigated to within a Frame.
    /// </summary>
    public sealed partial class MainPage_AddCustomToggle : Page
    {
        Symbol TouchWritingIcon = (Symbol)0xED5F;

        public MainPage_AddCustomToggle()
        {
            this.InitializeComponent();
        }

        // Handler for the custom toggle button that enables touch inking.
        private void CustomToggle_Click(object sender, RoutedEventArgs e)
        {
            if (toggleButton.IsChecked == true)
            {
                inkCanvas.InkPresenter.InputDeviceTypes |= CoreInputDeviceTypes.Touch;
            }
            else
            {
                inkCanvas.InkPresenter.InputDeviceTypes &= ~CoreInputDeviceTypes.Touch;
            }
        }
    }
}
自定义工具
可以创建自定义工具按钮来调用应用定义的非笔工具。
默认情况下,InkPresenter 将所有输入作为墨迹笔划或擦除笔划进行处理。 这包括由辅助硬件提供(如笔桶按钮、鼠标右键或类似)修改的输入。 但是,可以将 InkPresenter 配置为保留未处理的特定输入,然后可以传递到应用进行自定义处理。
在此示例中,我们定义了一个自定义工具按钮,该按钮在选中时会导致后续笔划被处理并呈现为选择套索(虚线),而不是墨迹。 所选区域边界内的所有墨迹笔划都设置为 “已选中”。
注意
请参阅适用于InkCanvas 和 InkToolbar 的 InkCanvas 控件 UX 指南。 以下建议与此示例相关:
- 如果提供笔划选择,我们建议为工具按钮使用“Segoe MLD2 Assets”字体中的“EF20”图标,并附带“选择”工具提示。
XAML
首先,我们使用 Click 事件侦听器声明 InkToolbarCustomToolButton 元素(customToolButton ),该侦听器指定配置笔划选择的事件处理程序(customToolButton_Click)。 (我们还添加了一组用于复制、剪切和粘贴笔划选择的按钮。)
我们还添加一个 Canvas 元素来绘制所选笔划。 使用单独的层绘制所选笔划可确保 InkCanvas 及其内容保持不变。
<Grid Background="{ThemeResource ApplicationPageBackgroundThemeBrush}">
    <Grid.RowDefinitions>
        <RowDefinition Height="Auto"/>
        <RowDefinition Height="Auto"/>
        <RowDefinition Height="*"/>
    </Grid.RowDefinitions>
    <StackPanel x:Name="HeaderPanel" Orientation="Horizontal" Grid.Row="0">
        <TextBlock x:Name="Header"
                   Text="Basic ink sample"
                   Style="{ThemeResource HeaderTextBlockStyle}"
                   Margin="10,0,0,0" />
    </StackPanel>
    <StackPanel x:Name="ToolPanel" Orientation="Horizontal" Grid.Row="1">
        <InkToolbar x:Name="inkToolbar"
                    VerticalAlignment="Top"
                    TargetInkCanvas="{x:Bind inkCanvas}">
            <InkToolbarCustomToolButton
                x:Name="customToolButton"
                Click="customToolButton_Click"
                ToolTipService.ToolTip="Selection tool">
                <SymbolIcon Symbol="{x:Bind SelectIcon}"/>
            </InkToolbarCustomToolButton>
        </InkToolbar>
        <Button x:Name="cutButton"
                Content="Cut"
                Click="cutButton_Click"
                Width="100"
                Margin="5,0,0,0"/>
        <Button x:Name="copyButton"
                Content="Copy"
                Click="copyButton_Click"
                Width="100"
                Margin="5,0,0,0"/>
        <Button x:Name="pasteButton"
                Content="Paste"
                Click="pasteButton_Click"
                Width="100"
                Margin="5,0,0,0"/>
    </StackPanel>
    <Grid Grid.Row="2" x:Name="outputGrid"
              Background="{ThemeResource SystemControlBackgroundChromeWhiteBrush}"
              Height="Auto">
        <!-- Canvas for displaying selection UI. -->
        <Canvas x:Name="selectionCanvas"/>
        <!-- Canvas for displaying ink. -->
        <InkCanvas x:Name="inkCanvas" />
    </Grid>
</Grid>
代码隐藏
然后,处理 MainPage.xaml.cs 代码隐藏文件中的 InkToolbarCustomToolButton 、Click 事件。
此处理程序将 InkPresenter 配置为将未处理的输入传递到应用。
有关单步执行此代码的更详细信息,请参阅 Windows 应用中的笔交互和 Windows Ink 的“传递输入以进行高级处理”部分。
我们还使用 SymbolIcon 元素和 {x:Bind} 标记扩展为按钮指定了图标,将其绑定到代码隐藏文件定义的字段(SelectIcon)。
以下代码片段包括 Click 事件处理程序和 SelectIcon 的定义。
namespace Ink_Basic_InkToolbar
{
    /// <summary>
    /// An empty page that can be used on its own or navigated to within a Frame.
    /// </summary>
    public sealed partial class MainPage_AddCustomTool : Page
    {
        // Icon for custom selection tool button.
        Symbol SelectIcon = (Symbol)0xEF20;

        // Stroke selection tool.
        private Polyline lasso;
        // Stroke selection area.
        private Rect boundingRect;

        public MainPage_AddCustomTool()
        {
            this.InitializeComponent();

            // Listen for new ink or erase strokes to clean up selection UI.
            inkCanvas.InkPresenter.StrokeInput.StrokeStarted +=
                StrokeInput_StrokeStarted;
            inkCanvas.InkPresenter.StrokesErased +=
                InkPresenter_StrokesErased;
        }

        private void customToolButton_Click(object sender, RoutedEventArgs e)
        {
            // By default, the InkPresenter processes input modified by
            // a secondary affordance (pen barrel button, right mouse
            // button, or similar) as ink.
            // To pass through modified input to the app for custom processing
            // on the app UI thread instead of the background ink thread, set
            // InputProcessingConfiguration.RightDragAction to LeaveUnprocessed.
            inkCanvas.InkPresenter.InputProcessingConfiguration.RightDragAction =
                InkInputRightDragAction.LeaveUnprocessed;

            // Listen for unprocessed pointer events from modified input.
            // The input is used to provide selection functionality.
            inkCanvas.InkPresenter.UnprocessedInput.PointerPressed +=
                UnprocessedInput_PointerPressed;
            inkCanvas.InkPresenter.UnprocessedInput.PointerMoved +=
                UnprocessedInput_PointerMoved;
            inkCanvas.InkPresenter.UnprocessedInput.PointerReleased +=
                UnprocessedInput_PointerReleased;
        }

        // Handle new ink or erase strokes to clean up selection UI.
        private void StrokeInput_StrokeStarted(
            InkStrokeInput sender, Windows.UI.Core.PointerEventArgs args)
        {
            ClearSelection();
        }

        private void InkPresenter_StrokesErased(
            InkPresenter sender, InkStrokesErasedEventArgs args)
        {
            ClearSelection();
        }

        private void cutButton_Click(object sender, RoutedEventArgs e)
        {
            inkCanvas.InkPresenter.StrokeContainer.CopySelectedToClipboard();
            inkCanvas.InkPresenter.StrokeContainer.DeleteSelected();
            ClearSelection();
        }

        private void copyButton_Click(object sender, RoutedEventArgs e)
        {
            inkCanvas.InkPresenter.StrokeContainer.CopySelectedToClipboard();
        }

        private void pasteButton_Click(object sender, RoutedEventArgs e)
        {
            if (inkCanvas.InkPresenter.StrokeContainer.CanPasteFromClipboard())
            {
                inkCanvas.InkPresenter.StrokeContainer.PasteFromClipboard(
                    new Point(0, 0));
            }
            else
            {
                // Cannot paste from clipboard.
            }
        }

        // Clean up selection UI.
        private void ClearSelection()
        {
            var strokes = inkCanvas.InkPresenter.StrokeContainer.GetStrokes();
            foreach (var stroke in strokes)
            {
                stroke.Selected = false;
            }
            ClearBoundingRect();
        }

        private void ClearBoundingRect()
        {
            if (selectionCanvas.Children.Any())
            {
                selectionCanvas.Children.Clear();
                boundingRect = Rect.Empty;
            }
        }

        // Handle unprocessed pointer events from modified input.
        // The input is used to provide selection functionality.
        // Selection UI is drawn on a canvas under the InkCanvas.
        private void UnprocessedInput_PointerPressed(
            InkUnprocessedInput sender, PointerEventArgs args)
        {
            // Initialize a selection lasso.
            lasso = new Polyline()
            {
                Stroke = new SolidColorBrush(Windows.UI.Colors.Blue),
                StrokeThickness = 1,
                StrokeDashArray = new DoubleCollection() { 5, 2 },
            };

            lasso.Points.Add(args.CurrentPoint.RawPosition);

            selectionCanvas.Children.Add(lasso);
        }

        private void UnprocessedInput_PointerMoved(
            InkUnprocessedInput sender, PointerEventArgs args)
        {
            // Add a point to the lasso Polyline object.
            lasso.Points.Add(args.CurrentPoint.RawPosition);
        }

        private void UnprocessedInput_PointerReleased(
            InkUnprocessedInput sender, PointerEventArgs args)
        {
            // Add the final point to the Polyline object and
            // select strokes within the lasso area.
            // Draw a bounding box on the selection canvas
            // around the selected ink strokes.
            lasso.Points.Add(args.CurrentPoint.RawPosition);

            boundingRect =
                inkCanvas.InkPresenter.StrokeContainer.SelectWithPolyLine(
                    lasso.Points);

            DrawBoundingRect();
        }

        // Draw a bounding rectangle, on the selection canvas, encompassing
        // all ink strokes within the lasso area.
        private void DrawBoundingRect()
        {
            // Clear all existing content from the selection canvas.
            selectionCanvas.Children.Clear();

            // Draw a bounding rectangle only if there are ink strokes
            // within the lasso area.
            if (!((boundingRect.Width == 0) ||
                (boundingRect.Height == 0) ||
                boundingRect.IsEmpty))
            {
                var rectangle = new Rectangle()
                {
                    Stroke = new SolidColorBrush(Windows.UI.Colors.Blue),
                    StrokeThickness = 1,
                    StrokeDashArray = new DoubleCollection() { 5, 2 },
                    Width = boundingRect.Width,
                    Height = boundingRect.Height
                };

                Canvas.SetLeft(rectangle, boundingRect.X);
                Canvas.SetTop(rectangle, boundingRect.Y);

                selectionCanvas.Children.Add(rectangle);
            }
        }
    }
}
自定义墨迹渲染
默认情况下,墨迹输入在低延迟后台线程上进行处理,并在绘制时呈现为“湿”。 完成笔划(笔或手指抬起或松开鼠标按钮)时,笔划将在 UI 线程上进行处理,并将“干”渲染到 InkCanvas 层(替换应用程序内容上方的湿墨迹)。
墨迹平台允许你重写此行为,并通过自定义干墨输入来完全自定义墨迹书写体验。
有关自定义烘干的详细信息,请参阅 Windows 应用中的笔交互和 Windows Ink。
注意
自定义干墨和 InkToolbar
如果应用修改了 InkPresenter 的自定义干燥渲染行为,则渲染的墨迹笔划不再可用于 InkToolbar,并且 InkToolbar 的内置擦除命令无法按预期工作。 要提供擦除功能,必须处理所有指针事件、对每个笔划执行命中测试,并重写内置的“擦除所有墨迹”命令。
