创建自适应磁贴
注意
生活磁贴是 Windows 10 功能,在更高版本的 Windows 上不受支持。 对于新应用,建议遵循应用图标的当前指南。
自适应磁贴模板是 Windows 10 中的一项新功能,允许你使用适应不同屏幕密度的简单灵活的标记语言设计自己的磁贴通知内容。 本文介绍了如何为 Windows 应用创建自适应动态磁贴。 有关自适应元素和属性的完整列表,请参阅 自适应磁贴架构。
(如果需要,仍可使用预设 模板设计 Windows 10 通知时 Windows 8 磁贴模板目录 。
使用入门
安装通知库。 如果要使用 C# 而不是 XML 生成通知,请安装名为 Microsoft.Toolkit.Uwp.Notifications 的 NuGet 包(搜索“notifications uwp”)。 本文中提供的 C# 示例使用 NuGet 包版本 1.0.0。
安装通知可视化工具。 此免费 Windows 应用通过在你编辑时提供磁贴的即时可视预览来帮助你设计自适应动态磁贴,类似于 Visual Studio 的 XAML 编辑器/设计视图。 有关详细信息,请参阅通知可视化工具,或从 Microsoft Store 下载通知可视化工具。
如何发送磁贴通知
请阅读有关 发送本地磁贴通知的快速入门。 以下文档介绍了使用自适应磁贴提供的所有可视 UI 可能性。
用法指南
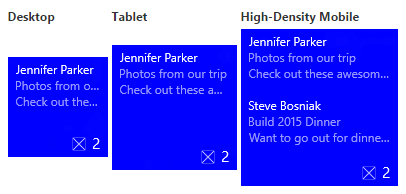
自适应模板旨在跨不同的外形规格和通知类型工作。 组和子组等元素将内容链接在一起,并且不会自行暗示特定的视觉行为。 通知的最终外观应基于其显示的特定设备,无论是手机、平板电脑还是台式机,还是其他设备。
提示是可添加到元素以实现特定视觉行为的可选属性。 提示可以是特定于设备的,也可以是特定于通知的。
基本示例
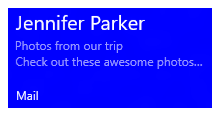
此示例演示自适应磁贴模板可以生成的内容。
<tile>
  <visual>

    <binding template="TileMedium">
      ...
    </binding>

    <binding template="TileWide">
      <text hint-style="subtitle">Jennifer Parker</text>
      <text hint-style="captionSubtle">Photos from our trip</text>
      <text hint-style="captionSubtle">Check out these awesome photos I took while in New Zealand!</text>
    </binding>

    <binding template="TileLarge">
      ...
    </binding>

  </visual>
</tile>
TileContent content = new TileContent()
{
    Visual = new TileVisual()
    {
        TileMedium = ...

        TileWide = new TileBinding()
        {
            Content = new TileBindingContentAdaptive()
            {
                Children =
                {
                    new AdaptiveText()
                    {
                        Text = "Jennifer Parker",
                        HintStyle = AdaptiveTextStyle.Subtitle
                    },

                    new AdaptiveText()
                    {
                        Text = "Photos from our trip",
                        HintStyle = AdaptiveTextStyle.CaptionSubtle
                    },

                    new AdaptiveText()
                    {
                        Text = "Check out these awesome photos I took while in New Zealand!",
                        HintStyle = AdaptiveTextStyle.CaptionSubtle
                    }
                }
            }
        },

        TileLarge = ...
    }
};
Result:
磁贴大小
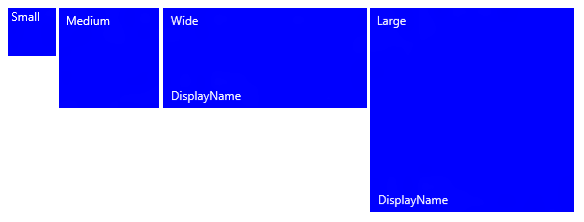
每个磁贴大小的内容在 XML 有效负载中的单独 TileBinding 元素中单独指定。 通过将模板属性设置为以下值之一来选择目标大小:
TileSmallTileMediumTileWideTileLarge
对于单个磁贴通知 XML 有效负载,请为要支持的每个磁贴大小提供 <绑定> 元素,如以下示例所示:
<tile>
  <visual>

    <binding template="TileSmall">
      <text>Small</text>
    </binding>

    <binding template="TileMedium">
      <text>Medium</text>
    </binding>

    <binding template="TileWide">
      <text>Wide</text>
    </binding>

    <binding template="TileLarge">
      <text>Large</text>
    </binding>

  </visual>
</tile>
TileContent content = new TileContent()
{
    Visual = new TileVisual()
    {
        TileSmall = new TileBinding()
        {
            Content = new TileBindingContentAdaptive()
            {
                Children =
                {
                    new AdaptiveText() { Text = "Small" }
                }
            }
        },

        TileMedium = new TileBinding()
        {
            Content = new TileBindingContentAdaptive()
            {
                Children =
                {
                    new AdaptiveText() { Text = "Medium" }
                }
            }
        },

        TileWide = new TileBinding()
        {
            Content = new TileBindingContentAdaptive()
            {
                Children =
                {
                    new AdaptiveText() { Text = "Wide" }
                }
            }
        },

        TileLarge = new TileBinding()
        {
            Content = new TileBindingContentAdaptive()
            {
                Children =
                {
                    new AdaptiveText() { Text = "Large" }
                }
            }
        }
    }
};
Result:
品牌打造
可以使用通知有效负载上的品牌属性来控制动态磁贴底部的品牌(显示名称和角落徽标)。 可以选择显示、仅namelogo显示none和/或同时显示nameAndLogo。
<visual branding="logo">
  ...
</visual>
new TileVisual()
{
    Branding = TileBranding.Logo,
    ...
}
Result:

品牌可以应用于以下两种方式之一的特定磁贴大小:
如果未为绑定指定品牌,它将使用视觉元素上提供的品牌。
<tile>
  <visual branding="nameAndLogo">

    <binding template="TileMedium" branding="logo">
      ...
    </binding>

    <!--Inherits branding from visual-->
    <binding template="TileWide">
      ...
    </binding>

  </visual>
</tile>
TileContent content = new TileContent()
{
    Visual = new TileVisual()
    {
        Branding = TileBranding.NameAndLogo,

        TileMedium = new TileBinding()
        {
            Branding = TileBranding.Logo,
            ...
        },

        // Inherits branding from Visual
        TileWide = new TileBinding()
        {
            ...
        }
    }
};
默认品牌结果:
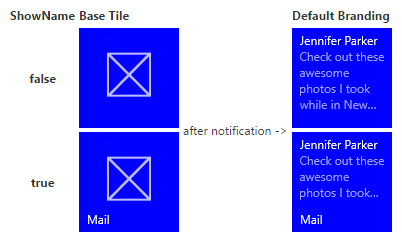
如果未在通知有效负载中指定品牌,则基本磁贴的属性将确定品牌。 如果基本磁贴显示显示名称,则品牌将默认为 name。 否则,如果未显示显示名称,则品牌将默认 none 为。
请注意 ,这是 Windows 8.x 中默认品牌为“徽标”的更改。
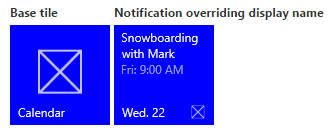
## 显示名称
可以通过使用属性输入所选 displayName 的文本字符串来替代通知的显示名称。 与品牌一样,可以在 TileVisual 元素(影响整个通知有效负载)或仅影响单个磁贴的 TileBinding 元素上指定此功能。
<tile>
  <visual branding="nameAndLogo" displayName="Wednesday 22">

    <binding template="TileMedium" displayName="Wed. 22">
      ...
    </binding>

    <!--Inherits displayName from visual-->
    <binding template="TileWide">
      ...
    </binding>

  </visual>
</tile>
TileContent content = new TileContent()
{
    Visual = new TileVisual()
    {
        Branding = TileBranding.NameAndLogo,
        DisplayName = "Wednesday 22",

        TileMedium = new TileBinding()
        {
            DisplayName = "Wed. 22",
            ...
        },

        // Inherits DisplayName from Visual
        TileWide = new TileBinding()
        {
            ...
        }
    }
};
Result:
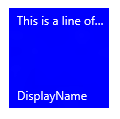
文本
AdaptiveText 元素用于显示文本。 可以使用提示来修改文本的显示方式。
<text>This is a line of text</text>
new AdaptiveText()
{
    Text = "This is a line of text"
};
Result:
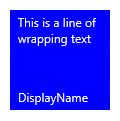
文字环绕
默认情况下,文本不会换行,并且将继续从磁贴边缘继续。 使用 hint-wrap 特性设置文本元素上的文本换行。 还可以通过使用hint-minLineshint-maxLines和这两个值接受正整数来控制最小和最大行数。
<text hint-wrap="true">This is a line of wrapping text</text>
new AdaptiveText()
{
    Text = "This is a line of wrapping text",
    HintWrap = true
};
Result:
文本样式
样式控制文本元素的字号、颜色和粗细。 有许多可用的样式,包括每个样式的“微妙”变体,将不透明度设置为 60%,这通常使文本颜色为浅灰色的阴影。
<text hint-style="base">Header content</text>
<text hint-style="captionSubtle">Subheader content</text>
new AdaptiveText()
{
    Text = "Header content",
    HintStyle = AdaptiveTextStyle.Base
},

new AdaptiveText()
{
    Text = "Subheader content",
    HintStyle = AdaptiveTextStyle.CaptionSubtle
}
Result:
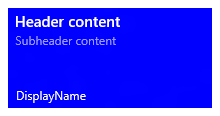
请注意 ,如果未指定提示样式,则样式默认为标题。
基本文本样式
| <text hint-style="*" /> | 字体高度 | 字体粗细 |
|---|---|---|
| caption | 12 个有效像素(epx) | 常规 |
| 正文 | 15 epx | 常规 |
| base | 15 epx | 半粗体 |
| subtitle | 20 epx | 常规 |
| title | 24 epx | Semilight |
| subheader | 34 epx | 浅色 |
| 头文件 | 46 epx | 浅色 |
数字文本样式变体
这些变体减少了行高,使上方和下方的内容更接近文本。
- titleNumeral
- subheaderNumeral
- headerNumeral
微妙的文本样式变体
每个样式都有一个微妙的变体,使文本具有 60% 的不透明度,这通常使文本颜色为浅灰色的阴影。
- captionSubtle
- bodySubtle
- baseSubtle
- subtitleSubtle
- titleSubtle
- titleNumeralSubtle
- subheaderSubtle
- subheaderNumeralSubtle
- headerSubtle
- headerNumeralSubtle
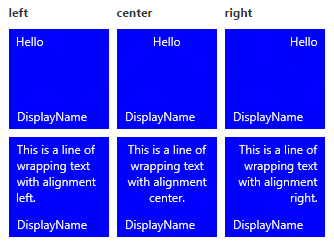
Text alignment
文本可以水平对齐左对齐、居中或右对齐。 在英语等从左到右的语言中,文本默认为左对齐。 在阿拉伯语等从右到左的语言中,文本默认为右对齐。 可以在元素上手动设置与 提示对齐属性的对齐 方式。
<text hint-align="center">Hello</text>
new AdaptiveText()
{
    Text = "Hello",
    HintAlign = AdaptiveTextAlign.Center
};
Result:
组和子组
组允许你以语义方式声明组内的内容是相关的,并且必须全部显示该内容才能有意义。 例如,你可能有两个文本元素(一个标题和一个子标题),并且只显示标题是没有意义的。 通过将这些元素分组到子组中,这些元素将全部显示(如果可以容纳)或根本不显示(因为它们无法容纳)。
若要跨设备和屏幕提供最佳体验,请提供多个组。 使用多个组,磁贴可以适应较大的屏幕。
请注意 ,组的唯一有效子级是子组。
<binding template="TileWide" branding="nameAndLogo">
  <group>
    <subgroup>
      <text hint-style="subtitle">Jennifer Parker</text>
      <text hint-style="captionSubtle">Photos from our trip</text>
      <text hint-style="captionSubtle">Check out these awesome photos I took while in New Zealand!</text>
    </subgroup>
  </group>

  <text />

  <group>
    <subgroup>
      <text hint-style="subtitle">Steve Bosniak</text>
      <text hint-style="captionSubtle">Build 2015 Dinner</text>
      <text hint-style="captionSubtle">Want to go out for dinner after Build tonight?</text>
    </subgroup>
  </group>
</binding>
TileWide = new TileBinding()
{
    Branding = TileBranding.NameAndLogo,
    Content = new TileBindingContentAdaptive()
    {
        Children =
        {
            CreateGroup(
                from: "Jennifer Parker",
                subject: "Photos from our trip",
                body: "Check out these awesome photos I took while in New Zealand!"),

            // For spacing
            new AdaptiveText(),

            CreateGroup(
                from: "Steve Bosniak",
                subject: "Build 2015 Dinner",
                body: "Want to go out for dinner after Build tonight?")
        }
    }
}

...

private static AdaptiveGroup CreateGroup(string from, string subject, string body)
{
    return new AdaptiveGroup()
    {
        Children =
        {
            new AdaptiveSubgroup()
            {
                Children =
                {
                    new AdaptiveText()
                    {
                        Text = from,
                        HintStyle = AdaptiveTextStyle.Subtitle
                    },
                    new AdaptiveText()
                    {
                        Text = subject,
                        HintStyle = AdaptiveTextStyle.CaptionSubtle
                    },
                    new AdaptiveText()
                    {
                        Text = body,
                        HintStyle = AdaptiveTextStyle.CaptionSubtle
                    }
                }
            }
        }
    };
}
Result:
子组(列)
子组还允许将数据划分为组中的语义部分。 对于动态磁贴,这可以直观地转换为列。
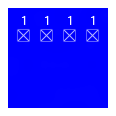
通过此属性 hint-weight 可以控制列的宽度。 该值 hint-weight 表示为可用空间的加权比例,这与 GridUnitType.Star 行为相同。 对于相等宽度的列,请将每个权重分配给 1。
| hint-weight | 宽度百分比 |
| 1 | 25% |
| 1 | 25% |
| 1 | 25% |
| 1 | 25% |
| 总重量:4 |
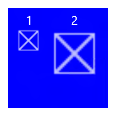
若要使一列比另一列大两倍,请将较小的列指定为 1,而较大的列的权重为 2。
| hint-weight | 宽度百分比 |
| 1 | 33.3% |
| 2 | 66.7% |
| 总重量:3 |
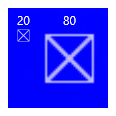
如果希望第一列占用总宽度的 20%,第二列占用总宽度的 80%,请将第一个权重分配给 20,第二个权重为 80。 如果总权重等于 100,它们将充当百分比。
| hint-weight | 宽度百分比 |
| 20 | 20% |
| 80 | 80% |
| 总重量:100 |
请注意 ,列之间会自动添加 8 像素的边距。
如果有多个子组,则应指定 hint-weight仅接受正整数的子组。 如果未为第一个子组指定 hint-weight ,则会为其分配权重 50。 没有指定 hint-weight 值的下一个子组的权重将等于 100 减去上述权重的总和,如果结果为零,则为 1。 没有指定提示权重的剩余子组将分配为 1 的权重。
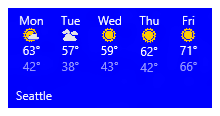
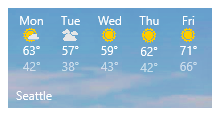
下面是天气磁贴的示例代码,其中显示了如何实现宽度相等五列的磁贴:
<binding template="TileWide" displayName="Seattle" branding="name">
  <group>
    <subgroup hint-weight="1">
      <text hint-align="center">Mon</text>
      <image src="Assets\Weather\Mostly Cloudy.png" hint-removeMargin="true"/>
      <text hint-align="center">63°</text>
      <text hint-align="center" hint-style="captionsubtle">42°</text>
    </subgroup>
    <subgroup hint-weight="1">
      <text hint-align="center">Tue</text>
      <image src="Assets\Weather\Cloudy.png" hint-removeMargin="true"/>
      <text hint-align="center">57°</text>
      <text hint-align="center" hint-style="captionsubtle">38°</text>
    </subgroup>
    <subgroup hint-weight="1">
      <text hint-align="center">Wed</text>
      <image src="Assets\Weather\Sunny.png" hint-removeMargin="true"/>
      <text hint-align="center">59°</text>
      <text hint-align="center" hint-style="captionsubtle">43°</text>
    </subgroup>
    <subgroup hint-weight="1">
      <text hint-align="center">Thu</text>
      <image src="Assets\Weather\Sunny.png" hint-removeMargin="true"/>
      <text hint-align="center">62°</text>
      <text hint-align="center" hint-style="captionsubtle">42°</text>
    </subgroup>
    <subgroup hint-weight="1">
      <text hint-align="center">Fri</text>
      <image src="Assets\Weather\Sunny.png" hint-removeMargin="true"/>
      <text hint-align="center">71°</text>
      <text hint-align="center" hint-style="captionsubtle">66°</text>
    </subgroup>
  </group>
</binding>
TileWide = new TileBinding()
{
    DisplayName = "Seattle",
    Branding = TileBranding.Name,
    Content = new TileBindingContentAdaptive()
    {
        Children =
        {
            new AdaptiveGroup()
            {
                Children =
                {
                    CreateSubgroup("Mon", "Mostly Cloudy.png", "63°", "42°"),
                    CreateSubgroup("Tue", "Cloudy.png", "57°", "38°"),
                    CreateSubgroup("Wed", "Sunny.png", "59°", "43°"),
                    CreateSubgroup("Thu", "Sunny.png", "62°", "42°"),
                    CreateSubgroup("Fri", "Sunny.png", "71°", "66°")
                }
            }
        }
    }
}

...

private static AdaptiveSubgroup CreateSubgroup(string day, string image, string highTemp, string lowTemp)
{
    return new AdaptiveSubgroup()
    {
        HintWeight = 1,
        Children =
        {
            new AdaptiveText()
            {
                Text = day,
                HintAlign = AdaptiveTextAlign.Center
            },
            new AdaptiveImage()
            {
                Source = "Assets/Weather/" + image,
                HintRemoveMargin = true
            },
            new AdaptiveText()
            {
                Text = highTemp,
                HintAlign = AdaptiveTextAlign.Center
            },
            new AdaptiveText()
            {
                Text = lowTemp,
                HintAlign = AdaptiveTextAlign.Center,
                HintStyle = AdaptiveTextStyle.CaptionSubtle
            }
        }
    };
}
Result:
映像
图像<>元素用于在磁贴通知上显示图像。 图像可以嵌入磁贴内容(默认值),作为内容背后的背景图像,或作为从通知顶部进行动画处理的速览图像。
注意
可以从应用的包、应用的本地存储或 Web 使用图像。 自 Fall Creators Update 起,正常连接上的 Web 图像的大小限制提升至 3 MB,按流量计费的连接上的限制提升至 1 MB。 在尚未运行 Fall Creators Update 的设备上,Web 图像的大小不得超过 200 KB。
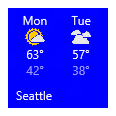
如果未指定额外的行为,图像将统一收缩或展开以填充可用宽度。 此示例显示了使用两列和内联图像的磁贴。 内联图像拉伸以填充列的宽度。
<binding template="TileMedium" displayName="Seattle" branding="name">
  <group>
    <subgroup>
      <text hint-align="center">Mon</text>
      <image src="Assets\Apps\Weather\Mostly Cloudy.png" hint-removeMargin="true"/>
      <text hint-align="center">63°</text>
      <text hint-style="captionsubtle" hint-align="center">42°</text>
    </subgroup>
    <subgroup>
      <text hint-align="center">Tue</text>
      <image src="Assets\Apps\Weather\Cloudy.png" hint-removeMargin="true"/>
      <text hint-align="center">57°</text>
      <text hint-style="captionSubtle" hint-align="center">38°</text>
    </subgroup>
  </group>
</binding>
TileMedium = new TileBinding()
{
    DisplayName = "Seattle",
    Branding = TileBranding.Name,
    Content = new TileBindingContentAdaptive()
    {
        Children =
        {
            new AdaptiveGroup()
            {
                Children =
                {
                    CreateSubgroup("Mon", "Mostly Cloudy.png", "63°", "42°"),
                    CreateSubgroup("Tue", "Cloudy.png", "57°", "38°")
                }
            }
        }
    }
}
...
private static AdaptiveSubgroup CreateSubgroup(string day, string image, string highTemp, string lowTemp)
{
    return new AdaptiveSubgroup()
    {
        Children =
        {
            new AdaptiveText()
            {
                Text = day,
                HintAlign = AdaptiveTextAlign.Center
            },
            new AdaptiveImage()
            {
                Source = "Assets/Weather/" + image,
                HintRemoveMargin = true
            },
            new AdaptiveText()
            {
                Text = highTemp,
                HintAlign = AdaptiveTextAlign.Center
            },
            new AdaptiveText()
            {
                Text = lowTemp,
                HintAlign = AdaptiveTextAlign.Center,
                HintStyle = AdaptiveTextStyle.CaptionSubtle
            }
        }
    };
}
Result:
放置在 <绑定> 根目录或第一组中的图像也将拉伸以适应可用高度。
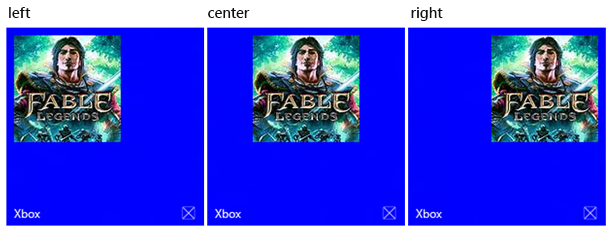
图像对齐方式
可以使用提示对齐属性将图像设置为左对齐、居中对齐或右 对齐 。 这也将导致图像以本机分辨率显示,而不是拉伸以填充宽度。
<binding template="TileLarge">
  <image src="Assets/fable.jpg" hint-align="center"/>
</binding>
TileLarge = new TileBinding()
{
    Content = new TileBindingContentAdaptive()
    {
        Children =
        {
            new AdaptiveImage()
            {
                Source = "Assets/fable.jpg",
                HintAlign = AdaptiveImageAlign.Center
            }
        }
    }
}
Result:
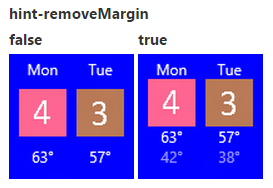
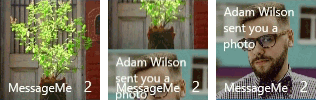
图像边距
默认情况下,内联图像在图像上方或下方的任何内容之间具有 8 像素的边距。 可以使用图像上的 hint-removeMargin 属性删除此边距。 但是,图像始终保留磁贴边缘的 8 像素边距,子组(列)始终保留列之间的 8 像素填充。
<binding template="TileMedium" branding="none">
  <group>
    <subgroup>
      <text hint-align="center">Mon</text>
      <image src="Assets\Numbers\4.jpg" hint-removeMargin="true"/>
      <text hint-align="center">63°</text>
      <text hint-style="captionsubtle" hint-align="center">42°</text>
    </subgroup>
    <subgroup>
      <text hint-align="center">Tue</text>
      <image src="Assets\Numbers\3.jpg" hint-removeMargin="true"/>
      <text hint-align="center">57°</text>
      <text hint-style="captionsubtle" hint-align="center">38°</text>
    </subgroup>
  </group>
</binding>
TileMedium = new TileBinding()
{
    Branding = TileBranding.None,
    Content = new TileBindingContentAdaptive()
    {
        Children =
        {
            new AdaptiveGroup()
            {
                Children =
                {
                    CreateSubgroup("Mon", "4.jpg", "63°", "42°"),
                    CreateSubgroup("Tue", "3.jpg", "57°", "38°")
                }
            }
        }
    }
}

...

private static AdaptiveSubgroup CreateSubgroup(string day, string image, string highTemp, string lowTemp)
{
    return new AdaptiveSubgroup()
    {
        HintWeight = 1,
        Children =
        {
            new AdaptiveText()
            {
                Text = day,
                HintAlign = AdaptiveTextAlign.Center
            },
            new AdaptiveImage()
            {
                Source = "Assets/Numbers/" + image,
                HintRemoveMargin = true
            },
            new AdaptiveText()
            {
                Text = highTemp,
                HintAlign = AdaptiveTextAlign.Center
            },
            new AdaptiveText()
            {
                Text = lowTemp,
                HintAlign = AdaptiveTextAlign.Center,
                HintStyle = AdaptiveTextStyle.CaptionSubtle
            }
        }
    };
}
图像裁剪
图像可以使用提示裁剪属性裁剪成圆圈,该属性目前仅支持值“none”或“circle”。
<binding template="TileLarge" hint-textStacking="center">
  <group>
    <subgroup hint-weight="1"/>
    <subgroup hint-weight="2">
      <image src="Assets/Apps/Hipstame/hipster.jpg" hint-crop="circle"/>
    </subgroup>
    <subgroup hint-weight="1"/>
  </group>

  <text hint-style="title" hint-align="center">Hi,</text>
  <text hint-style="subtitleSubtle" hint-align="center">MasterHip</text>
</binding>
TileLarge = new TileBinding()
{
    Content = new TileBindingContentAdaptive()
    {
        TextStacking = TileTextStacking.Center,
        Children =
        {
            new AdaptiveGroup()
            {
                Children =
                {
                    new AdaptiveSubgroup() { HintWeight = 1 },
                    new AdaptiveSubgroup()
                    {
                        HintWeight = 2,
                        Children =
                        {
                            new AdaptiveImage()
                            {
                                Source = "Assets/Apps/Hipstame/hipster.jpg",
                                HintCrop = AdaptiveImageCrop.Circle
                            }
                        }
                    },
                    new AdaptiveSubgroup() { HintWeight = 1 }
                }
            },
            new AdaptiveText()
            {
                Text = "Hi,",
                HintStyle = AdaptiveTextStyle.Title,
                HintAlign = AdaptiveTextAlign.Center
            },
            new AdaptiveText()
            {
                Text = "MasterHip",
                HintStyle = AdaptiveTextStyle.SubtitleSubtle,
                HintAlign = AdaptiveTextAlign.Center
            }
        }
    }
}
Result:

背景图像
若要设置背景图像,请将图像元素放置在绑定>的<根目录中,并将放置属性设置为“background”。
<binding template="TileWide">
  <image src="Assets\Mostly Cloudy-Background.jpg" placement="background"/>
  <group>
    <subgroup hint-weight="1">
      <text hint-align="center">Mon</text>
      <image src="Assets\Weather\Mostly Cloudy.png" hint-removeMargin="true"/>
      <text hint-align="center">63°</text>
      <text hint-align="center" hint-style="captionsubtle">42°</text>
    </subgroup>
    ...
  </group>
</binding>
TileWide = new TileBinding()
{
    Content = new TileBindingContentAdaptive()
    {
        BackgroundImage = new TileBackgroundImage()
        {
            Source = "Assets/Mostly Cloudy-Background.jpg"
        },

        Children =
        {
            new AdaptiveGroup()
            {
                Children =
                {
                    CreateSubgroup("Mon", "Mostly Cloudy.png", "63°", "42°")
                    ...
                }
            }
        }
    }
}

...

private static AdaptiveSubgroup CreateSubgroup(string day, string image, string highTemp, string lowTemp)
{
    return new AdaptiveSubgroup()
    {
        HintWeight = 1,
        Children =
        {
            new AdaptiveText()
            {
                Text = day,
                HintAlign = AdaptiveTextAlign.Center
            },
            new AdaptiveImage()
            {
                Source = "Assets/Weather/" + image,
                HintRemoveMargin = true
            },
            new AdaptiveText()
            {
                Text = highTemp,
                HintAlign = AdaptiveTextAlign.Center
            },
            new AdaptiveText()
            {
                Text = lowTemp,
                HintAlign = AdaptiveTextAlign.Center,
                HintStyle = AdaptiveTextStyle.CaptionSubtle
            }
        }
    };
}
Result:
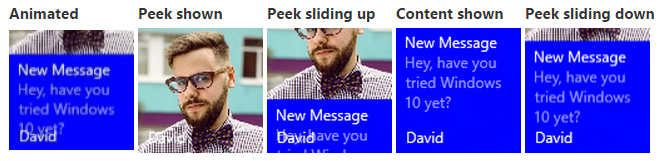
速览图像
可以指定磁贴顶部的“速览”图像。 速览图像使用动画从磁贴顶部向下/向上滑动,查看视图,然后滑动回去以显示磁贴上的主要内容。 若要设置速览图像,请将图像元素放置在绑定>的<根目录中,并将放置属性设置为“速览”。
<binding template="TileMedium" branding="name">
  <image placement="peek" src="Assets/Apps/Hipstame/hipster.jpg"/>
  <text>New Message</text>
  <text hint-style="captionsubtle" hint-wrap="true">Hey, have you tried Windows 10 yet?</text>
</binding>
TileWide = new TileBinding()
{
    Branding = TileBranding.Name,
    Content = new TileBindingContentAdaptive()
    {
        PeekImage = new TilePeekImage()
        {
            Source = "Assets/Apps/Hipstame/hipster.jpg"
        },
        Children =
        {
            new AdaptiveText()
            {
                Text = "New Message"
            },
            new AdaptiveText()
            {
                Text = "Hey, have you tried Windows 10 yet?",
                HintStyle = AdaptiveTextStyle.CaptionSubtle,
                HintWrap = true
            }
        }
    }
}
用于查看和背景图像的圆圈裁剪
使用速览和背景图像上的提示裁剪属性执行圆圈裁剪:
<image placement="peek" hint-crop="circle" src="Assets/Apps/Hipstame/hipster.jpg"/>
new TilePeekImage()
{
    HintCrop = TilePeekImageCrop.Circle,
    Source = "Assets/Apps/Hipstame/hipster.jpg"
}
结果将如下所示:

同时使用速览和背景图像
若要在磁贴通知上使用速览图像和背景图像,请在通知有效负载中同时指定速览图像和背景图像。
结果将如下所示:
查看和背景图像覆盖
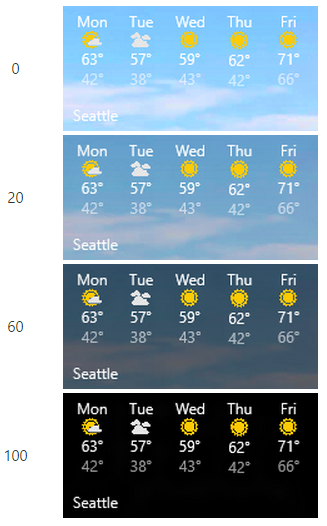
可以使用提示覆盖在背景和速览图像 上设置黑色覆盖,该覆盖接受 0-100 的整数,0 不覆盖,100 为全黑覆盖。 可以使用覆盖来帮助确保磁贴上的文本可读。
在背景图像上使用提示覆盖
只要有效负载中有一些文本元素(否则默认为 0% 覆盖),背景图像将默认为 20% 覆盖。
<binding template="TileWide">
  <image placement="background" hint-overlay="60" src="Assets\Mostly Cloudy-Background.jpg"/>
  ...
</binding>
TileWide = new TileBinding()
{
    Content = new TileBindingContentAdaptive()
    {
        BackgroundImage = new TileBackgroundImage()
        {
            Source = "Assets/Mostly Cloudy-Background.jpg",
            HintOverlay = 60
        },

        ...
    }
}
hint-overlay 结果:
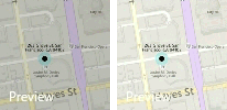
在速览图像上使用提示覆盖
从 Windows 10 版本 1511 开始,我们也支持你的速览图像的覆盖,就像背景图像一样。 将速览图像元素上的提示覆盖指定为 0-100 中的整数。 速览图像的默认覆盖为 0(无覆盖)。
<binding template="TileMedium">
  <image hint-overlay="20" src="Assets\Map.jpg" placement="peek"/>
  ...
</binding>
TileMedium = new TileBinding()
{
    Content = new TileBindingContentAdaptive()
    {
        PeekImage = new TilePeekImage()
        {
            Source = "Assets/Map.jpg",
            HintOverlay = 20
        },
        ...
    }
}
本示例显示 20% 不透明度(左)和 0% 不透明度(右)的速览图像:
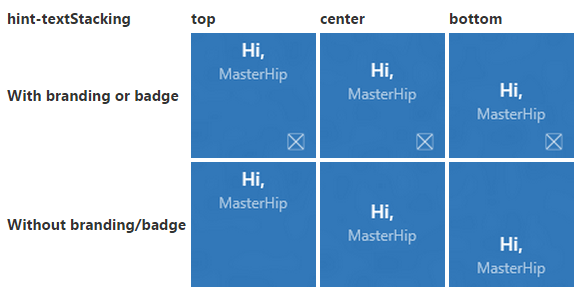
垂直对齐(文本堆叠)
可以使用 TileBinding 元素和 AdaptiveSubgroup 元素上的属性来控制磁贴hint-textStacking上内容的垂直对齐方式。 默认情况下,所有内容垂直对齐到顶部,但也可以将内容与底部或中心对齐。
绑定元素上的文本堆叠
在 TileBinding 级别应用时,文本堆叠会将通知内容的垂直对齐方式设置为整体,并在品牌/锁屏提醒区域上方的可用垂直空间中对齐。
<binding template="TileMedium" hint-textStacking="center" branding="logo">
  <text hint-style="base" hint-align="center">Hi,</text>
  <text hint-style="captionSubtle" hint-align="center">MasterHip</text>
</binding>
TileMedium = new TileBinding()
{
    Branding = TileBranding.Logo,
    Content = new TileBindingContentAdaptive()
    {
        TextStacking = TileTextStacking.Center,
        Children =
        {
            new AdaptiveText()
            {
                Text = "Hi,",
                HintStyle = AdaptiveTextStyle.Base,
                HintAlign = AdaptiveTextAlign.Center
            },

            new AdaptiveText()
            {
                Text = "MasterHip",
                HintStyle = AdaptiveTextStyle.CaptionSubtle,
                HintAlign = AdaptiveTextAlign.Center
            }
        }
    }
}
子组元素上的文本堆叠
在 AdaptiveSubgroup 级别应用时,文本堆叠设置子组(列)内容的垂直对齐方式,并在整个组中的可用垂直空间中对齐。
<binding template="TileWide" branding="nameAndLogo">
  <group>
    <subgroup hint-weight="33">
      <image src="Assets/Apps/Hipstame/hipster.jpg" hint-crop="circle"/>
    </subgroup>
    <subgroup hint-textStacking="center">
      <text hint-style="subtitle">Hi,</text>
      <text hint-style="bodySubtle">MasterHip</text>
    </subgroup>
  </group>
</binding>
TileWide = new TileBinding()
{
    Branding = TileBranding.NameAndLogo,
    Content = new TileBindingContentAdaptive()
    {
        Children =
        {
            new AdaptiveGroup()
            {
                Children =
                {
                    // Image column
                    new AdaptiveSubgroup()
                    {
                        HintWeight = 33,
                        Children =
                        {
                            new AdaptiveImage()
                            {
                                Source = "Assets/Apps/Hipstame/hipster.jpg",
                                HintCrop = AdaptiveImageCrop.Circle
                            }
                        }
                    },

                    // Text column
                    new AdaptiveSubgroup()
                    {
                        // Vertical align its contents
                        TextStacking = TileTextStacking.Center,
                        Children =
                        {
                            new AdaptiveText()
                            {
                                Text = "Hi,",
                                HintStyle = AdaptiveTextStyle.Subtitle
                            },

                            new AdaptiveText()
                            {
                                Text = "MasterHip",
                                HintStyle = AdaptiveTextStyle.BodySubtle
                            }
                        }
                    }
                }
            }
        }
    }
}