注意
混合现实学院教程在制作时考虑到了 HoloLens(第一代)和混合现实沉浸式头戴显示设备。 因此,对于仍在寻求这些设备的开发指导的开发人员而言,我们觉得很有必要保留这些教程。 我们不会在这些教程中更新 HoloLens 2 所用的最新工具集或集成相关的内容。 我们将维护这些教程,使之持续适用于支持的设备。 将来会发布一系列演示如何针对 HoloLens 2 进行开发的新教程。 此通知将在教程发布时通过指向这些教程的链接进行更新。
在本课程中,你将学习如何使用 Azure 机器学习工作室(经典)向混合现实应用程序中添加机器学习 (ML) 功能。
Azure 机器学习工作室(经典)是 Microsoft 的一项服务,为开发者提供了大量的机器学习算法,可以帮助进行数据的输入、输出、准备和可视化。 然后从这些组件中,可以开发预测分析试验,对其进行迭代,并使用它来训练你的模型。 训练后,可以使模型在 Azure 云中运行,以便模型可以对新数据进行评分。 有关详细信息,请访问 Azure 机器学习工作室(经典)页面。
完成本课程后,你将拥有一个混合现实沉浸式头戴显示设备应用程序,并将了解如何执行以下操作:
- 向 Azure 机器学习工作室(经典)门户提供销售数据表,并设计一种算法来预测热门商品的未来销售情况。
- 创建一个 Unity 项目,它可以接收和解释 ML 服务中的预测数据。
- 通过在货架上提供最热门的销售商品,在 Unity 项目中直观地显示预测数据。
在应用程序中,由你决定结果与设计的集成方式。 本课程旨在教授如何将 Azure 服务与 Unity 项目集成。 你的任务是运用从本课程中学到的知识来增强混合现实应用程序。
本课程是独立教程,不直接涉及任何其他混合现实实验室。
设备支持
| 课程 | HoloLens | 沉浸式头戴显示设备 |
|---|---|---|
| MR 和 Azure 307:机器学习 | ✔️ | ✔️ |
注意
尽管本课程主要重点介绍 Windows Mixed Reality 沉浸式 (VR) 头戴显示设备,但你也可以将本课程中学到的内容应用到 Microsoft HoloLens。 随着课程的进行,你将看到有关支持 HoloLens 可能需要进行的任何更改的说明。 使用 HoloLens 时,你可能会在语音捕获过程中注意到某些回声。
先决条件
注意
本教程专为具有 Unity 和 C# 基本经验的开发人员设计。 另请注意,本文档中的先决条件和书面说明在编写时(2018 年 5 月)已经过测试和验证。 可随意使用最新软件(如安装工具一文所列的软件),但不应假设本课程中的信息会与你在比下列版本更高的软件中找到的内容完全一致。
建议在本课程中使用以下硬件和软件:
- 一台与 Windows Mixed Reality 兼容的开发电脑,用于沉浸式 (VR) 头戴显示设备方面的开发
- 已启用开发人员模式的 Windows 10 Fall Creators Update(或更高版本)
- 最新的 Windows 10 SDK
- Unity 2017.4
- Visual Studio 2017
- Windows Mixed Reality 沉浸式 (VR) 头戴显示设备或已启用开发人员模式的 Microsoft HoloLens
- 可访问 Internet 以便进行 Azure 设置和 ML 数据检索
开始之前
为了避免在生成此项目时遇到问题,强烈建议在根文件夹或接近根的文件夹中创建本教程中提到的项目(长文件夹路径会在生成时导致问题)。
第 1 章 - Azure 存储帐户设置
若要使用 Azure 翻译 API,需要将服务实例配置为可供应用程序使用。
登录到 Azure 门户。
注意
如果你没有 Azure 帐户,需要创建一个。 如果你在课堂或实验室场景中跟着本教程学习,请让讲师或监督人员帮助设置你的新帐户。
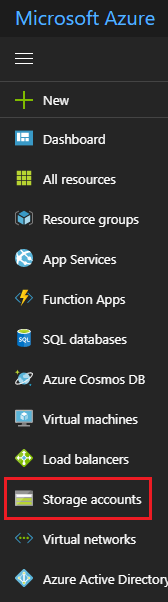
登录后,在左侧菜单中单击“存储帐户”。
注意
在更新的门户中,“新建”一词可能已替换为“创建资源”。
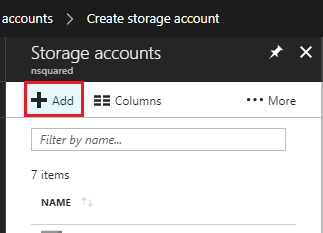
在“存储帐户”选项卡上,单击“添加”。
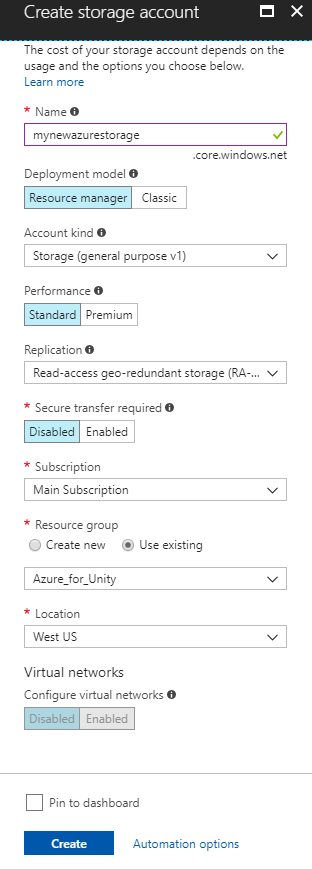
在“创建存储帐户”面板中:
为帐户插入名称,请注意,此字段仅接受数字和小写字母。
对于“部署模型”,请选择“资源管理器”。
对于“帐户类型”,请选择“存储(常规用途 v1)”。
对于“性能”,请选择“标准”。
对于“复制”,请选择“读取访问地域冗余存储(RA-GRS)”。
将“需要安全传输”保留为“已禁用”。
选择一个“订阅” 。
选择一个资源组或创建一个新资源组。 通过资源组,可监视和预配 Azure 资产集合、控制其访问权限并管理其计费。 建议保留与单个项目(例如通用资源组下的这些实验室)相关联的所有 Azure 服务。
若要详细了解 Azure 资源组,请访问资源组一文。
为资源组确定位置(如果正在创建新的资源组)。 理想情况下,此位置在运行应用程序的区域中。 某些 Azure 资产仅在特定区域可用。
还需要确认了解应用于此服务的条款和条件。
单击“创建”后,必须等待服务创建完成,这可能需要一分钟时间。
创建服务实例后,门户中将显示一条通知。
第 2 章 - Azure 机器学习工作室(经典)
若要使用 Azure 机器学习,需要将机器学习服务实例配置为可供应用程序使用。
在 Azure 门户中,单击左上角的“新建”,搜索“机器学习工作室工作区”,然后按 Enter。
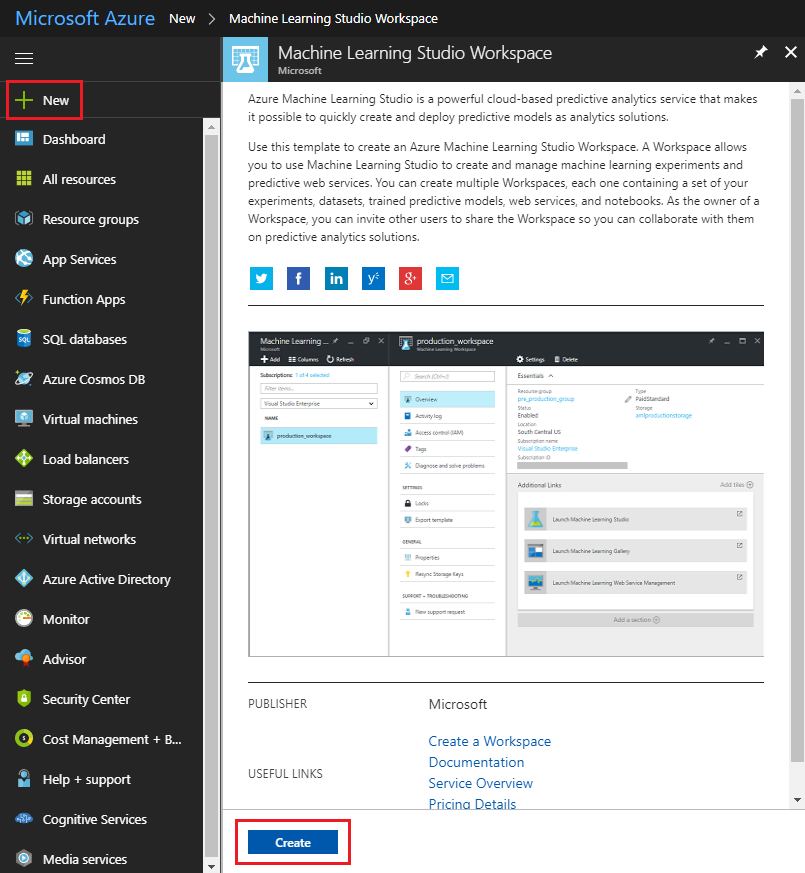
新页面将提供机器学习工作室工作区服务的描述。 在此提示的左下角,单击“创建”按钮以创建与此服务的关联。
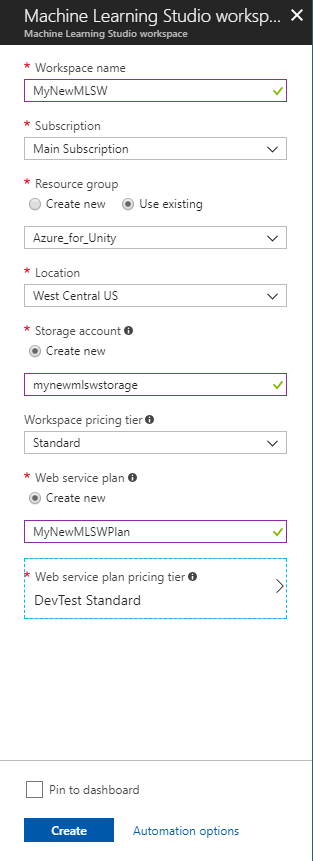
单击“创建”后将显示一个面板,需要在其中提供有关你的新机器学习工作室服务的一些详细信息:
插入此服务实例的所需工作区名称。
选择一个“订阅” 。
选择一个资源组或创建一个新资源组。 通过资源组,可监视和预配 Azure 资产集合、控制其访问权限并管理其计费。 建议保留与单个项目(例如通用资源组下的这些实验室)相关联的所有 Azure 服务。
若要详细了解 Azure 资源组,请访问资源组一文。
为资源组确定位置(如果正在创建新的资源组)。 理想情况下,此位置在运行应用程序的区域中。 某些 Azure 资产仅在特定区域可用。 应使用在上一章中用于创建 Azure 存储的相同资源组。
对于“存储帐户”部分,请单击“使用现有项”,单击下拉菜单,然后单击在上一章创建的存储帐户。
从下拉菜单中选择合适的工作区定价层。
在“Web 服务计划”部分中,单击“新建”,然后在文本字段中插入名称。
在“Web 服务计划定价层”部分,选择所需的定价层。 应该可以免费使用名为“DEVTEST 标准”的开发测试层。
还需要确认了解应用于此服务的条款和条件。
单击 “创建” 。
单击“创建”后,必须等待服务创建完成,这可能需要一分钟时间。
创建服务实例后,门户中将显示一条通知。

单击通知可浏览新的服务实例。
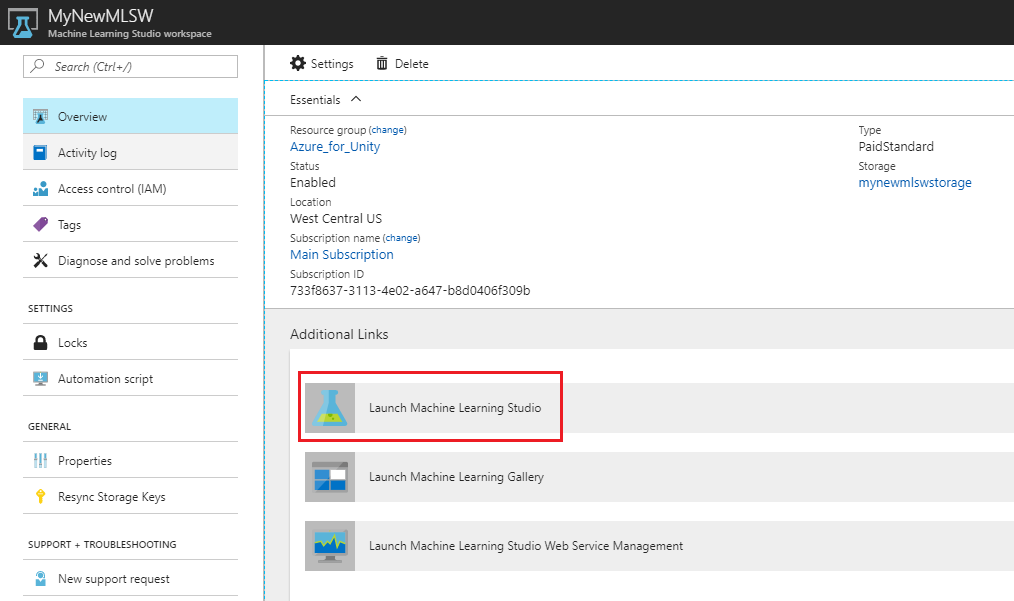
单击通知中的“转到资源”按钮,浏览新的服务实例。
在显示的页面中的“附加链接”部分下,单击“启动机器学习工作室”,这会将浏览器定向到机器学习工作室门户。
使用右上角或中间的登录按钮登录你的机器学习工作室(经典)。

第 3 章 - 机器学习工作室(经典):数据集设置
机器学习算法的工作方式之一是分析现有数据,然后尝试根据现有数据集预测将来的结果。 这通常意味着现有的数据越多,算法预测将来结果的能力就越强。
本课程为你提供了一个示例表,名为 ProductsTableCSV,可在此处下载。
重要
上面的 .zip 文件包含 ProductsTableCSV 和 .unitypackage,在第 6 章中需要用到它们。 第 6 章中也提供了这个高,但与 csv 文件是分开的。
此示例数据集包含 2017 年每一天中每小时的最畅销商品的记录。
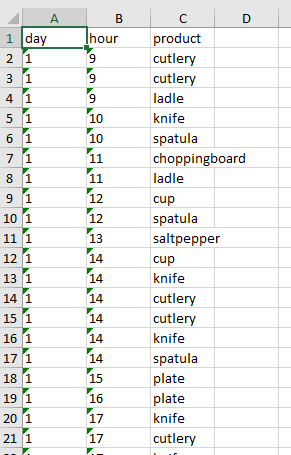
例如,2017 年第一天下午 1 点(13 小时),最畅销的商品是盐和胡椒。
此示例表包含 9998 个条目。
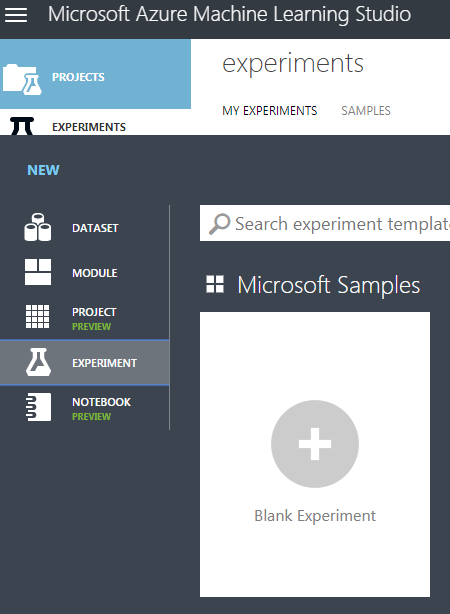
回到机器学习工作室(经典)门户,并将此表添加为 ML 的数据集。 通过单击屏幕左下角的“+ 新建”按钮来执行此操作。
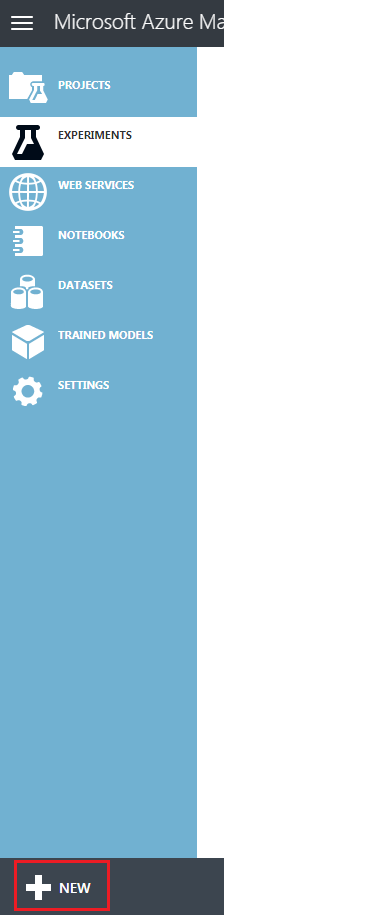
底部将出现一个节,左侧有导航面板。 单击“数据集”,然后在右侧选择“从本地文件”。
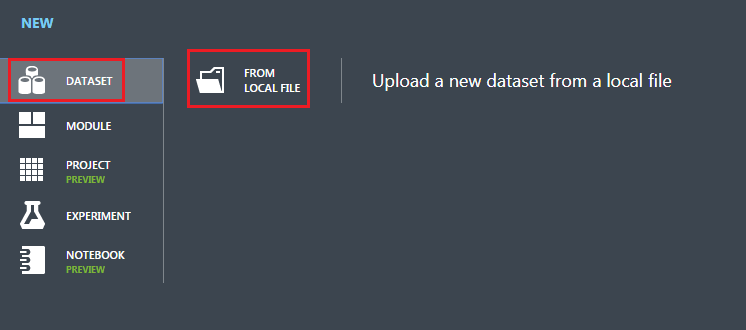
按照以下步骤上传新数据集:
将出现上传窗口,可以在其中浏览硬盘以查找新数据集。
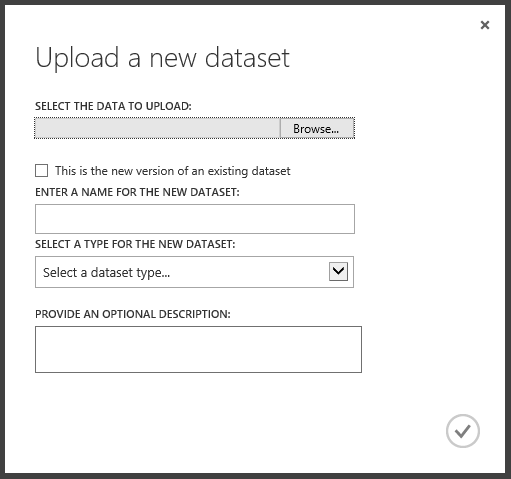
选择数据集后,返回到上传窗口,将该复选框保持未勾选状态。
在下面的文本字段中,输入“ProductsTableCSV.csv”作为数据集的名称(但应自动添加)。
使用“类型”对应的下拉菜单,选择“具有标题的通用 CSV 文件(.csv)”。
按上传窗口右下角的对勾,这会上传你的数据集。
第 4 章 - 机器学习工作室(经典):试验
在生成机器学习系统之前,需要生成一个试验来验证数据理论。 根据结果,可以知道是否需要更多数据,或者数据与可能的结果之间是否没有相关性。
若要开始创建试验,请执行以下操作:
再次单击页面左下角的“+ 新建”按钮,然后单击“试验”>“空白试验”。
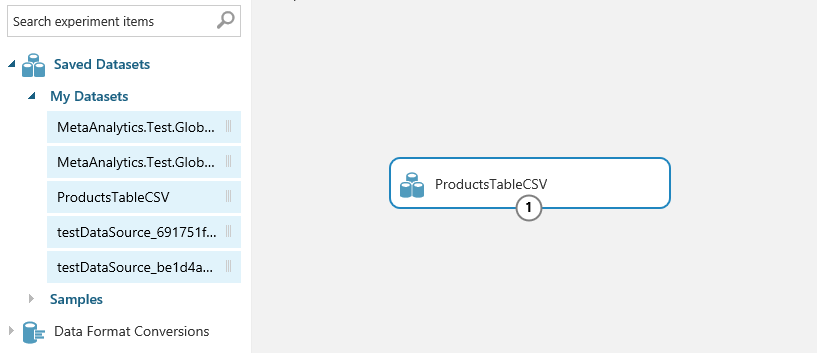
将显示一个新页面,其中包含一个空白试验:
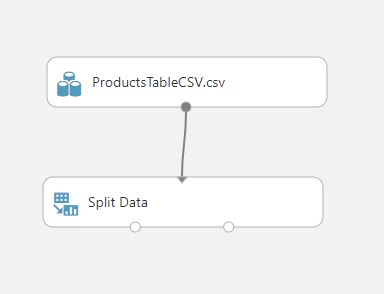
从左侧面板展开“已保存的数据集”>“我的数据集”,然后将 ProductsTableCSV 拖到“试验画布”上。
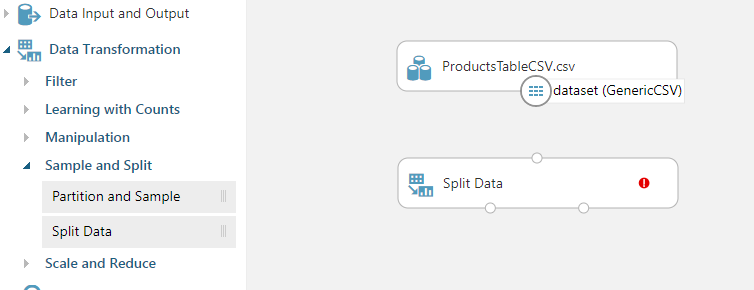
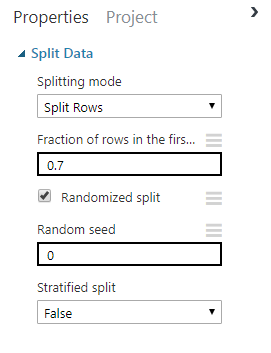
在左侧面板中,展开“数据转换”>“样本和拆分”。 然后将“拆分数据”项拖放到“试验画布”中。 “拆分数据”项将数据集拆分为两部分。 一部分用来训练机器学习算法。 另一部分用来评估生成的算法的准确度。
在右侧面板中(在画布上选了“拆分数据”项时),编辑“第一个输出数据集中的行的分数”,设置为“0.7”。 这会将数据分成两部分,第一部分占数据的 70%,第二部分将是剩余的 30%。 为确保数据随机拆分,请确保选中“随机拆分”复选框。
将连接从画布上 ProductsTableCSV 项的底部拖到“拆分数据”项的顶部。 这会连接这些项并将 ProductsTableCSV 数据集输出(数据)发送到“拆分数据”的输入。
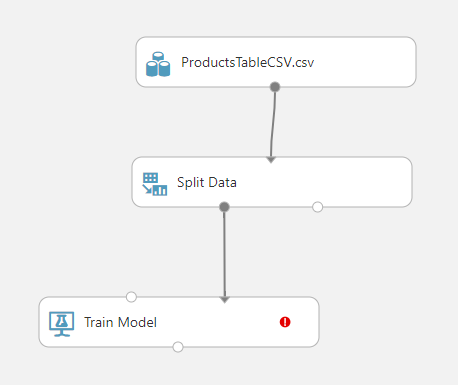
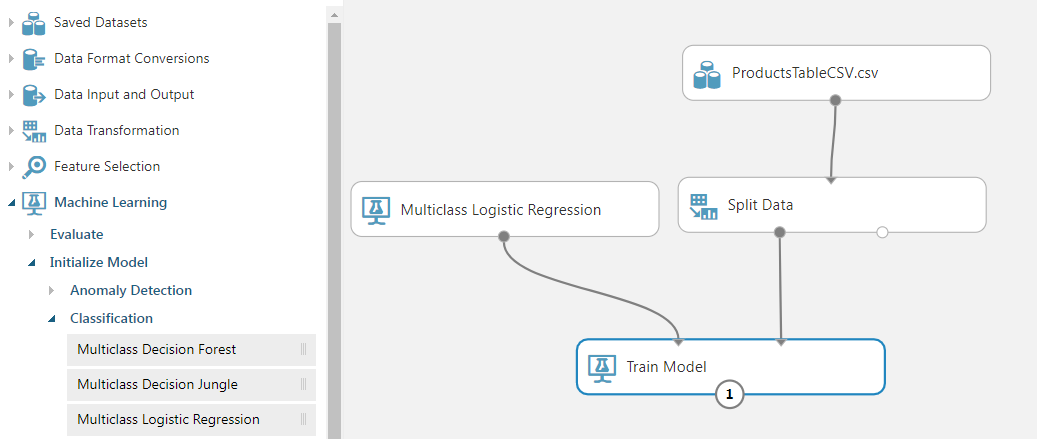
在左侧的“试验”面板中,展开“机器学习”>“训练”。 将“训练模型”项目拖放到试验画布中。 你的画布应与下图相同。

从“拆分数据”项的左下角拖动一个连接到“训练模型”项的右上角。 训练模型将使用数据集中前 70% 的拆分数据来训练算法。
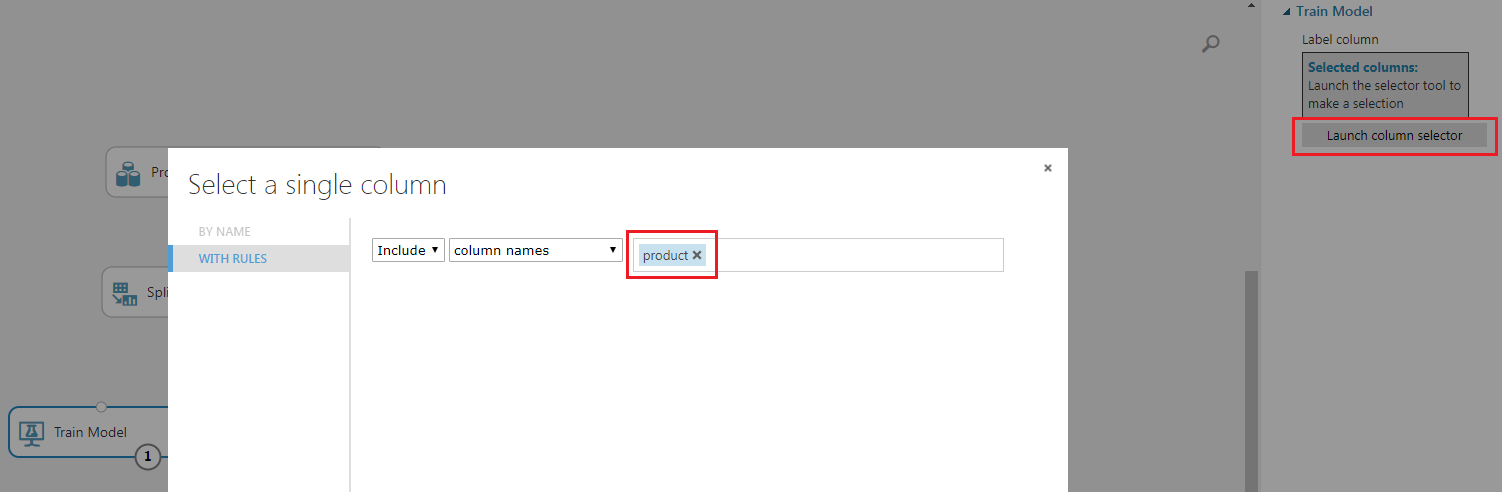
在画布上选择“训练模型”项,然后在“属性”面板(在浏览器窗口的右侧)中单击“启动列选择器”按钮。
在文本框中输入“产品”,然后按 Enter 键。“产品”将设置为用于训练预测的列。 完成此操作后,单击右下角的对勾以关闭选择对话框。
你将训练“多类逻辑回归”算法,以根据一天中的小时和日期预测最畅销的产品。 本文档不会详细介绍 Azure 机器学习工作室提供的不同算法,但你可以从机器学习算法速查表中找到更多信息
从左侧的试验项面板中,展开“机器学习”>“初始化模型”>“分类”,然后将“多类逻辑回归”项拖放到试验画布上。
将输出(在“多类逻辑回归”的底部)连接到“训练模型”项的左上角输入。
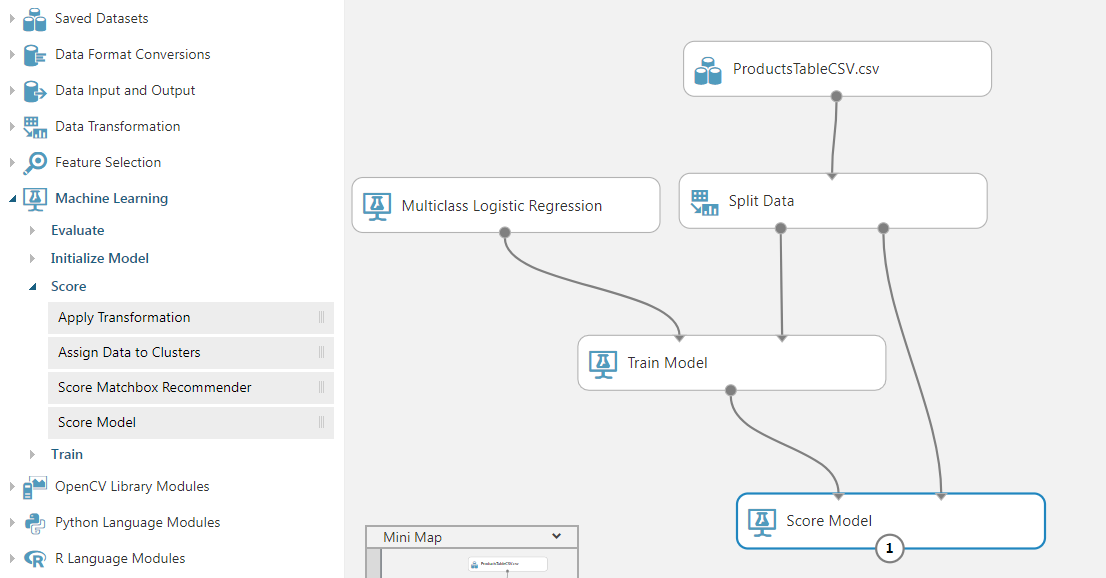
在左侧面板的试验项列表中,展开“机器学习”>“评分”,并将“评分模型”项拖放到画布上。
将输出(在“训练模型”的底部)连接到“评分模型”的左上角输入。
将“拆分数据”的右下角输出连接到“评分模型”项的右上角输入。
在左侧面板的“试验”项列表中,展开“机器学习”>“评估”,然后将“评估模型”项拖到画布上。
将“评分模型”的输出连接到“评估模型”的左上角输入。
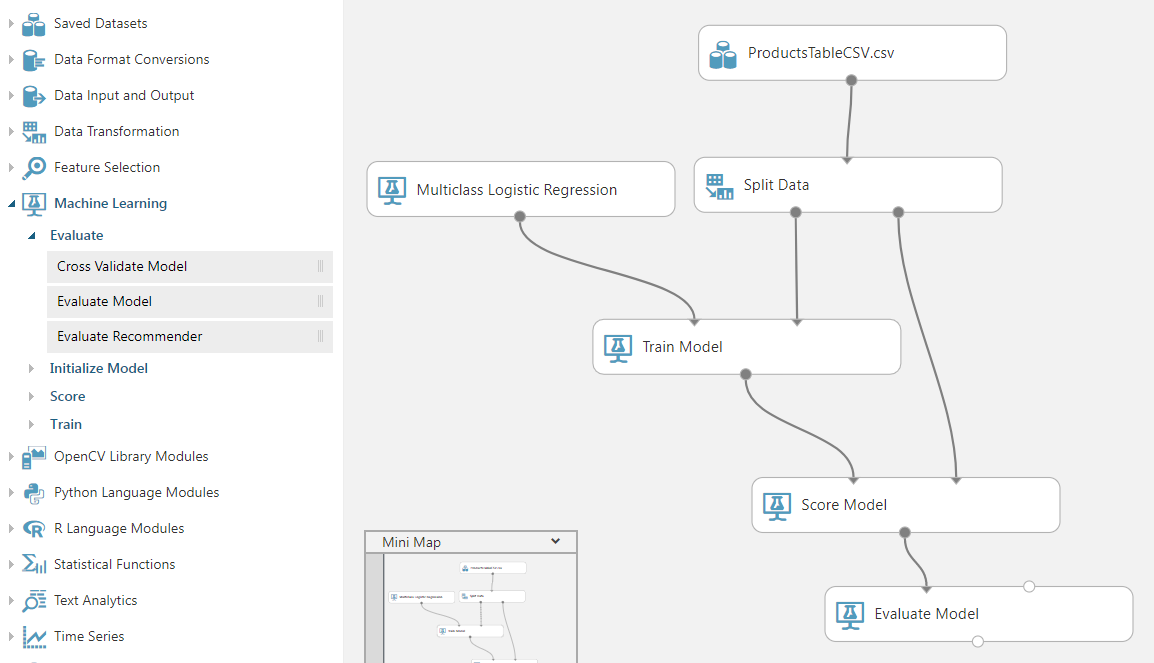
你已经生成了第一个机器学习试验。 现在可以保存并运行该试验。 在页面底部的菜单中,单击“保存”按钮保存你的试验,然后单击“运行”以开始试验。

可以在画布的右上角看到试验的状态。 稍等片刻,让试验完成。
如果你有一个大型(真实情况)数据集,则试验可能需要数小时才能运行完毕。

右键单击画布中的“评估模型”项,从上下文菜单中将鼠标悬停在“评估模型”上,然后选择“可视化”。

将显示评估结果,显示预测结果与实际结果。 这会使用前面拆分的 30% 的原始数据集来评估模型。 可以看到结果不是很好,理想情况下,每行中的最高数字是列中突出显示的项。
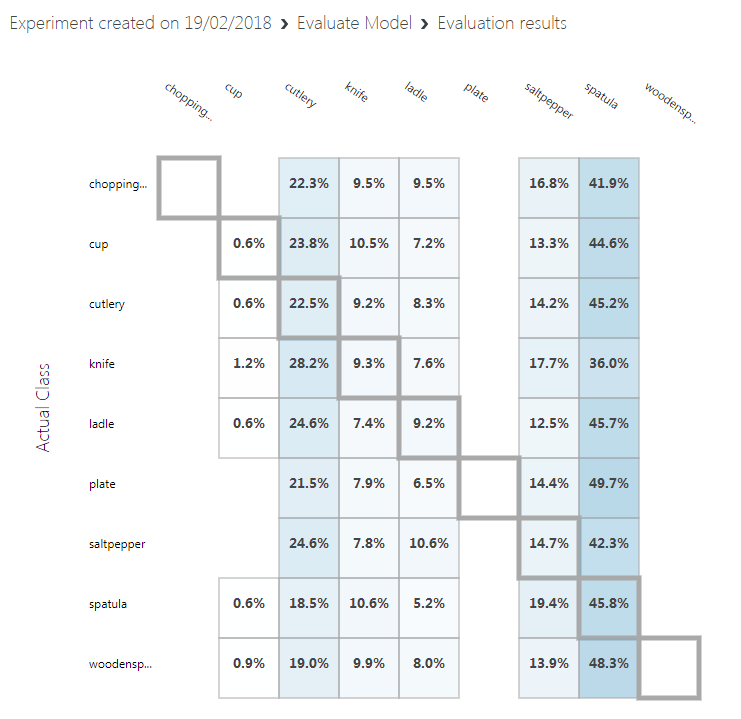
关闭结果。
若要使用新训练的机器学习模型,需要将其公开为 Web 服务。 为此,请单击页面底部菜单中的“设置 Web 服务”菜单项,然后单击“预测 Web 服务”。

将创建一个新选项卡,并合并训练模型以创建新的 Web 服务。
在页面底部的菜单中单击“保存”,然后单击“运行”。 你将在试验画布的右上角看到更新的状态。

完成运行后,页面底部将出现一个“部署 Web 服务”按钮。 现已准备好部署 Web 服务。 单击页面底部菜单中的“部署 Web 服务(经典)”。

浏览器可能会提示是否允许弹出窗口,你应该允许,但如果部署页面未显示,你可能需要再次按“部署 Web 服务”。
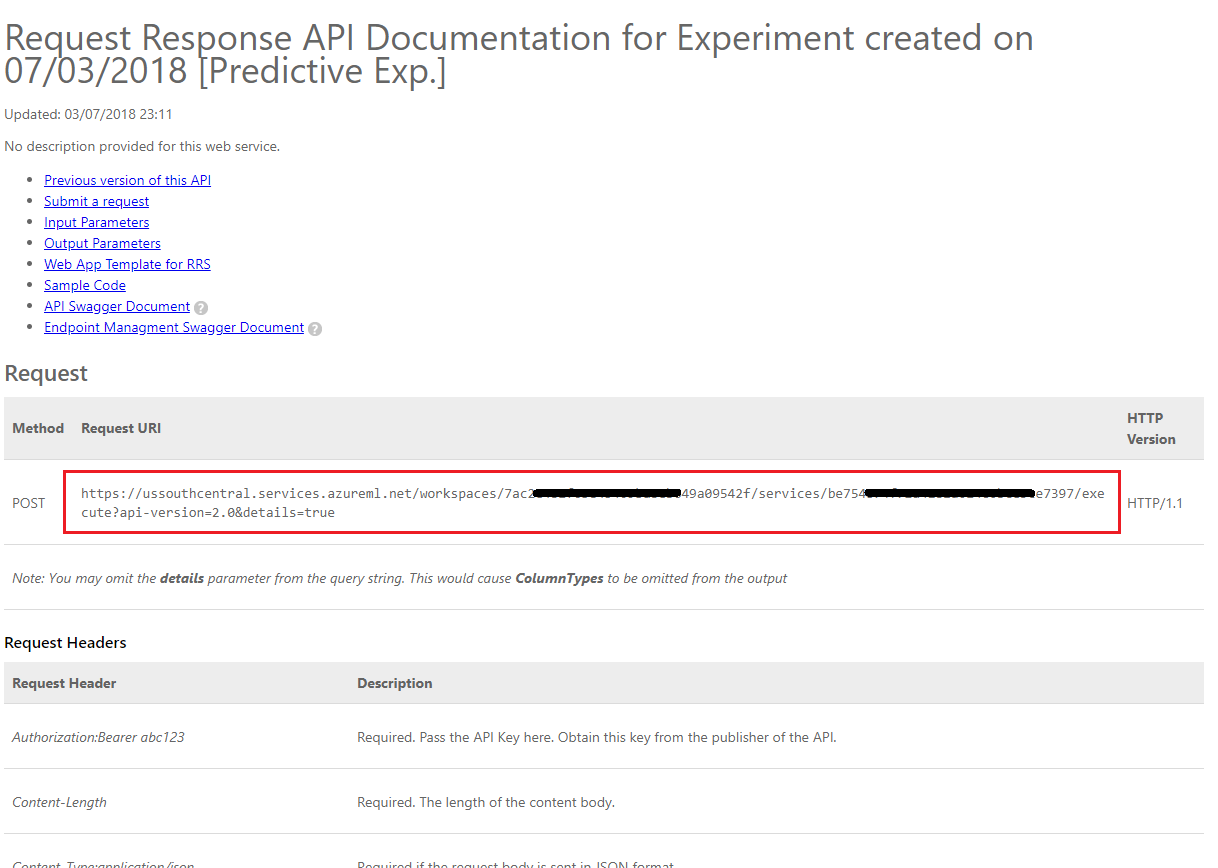
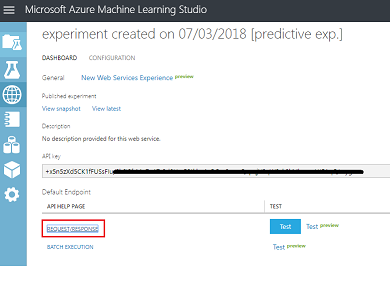
创建试验后,你将重定向到“仪表板”页面,其中显示了你的 API 密钥。 暂时将其复制到记事本中,稍后需要在代码中使用它。 记下 API 密钥后,在“默认终结点”部分中单击“密钥”下方的“请求/响应”按钮。

注意
如果在此页面中单击“测试”,可以提供输入数据并查看输出。 输入天和小时。 将“产品”项留空。 然后单击“确认”按钮。 页面底部的输出将显示代表每个产品成为选择的可能性的 JSON。
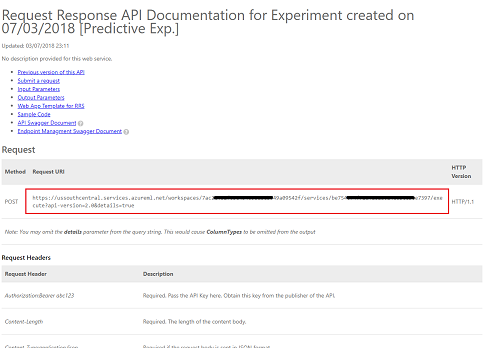
将打开一个新网页,显示有关机器学习工作室(经典)所需的请求结构的说明和一些示例。 将此页面中显示的“请求 URI”复制到记事本中。
你现在已经构建了一个机器学习系统,该系统根据与一天中的时间和一年中的哪一天相关的历史购买数据提供最有可能售出的产品。
若要调用 Web 服务,需要服务终结点的 URL 和服务的 API 密钥。 在顶部菜单中单击“消耗”选项卡。
“消耗信息”页面将显示从代码调用 Web 服务所需的信息。 创建“主密钥”和“请求-响应”URL 的副本。 在下一章中需要这些信息。
第 5 章 - 设置 Unity 项目
设置并测试混合现实沉浸式头戴显示设备。
注意
本课程不需要运动控制器。 如果在设置沉浸式头戴显示设备方面需要支持,请单击此处。
打开 Unity 并创建一个名为 MR_MachineLearning 的新 Unity 项目。确保项目类型设置为“3D”。
当 Unity 处于打开状态时,有必要检查默认“脚本编辑器”是否设置为“Visual Studio”。 转到“编辑”>“首选项”,然后在新窗口中导航到“外部工具”。 将外部脚本编辑器更改为 Visual Studio 2017。 关闭“首选项”窗口。
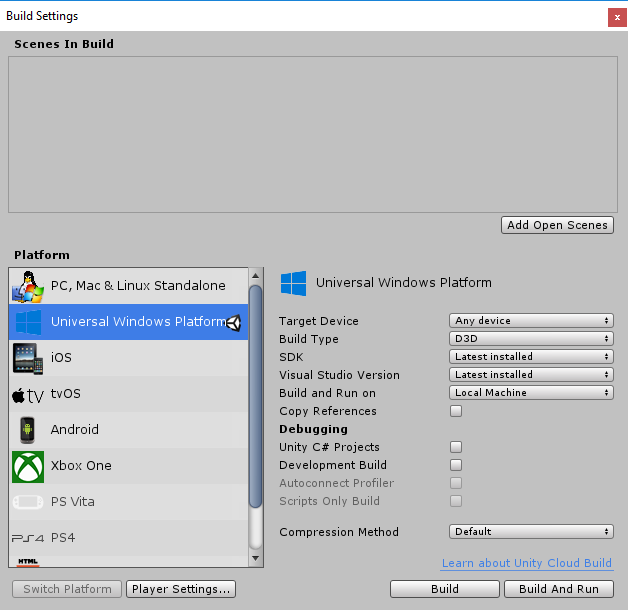
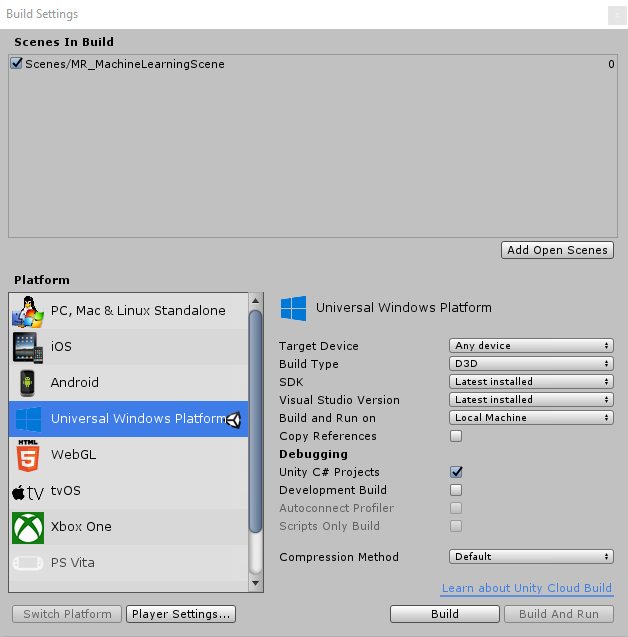
接下来,转到“文件”>“生成设置”,并通过单击“切换平台”按钮将平台切换到“通用 Windows 平台”。
此外,确保:
将“目标设备”设置为“任何设备”。
对于 Microsoft HoloLens,请将“目标设备”设置为“HoloLens”。
将“生成类型”设置为“D3D”
将“SDK”设置为“最新安装的版本”
将“Visual Studio 版本”设置为“最新安装的版本”
将“生成并运行”设置为“本地计算机”
现在不要担心如何设置场景,因为稍后会提供这方面的信息。
其余设置暂时应保留默认值。
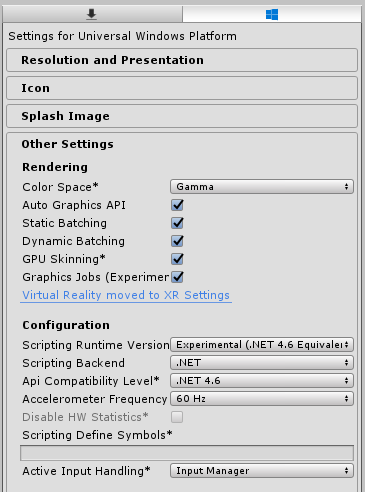
在“生成设置”窗口中,单击“播放器设置”按钮,这会在检查器所在的空间中打开相关面板。
在此面板中,需要验证一些设置:
在“其他设置”选项卡中:
脚本运行时版本应为实验性版本(.NET 4.6 等效版本)
“脚本后端”应为 “.NET”
“API 兼容性级别”应为“.NET 4.6”
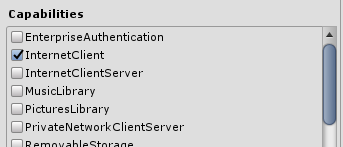
在“发布设置”选项卡的“功能”下,检查以下内容:
InternetClient
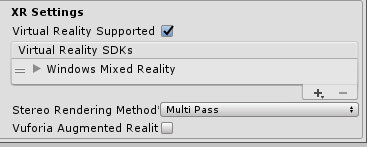
再往下滑面板,在“XR 设置”(在“发布设置”下方)中,勾选“支持的虚拟现实”,确保已添加“Windows Mixed Reality SDK”
返回生成设置 Unity C# 项目不再灰显;勾选此框旁边的复选框。
关闭“生成设置”窗口 。
保存项目(“文件”>“保存项目”)。
第 6 章 - 导入 MLProducts Unity 包
对于本课程,需要下载名为 Azure-MR-307.unitypackage 的 Unity 资产包。 这个包附带一个场景,其中包含预生成的所有对象,因此你可以专注于如何使其全部生效。 提供了 ShelfKeeper 脚本,但仅保存公共变量,用于场景设置结构。 你将需要完成所有其他部分。
若要导入此包,请执行以下操作:
在面前的 Unity 仪表板中,单击屏幕顶部菜单中的“资产”,然后依次单击“导入包”、“自定义包”。
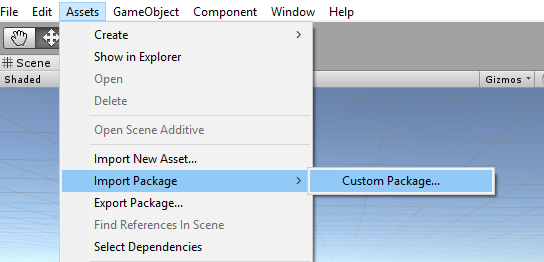
使用文件选择器选择 Azure-MR-307.unitypackage 包,然后单击“打开”。
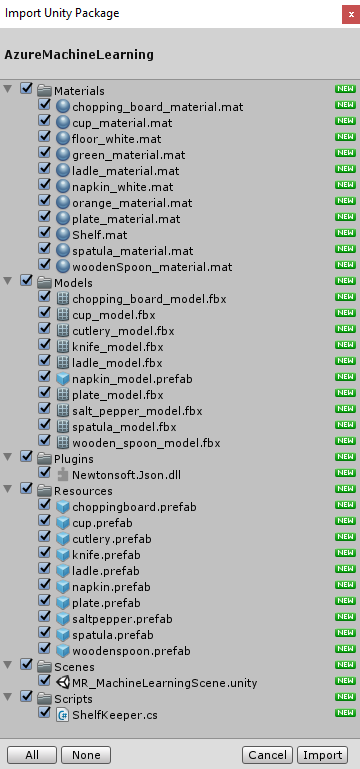
此时会显示此资产的组件列表。 单击“导入”以确认导入。
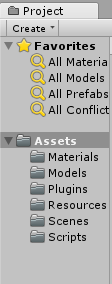
导入完成后,你会注意到 Unity 项目面板中出现了一些新文件夹。 这些是 3D 模型和相应的材料,也是你将要处理的预制场景的一部分。 在本课程中,你将编写大部分代码。
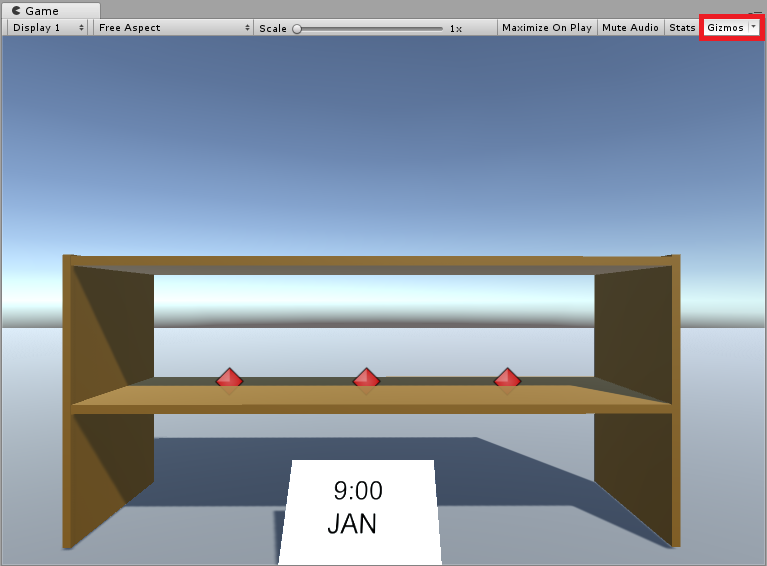
在“项目面板”文件夹中,单击“场景”文件夹并双击里面的场景(名为 MR_MachineLearningScene)。 场景将打开(见下图)。 如果缺少红色菱形,只需单击游戏面板右上角的 Gizmos 按钮。
第 7 章 - 在 Unity 中检查 DLL
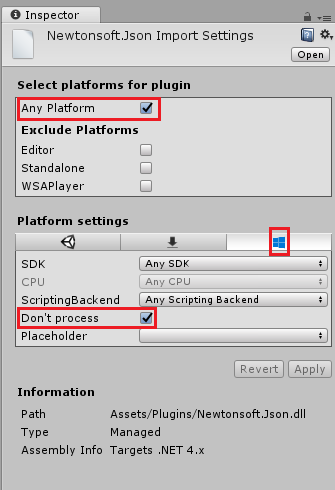
为了利用 JSON 库(用于序列化和反序列化),已使用你引入的包实现了 Newtonsoft DLL。 虽然该库应该包含正确的配置,但也有必要进行检查(特别是如果你遇到代码无法正常工作的问题)。
为此,请执行以下操作:
单击“插件”文件夹中的 Newtonsoft 文件,然后查看“检查器”面板。 确保勾选“任何平台”。 转到“UWP”选项卡,并确保勾选“不要处理”。
第 8 章 - 创建 ShelfKeeper 类
ShelfKeeper 类用于托管控制 UI 和场景中生成的产品的方法。
导入的包中即包含这个类,尽管不完整。 现在需要将这个类补全:
双击“脚本”文件夹中的 ShelfKeeper 脚本,使用 Visual Studio 2017 打开该脚本。
将脚本中现有的所有代码替换为以下代码,该代码设置时间和日期并具有显示产品的方法。
using UnityEngine;

public class ShelfKeeper : MonoBehaviour
{
    /// <summary>
    /// Provides this class Singleton-like behavior
    /// </summary>
    public static ShelfKeeper instance;

    /// <summary>
    /// Unity Inspector accessible Reference to the Text Mesh object needed for data
    /// </summary>
    public TextMesh dateText;

    /// <summary>
    /// Unity Inspector accessible Reference to the Text Mesh object needed for time
    /// </summary>
    public TextMesh timeText;

    /// <summary>
    /// Provides references to the spawn locations for the products prefabs
    /// </summary>
    public Transform[] spawnPoint;

    private void Awake()
    {
        instance = this;
    }

    /// <summary>
    /// Set the text of the date in the scene
    /// </summary>
    public void SetDate(string day, string month)
    {
        dateText.text = day + " " + month;
    }

    /// <summary>
    /// Set the text of the time in the scene
    /// </summary>
    public void SetTime(string hour)
    {
        timeText.text = hour + ":00";
    }

    /// <summary>
    /// Spawn a product on the shelf by providing the name and selling grade
    /// </summary>
    /// <param name="name"></param>
    /// <param name="sellingGrade">0 being the best seller</param>
    public void SpawnProduct(string name, int sellingGrade)
    {
        Instantiate(Resources.Load(name),
            spawnPoint[sellingGrade].transform.position, spawnPoint[sellingGrade].transform.rotation);
    }
}
返回到 Unity 之前,请务必在 Visual Studio 中保存所做的更改。
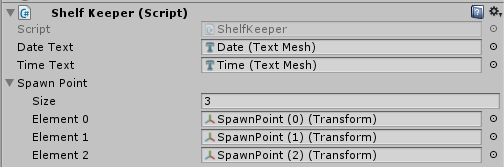
返回 Unity Editor,检查 ShelfKeeper 类是否如下所示:
重要
如果你的脚本没有参考目标(即日期(文本网格)),只需将相应的对象从层次结构面板拖到目标字段中即可。 如果需要,请参阅下面的说明:
在 ShelfKeeper 组件脚本中单击“生成点”数组以将其打开。 将出现一个名为 Size 的子节,指示数组的大小。 在 Size 旁边的文本框中键入 3 并按 Enter 键,将在下方创建三个槽。
在“层次结构”中,展开“时间显示”对象(通过单击旁边的箭头)。 接下来从“层次结构”中单击“主相机”,这样“检查器”中将显示其信息。
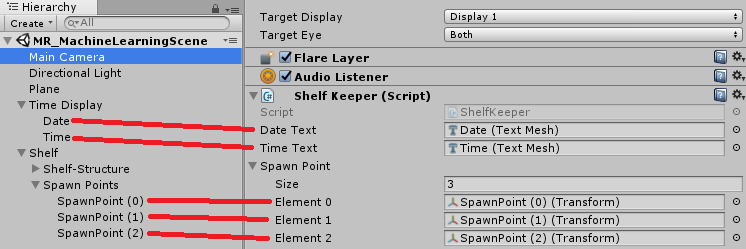
在“层次结构”面板中选择“主相机”。 将“日期”和“时间”对象从“层次结构面板”拖放到 ShelfKeeper 组件中“主相机”的“检查器”中的“日期文本”和“时间文本”槽。
将生成点从层次结构面板(在 Shelf 对象下)拖动到生成点数组下的 3 个元素引用目标,如下图所示。
第 9 章 - 创建 ProductPrediction 类
要创建的下一个类是 ProductPrediction 类。
此类负责执行以下操作:
查询机器学习服务实例并提供当前日期和时间。
将 JSON 响应反序列化为可用数据。
解释数据并检索 3 种推荐产品。
调用 ShelfKeeper 类方法在场景中显示数据。
若要创建此类,请执行以下操作:
在“项目”面板中转到“脚本”文件夹。
右键单击文件夹并选择“创建”>“C# 脚本”。 调用脚本 ProductPrediction。
双击新的 ProductPrediction 脚本以使用 Visual Studio 2017 打开。
如果弹出“检测到文件修改”对话框,请单击“重新加载解决方案”。
将以下命名空间添加到 ProductPrediction 类的顶部:
using System;
using System.Collections.Generic;
using UnityEngine;
using System.Linq;
using Newtonsoft.Json;
using UnityEngine.Networking;
using System.Runtime.Serialization;
using System.Collections;
在 ProductPrediction 类中插入以下两个对象,其中包含一些嵌套类。 这些类用于序列化和反序列化机器学习服务的 JSON。
    /// <summary>
    /// This object represents the Prediction request
    /// It host the day of the year and hour of the day
    /// The product must be left blank when serialising
    /// </summary>
    public class RootObject
    {
        public Inputs Inputs { get; set; }
    }

    public class Inputs
    {
        public Input1 input1 { get; set; }
    }

    public class Input1
    {
        public List<string> ColumnNames { get; set; }
        public List<List<string>> Values { get; set; }
    }
/// <summary> /// This object containing the deserialised Prediction result /// It host the list of the products /// and the likelihood of them being sold at current date and time /// </summary> public class Prediction { public Results Results { get; set; } } public class Results { public Output1 output1; } public class Output1 { public string type; public Value value; } public class Value { public List<string> ColumnNames { get; set; } public List<List<string>> Values { get; set; } }然后在前面的代码上方添加以下变量(让 JSON 相关代码处于脚本底部,也就是在所有其他代码下方,不遮盖其他代码):
    /// <summary>
    /// The 'Primary Key' from your Machine Learning Portal
    /// </summary>
    private string authKey = "-- Insert your service authentication key here --";

    /// <summary>
    /// The 'Request-Response' Service Endpoint from your Machine Learning Portal
    /// </summary>
    private string serviceEndpoint = "-- Insert your service endpoint here --";

    /// <summary>
    /// The Hour as set in Windows
    /// </summary>
    private string thisHour;

    /// <summary>
    /// The Day, as set in Windows
    /// </summary>
    private string thisDay;

    /// <summary>
    /// The Month, as set in Windows
    /// </summary>
    private string thisMonth;

    /// <summary>
    /// The Numeric Day from current Date Conversion
    /// </summary>
    private string dayOfTheYear;

    /// <summary>
    /// Dictionary for holding the first (or default) provided prediction
    /// from the Machine Learning Experiment
    /// </summary>
    private Dictionary<string, string> predictionDictionary;

    /// <summary>
    /// List for holding product prediction with name and scores
    /// </summary>
    private List<KeyValuePair<string, double>> keyValueList;
重要
确保将来自机器学习门户的主密钥和请求-响应终结点插入此处的变量中。 下图显示了你从何处获取密钥和端点。
将此代码插入到 Start() 方法中。 将在类初始化时调用 Start() 方法:
    void Start()
    {
        // Call to get the current date and time as set in Windows
        GetTodayDateAndTime();

        // Call to set the HOUR in the UI
        ShelfKeeper.instance.SetTime(thisHour);

        // Call to set the DATE in the UI
        ShelfKeeper.instance.SetDate(thisDay, thisMonth);

        // Run the method to Get Predication from Azure Machine Learning
        StartCoroutine(GetPrediction(thisHour, dayOfTheYear));
    }
以下方法将从 Windows 收集日期和时间,然后将其转换为某种特定格式,以供机器学习试验用来与表中存储的数据进行比较。
    /// <summary>
    /// Get current date and hour
    /// </summary>
    private void GetTodayDateAndTime()
    {
        // Get today date and time
        DateTime todayDate = DateTime.Now;

        // Extrapolate the HOUR
        thisHour = todayDate.Hour.ToString();

        // Extrapolate the DATE
        thisDay = todayDate.Day.ToString();
        thisMonth = todayDate.ToString("MMM");

        // Extrapolate the day of the year
        dayOfTheYear = todayDate.DayOfYear.ToString();
    }
可以删除 Update() 方法,因为此类不会使用它。
添加以下方法,该方法将当前日期和时间传送到机器学习终结点并接收 JSON 格式的响应。
    private IEnumerator GetPrediction(string timeOfDay, string dayOfYear)
    {
        // Populate the request object
        // Using current day of the year and hour of the day
        RootObject ro = new RootObject
        {
            Inputs = new Inputs
            {
                input1 = new Input1
                {
                    ColumnNames = new List<string>
                    {
                        "day",
                        "hour",
                    "product"
                    },
                    Values = new List<List<string>>()
                }
            }
        };

        List<string> l = new List<string>
        {
            dayOfYear,
            timeOfDay,
            ""
        };

        ro.Inputs.input1.Values.Add(l);

        Debug.LogFormat("Score request built");

        // Serialize the request
        string json = JsonConvert.SerializeObject(ro);

        using (UnityWebRequest www = UnityWebRequest.Post(serviceEndpoint, "POST"))
        {
            byte[] jsonToSend = new System.Text.UTF8Encoding().GetBytes(json);
            www.uploadHandler = new UploadHandlerRaw(jsonToSend);

            www.downloadHandler = new DownloadHandlerBuffer();
            www.SetRequestHeader("Authorization", "Bearer " + authKey);
            www.SetRequestHeader("Content-Type", "application/json");
            www.SetRequestHeader("Accept", "application/json");

            yield return www.SendWebRequest();
            string response = www.downloadHandler.text;

            // Deserialize the response
            DataContractSerializer serializer;
            serializer = new DataContractSerializer(typeof(string));
            DeserialiseJsonResponse(response);
        }
    }
添加以下方法,该方法负责反序列化 JSON 响应,并将反序列化的结果传达给 ShelfKeeper 类。 最终结果是预测在当前日期和时间最畅销的三个商品的名称。 将以下代码插入到 ProductPrediction 类中前面所述方法的下面。
    /// <summary>
    /// Deserialize the response received from the Machine Learning portal
    /// </summary>
    public void DeserialiseJsonResponse(string jsonResponse)
    {
        // Deserialize JSON
        Prediction prediction = JsonConvert.DeserializeObject<Prediction>(jsonResponse);
        predictionDictionary = new Dictionary<string, string>();

        for (int i = 0; i < prediction.Results.output1.value.ColumnNames.Count; i++)
        {
            if (prediction.Results.output1.value.Values[0][i] != null)
            {
                predictionDictionary.Add(prediction.Results.output1.value.ColumnNames[i], prediction.Results.output1.value.Values[0][i]);
            }
        }

        keyValueList = new List<KeyValuePair<string, double>>();

        // Strip all non-results, by adding only items of interest to the scoreList
        for (int i = 0; i < predictionDictionary.Count; i++)
        {
            KeyValuePair<string, string> pair = predictionDictionary.ElementAt(i);
            if (pair.Key.StartsWith("Scored Probabilities"))
            {
                // Parse string as double then simplify the string key so to only have the item name
                double scorefloat = 0f;
                double.TryParse(pair.Value, out scorefloat);
                string simplifiedName =
                    pair.Key.Replace("\"", "").Replace("Scored Probabilities for Class", "").Trim();
                keyValueList.Add(new KeyValuePair<string, double>(simplifiedName, scorefloat));
            }
        }

        // Sort Predictions (results will be lowest to highest)
        keyValueList.Sort((x, y) => y.Value.CompareTo(x.Value));

        // Spawn the top three items, from the keyValueList, which we have sorted
        for (int i = 0; i < 3; i++)
        {
            ShelfKeeper.instance.SpawnProduct(keyValueList[i].Key, i);
        }

        // Clear lists in case of reuse
        keyValueList.Clear();
        predictionDictionary.Clear();
    }
在 Visual Studio 中保存,然后返回 Unity。
将 ProductPrediction 类脚本从“脚本”文件夹拖放到“主相机”对象上。
选择“文件”>“保存场景/文件”>“保存项目”,以保存场景和项目。
第 10 章 - 生成 UWP 解决方案
现在需要将项目生成为 UWP 解决方案,使其可以作为独立的应用程序运行。
若要生成,请执行以下操作:
单击“文件”>“保存场景”以保存当前场景。
转到“文件”>“生成设置”
选中名为“Unity C# 项目”的框(此操作很重要,因为这样可以在生成完成后编辑类)。
单击“添加开放场景”。
单击“生成”。
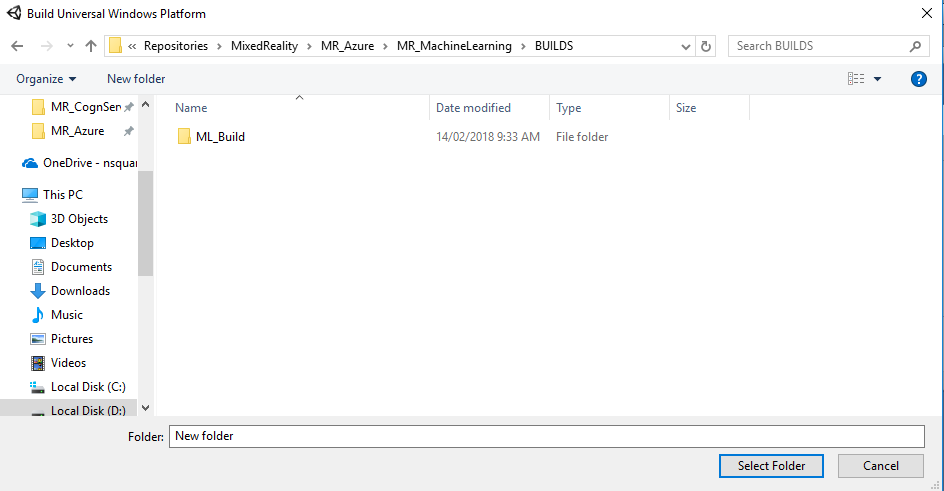
系统将提示你选择要在其中生成解决方案的文件夹。
创建“BUILDS”文件夹,然后在此文件夹中使用适当的名称创建另一个文件夹。
单击新文件夹,然后单击“选择文件夹”,以在该位置开始生成。

Unity 完成生成(可能需要一些时间)后,会在生成位置打开“文件资源管理器”窗口(检查任务栏,因为它可能不会始终显示在窗口上方,但会通知你增加了一个新窗口)。
第 11 章 - 部署应用程序
若要部署应用程序,请执行以下操作:
导航到新的 Unity 生成(“应用”文件夹)并使用 Visual Studio 打开解决方案文件。
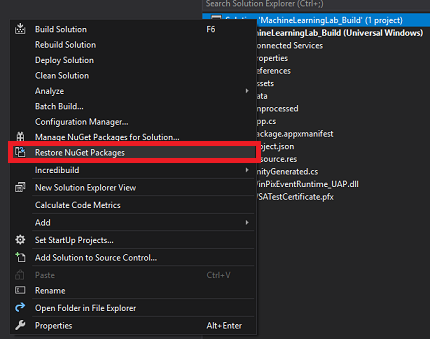
在打开 Visual Studio 后,需要还原 NuGet 包。为此,可以在解决方案资源管理器(位于 Visual Studio 右侧)中右键单击“MachineLearningLab_Build”解决方案,然后单击“还原 NuGet 包”:
在“解决方案配置”中,选择“调试”。
在“解决方案平台”中,选择“x86,本地计算机”。
对于 Microsoft HoloLens,你可能会发现,将此选项设置为“远程计算机”会更容易,这样你就不会受限于你的计算机。 不过,还需要执行以下操作:
- 了解 HoloLens 的 IP 地址,该地址可通过“设置”>“网络和 Internet”>“Wi-Fi”>“高级选项”找到;应使用 IPv4 地址。
- 确保将“开发人员模式”设置为“开”,可通过“设置”>“更新和安全”>“适用于开发人员”找到它。

转到“生成”菜单,单击“部署解决方案”,以将应用程序旁加载到电脑。
应用现在应显示在已安装的应用列表中,随时可以启动。
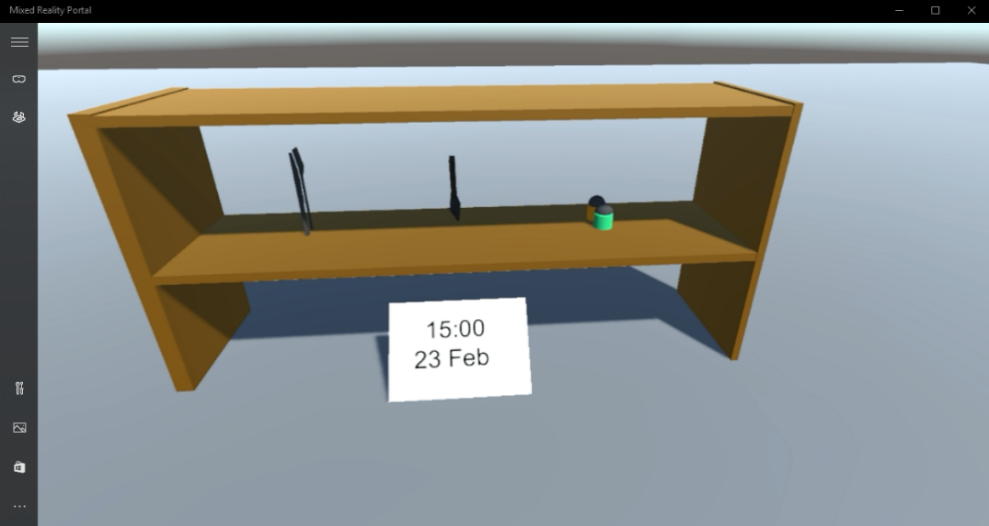
运行混合现实应用程序时,你会看到在你的 Unity 场景中设置的工作台,并且从初始化开始,系统将提取你在 Azure 中设置的数据。 数据将在你的应用程序中反序列化,并且当前日期和时间的前三个结果将以可视化方式提供,显示为工作台上的三个模型。
你已完成了机器学习应用程序
恭喜,你生成了一个混合现实应用程序,该应用程序利用 Azure 机器学习进行数据预测并将其显示在你的场景中。
练习
练习 1
试验应用程序的排序顺序,并将三个底部预测显示在货架上,因为这些数据也可能有用。
练习 2
使用 Azure 表使用天气信息填充新表并使用数据创建新试验。