在 Azure Active Directory B2C 中新增用戶屬性並自定義用戶輸入
開始之前,請使用 [選擇原則類型 選取器] 來選擇您要設定的原則類型。 Azure Active Directory B2C 提供兩種方法來定義使用者如何與您的應用程式互動:透過預先 定義的使用者流程 ,或透過完全可設定 的自定義原則。 本文中每個方法所需的步驟都不同。
在本文中,您會在 Azure Active Directory B2C (Azure AD B2C) 的註冊旅程期間收集新的屬性。 您將取得使用者的城市、將其設定為下拉式清單,並定義是否需要提供。
重要
此範例使用內建宣告 『city』。 相反地,您可以選擇其中一個支援的 Azure AD B2C 內建屬性 或自定義屬性。 若要使用自定義屬性, 請啟用自訂屬性。 若要使用不同的內建或自定義屬性,請將 『city』 取代為您選擇的 屬性,例如內建屬性 jobTitle 或自定義屬性,例如 extension_loyaltyId。
必要條件
- 建立使用者流程 ,讓使用者可以註冊並登入您的應用程式。
- 註冊 Web 應用程式。
- 完成開始使用 Active Directory B2C 中的自定義原則中的 步驟
- 註冊 Web 應用程式。
新增使用者屬性您的使用者流程
- 登入 Azure 入口網站。
- 如果您有多個租使用者的存取權,請選取頂端功能表中的 [設定] 圖示,從 [目錄 + 訂用帳戶] 功能表切換至您的 Azure AD B2C 租使用者。
- 在 [Azure 服務] 底下,選取 [Azure AD B2C]。 或使用搜尋方塊來尋找並選取 [Azure AD B2C]。
- 在您的 Azure AD B2C 租使用者中,選取 [ 使用者流程]。
- 選取您的原則(例如“B2C_1_SignupSignin”)加以開啟。
- 選取 [用戶屬性 ],然後選取使用者屬性(例如「城市」)。
- 選取 [儲存]。
為您的應用程式提供選擇性宣告
應用程式宣告是傳回給應用程式的值。 更新您的使用者流程以包含所需的宣告。
- 選取您的原則(例如“B2C_1_SignupSignin”)加以開啟。
- 選取 [ 應用程式宣告]。
- 選取您要傳送回應用程式的屬性(例如“City”。。
- 選取 [儲存]。
設定使用者屬性輸入類型
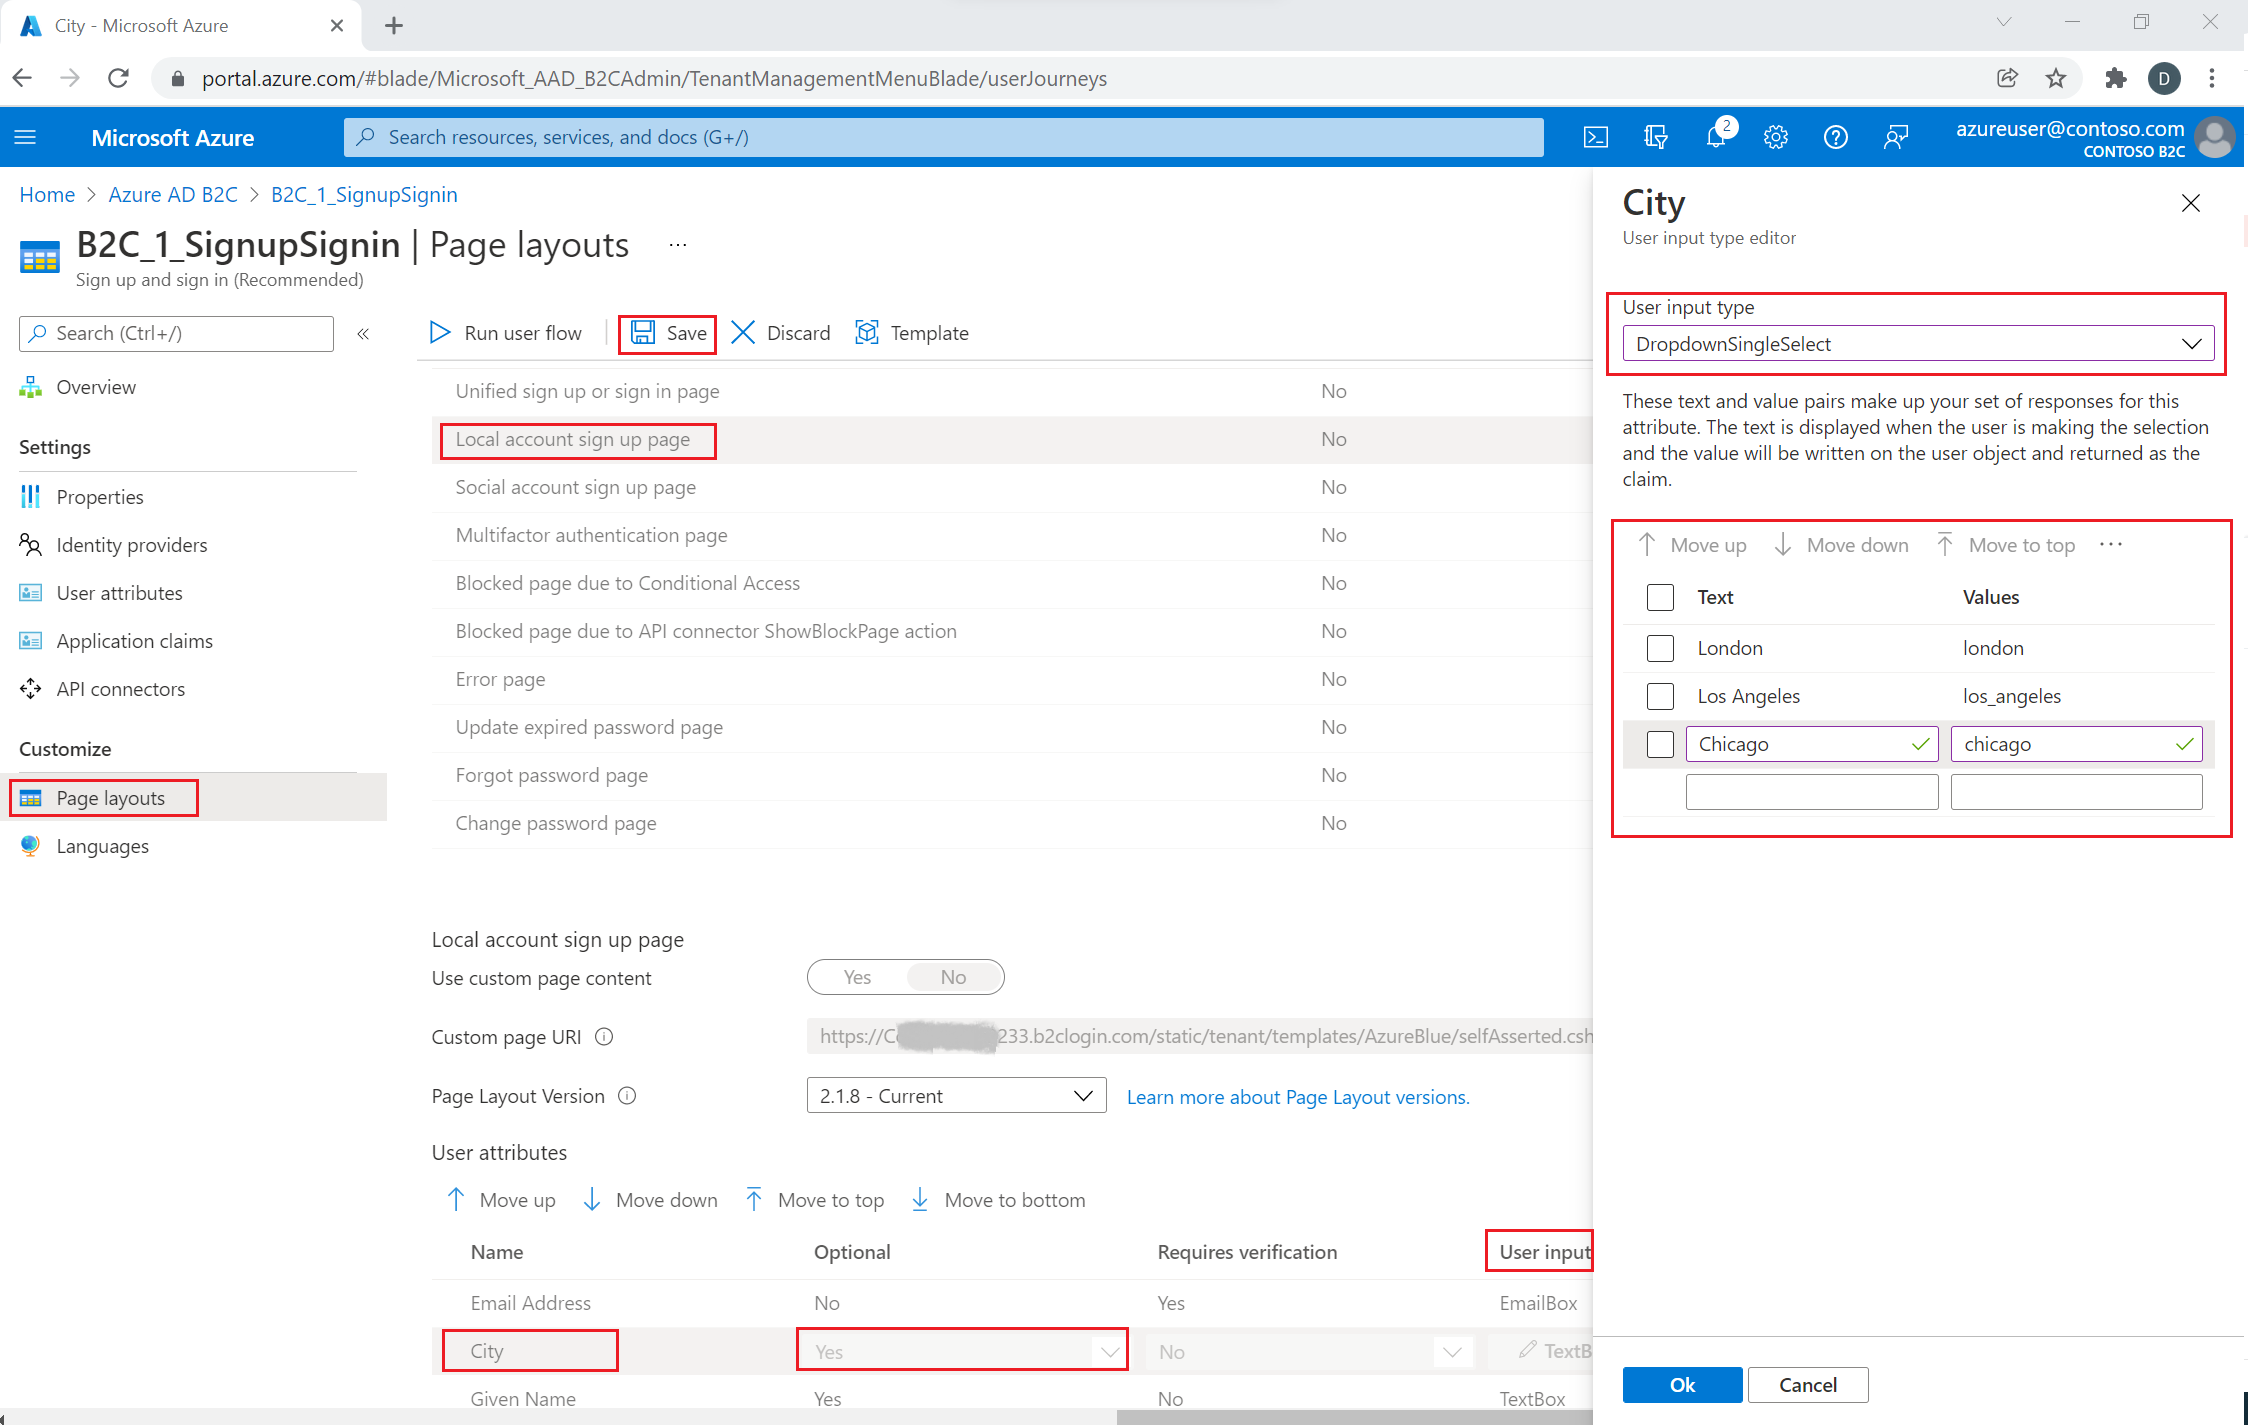
選取您的原則(例如“B2C_1_SignupSignin”)加以開啟。
選取 [版面配置]。
選取 [ 本機帳戶註冊] 頁面。
在 [用戶屬性] 底下,選取 [城市]。
- 在 [ 選擇性 ] 下拉式清單中,選取 [ 否]。
- 在 [ 使用者輸入類型] 中,選取目前的使用者輸入類型,例如 TextBox,以開啟 [使用者輸入類型編輯器 ] 視窗窗格。
- 在 [ 使用者輸入類型 ] 下拉式清單中,選取 [下拉式清單][選取]。
- 在 [文字] 和 [值] 中,輸入組成屬性回應集的文字和值組。 文字會顯示在流程的 Web 介面中,且 [值] 會儲存至 Azure AD B2C 以供選取的文字使用。 選擇性:使用 [上移/下移] 按鈕來重新排序下拉式專案。
選取 [確定]。 選用:使用 [上移/下移] 按鈕,在註冊頁面中重新排序用戶屬性。
選取 [儲存]。

使用本地化集合提供值清單
若要提供城市屬性的一組值清單:
- 在使用者流程上啟用語言自定義
- 選取您的原則(例如“B2C_1_SignupSignin”)加以開啟。
- 在使用者流程的 [ 語言] 頁面上,選取您想要自定義的語言。
- 在 [頁面層級資源檔案] 底下,選取 [本機帳戶註冊] 頁面。
- 如果您先前已編輯此語言,請選取 [ 下載預設值 ] (或 [下載覆寫 ]。
- 建立
LocalizedCollections屬性。
LocalizedCollections是和 Value 配對的Name陣列。 項目的順序將會是其顯示的順序。
ElementId是此屬性LocalizedCollections是回應的用戶屬性。Name是向用戶顯示的值。Value是選取此選項時,宣告中傳回的內容。
{
  "LocalizedStrings": [...],
  "LocalizedCollections": [
    {
      "ElementType": "ClaimType",
      "ElementId": "city",
      "TargetCollection": "Restriction",
      "Override": true,
      "Items": [
        {
          "Name": "Berlin",
          "Value": "Berlin"
        },
        {
          "Name": "London",
          "Value": "London"
        },
        {
          "Name": "Seattle",
          "Value": "Seattle"
        }
      ]
    }
  ]
}
上傳變更
- 完成 JSON 檔案的變更之後,請返回 B2C 租使用者。
- 選取 [使用者流程 ],然後選取您的原則(例如「B2C_1_SignupSignin」),以開啟它。
- 選取 [ 語言]。
- 選取您想要翻譯的語言。
- 在 [頁面層級資源檔案] 底下,選取 [本機帳戶註冊] 頁面。
- 選取資料夾圖示,然後選取要上傳的 JSON 檔案。 變更會自動儲存至您的使用者流程。
測試您的使用者流程
- 選取您的原則(例如“B2C_1_SignupSignin”)加以開啟。
- 若要測試您的原則,請選取 [ 執行使用者流程]。
- 針對 [ 應用程式],選取您先前註冊的名為 testapp1 的Web應用程式。 回覆 URL 應該會顯示
https://jwt.ms。 - 按兩下 [ 執行使用者流程]
概觀
您可以使用註冊或登入使用者旅程圖,從使用者收集初始數據。 稍後可以使用配置檔編輯使用者旅程圖來收集其他宣告。 每當 Azure AD B2C 以互動方式從使用者收集資訊時,就會使用 自我判斷技術配置檔。 在這裡範例中,您會:
- 定義「城市」宣告。
- 詢問用戶他們的城市。
- 將城市保存到 Azure AD B2C 目錄中的使用者配置檔。
- 從每個登入的 Azure AD B2C 目錄讀取城市宣告。
- 登入或註冊之後,將城市傳回您的信賴憑證者應用程式。
定義宣告
宣告會在 Azure AD B2C 原則執行期間提供數據的暫存記憶體。 宣告架構是您宣告宣告的位置。 下列元素可用來定義宣告:
- DisplayName - 定義使用者面向標籤的字串。
- DataType - 宣告的類型。
- UserHelpText - 協助用戶瞭解所需的專案。
- UserInputType - 輸入控件的類型,例如文本框、單選選取範圍、下拉式清單或多個選取範圍。
開啟原則的延伸模組檔案。 例如: SocialAndLocalAccounts/TrustFrameworkExtensions.xml 。
- 搜尋 BuildingBlocks 元素。 如果專案不存在,請加以新增。
- 找出 ClaimsSchema 元素。 如果專案不存在,請加以新增。
- 將城市宣告新增至 ClaimsSchema 元素。
<!--
<BuildingBlocks>
  <ClaimsSchema> -->
    <ClaimType Id="city">
      <DisplayName>City where you work</DisplayName>
      <DataType>string</DataType>
      <UserInputType>DropdownSingleSelect</UserInputType>
      <Restriction>
        <Enumeration Text="Berlin" Value="berlin" />
        <Enumeration Text="London" Value="london" />
        <Enumeration Text="Seattle" Value="seattle" />
      </Restriction>
    </ClaimType>
  <!--
  </ClaimsSchema>
</BuildingBlocks>-->
在元素中包含 Enumeration SelectByDefault 屬性,以在頁面第一次載入時預設選取它。 例如,若要預先選取 倫敦 專案,請變更 Enumeration 元素,如下列範例所示:
<Restriction>
  <Enumeration Text="Berlin" Value="berlin" />
  <Enumeration Text="London" Value="london" SelectByDefault="true" />
  <Enumeration Text="Seattle" Value="seattle" />
</Restriction>
將宣告新增至使用者介面
當使用者預期提供輸入時,會叫用下列技術配置檔:
- LocalAccountSignUpWithLogonEmail - 本機帳戶註冊流程。
- SelfAsserted-Social - 同盟帳戶第一次使用者登入。
- SelfAsserted-ProfileUpdate - 編輯配置檔流程。
若要在註冊期間收集城市宣告,必須將它新增為技術配置文件的 LocalAccountSignUpWithLogonEmail 輸出宣告。 覆寫延伸模組檔案中的這個技術配置檔。 指定輸出宣告的完整清單,以控制在畫面上呈現宣告的順序。 尋找 ClaimsProviders 元素。 新增 ClaimsProviders,如下所示:
<ClaimsProvider>
  <DisplayName>Local Account</DisplayName>
  <TechnicalProfiles>
    <!--Local account sign-up page-->
    <TechnicalProfile Id="LocalAccountSignUpWithLogonEmail">
      <OutputClaims>
       <OutputClaim ClaimTypeReferenceId="email" PartnerClaimType="Verified.Email" Required="true" />
       <OutputClaim ClaimTypeReferenceId="newPassword" Required="true" />
       <OutputClaim ClaimTypeReferenceId="reenterPassword" Required="true" />
       <OutputClaim ClaimTypeReferenceId="displayName" />
       <OutputClaim ClaimTypeReferenceId="givenName" />
       <OutputClaim ClaimTypeReferenceId="surName" />
       <OutputClaim ClaimTypeReferenceId="city"/>
     </OutputClaims>
   </TechnicalProfile>
  </TechnicalProfiles>
</ClaimsProvider>
若要在使用同盟帳戶初始登入之後收集城市宣告,必須將它新增為技術設定檔的 SelfAsserted-Social 輸出宣告。 若要讓本機和同盟帳戶使用者稍後能夠編輯其設定檔資料,請將輸入和輸出宣告新增至 SelfAsserted-ProfileUpdate 技術設定檔。 覆寫延伸模組檔案中的這些技術設定檔。 指定輸出宣告的完整清單,以控制在畫面上呈現宣告的順序。 尋找 ClaimsProviders 元素。 新增 ClaimsProviders,如下所示:
<ClaimsProvider>
  <DisplayName>Self Asserted</DisplayName>
  <TechnicalProfiles>
    <!--Federated account first-time sign-in page-->
    <TechnicalProfile Id="SelfAsserted-Social">
      <InputClaims>
        <InputClaim ClaimTypeReferenceId="city" />
      </InputClaims>
      <OutputClaims>
        <OutputClaim ClaimTypeReferenceId="displayName"/>
        <OutputClaim ClaimTypeReferenceId="givenName"/>
        <OutputClaim ClaimTypeReferenceId="surname"/>
        <OutputClaim ClaimTypeReferenceId="city"/>
      </OutputClaims>
    </TechnicalProfile>
    <!--Edit profile page-->
    <TechnicalProfile Id="SelfAsserted-ProfileUpdate">
      <InputClaims>
        <InputClaim ClaimTypeReferenceId="city" />
      </InputClaims>
      <OutputClaims>
        <OutputClaim ClaimTypeReferenceId="displayName"/>
        <OutputClaim ClaimTypeReferenceId="givenName" />
        <OutputClaim ClaimTypeReferenceId="surname" />
        <OutputClaim ClaimTypeReferenceId="city"/>
      </OutputClaims>
    </TechnicalProfile>
  </TechnicalProfiles>
</ClaimsProvider>
讀取和寫入宣告
下列技術設定檔是 Active Directory 技術設定檔 ,可讀取和寫入資料至 Microsoft Entra ID。
使用 PersistedClaims 將資料寫入使用者設定檔,以及 OutputClaims 從個別 Active Directory 技術設定檔內的使用者設定檔讀取資料。
覆寫延伸模組檔案中的這些技術設定檔。 尋找 ClaimsProviders 元素。 新增 ClaimsProviders,如下所示:
<ClaimsProvider>
  <DisplayName>Azure Active Directory</DisplayName>
  <TechnicalProfiles>
    <!-- Write data during a local account sign-up flow. -->
    <TechnicalProfile Id="AAD-UserWriteUsingLogonEmail">
      <PersistedClaims>
        <PersistedClaim ClaimTypeReferenceId="city"/>
      </PersistedClaims>
    </TechnicalProfile>
    <!-- Write data during a federated account first-time sign-in flow. -->
    <TechnicalProfile Id="AAD-UserWriteUsingAlternativeSecurityId">
      <PersistedClaims>
        <PersistedClaim ClaimTypeReferenceId="city"/>
      </PersistedClaims>
    </TechnicalProfile>
    <!-- Write data during edit profile flow. -->
    <TechnicalProfile Id="AAD-UserWriteProfileUsingObjectId">
      <PersistedClaims>
        <PersistedClaim ClaimTypeReferenceId="city"/>
      </PersistedClaims>
    </TechnicalProfile>
    <!-- Read data after user resets the password. -->
    <TechnicalProfile Id="AAD-UserReadUsingEmailAddress">
      <OutputClaims>
        <OutputClaim ClaimTypeReferenceId="city" />
      </OutputClaims>
    </TechnicalProfile>
    <!-- Read data after user authenticates with a local account. -->
    <TechnicalProfile Id="AAD-UserReadUsingObjectId">
      <OutputClaims>
        <OutputClaim ClaimTypeReferenceId="city" />
      </OutputClaims>
    </TechnicalProfile>
    <!-- Read data after user authenticates with a federated account. -->
    <TechnicalProfile Id="AAD-UserReadUsingAlternativeSecurityId">
      <OutputClaims>
        <OutputClaim ClaimTypeReferenceId="city" />
      </OutputClaims>
    </TechnicalProfile>
  </TechnicalProfiles>
</ClaimsProvider>
在權杖中包含宣告
若要將城市宣告傳回信賴憑證者應用程式,請將輸出宣告新增至 SocialAndLocalAccounts/SignUpOrSignIn.xml 檔案。 輸出宣告會在成功使用者旅程圖之後新增至權杖中,並將傳送至應用程式。 修改信賴憑證者區段中的技術設定檔專案,以將城市新增為輸出宣告。
<RelyingParty>
  <DefaultUserJourney ReferenceId="SignUpOrSignIn" />
  <TechnicalProfile Id="PolicyProfile">
    <DisplayName>PolicyProfile</DisplayName>
    <Protocol Name="OpenIdConnect" />
    <OutputClaims>
      <OutputClaim ClaimTypeReferenceId="displayName" />
      <OutputClaim ClaimTypeReferenceId="givenName" />
      <OutputClaim ClaimTypeReferenceId="surname" />
      <OutputClaim ClaimTypeReferenceId="email" />
      <OutputClaim ClaimTypeReferenceId="objectId" PartnerClaimType="sub"/>
      <OutputClaim ClaimTypeReferenceId="identityProvider" />
      <OutputClaim ClaimTypeReferenceId="tenantId" AlwaysUseDefaultValue="true" DefaultValue="{Policy:TenantObjectId}" />
      <OutputClaim ClaimTypeReferenceId="city" DefaultValue="" />
    </OutputClaims>
    <SubjectNamingInfo ClaimType="sub" />
  </TechnicalProfile>
</RelyingParty>
上傳及測試已更新的自訂原則
- 如果您有多個租使用者的存取權,請選取 頂端功能表中的 [設定 ] 圖示,從 [目錄 + 訂 用帳戶] 功能表切換至您的 Azure AD B2C 租使用者。
- 搜尋並選取 Azure AD B2C。
- 在 [原則] 底下 ,選取 [ 身分識別體驗架構 ]。
- 選取 [ 上傳自訂原則 ]。
- 上傳您先前變更的原則檔案。
測試自訂原則
- 選取您的信賴憑證者原則,例如
B2C_1A_signup_signin。 - 針對 [ 應用程式 ],選取您 先前註冊的 Web 應用程式。 回復 URL 應該會顯示
https://jwt.ms。 - 選取 [ 立即 執行] 按鈕。
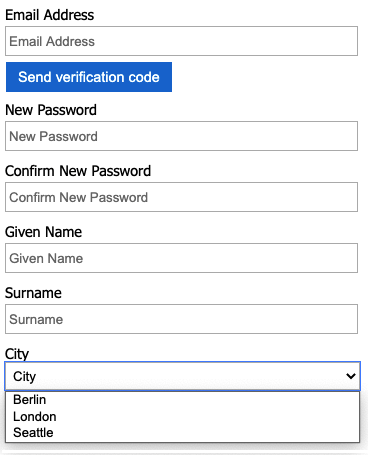
- 從註冊或登入頁面,選取 [ 立即 註冊] 以註冊。 完成輸入使用者資訊,包括城市名稱,然後按一下 [ 建立 ]。 您應該會看到傳回之權杖的內容。
註冊畫面看起來應該類似下列螢幕擷取畫面:

傳回至應用程式的權杖包含 city 宣告。
{
  "typ": "JWT",
  "alg": "RS256",
  "kid": "X5eXk4xyojNFum1kl2Ytv8dlNP4-c57dO6QGTVBwaNk"
}.{
  "exp": 1583500140,
  "nbf": 1583496540,
  "ver": "1.0",
  "iss": "https://contoso.b2clogin.com/f06c2fe8-709f-4030-85dc-38a4bfd9e82d/v2.0/",
  "aud": "e1d2612f-c2bc-4599-8e7b-d874eaca1ee1",
  "acr": "b2c_1a_signup_signin",
  "nonce": "defaultNonce",
  "iat": 1583496540,
  "auth_time": 1583496540,
  "name": "Emily Smith",
  "email": "joe@outlook.com",
  "given_name": "Emily",
  "family_name": "Smith",
  "city": "Berlin"
  ...
}
[選擇性]將 UI 當地語系化
Azure AD B2C 可讓您將原則納入不同的語言。 如需詳細資訊, 請參閱自訂語言體驗 。 若要將註冊頁面當地語系化, 請設定支援的語言 清單,並提供 特定語言的標籤 。
注意
搭配語言特定標籤使用 LocalizedCollection 時,您可以從宣告定義 中移除 Restriction 集合 。
下列範例示範如何提供英文和西班牙文的城市清單。 兩者都會使用英文和西班牙文的專案清單來設定 Restriction 宣告 城市 集合。 SelectByDefault 會在頁面第一次載入時預設選取專案。
<!--
<BuildingBlocks>-->
  <Localization Enabled="true">
    <SupportedLanguages DefaultLanguage="en" MergeBehavior="Append">
      <SupportedLanguage>en</SupportedLanguage>
      <SupportedLanguage>es</SupportedLanguage>
    </SupportedLanguages>
    <LocalizedResources Id="api.localaccountsignup.en">
      <LocalizedCollections>
        <LocalizedCollection ElementType="ClaimType" ElementId="city" TargetCollection="Restriction">
          <Item Text="Berlin" Value="Berlin"></Item>
          <Item Text="London" Value="London" SelectByDefault="true"></Item>
          <Item Text="Seattle" Value="Seattle"></Item>
        </LocalizedCollection>
      </LocalizedCollections>
    </LocalizedResources>
    <LocalizedResources Id="api.localaccountsignup.es">
      <LocalizedCollections>
        <LocalizedCollection ElementType="ClaimType" ElementId="city" TargetCollection="Restriction">
          <Item Text="Berlina" Value="Berlin"></Item>
          <Item Text="Londres" Value="London" SelectByDefault="true"></Item>
          <Item Text="Seattle" Value="Seattle"></Item>
        </LocalizedCollection>
      </LocalizedCollections>
    </LocalizedResources>
  </Localization>
<!--
</BuildingBlocks>-->
新增當地語系化專案之後, 請使用當地語系化 來編輯內容定義。 在下列範例中,會將英文 (en) 和西班牙文 (es) 自訂當地語系化資源新增至註冊頁面:
<!--
<BuildingBlocks>
  <ContentDefinitions> -->
   <ContentDefinition Id="api.localaccountsignup">
    <LocalizedResourcesReferences MergeBehavior="Prepend">
        <LocalizedResourcesReference Language="en" LocalizedResourcesReferenceId="api.localaccountsignup.en" />
        <LocalizedResourcesReference Language="es" LocalizedResourcesReferenceId="api.localaccountsignup.es" />
    </LocalizedResourcesReferences>
   </ContentDefinition>
  <!--
  </ContentDefinitions>
</BuildingBlocks>-->
下一步
- 深入瞭解 IEF 參考中的 ClaimsSchema 元素。
- 瞭解如何 在 Azure AD B2C 中使用自訂屬性。
下一步
- 在 Azure Active Directory B2C 中自訂使用者介面。
- 在 Azure Active Directory B2C 中使用 HTML 範本自訂使用者介面。
- 啟用 JavaScript 。