啟用通話的推播通知
在這裡,我們將瞭解如何啟用 Azure 通訊服務 通話的推播通知。 設定推播通知可讓使用者知道他們何時有來電,然後可以接聽。
推播通知
推播通知可讓您將應用程式的資訊傳送給使用者的裝置。 您可以使用推播通知來顯示對話框、播放音效或顯示應用程式UI層的來電。 Azure 通訊服務 提供與 Azure 事件方格 和 Azure 通知中樞的整合,可讓您將推播通知新增至您的應用程式。
TTL 令牌
存留時間 (TTL) 令牌是一個設定,可決定通知令牌在變成無效之前保持有效的時間長度。 此設定適用於用戶參與不需要每日互動,但在較長期間內仍相當重要的應用程式。
TTL 組態允許管理推播通知的生命週期,減少經常更新令牌的需求,同時確保應用程式與其用戶之間的通道在延長期間保持開放且可靠。
目前,TTL 的最大值為180天(15,552,000秒),最小值為5分鐘(300秒)。 您可以輸入此值,並據以根據您的需求進行調整。 如果您沒有提供值,預設值為24小時(86,400秒)。
在註冊機構中儲存裝置令牌資訊時,呼叫註冊器推播通知 API 之後。 TTL 生命週期結束后,會刪除裝置端點資訊。 如果這些裝置未再次呼叫緩存器推播通知 API,則這些裝置上的任何連入呼叫都無法傳遞至裝置。
如果您想要撤銷需要遵循 此程式的身分識別,一旦撤銷身分識別,應該刪除登錄器專案。
注意
對於 CTE(自定義 Teams 端點),最大 TTL 值為 24 小時(86,400 秒), 無法增加此值。
必要條件
- 具有有效訂用帳戶的 Azure 帳戶。 免費建立帳戶。
- 已部署通訊服務資源。 建立通訊服務資源。
- 用來啟用呼叫用戶端的使用者存取權杖。 如需詳細資訊,請參閱建立和管理存取權杖。
- 選擇性:完成快速入門以將語音通話新增至您的應用程式
Azure 通訊服務 Web 通話 SDK - Web 推播通知快速入門
重要
此 Azure 通訊服務功能目前處於預覽狀態。
提供的預覽 API 並無服務等級協定。 建議您不要將其用於生產工作負載。 有些功能可能不受支援,或是在功能上有所限制。
如需詳細資訊,請參閱 Microsoft Azure 預覽版增補使用規定。
Azure 通訊服務 Web 通話 SDK - Web 推播通知處於公開預覽狀態,並可在 1.12.0-beta.2+ 版中取得。
請流覽我們的 Web 推播通知快速入門教學課程: https://github.com/Azure-Samples/communication-services-javascript-quickstarts/blob/main/calling-web-push-notifications/README.md
安裝 SDK
找出您的專案層級 build.gradle 檔案,並將 新增mavenCentral()至 和 allprojects下的buildscript存放庫清單:
buildscript {
    repositories {
    ...
        mavenCentral()
    ...
    }
}
allprojects {
    repositories {
    ...
        mavenCentral()
    ...
    }
}
然後,在您的模組層級 build.gradle 檔案中,將下列幾行新增至 dependencies 區段:
dependencies {
    ...
    implementation 'com.azure.android:azure-communication-calling:1.0.0'
    ...
}
初始化必要的物件
若要建立CallAgent實例,您必須在 實例上CallClient呼叫 createCallAgent 方法。 這個呼叫會以異步方式傳 CallAgent 回實例物件。
方法 createCallAgent 會採用 CommunicationUserCredential 作為自變數,其會 封裝存取令牌。
若要存取 DeviceManager,您必須先建立 callAgent 實例。 然後,您可以使用 CallClient.getDeviceManager 方法來取得 DeviceManager。
String userToken = '<user token>';
CallClient callClient = new CallClient();
CommunicationTokenCredential tokenCredential = new CommunicationTokenCredential(userToken);
android.content.Context appContext = this.getApplicationContext(); // From within an activity, for instance
CallAgent callAgent = callClient.createCallAgent(appContext, tokenCredential).get();
DeviceManager deviceManager = callClient.getDeviceManager(appContext).get();
若要設定呼叫者的顯示名稱,請使用下列替代方法:
String userToken = '<user token>';
CallClient callClient = new CallClient();
CommunicationTokenCredential tokenCredential = new CommunicationTokenCredential(userToken);
android.content.Context appContext = this.getApplicationContext(); // From within an activity, for instance
CallAgentOptions callAgentOptions = new CallAgentOptions();
callAgentOptions.setDisplayName("Alice Bob");
DeviceManager deviceManager = callClient.getDeviceManager(appContext).get();
CallAgent callAgent = callClient.createCallAgent(appContext, tokenCredential, callAgentOptions).get();
推播通知的其他必要條件
已啟用雲端傳訊 (FCM) 的 Firebase 帳戶,以及連線至 Azure 通知中樞實例的 Firebase 雲端通訊服務。 如需詳細資訊,請參閱通訊服務通知。 此外,本教學課程假設您使用 Android Studio 3.6 版或更高版本來建置您的應用程式。
Android 應用程式需要一組許可權,才能從 Firebase 雲端通訊接收通知訊息。 在您的 AndroidManifest.xml 檔案中,於卷標後面 <manifest ...> 或下方 </application> 新增下列一組許可權。
<uses-permission android:name="android.permission.INTERNET"/>
<uses-permission android:name="android.permission.GET_ACCOUNTS"/>
<uses-permission android:name="com.google.android.c2dm.permission.RECEIVE" />
概觀
行動推播通知是您在行動裝置上看到的快顯通知。 針對通話,我們將著重於 VoIP(透過因特網通訊協定的語音通訊協定)推播通知。 我們將註冊推播通知、處理推播通知,然後取消註冊推播通知。
注意
若要註冊推播通知,以及處理自定義Teams端點的推播通知(CTE),API的相同。 以下所述的 API 也可以在自訂 Teams 端點 (CTE) 的 CommonCallAgent 或 TeamsCallAgent 類別上叫用。
註冊推播通知
若要註冊推播通知,應用程式必須在具有裝置註冊權杖的 CallAgent 執行個體上呼叫 registerPushNotification()。
若要取得裝置註冊令牌,請在區段中新增下列程式代碼行dependencies,將 Firebase SDK 新增至應用程式模組的build.gradle檔案,如果它尚未存在:
// Add the SDK for Firebase Cloud Messaging
implementation 'com.google.firebase:firebase-core:16.0.8'
implementation 'com.google.firebase:firebase-messaging:20.2.4'
在您的專案層級 build.gradle 檔案中 dependencies ,如果尚未存在,請在 區段中新增下列內容:
classpath 'com.google.gms:google-services:4.3.3'
如果檔案尚未存在,請將下列外掛程式新增至檔案的開頭:
apply plugin: 'com.google.gms.google-services'
選取工具列中的 [ 立即 同步處理]。 新增下列代碼段,以取得 Firebase Cloud Messaging SDK 針對用戶端應用程式實例所產生的裝置註冊令牌,請務必將下列匯入新增至實例主要活動的標頭。 代碼段需要它們才能擷取令牌:
import com.google.android.gms.tasks.OnCompleteListener;
import com.google.android.gms.tasks.Task;
import com.google.firebase.iid.FirebaseInstanceId;
import com.google.firebase.iid.InstanceIdResult;
新增此代碼段以擷取令牌:
FirebaseInstanceId.getInstance().getInstanceId()
    .addOnCompleteListener(new OnCompleteListener<InstanceIdResult>() {
        @Override
        public void onComplete(@NonNull Task<InstanceIdResult> task) {
            if (!task.isSuccessful()) {
                Log.w("PushNotification", "getInstanceId failed", task.getException());
                return;
            }

            // Get new Instance ID token
            String deviceToken = task.getResult().getToken();
            // Log
            Log.d("PushNotification", "Device Registration token retrieved successfully");
        }
    });
向通話服務 SDK 註冊裝置註冊令牌,以取得來電推播通知:
String deviceRegistrationToken = "<Device Token from previous section>";
try {
    callAgent.registerPushNotification(deviceRegistrationToken).get();
}
catch(Exception e) {
    System.out.println("Something went wrong while registering for Incoming Calls Push Notifications.")
}
推播通知處理
若要接收來電推播通知,請在具有承載的 CallAgent 實例上呼叫 handlePushNotification()。
若要從 Firebase 雲端傳訊取得承載,請先建立新的服務 (File > New > Service > Service),以擴充 FirebaseMessagingService Firebase SDK 類別,並覆寫 onMessageReceived 方法。 當 Firebase 雲端傳訊將推播通知傳遞至應用程式時,會呼叫這個方法。
public class MyFirebaseMessagingService extends FirebaseMessagingService {
    private java.util.Map<String, String> pushNotificationMessageDataFromFCM;

    @Override
    public void onMessageReceived(RemoteMessage remoteMessage) {
        // Check if message contains a notification payload.
        if (remoteMessage.getNotification() != null) {
            Log.d("PushNotification", "Message Notification Body: " + remoteMessage.getNotification().getBody());
        }
        else {
            pushNotificationMessageDataFromFCM = remoteMessage.getData();
        }
    }
}
將下列服務定義新增至 AndroidManifest.xml 標籤內的 <application> 檔案:
<service
    android:name=".MyFirebaseMessagingService"
    android:exported="false">
    <intent-filter>
        <action android:name="com.google.firebase.MESSAGING_EVENT" />
    </intent-filter>
</service>
- 擷取承載之後,就可以將承載傳遞至通訊服務 SDK,以剖析成內部 IncomingCallInformation 物件,而該物件會藉由呼叫 CallAgent 實例上的 handlePushNotification 方法來處理。
CallAgent實例的建立方式是在 類別上CallClient呼叫createCallAgent(...)方法。
try {
    IncomingCallInformation notification = IncomingCallInformation.fromMap(pushNotificationMessageDataFromFCM);
    Future handlePushNotificationFuture = callAgent.handlePushNotification(notification).get();
}
catch(Exception e) {
    System.out.println("Something went wrong while handling the Incoming Calls Push Notifications.");
}
當推播通知訊息的處理成功,且所有事件處理程式都已正確註冊時,應用程式會響鈴。
取消註冊推播通知
應用程式可以隨時取消註冊推播通知。 unregisterPushNotification()呼叫 callAgent 上的 方法以取消註冊。
try {
    callAgent.unregisterPushNotification().get();
}
catch(Exception e) {
    System.out.println("Something went wrong while un-registering for all Incoming Calls Push Notifications.")
}
設定系統
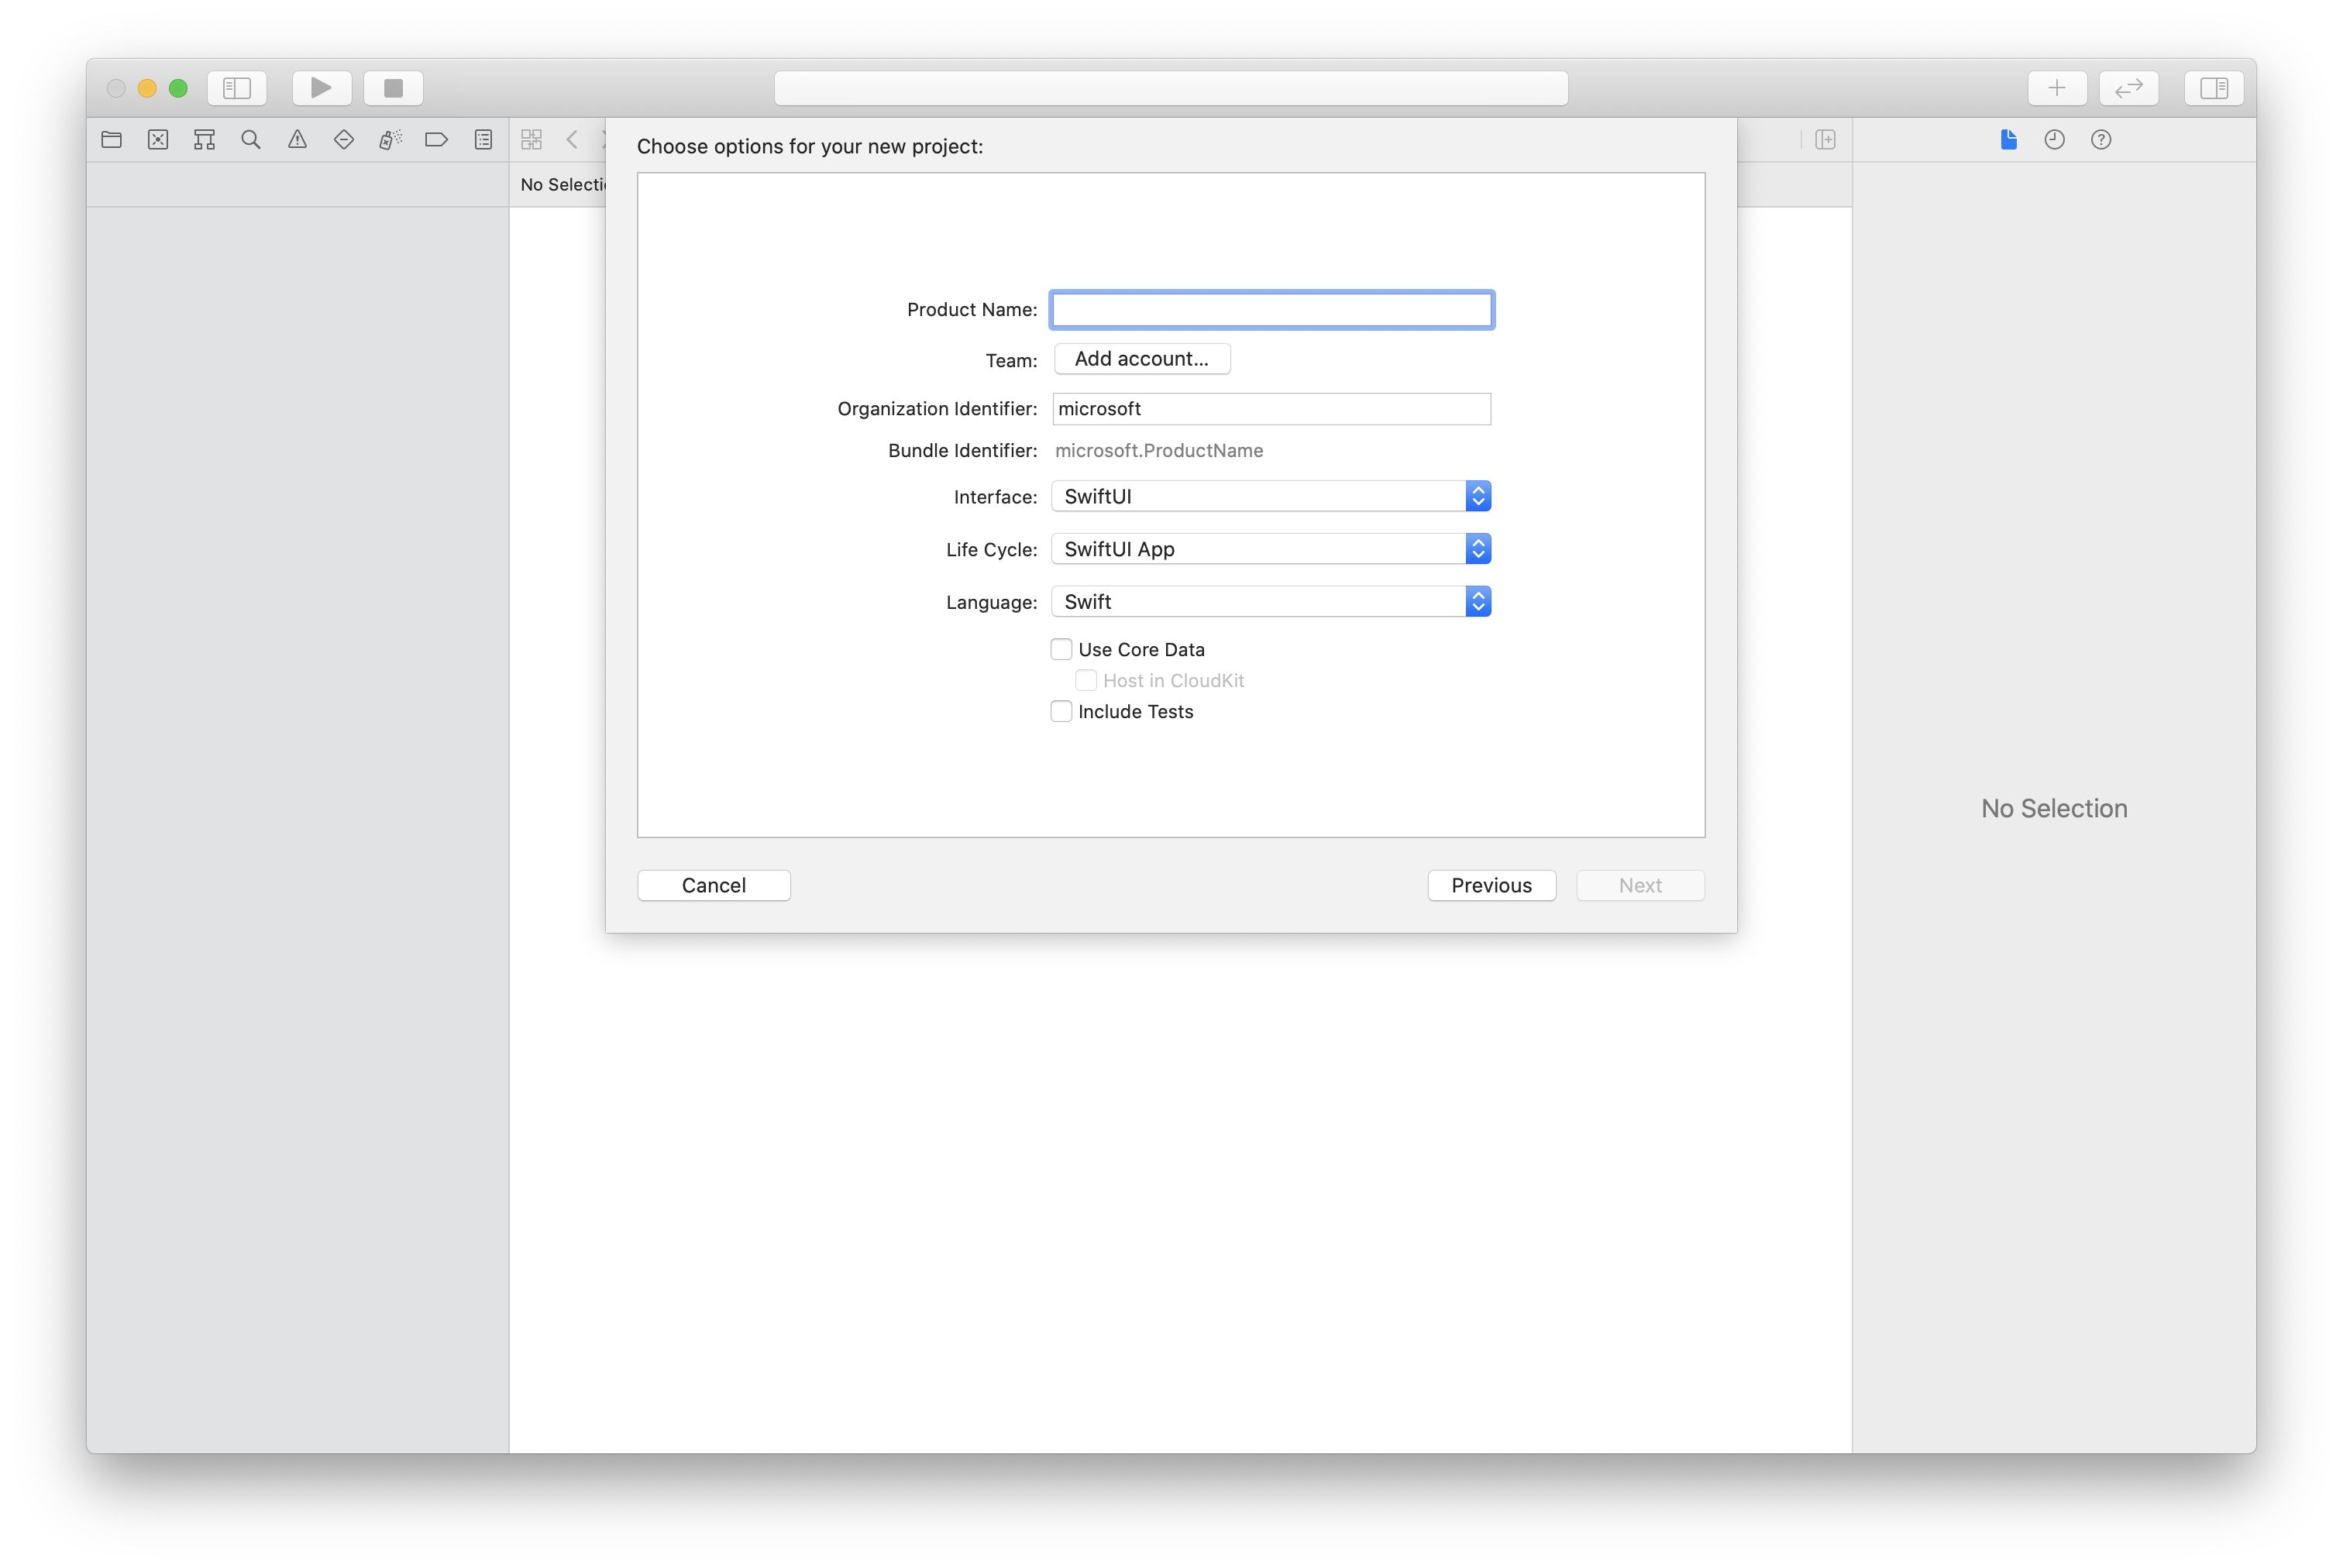
建立 Xcode 專案
在 Xcode 中,建立新的 iOS 專案,然後選取 [單一檢視應用程式 ] 範本。 本快速入門使用 SwiftUI 架構,因此您應該將 Language 設定為 Swift,並將 Interface 設定為 SwiftUI。
在本快速入門期間,您不會建立測試。 您可以隨意清除 [ 包含測試 ] 複選框。
使用 CocoaPods 安裝套件和相依性
為您的應用程式建立 Podfile,如下列範例所示:
platform :ios, '13.0'
use_frameworks!
target 'AzureCommunicationCallingSample' do
    pod 'AzureCommunicationCalling', '~> 1.0.0'
end
執行
pod install。使用 Xcode 開啟
.xcworkspace。
要求存取麥克風
若要存取裝置的麥克風,您必須使用 NSMicrophoneUsageDescription更新應用程式的資訊屬性清單。 您可以將相關聯的值設定為字串,此字串將包含在系統用來要求使用者存取的對話框中。
以滑鼠右鍵按兩下專案樹狀結構的Info.plist專案,然後選取[開啟為>原始程式碼]。 在最上層 <dict> 區段中新增下列幾行,然後儲存盤案。
<key>NSMicrophoneUsageDescription</key>
<string>Need microphone access for VOIP calling.</string>
設定應用程式架構
開啟專案的 ContentView.swift 檔案。 import將宣告新增至檔案頂端以匯入連結AzureCommunicationCalling庫。 此外,匯入 AVFoundation。 您需要它才能在程式代碼中要求音訊許可權。
import AzureCommunicationCalling
import AVFoundation
初始化 CallAgent
若要從 建立 CallAgent 實例,您必須使用callClient.createCallAgent方法,以異步方式在物件初始化之後傳回CallAgent物件。CallClient
若要建立呼叫用戶端,請傳遞 CommunicationTokenCredential 物件:
import AzureCommunication

let tokenString = "token_string"
var userCredential: CommunicationTokenCredential?
do {
    let options = CommunicationTokenRefreshOptions(initialToken: token, refreshProactively: true, tokenRefresher: self.fetchTokenSync)
    userCredential = try CommunicationTokenCredential(withOptions: options)
} catch {
    updates("Couldn't created Credential object", false)
    initializationDispatchGroup!.leave()
    return
}

// tokenProvider needs to be implemented by Contoso, which fetches a new token
public func fetchTokenSync(then onCompletion: TokenRefreshOnCompletion) {
    let newToken = self.tokenProvider!.fetchNewToken()
    onCompletion(newToken, nil)
}
將 CommunicationTokenCredential 您建立的物件傳遞至 CallClient,並設定顯示名稱:
self.callClient = CallClient()
let callAgentOptions = CallAgentOptions()
options.displayName = " iOS Azure Communication Services User"

self.callClient!.createCallAgent(userCredential: userCredential!,
    options: callAgentOptions) { (callAgent, error) in
        if error == nil {
            print("Create agent succeeded")
            self.callAgent = callAgent
        } else {
            print("Create agent failed")
        }
})
概觀
行動推播通知是您在行動裝置上看到的快顯通知。 針對通話,我們將著重於 VoIP(透過因特網通訊協定的語音通訊協定)推播通知。 我們將註冊推播通知、處理推播通知,然後取消註冊推播通知。 如需 iOS 應用程式中 CallKit 整合的指南,請參閱這裡的 CallKit 與 iOS ACS SDK 整合。
注意
若要註冊推播通知,並處理自定義Teams端點的推播通知 (CTE) API 相同。 描述的 API 也可以在自訂 Teams 端點 (CTE) 的 CommonCallAgent 或 TeamsCallAgent 類別上叫用。
設定推播通知
行動推播通知是您在行動裝置中取得的快顯通知。 針對通話,我們將著重於 VoIP(透過因特網通訊協定的語音通訊協定)推播通知。
下列小節描述如何註冊、處理和取消註冊推播通知。 開始這些工作之前,請先完成下列必要條件:
- 在 Xcode 中,移至 [簽署與功能]。 選取 [+ 功能],然後選取 [推播通知],以新增功能。
- 選取 [+ 功能],然後選取 [背景模式],以新增另一個功能。
- 在 [背景模式] 底下,選取 [透過 IP 的語音] 和 [遠端通知] 核取方塊。

註冊推播通知
若要註冊推播通知,請使用裝置註冊令牌在 實體上CallAgent呼叫 registerPushNotification() 。
成功初始化之後,必須註冊推播通知。 callAgent當對象終結時,logout將會呼叫 ,這會自動取消註冊推播通知。
let deviceToken: Data = pushRegistry?.pushToken(for: PKPushType.voIP)
callAgent.registerPushNotifications(deviceToken: deviceToken!) { (error) in
    if(error == nil) {
        print("Successfully registered to push notification.")
    } else {
        print("Failed to register push notification.")
    }
}
處理推播通知
若要接收連入通話的推播通知,請在具有字典裝載的 CallAgent 執行個體上呼叫 handlePushNotification()。
let callNotification = PushNotificationInfo.fromDictionary(pushPayload.dictionaryPayload)

callAgent.handlePush(notification: callNotification) { (error) in
    if (error == nil) {
        print("Handling of push notification was successful")
    } else {
        print("Handling of push notification failed")
    }
}
取消註冊推播通知
應用程式可以隨時取消註冊推播通知。 只要在上CallAgent呼叫 unregisterPushNotification 方法即可。
注意
應用程式不會在註銷時自動從推播通知取消註冊。
callAgent.unregisterPushNotification { (error) in
    if (error == nil) {
        print("Unregister of push notification was successful")
    } else {
       print("Unregister of push notification failed, please try again")
    }
}
設定系統
建立 Visual Studio 專案
針對 UWP 應用程式,在 Visual Studio 2022 中建立新的 空白應用程式 (通用 Windows) 專案。 輸入專案名稱之後,您可以選擇 10.0.17763.0 之後的任何 Windows SDK。
針對 WinUI 3 應用程式,使用 [空白應用程式]、[傳統型] 範本建立新的專案,以設定單頁 WinUI 3 應用程式。 需要 Windows 應用程式 SDK 1.3 版或更新版本。
使用 NuGet 封裝管理員 安裝套件和相依性
呼叫 SDK API 和連結庫可透過 NuGet 套件公開使用。
下列步驟示範如何尋找、下載及安裝呼叫 SDK NuGet 套件:
- 選取 [工具>][NuGet 封裝管理員 管理解決方案的 NuGet 套件],以開啟 NuGet 封裝管理員。>
- 選取 [ 瀏覽],然後在搜尋方塊中輸入
Azure.Communication.Calling.WindowsClient。 - 請確定已選取 [ 包含發行前版本 ] 複選框。
- 選取套件
Azure.Communication.Calling.WindowsClient,然後選取Azure.Communication.Calling.WindowsClient1.4.0-beta.1 或更新版本。 - 選取對應至右側索引標籤上 [通訊服務] 項目的複選框。
- 選取 [安裝] 按鈕。
概觀
Windows 平臺上的推播通知會使用 Windows Push Notification Service (WNS),傳遞。
注意
若要註冊推播通知,以及處理自定義Teams端點的推播通知(CTE),API的相同。 以下所述的 API 也可以在自訂 Teams 端點 (CTE) 的 CommonCallAgent 或 TeamsCallAgent 類別上叫用。
設定推播通知
推播通知是您在裝置中取得的快顯通知。 針對通話,我們將著重於 VoIP(透過因特網通訊協定的語音通訊協定)推播通知。
下列各節說明如何註冊、處理及顯示 Windows 通知,以接聽/拒絕來電。 開始這些工作之前,請先完成下列必要條件:
遵循教學課程:使用 Azure 通知中樞將通知傳送至 通用 Windows 平台 應用程式。 遵循本教學課程之後,您有:
- 具有
WindowsAzure.Messaging.Managed和Microsoft.Toolkit.Uwp.Notifications封裝的應用程式。 - 參考為
<AZURE_PNH_HUB_NAME>的 Azure PNH(推播通知中樞)中樞名稱,以及本快速入門中所參考的<AZURE_PNH_HUB_CONNECTION_STRING>Azure PNH 連線 ion 字串。
- 具有
若要在每一個應用程式 init 上註冊 WNS (Windows Notification Service) 通道,請務必在App.xaml.cs檔案上新增初始化程式代碼:
// App.xaml.cs

protected override async void OnLaunched(LaunchActivatedEventArgs e)
{
    await InitNotificationsAsync();

    ...
}

private async Task InitNotificationsAsync()
{
    if (AZURE_PNH_HUB_NAME != "<AZURE_PNH_HUB_NAME>" && AZURE_PNH_HUB_CONNECTION_STRING != "<AZURE_PNH_HUB_CONNECTION_STRING>")
    {
        var channel = await PushNotificationChannelManager.CreatePushNotificationChannelForApplicationAsync();
        channel.PushNotificationReceived += Channel_PushNotificationReceived;

        var hub = new NotificationHub(AZURE_PNH_HUB_NAME, AZURE_PNH_HUB_CONNECTION_STRING);
        var result = await hub.RegisterNativeAsync(channel.Uri);

        if (result.ChannelUri != null)
        {
            PNHChannelUri = new Uri(result.ChannelUri);
        }
        else
        {
            Debug.WriteLine("Cannot register WNS channel");
        }
    }
}
- 註冊在新的推播通知訊息送達App.xaml.cs時啟動的事件處理程式:
// App.xaml.cs

private void Channel_PushNotificationReceived(PushNotificationChannel sender, PushNotificationReceivedEventArgs args)
{
    switch (args.NotificationType)
    {
      case PushNotificationType.Toast:
      case PushNotificationType.Tile:
      case PushNotificationType.TileFlyout:
      case PushNotificationType.Badge:
          break;
      case PushNotificationType.Raw:
          var frame = (Frame)Window.Current.Content;
          if (frame.Content is MainPage)
          {
              var mainPage = frame.Content as MainPage;
              await mainPage.HandlePushNotificationIncomingCallAsync(args.RawNotification.Content);
          }
          break;
    }
}
註冊推播通知
若要註冊推播通知,請使用在應用程式 init 上取得的 WNS 註冊通道呼叫 RegisterForPushNotificationAsync()CallAgent 實例。
成功初始化之後,必須註冊推播通知。
// MainPage.xaml.cs

this.callAgent = await this.callClient.CreateCallAgentAsync(tokenCredential, callAgentOptions);

if ((Application.Current as App).PNHChannelUri != null)
{
    await this.callAgent.RegisterForPushNotificationAsync((Application.Current as App).PNHChannelUri.ToString());
}

this.callAgent.CallsUpdated += OnCallsUpdatedAsync;
this.callAgent.IncomingCallReceived += OnIncomingCallAsync;
處理推播通知
若要接收連入通話的推播通知,請在具有字典裝載的 CallAgent 執行個體上呼叫 handlePushNotification()。
// MainPage.xaml.cs

public async Task HandlePushNotificationIncomingCallAsync(string notificationContent)
{
    if (this.callAgent != null)
    {
        PushNotificationDetails pnDetails = PushNotificationDetails.Parse(notificationContent);
        await callAgent.HandlePushNotificationAsync(pnDetails);
    }
}
這會在 CallAgent 上觸發來電事件,以顯示來電通知。
// MainPage.xaml.cs

private async void OnIncomingCallAsync(object sender, IncomingCallReceivedEventArgs args)
{
    incomingCall = args.IncomingCall;
    (Application.Current as App).ShowIncomingCallNotification(incomingCall);
}
// App.xaml.cs

public void ShowIncomingCallNotification(IncomingCall incomingCall)
{
    string incomingCallType = incomingCall.IsVideoEnabled ? "Video" : "Audio";
    string caller = incomingCall.CallerDetails.DisplayName != "" ? incomingCall.CallerDetails.DisplayName : incomingCall.CallerDetails.Identifier.RawId;
    new ToastContentBuilder()
    .SetToastScenario(ToastScenario.IncomingCall)
    .AddText(caller + " is calling you.")
    .AddText("New Incoming " + incomingCallType + " Call")
      .AddButton(new ToastButton()
          .SetContent("Decline")
          .AddArgument("action", "decline"))
      .AddButton(new ToastButton()
          .SetContent("Accept")
          .AddArgument("action", "accept"))
      .Show();
}
新增程式代碼以處理 OnActivated 方法中通知的按鈕按下:
// App.xaml.cs

protected override async void OnActivated(IActivatedEventArgs e)
{
    // Handle notification activation
    if (e is ToastNotificationActivatedEventArgs toastActivationArgs)
    {
      ToastArguments args = ToastArguments.Parse(toastActivationArgs.Argument);
      string action = args?.Get("action");

      if (!string.IsNullOrEmpty(action))
      {
          var frame = Window.Current.Content as Frame;
          if (frame.Content is MainPage)
          {
              var mainPage = frame.Content as MainPage;
              await mainPage.AnswerIncomingCall(action);
          }
      }
    }
}
// MainPage.xaml.cs

public async Task AnswerIncomingCall(string action)
{
    if (action == "accept")
    {
      var acceptCallOptions = new AcceptCallOptions()
      {
          IncomingVideoOptions = new IncomingVideoOptions()
          {
              StreamKind = VideoStreamKind.RemoteIncoming
          }
      };

      call = await incomingCall?.AcceptAsync(acceptCallOptions);
      call.StateChanged += OnStateChangedAsync;
      call.RemoteParticipantsUpdated += OnRemoteParticipantsUpdatedAsync;
    }
    else if (action == "decline")
    {
      await incomingCall?.RejectAsync();
    }
}