使用 Azure 監視器 Log Analytics 診斷設定來監視 Azure Cosmos DB 資料
適用於: NoSQL
NoSQL  MongoDB
  Cassandra
  Gremlin
  Table
Table
Azure 中的診斷設定可用來收集資源記錄。 資源會發出 Azure 資源記錄,並提供該資源作業的豐富、經常性資料。 系統會依要求擷取這些記錄並稱之為資料平面記錄。 資料平面作業的一些範例包括刪除、插入和 readFeed。 這些記錄的內容會依資源類型而有所不同。
如需診斷設定的詳細資訊,請參閱 Azure 監視器中的診斷設定。
注意
建議您在資源專屬模式中建立診斷設定 (適用於 API for Table 以外的所有 API),遵循 REST API 索引標籤中的指示。此選項提供額外的成本最佳化,具有可用於處理資料的改良檢視。
必要條件
- 現有的 Azure Cosmos DB 帳戶。
- 現有的 Azure 監視器 Log Analytics 工作區。
警告
如果您需要刪除資源、重新命名或移動資源,或是跨資源群組或訂用帳戶移轉資源,請先刪除資源的診斷設定。 否則,如果您重新建立此資源,根據每個資源的資源設定,新的資源可能會隨附已刪除資源的診斷設定。 如果新的資源隨附這些診斷設定,則會繼續依照診斷設定中的定義收集資源記錄,並將適用的計量和記錄資料傳送至先前設定的目的地。
此外,對於您即將刪除且不打算再使用的資源,最好能刪除其診斷設定以確保環境乾淨。
建立診斷設定
在這裡,我們會逐步解說建立帳戶診斷設定的程序。
登入 Azure 入口網站。
導覽至現有的 Azure Cosmos DB 帳戶。
在資源功能表的 [監視] 區段中,選取 [診斷設定]。 接著,選取 [新增診斷設定] 選項。

重要
如果帳戶中未啟用「全文檢索查詢」功能,則您可能會看到「啟用全文檢索查詢 [...] 以取得更詳細的記錄」提示。 如果您不想要啟用此功能,則可以放心地忽略此警告。 如需詳細資訊,請參閱啟用全文檢索查詢。
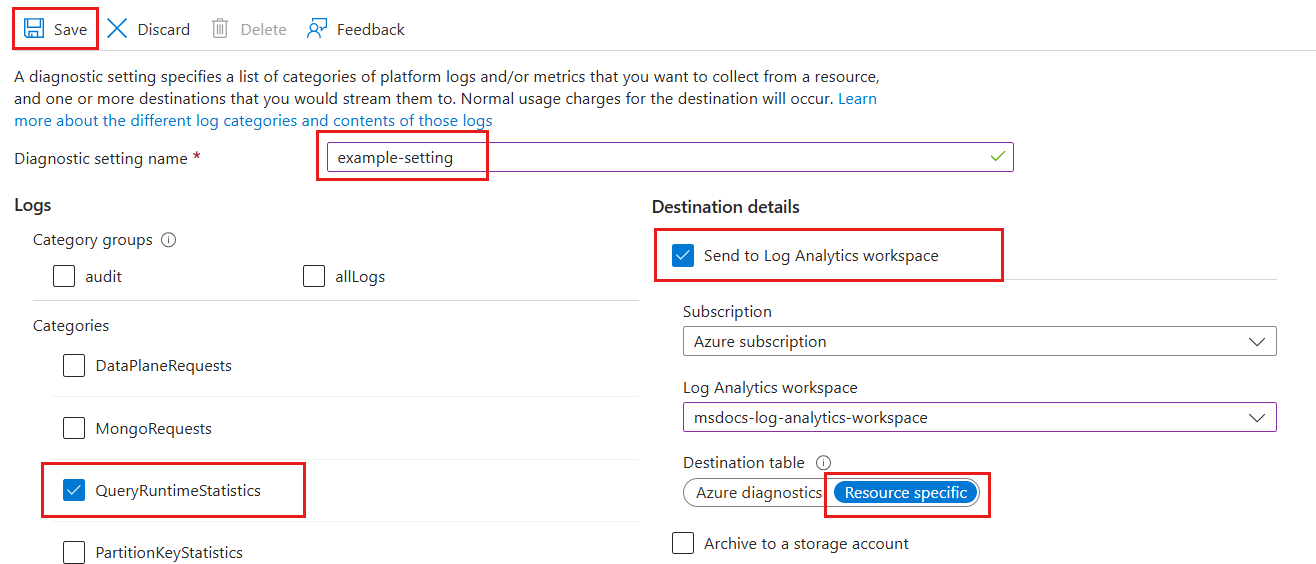
在 [診斷設定] 窗格中,將設定命名為 example-setting,然後選取 QueryRuntimeStatistics 類別。 啟用 [傳送至 Log Analytics 工作區 ] 複選框,然後選取現有的工作區。 最後,選取 [資源特定] 作為目的地選項。

使用 az monitor diagnostic-settings create 命令,透過 Azure CLI 建立診斷設定。 請參閱此命令的文件,以瞭解其參數的描述。
確定您已登入 Azure CLI。 如需詳細資訊,請參閱使用 Azure CLI 登入。
使用 az monitor diagnostic-settings create 建立設定。
az monitor diagnostic-settings create \
  --resource $(az cosmosdb show \
    --resource-group "<resource-group-name>" \
    --name "<account-name>" \
    --query "id" \
    --output "tsv" \
  ) \
  --workspace $(az monitor log-analytics workspace show \
    --resource-group "<resource-group-name>" \
    --name "<account-name>" \
    --query "id" \
    --output "tsv" \
  ) \
  --name "example-setting" \
  --export-to-resource-specific true \
  --logs '[
    {
      "category": "QueryRuntimeStatistics",
      "enabled": true
    }
  ]'
重要
此範例會使用 --export-to-resource-specific 引數來啟用資源特定的資料表。
檢閱使用 az monitor diagnostics-settings show 來建立新設定的結果。
az monitor diagnostic-settings show \
  --name "example-setting" \
  --resource $(az cosmosdb show \
    --resource-group "<resource-group-name>" \
    --name "<account-name>" \
    --query "id" \
    --output "tsv" \
  )
使用 Azure 監視器 REST API,透過互動式主控台建立診斷設定。
確定您已登入 Azure CLI。 如需詳細資訊,請參閱使用 Azure CLI 登入。
使用 HTTP PUT 要求和 az rest 來建立 Azure Cosmos DB 資源的診斷設定。
diagnosticSettingName="example-setting"

resourceId=$(az cosmosdb show \
  --resource-group "<resource-group-name>" \
  --name "<account-name>" \
  --query "id" \
  --output "tsv" \
)

workspaceId=$(az monitor log-analytics workspace show \
  --resource-group "<resource-group-name>" \
  --name "<account-name>" \
  --query "id" \
  --output "tsv" \
)

az rest \
  --method "PUT" \
  --url "$resourceId/providers/Microsoft.Insights/diagnosticSettings/$diagnosticSettingName" \
  --url-parameters "api-version=2021-05-01-preview" \
  --body '{
    "properties": {
      "workspaceId": "'"$workspaceId"'",
      "logs": [
        {
          "category": "QueryRuntimeStatistics",
          "enabled": true
        }
      ],
      "logAnalyticsDestinationType": "Dedicated"
    }
  }'
重要
此範例會將 logAnalyticsDestinationType 屬性設定為 Dedicated,以啟用資源特定的資料表。
再次使用 az rest 搭配 HTTP GET 動詞命令來取得診斷設定的屬性。
diagnosticSettingName="example-setting"

resourceId=$(az cosmosdb show \
  --resource-group "<resource-group-name>" \
  --name "<account-name>" \
  --query "id" \
  --output "tsv" \
)

az rest \
  --method "GET" \
  --url "$resourceId/providers/Microsoft.Insights/diagnosticSettings/$diagnosticSettingName" \
  --url-parameters "api-version=2021-05-01-preview"
使用 Bicep 範本來建立診斷設定。
確定您已登入 Azure CLI。 如需詳細資訊,請參閱使用 Azure CLI 登入。
建立名為 diagnosticSetting.bicep 的新檔案。
輸入下列 Bicep 範本內容,以部署 Azure Cosmos DB 資源的診斷設定。
@description('The name of the diagnostic setting to create.')
param diagnosticSettingName string = 'example-setting'

@description('The name of the Azure Cosmos DB account to monitor.')
param azureCosmosDbAccountName string

@description('The name of the Azure Monitor Log Analytics workspace to use.')
param logAnalyticsWorkspaceName string

resource azureCosmosDbAccount 'Microsoft.DocumentDB/databaseAccounts@2021-06-15' existing = {
  name: azureCosmosDbAccountName
}

resource logAnalyticsWorkspace 'Microsoft.OperationalInsights/workspaces@2023-09-01' existing = {
  name: logAnalyticsWorkspaceName
}

resource diagnosticSetting 'Microsoft.Insights/diagnosticSettings@2021-05-01-preview' = {
  name: diagnosticSettingName
  scope: azureCosmosDbAccount
  properties: {
    workspaceId: logAnalyticsWorkspace.id
    logAnalyticsDestinationType: 'Dedicated'
    logs: [
      {
        category: 'QueryRuntimeStatistics'
        enabled: true
      }
    ]
  }
}
重要
此範例會將 logAnalyticsDestinationType 屬性設定為 Dedicated,以啟用資源特定的資料表。
使用 az deployment group create 來部署範本。
az deployment group create \
    --resource-group "<resource-group-name>" \
    --template-file diagnosticSetting.bicep \
    --parameters \
      azureCosmosDbAccountName="<azure-cosmos-db-account-name>" \
      logAnalyticsWorkspaceName="<log-analytics-workspace-name>"
使用 Azure Resource Manager 範本來建立診斷設定。
確定您已登入 Azure CLI。 如需詳細資訊,請參閱使用 Azure CLI 登入。
建立名為 diagnosticSetting.bicep 的新檔案。
輸入下列 Azure Resource Manager 範本內容,以部署 Azure Cosmos DB 資源的診斷設定。
{
  "$schema": "<https://schema.management.azure.com/schemas/2019-04-01/deploymentTemplate.json#>",
  "contentVersion": "1.0.0.0",
  "parameters": {
    "diagnosticSettingName": {
      "type": "string",
      "defaultValue": "example-setting",
      "metadata": {
        "description": "The name of the diagnostic setting to create."
      }
    },
    "azureCosmosDbAccountName": {
      "type": "string",
      "metadata": {
        "description": "The name of the Azure Cosmos DB account to monitor."
      }
    },
    "logAnalyticsWorkspaceName": {
      "type": "string",
      "metadata": {
        "description": "The name of the Azure Monitor Log Analytics workspace to use."
      }
    }
  },
  "resources": [
    {
      "type": "Microsoft.Insights/diagnosticSettings",
      "apiVersion": "2021-05-01-preview",
      "scope": "[format('Microsoft.DocumentDB/databaseAccounts/{0}', parameters('azureCosmosDbAccountName'))]",
      "name": "[parameters('diagnosticSettingName')]",
      "properties": {
        "workspaceId": "[resourceId('Microsoft.OperationalInsights/workspaces', parameters('logAnalyticsWorkspaceName'))]",
        "logAnalyticsDestinationType": "Dedicated",
        "logs": [
          {
            "category": "QueryRuntimeStatistics",
            "enabled": true
          }
        ]
      }
    }
  ]
}
重要
此範例會將 logAnalyticsDestinationType 屬性設定為 Dedicated,以啟用資源特定的資料表。
使用 az deployment group create 來部署範本。
az deployment group create \
    --resource-group "<resource-group-name>" \
    --template-file azuredeploy.json \
    --parameters \
      azureCosmosDbAccountName="<azure-cosmos-db-account-name>" \
      logAnalyticsWorkspaceName="<log-analytics-workspace-name>"
啟用記錄查詢文字的全文檢索查詢
Azure Cosmos DB 提供進階記錄,以進行詳細疑難排解。 啟用全文檢索查詢,您可以在 Azure Cosmos DB 帳戶內檢視所有要求的去模糊化查詢。 您也會授與 Azure Cosmos DB 存取權,以在您的記錄中存取和呈現此資料。
警告
啟用這項功能可能會導致額外的記錄成本,如需定價詳細資料,請造訪 Azure 監視器定價。 建議您在疑難排解之後停用此功能。
在現有的 Azure Cosmos DB 帳戶頁面上,選取資源功能表 [設定] 區段中的 [功能] 選項。 然後,選取 [診斷全文檢索查詢] 功能。

在對話框中,選取 Enable。 此設定會在幾分鐘內套用。 現在起,所有新擷取的記錄都會有每個要求的全文檢索或 PIICommand 文字。

使用 Azure CLI 為您的 Azure Cosmos DB 帳戶啟用全文檢索查詢。
再次使用 az rest 搭配 HTTP PATCH 動詞命令和 JSON 承載來啟用全文檢索查詢。
az rest \
  --method "PATCH" \
  --url $(az cosmosdb show \
    --resource-group "<resource-group-name>" \
    --name "<account-name>" \
    --query "id" \
    --output "tsv" \
  ) \
  --url-parameters "api-version=2021-05-01-preview" \
  --body '{
    "properties": {
      "diagnosticLogSettings": {
        "enableFullTextQuery": "True"
      }
    }
  }'
請稍候,完成此作業需要幾分鐘。 再次使用 az rest 搭配 HTTP GET 來檢查全文檢索查詢的狀態。
az rest \
  --method "GET" \
  --url $(az cosmosdb show \
    --resource-group "<resource-group-name>" \
    --name "<account-name>" \
    --query "id" \
    --output "tsv" \
  ) \
  --url-parameters "api-version=2021-05-01-preview" \
  --query "{accountName:name,fullTextQueryEnabled:properties.diagnosticLogSettings.enableFullTextQuery}"
輸出應類似於此範例。
{
  "accountName": "<account-name>",
  "fullTextQueryEnabled": "True"
}
相關內容
NoSQL
MongoDB
Cassandra
Gremlin
Table


