適用於: Azure Data Factory
  Azure Synapse Analytics
秘訣
試用 Microsoft Fabric 中的 Data Factory,這是適用於企業的全方位分析解決方案。 Microsoft Fabric 涵蓋從資料移動到資料科學、即時分析、商業智慧和報告的所有項目。 了解如何免費開始新的試用!
本快速入門說明如何使用 PowerShell 來建立 Azure Data Factory。 在此資料處理站中建立的管線會將資料從 Azure Blob 儲存體中的一個資料夾複製到其他資料夾。 如需如何使用 Azure Data Factory 轉換資料的教學課程,請參閱教學課程︰使用 Spark 轉換資料。
附註
本文不提供Data Factory 服務的詳細簡介。 如需 Azure Data Factory 服務簡介,請參閱 Azure Data Factory 簡介。
先決條件
Azure 訂用帳戶
如果您沒有 Azure 訂用帳戶,請在開始前建立免費帳戶。
Azure 角色
若要建立 Data Factory 執行個體,您用來登入 Azure 的使用者帳戶必須為「參與者」或「擁有者」角色,或是 Azure 訂用帳戶的「管理員」。 若要檢視您在訂用帳戶中擁有的權限,請移至 Azure 入口網站,選取右上角的使用者名稱、選取更多選項的 "..." 圖示,然後選取 [我的權限]。 如果您有多個訂用帳戶的存取權,請選取適當的訂用帳戶。
若要建立及管理 Data factory 的子資源 (包括資料集、連結服務、管線、觸發程序和整合執行階段),必須要符合下列需求:
- 若要在 Azure 入口網站中建立及管理子資源,您必須屬於資源群組層級或更高層級的 Data Factory 參與者角色。
- 若要使用 PowerShell 或 SDK 來建立及管理子資源,具備資源層級或更高層級的參與者角色即已足夠。
如需將使用者新增至角色的範例指示,請參閱新增角色一文。
如需詳細資訊,請參閱下列文章:
Azure 儲存體帳戶
您可以使用一般用途的 Azure 儲存體帳戶 (特別是 Blob 儲存體) 作為本教學課程中的「來源」和「目的地」資料存放區。 如果您沒有一般用途的 Azure 儲存體帳戶,請參閱建立儲存體帳戶以建立帳戶。
取得儲存體帳戶名稱
您在此快速入門中需要使用 Azure 儲存體帳戶的名稱。 下列程序提供可取得儲存體帳戶名稱的步驟:
- 在網頁瀏覽器中,移至 Azure 入口網站,然後使用您的 Azure 使用者名稱與密碼登入。
- 從 [Azure 入口網站] 功能表中,選取 [所有服務],然後選取 [儲存體]>[儲存體帳戶]。 您也可以從任何頁面搜尋並選取 [儲存體帳戶]。
- 在 [儲存體帳戶] 頁面中,篩選您的儲存體帳戶 (如有需要),然後選取您的儲存體帳戶。
您也可以從任何頁面搜尋並選取 [儲存體帳戶]。
建立 Blob 容器
在這一節中,您會在 Azure Blob 儲存體中建立一個名為 adftutorial 的 Blob 容器。
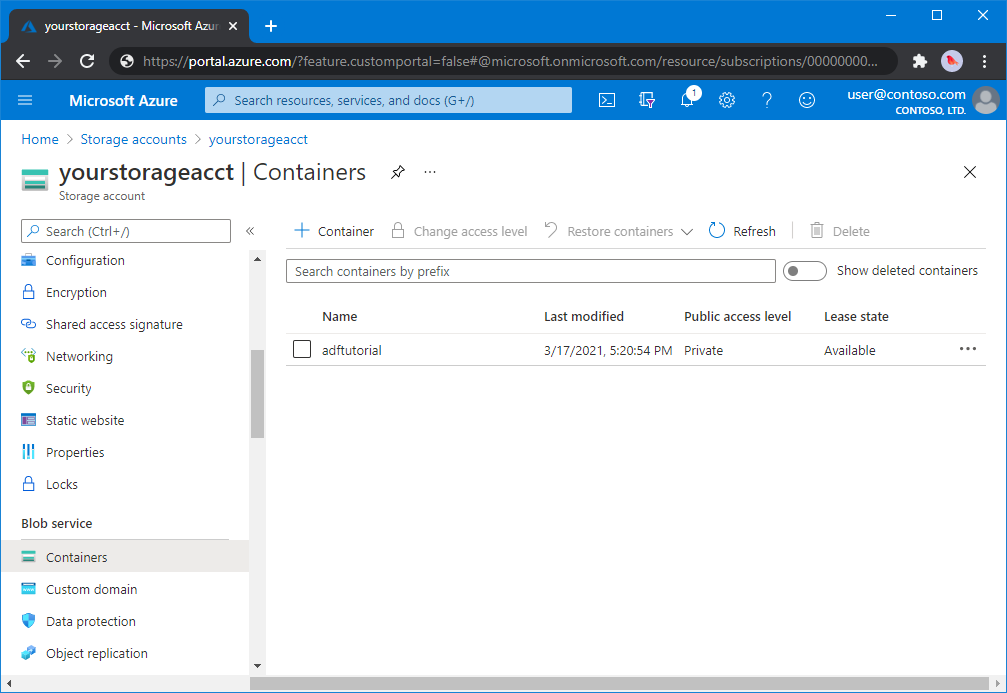
從 [儲存體帳戶] 頁面中,選取 [概觀]>[容器]。
在[帳戶名稱] <> - [容器] 頁面的工具列上,選取 [容器]。
在 [新增容器] 對話方塊中,輸入 adftutorial 作為名稱,然後選取 [確定]。 [帳戶名稱] <> [容器] - 頁面已更新,以在容器清單中納入 adftutorial。

新增 Blob 容器的輸入資料夾與檔案
在此節中,您會在您建立的容器中建立名為 input 的資料夾,然後將範例檔案上傳到 input 資料夾。 在您開始之前,請開啟文字編輯器 (例如 [記事本]) 並使用下列內容建立名為 emp.txt 的檔案:
John, Doe
Jane, Doe
將該檔案儲存在 C:\ADFv2QuickStartPSH 資料夾中。 (如果該資料夾不存在,請予以建立。)然後返回 Azure 入口網站並依照下列步驟執行:
在您先前退出的 [帳戶名稱] <> - [容器] 頁面中,從更新的容器清單中選取 [adftutorial]。
- 如果您關閉視窗,或移至另一個頁面,請再次登入 Azure 入口網站。
- 從 [Azure 入口網站] 功能表中,選取 [所有服務],然後選取 [儲存體]>[儲存體帳戶]。 您也可以從任何頁面搜尋並選取 [儲存體帳戶]。
- 選取您的儲存體帳戶,然後選取 [容器]>[adftutorial]。
在 [adftutorial] 容器頁面的工具列上,選取 [上傳]。
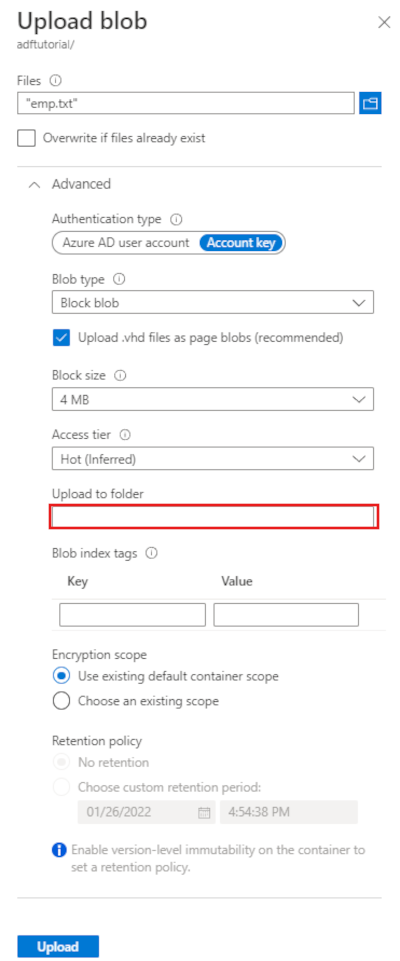
在 [上傳 Blob] 頁面上,選取 [檔案] 方塊,然後瀏覽並選取 emp.txt 檔。
展開 [進階] 標題。 現在會顯示該頁面,如下所示:

在 [上傳至資料夾] 方塊中,輸入 input。
選取 [上傳] 按鈕。 您應該會在清單中看到 emp.txt 檔案以及上傳的狀態。
選取 [關閉] 圖示 (X) 以關閉 [上傳 Blob] 頁面。
保持 [adftutorial] 容器頁面開啟。 您可以在本快速入門結尾處使用它來確認輸出。
Azure PowerShell
附註
建議您使用 Azure Az PowerShell 模組來與 Azure 互動。 若要開始使用,請參閱安裝 Azure PowerShell。 若要了解如何遷移至 Az PowerShell 模組,請參閱將 Azure PowerShell 從 AzureRM 移轉至 Az。
依照如何安裝和設定 Azure PowerShell中的指示,安裝最新的 Azure PowerShell 模組。
警告
如果您未使用最新版本的 PowerShell 和 Data Factory 模組,您可以在執行命令時遇到還原串行化錯誤。
登入 PowerShell
在您的電腦上啟動 PowerShell。 讓 PowerShell 保持開啟,直到本快速入門結束為止。 如果您關閉並重新開啟,則需要再次執行這些命令。
執行下列命令,並輸入您用來登入 Azure 入口網站的相同 Azure 使用者名稱和密碼:
Connect-AzAccount執行下列命令以檢視此帳戶的所有訂用帳戶:
Get-AzSubscription如果您發現您的帳戶與多個訂用帳戶相關聯,請執行下列命令來選取您需要使用的訂用帳戶。 以您的 Azure 訂用帳戶識別碼取代 SubscriptionId:
Select-AzSubscription -SubscriptionId "<SubscriptionId>"
建立 Data Factory
定義資源群組名稱的變數,以便稍後在 PowerShell 命令中使用。 將下列命令文字複製到 PowerShell,以雙引號指定 Azure 資源群組的名稱,然後執行命令。 例如:
"ADFQuickStartRG"。$resourceGroupName = "ADFQuickStartRG";不建議您覆寫已經存在的資源群組。 將不同的值指派給
$ResourceGroupName變數,然後執行一次命令若要建立 Azure 資源群組,請執行下列命令:
$ResGrp = New-AzResourceGroup $resourceGroupName -location 'East US'不建議您覆寫已經存在的資源群組。 將不同的值指派給
$ResourceGroupName變數,然後執行一次命令。定義 Data Factory 名稱的變數。
重要事項
將資料處理站名稱更新為全域唯一的。 例如,ADFTutorialFactorySP1127。
$dataFactoryName = "ADFQuickStartFactory";若要建立 Data Factory,請從 $ResGrp 變數使用 Location 和 ResourceGroupName 屬性來執行下列 Set-AzDataFactoryV2 Cmdlet:
$DataFactory = Set-AzDataFactoryV2 -ResourceGroupName $ResGrp.ResourceGroupName `
    -Location $ResGrp.Location -Name $dataFactoryName
請注意下列幾點:
Azure Data Factory 的名稱在全域必須是唯一的。 如果發生下列錯誤,請變更名稱,並再試一次。
The specified Data Factory name 'ADFv2QuickStartDataFactory' is already in use. Data Factory names must be globally unique.若要建立 Data Factory 實例,您用來登入 Azure 的使用者帳戶必須是 參與者 或 擁有者 角色的成員,或是 Azure 訂用帳戶的 系統管理員 。
如需目前可使用 Data Factory 的 Azure 區域清單,請在下列頁面上選取您感興趣的區域,然後展開 [分析] 以找出 [Data Factory]:依區域提供的產品。 資料處理站所使用的資料存放區 (Azure 儲存體、Azure SQL Database 等) 和計算 (HDInsight 等) 可位於其他區域。
建立連結的服務
在資料處理站中建立的連結服務,會將您的資料存放區和計算服務連結到資料處理站。 在本快速入門中,您要建立連結 Azure 儲存體的服務,可用來作為來源和接收的存放區。 連結的服務具有連線資訊,可供 Data Factory 服務在執行階段中用來連線。
秘訣
在本快速入門中,您會使用 帳戶密鑰 作為數據存放區的驗證類型,但您可以選擇其他支持的驗證方法: SAS URI、*服務主體和 受控識別 。 如需詳細資訊,請參閱本文的對應章節。 若要安全地儲存資料存放區的秘密,也建議您使用 Azure Key Vault。 如需詳細說明,請參閱本文。
使用下列內容在 C:\ADFv2QuickStartPSH 資料夾中建立名為 AzureStorageLinkedService.json 的 JSON 檔案:(如果尚未存在,請建立 ADFv2QuickStartPSH 資料夾。
重要事項
儲存檔案前,以 Azure 儲存體帳戶的名稱和金鑰取代 <accountName> 和 <accountKey>。
{
    "name": "AzureStorageLinkedService",
    "properties": {
        "annotations": [],
        "type": "AzureBlobStorage",
        "typeProperties": {
            "connectionString": "DefaultEndpointsProtocol=https;AccountName=<accountName>;AccountKey=<accountKey>;EndpointSuffix=core.windows.net"
        }
    }
}
如果您使用 [記事本],請在 [另存新檔] 對話方塊中的 [另存為類型] 欄位選取 [所有檔案]。 否則,它可能會將
.txt副檔名新增至檔案。 例如:AzureStorageLinkedService.json.txt。 如果您在 [檔案總管] 中開啟檔案之前先在 [記事本] 中建立檔案,您可能不會看到.txt擴展名,因為預設會設定 [隱藏已知檔類型的擴展名 ] 選項。 先移除.txt副檔名,再繼續下一個步驟。在 PowerShell 中,切換到 ADFv2QuickStartPSH 資料夾。
Set-Location 'C:\ADFv2QuickStartPSH'執行 Set-AzDataFactoryV2LinkedService Cmdlet 來建立連結服務 AzureStorageLinkedService。
Set-AzDataFactoryV2LinkedService -DataFactoryName $DataFactory.DataFactoryName `
    -ResourceGroupName $ResGrp.ResourceGroupName -Name "AzureStorageLinkedService" `
    -DefinitionFile ".\AzureStorageLinkedService.json"
以下是範例輸出:
LinkedServiceName : AzureStorageLinkedService
ResourceGroupName : <resourceGroupName>
DataFactoryName   : <dataFactoryName>
Properties        : Microsoft.Azure.Management.DataFactory.Models.AzureBlobStorageLinkedService
建立資料集
在此程序中,您會建立兩個資料集:InputDataset 和 OutputDataset。 這些資料集的類型為二進位。 其會參考您在前一節中建立的 Azure 儲存體連結服務。 輸入資料集代表輸入資料夾中的來源資料。 在輸入資料集定義中,您可以指定 Blob 容器 (adftutorial)、資料夾 (input) 以及包含來源資料的檔案 (emp.txt)。 此輸出資料集代表已複製到目的地的資料。 在輸出資料集定義中,您可以指定要將資料複製過去的 Blob 容器 (adftutorial)、資料夾 (output) 和檔案。
在 C:\ADFv2QuickStartPSH 資料夾中,使用下列內容建立名為 InputDataset.json 的 JSON 檔案:
{ "name": "InputDataset", "properties": { "linkedServiceName": { "referenceName": "AzureStorageLinkedService", "type": "LinkedServiceReference" }, "annotations": [], "type": "Binary", "typeProperties": { "location": { "type": "AzureBlobStorageLocation", "fileName": "emp.txt", "folderPath": "input", "container": "adftutorial" } } } }若要建立資料集:InputDataset,請執行 Set-AzDataFactoryV2Dataset Cmdlet。
Set-AzDataFactoryV2Dataset -DataFactoryName $DataFactory.DataFactoryName `
    -ResourceGroupName $ResGrp.ResourceGroupName -Name "InputDataset" `
    -DefinitionFile ".\InputDataset.json"
以下是範例輸出:
DatasetName       : InputDataset
ResourceGroupName : <resourceGroupname>
DataFactoryName   : <dataFactoryName>
Structure         :
Properties        : Microsoft.Azure.Management.DataFactory.Models.BinaryDataset
重複前述步驟,以建立輸出資料集。 在 C:\ADFv2QuickStartPSH 資料夾中,使用下列內容建立名為 OutputDataset.json 的 JSON 檔案:
{
    "name": "OutputDataset",
    "properties": {
        "linkedServiceName": {
            "referenceName": "AzureStorageLinkedService",
            "type": "LinkedServiceReference"
        },
        "annotations": [],
        "type": "Binary",
        "typeProperties": {
            "location": {
                "type": "AzureBlobStorageLocation",
                "folderPath": "output",
                "container": "adftutorial"
            }
        }
    }
}
執行 Set-AzDataFactoryV2Dataset Cmdlet 來建立 OutDataset。
Set-AzDataFactoryV2Dataset -DataFactoryName $DataFactory.DataFactoryName `
    -ResourceGroupName $ResGrp.ResourceGroupName -Name "OutputDataset" `
    -DefinitionFile ".\OutputDataset.json"
以下是範例輸出:
DatasetName       : OutputDataset
ResourceGroupName : <resourceGroupname>
DataFactoryName   : <dataFactoryName>
Structure         :
Properties        : Microsoft.Azure.Management.DataFactory.Models.BinaryDataset
建立管線
在此程序中,您會建立管線,其中含有使用輸入和輸出資料集的複製活動。 複製活動會將資料從您在輸入資料集設定中指定的檔案,複製到您在輸出資料集設定中指定的檔案。
在 C:\ADFv2QuickStartPSH 資料夾中,使用下列內容建立名為 Adfv2QuickStartPipeline.json 的 JSON 檔案:
{ "name": "Adfv2QuickStartPipeline", "properties": { "activities": [ { "name": "CopyFromBlobToBlob", "type": "Copy", "dependsOn": [], "policy": { "timeout": "7.00:00:00", "retry": 0, "retryIntervalInSeconds": 30, "secureOutput": false, "secureInput": false }, "userProperties": [], "typeProperties": { "source": { "type": "BinarySource", "storeSettings": { "type": "AzureBlobStorageReadSettings", "recursive": true } }, "sink": { "type": "BinarySink", "storeSettings": { "type": "AzureBlobStorageWriteSettings" } }, "enableStaging": false }, "inputs": [ { "referenceName": "InputDataset", "type": "DatasetReference" } ], "outputs": [ { "referenceName": "OutputDataset", "type": "DatasetReference" } ] } ], "annotations": [] } }若要建立管線:Adfv2QuickStartPipeline,請執行 Set-AzDataFactoryV2Pipeline Cmdlet。
$DFPipeLine = Set-AzDataFactoryV2Pipeline `
    -DataFactoryName $DataFactory.DataFactoryName `
    -ResourceGroupName $ResGrp.ResourceGroupName `
    -Name "Adfv2QuickStartPipeline" `
    -DefinitionFile ".\Adfv2QuickStartPipeline.json"
建立管線執行
在此步驟中,您會建立管線執行。
執行 Invoke-AzDataFactoryV2Pipeline Cmdlet 來建立管線執行。 Cmdlet 會傳回管線執行識別碼,方便後續監視。
$RunId = Invoke-AzDataFactoryV2Pipeline `
  -DataFactoryName $DataFactory.DataFactoryName `
  -ResourceGroupName $ResGrp.ResourceGroupName `
  -PipelineName $DFPipeLine.Name
監視管道執行
執行下列 PowerShell 程式碼以持續檢查管線執行狀態,直到完成複製資料為止。 在 PowerShell 視窗中複製/貼上下列指令碼,然後按 ENTER。
while ($True) {
    $Run = Get-AzDataFactoryV2PipelineRun `
        -ResourceGroupName $ResGrp.ResourceGroupName `
        -DataFactoryName $DataFactory.DataFactoryName `
        -PipelineRunId $RunId

    if ($Run) {
        if ( ($Run.Status -ne "InProgress") -and ($Run.Status -ne "Queued") ) {
            Write-Output ("Pipeline run finished. The status is: " +  $Run.Status)
            $Run
            break
        }
        Write-Output ("Pipeline is running...status: " + $Run.Status)
    }

    Start-Sleep -Seconds 10
}
以下是管線執行的範例輸出:
Pipeline is running...status: InProgress
Pipeline run finished. The status is:  Succeeded

ResourceGroupName : ADFQuickStartRG
DataFactoryName   : ADFQuickStartFactory
RunId             : 00000000-0000-0000-0000-0000000000000
PipelineName      : Adfv2QuickStartPipeline
LastUpdated       : 8/27/2019 7:23:07 AM
Parameters        : {}
RunStart          : 8/27/2019 7:22:56 AM
RunEnd            : 8/27/2019 7:23:07 AM
DurationInMs      : 11324
Status            : Succeeded
Message           :
執行下列指令碼來取出複製活動執行詳細資料,例如,讀取/寫入資料的大小。
Write-Output "Activity run details:"
$Result = Get-AzDataFactoryV2ActivityRun -DataFactoryName $DataFactory.DataFactoryName -ResourceGroupName $ResGrp.ResourceGroupName -PipelineRunId $RunId -RunStartedAfter (Get-Date).AddMinutes(-30) -RunStartedBefore (Get-Date).AddMinutes(30)
$Result

Write-Output "Activity 'Output' section:"
$Result.Output -join "`r`n"

Write-Output "Activity 'Error' section:"
$Result.Error -join "`r`n"
確認您看到的輸出類似下列活動執行結果範例輸出:
ResourceGroupName : ADFQuickStartRG
DataFactoryName   : ADFQuickStartFactory
ActivityRunId     : 00000000-0000-0000-0000-000000000000
ActivityName      : CopyFromBlobToBlob
PipelineRunId     : 00000000-0000-0000-0000-000000000000
PipelineName      : Adfv2QuickStartPipeline
Input             : {source, sink, enableStaging}
Output            : {dataRead, dataWritten, filesRead, filesWritten...}
LinkedServiceName :
ActivityRunStart  : 8/27/2019 7:22:58 AM
ActivityRunEnd    : 8/27/2019 7:23:05 AM
DurationInMs      : 6828
Status            : Succeeded
Error             : {errorCode, message, failureType, target}

Activity 'Output' section:
"dataRead": 20
"dataWritten": 20
"filesRead": 1
"filesWritten": 1
"sourcePeakConnections": 1
"sinkPeakConnections": 1
"copyDuration": 4
"throughput": 0.01
"errors": []
"effectiveIntegrationRuntime": "DefaultIntegrationRuntime (Central US)"
"usedDataIntegrationUnits": 4
"usedParallelCopies": 1
"executionDetails": [
  {
    "source": {
      "type": "AzureBlobStorage"
    },
    "sink": {
      "type": "AzureBlobStorage"
    },
    "status": "Succeeded",
    "start": "2019-08-27T07:22:59.1045645Z",
    "duration": 4,
    "usedDataIntegrationUnits": 4,
    "usedParallelCopies": 1,
    "detailedDurations": {
      "queuingDuration": 3,
      "transferDuration": 1
    }
  }
]

Activity 'Error' section:
"errorCode": ""
"message": ""
"failureType": ""
"target": "CopyFromBlobToBlob"
檢閱已部署的資源
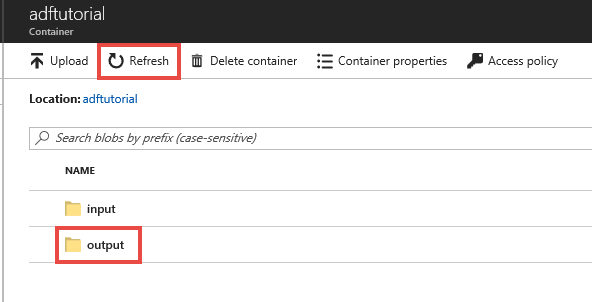
管道會自動在 adftutorial Blob 容器中建立輸出資料夾。 然後,它會將 emp.txt 檔案從輸入資料夾複製到輸出資料夾。
在 Azure 入口網站的 [adftutorial] 容器頁面上,選取 [重新整理] 可查看輸出資料夾。

在資料夾清單中,選取 [輸出]。
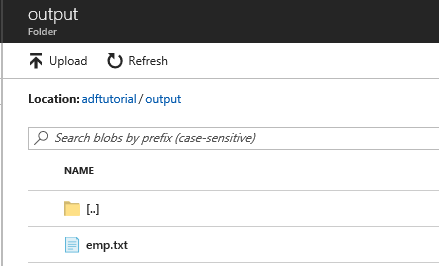
確認 emp.txt 已複製到輸出資料夾。

清除資源
您有兩種方式可以清除您在本快速入門中建立的資源。 您可以刪除 Azure 資源群組,其中包括資源群組中的所有資源。 如果您想要讓其他資源保持不變,請僅刪除您在本教學課程中建立的資料處理站。
刪除資源群組會刪除所有資源,包含其中的 Data Factory。 執行下列命令來刪除整個資源群組:
Remove-AzResourceGroup -ResourceGroupName $resourcegroupname
附註
置放資源群組可能需要一些時間。 請耐心等候程序完成
如果您需要只刪除 Data Factory,而非整個資源群組,請執行下列命令:
Remove-AzDataFactoryV2 -Name $dataFactoryName -ResourceGroupName $resourceGroupName
相關內容
在此範例中的管線會將資料從 Azure Blob 儲存體中的一個位置複製到其他位置。 瀏覽教學課程以了解使用 Data Factory 的更多案例。