在這個快速入門中,你將透過在本地機器上使用 Visual Studio Code 的 ASA 工具擴充功能,建立、執行並提交 Azure Stream Analytics (ASA) 工作。 您將了解如何建置 ASA 作業,以讀取來自 IoT 中樞的即時串流資料,並篩選溫度大於 27°的事件。 輸出結果會傳送至 Blob 儲存體中的檔案。 本快速入門中使用的輸入資料是由 Raspberry Pi 線上模擬器產生。
注意
Visual Studio Code 工具不支援中國東部、中國北部、德國中部和德國東北地區的工作。
必要條件
- Azure 訂閱。 如果您沒有 Azure 訂閱,請建立免費帳戶。
- Visual Studio Code
安裝 Azure 串流分析工具擴充功能
開啟 Visual Studio Code (VS Code)。
從左窗格上的 [延伸模組],搜尋串流分析,然後選取 Azure 串流分析工具延伸模組上的 [安裝]。
![顯示 Visual Studio Code 的 [延伸模組] 頁面的螢幕快照,其中包含安裝串流分析延伸模組的選項。](media/quick-create-visual-studio-code/install-extension.png)
安裝之後,選取活動列上的 Azure 圖示,然後登入 Azure。
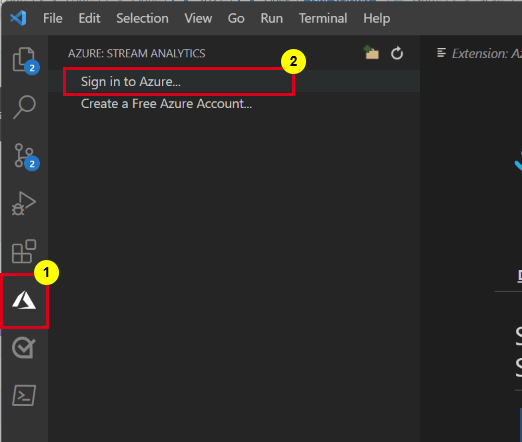
登入之後,您就可以在 Azure 帳戶底下看到訂用帳戶。
注意
ASA 工具擴充功能每次開啟 VS Code 時都會自動登入。 如果你的帳號有雙重驗證,請使用手機認證,而不是用 PIN 碼。 若要登出您的 Azure 帳戶,按 Ctrl + Shift + P 並輸入 Azure: Sign Out。
準備輸入資料
在定義串流分析工作前,先準備輸入資料。 解決方案會將即時感測器資料匯入物聯網中心,之後再設定為工作輸入。 若要準備工作所需的輸入資料,請完成下列步驟:
登入 Azure 入口網站。
選擇 "建立資源"。 在 [建立資源] 頁面上,選取 [物聯網]>[IoT 中樞]。
![顯示 [建立資源] 頁面上 IoT 中樞 功能表的螢幕快照。](media/stream-analytics-quick-create-portal/iot-hub-menu.png)
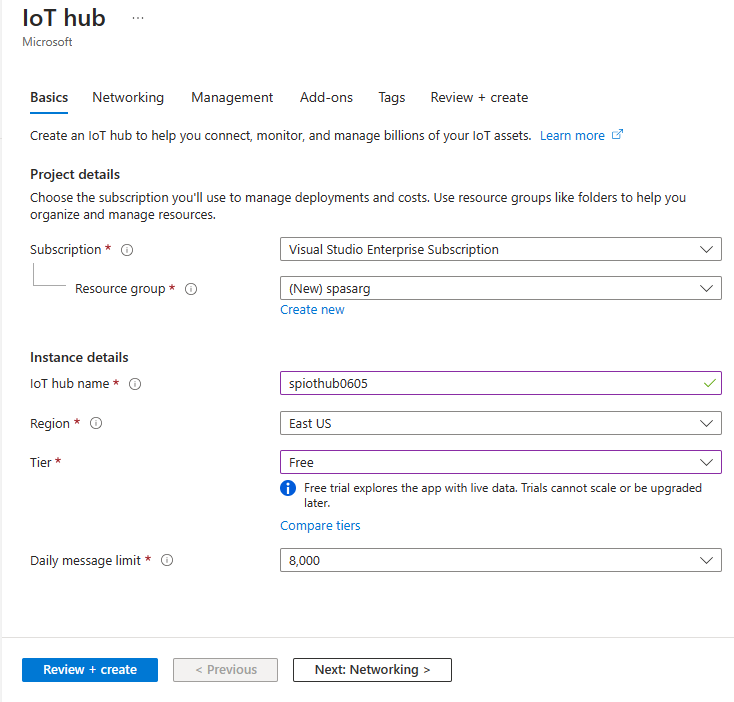
在 [IoT 中樞] 頁面上,遵循下列步驟:
- 針對 訂用帳戶,選取您的 Azure 訂用帳戶。
- 針對 [資源群組],選取現有的資源群組,或建立新的資源群組。
- 針對 [IoT 中樞名稱],輸入您 IoT 中樞的名稱。
- 針對 [區域],選取與您最接近的區域。
- 在層級選擇免費,如果您的訂閱仍提供此選項。 如需詳細資訊,請參閱 IoT 中樞定價。
- 針對 [每日訊息限制],保留預設值。
- 在頁面底部選取 下一步: 網路。
選擇 檢閱 + 創建。 檢閱您的 IoT 中樞資訊,然後選取 [建立]。 建立 IoT 中樞可能需要數分鐘。 您可以在 [通知] 窗格中監視進度。
建立資源(物聯網集線)後,選擇 「前往資源 」以進入物聯網集線頁面。
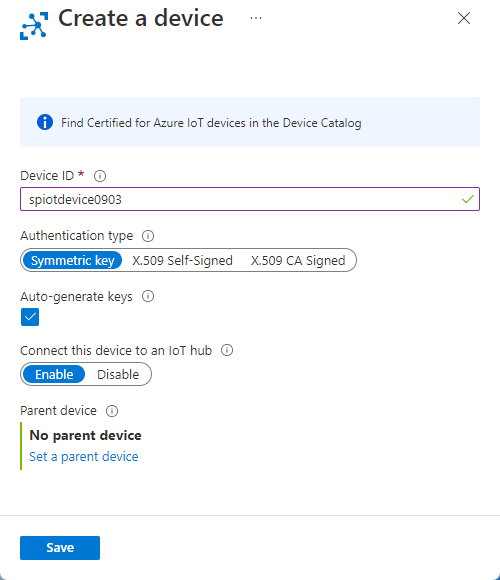
在 [IoT 中樞] 頁面上,選取左側功能表上的 [裝置],然後選取 [+ 新增裝置]。
![顯示 [裝置] 頁面上 [新增裝置] 按鈕的螢幕快照。](media/stream-analytics-quick-create-portal/add-device-button.png)
提供裝置識別碼,然後選取 [儲存]。
建立裝置後,你會在 物聯網裝置 清單中看到該裝置。 如果您沒有看到 [重新整理] 按鈕,請選取頁面上的 [重新整理] 按鈕。
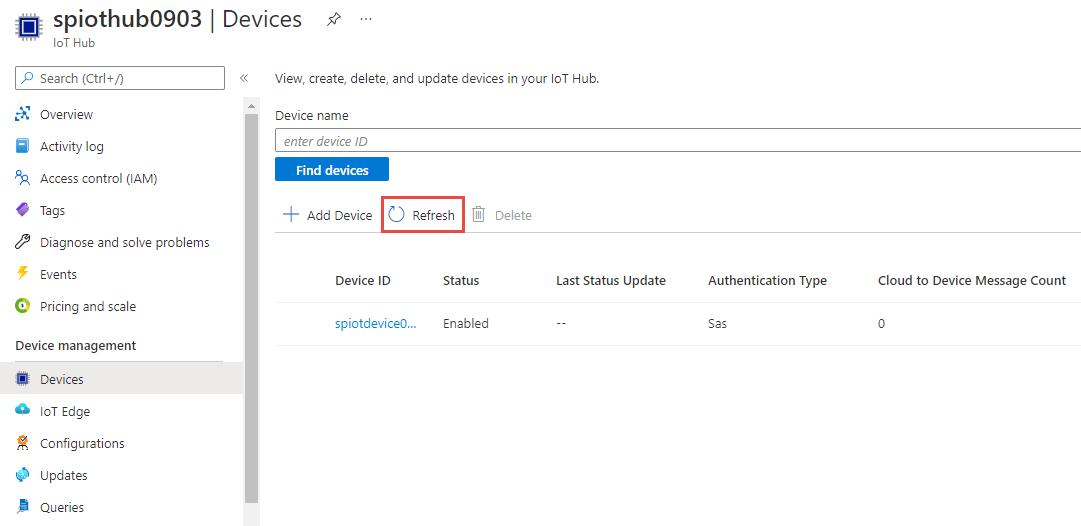
從清單中選取您的裝置。
在裝置頁面上,選取 [主要連接字串] 旁的 [複製] 按鈕,然後將其儲存到記事本以供稍後使用。
![顯示裝置 連接字串 旁 [複製] 按鈕的螢幕快照。](media/stream-analytics-quick-create-portal/save-iot-device-connection-string.png)
![顯示 [建立資源] 頁面上 IoT 中樞 功能表的螢幕快照。](media/stream-analytics-quick-create-portal/iot-hub-menu.png#lightbox)

![顯示 [裝置] 頁面上 [新增裝置] 按鈕的螢幕快照。](media/stream-analytics-quick-create-portal/add-device-button.png#lightbox)


![顯示裝置 連接字串 旁 [複製] 按鈕的螢幕快照。](media/stream-analytics-quick-create-portal/save-iot-device-connection-string.png#lightbox)
執行 IoT 模擬器
將第 15 行的佔位符替換成你在前一節儲存的 Azure IoT Hub 裝置連線字串。
選取執行。 輸出顯示傳送到物聯網集線的感測器資料和訊息。
![顯示 [Raspberry Pi Azure IoT 在線模擬器] 頁面與範例查詢的螢幕快照。](media/stream-analytics-quick-create-portal/ras-pi-connection-string.png)
重要
選取 [在幾分鐘后重設] 以重設 連接字串。
![顯示 [Raspberry Pi Azure IoT 在線模擬器] 頁面與範例查詢的螢幕快照。](media/stream-analytics-quick-create-portal/ras-pi-connection-string.png#lightbox)
建立 Blob 儲存體
從 Azure 入口網站的左上角,選取 [建立資源]>[儲存體]>[儲存體帳戶]。
![顯示 [建立記憶體帳戶] 功能表表的螢幕快照。](media/quick-create-visual-studio-code/create-storage-account-menu.png)
在 建立儲存體帳戶窗格中,輸入儲存體帳戶名稱、位置和資源群組。 選擇與您建立的 IoT 中樞相同的位置和資源群組。 然後,選取 [檢閱] 和 [建立] 以建立儲存體帳戶。
![顯示 [建立記憶體帳戶] 頁面的螢幕快照。](media/quick-create-visual-studio-code/create-storage-account.png)
在 [儲存體帳戶] 頁面上,選取左側功能表中的 [容器],然後選取命令列上的 [+ 容器]。
![顯示 [容器] 頁面的螢幕快照。](media/quick-create-visual-studio-code/add-blob-container-menu.png)
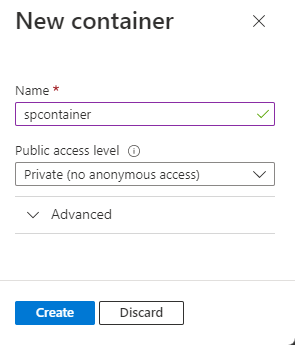
從 [新增容器] 頁面中,提供容器的名稱、將 [公用存取層級] 保留為 [私人 (沒有匿名存取)],然後選取 [確定]。
建立串流分析專案
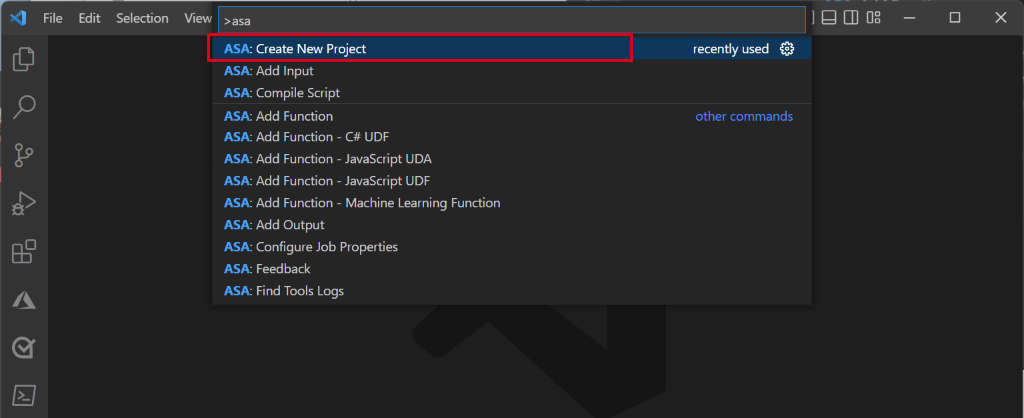
在 Visual Studio Code 中,選擇 「檢視>指令面板」,並輸入 ASA:建立新專案。
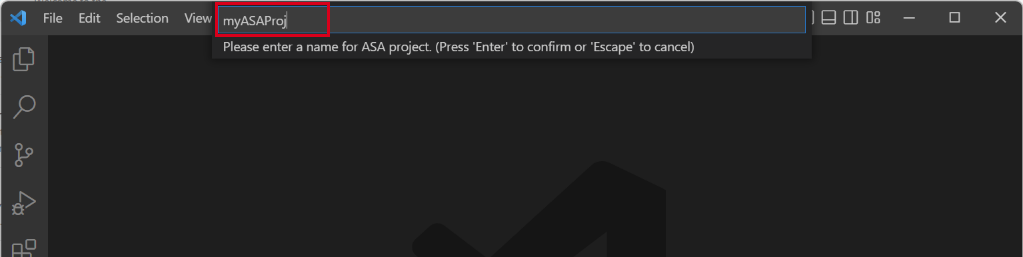
輸入您的專案名稱 (例如 myASAproj),然後選取專案的資料夾。
Visual Studio Code 會在你的工作區新增一個 ASA 專案。 其包含三個資料夾:輸入、輸出和功能。 此外也包含查詢指令碼 (*.asaql)、JobConfig.json 檔案和 asaproj.json 組態檔。
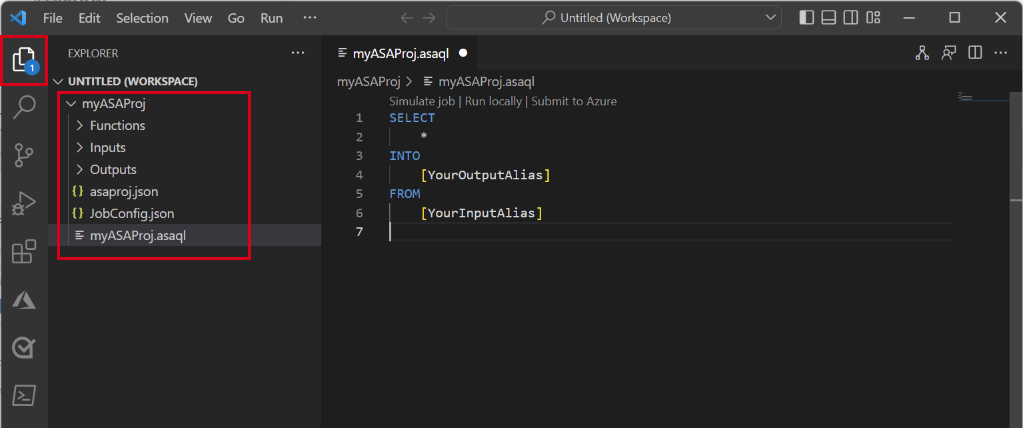
Asaproj.json 檔案包含將串流分析作業提交至 Azure 所需的輸入、輸出和作業組態設定。
注意
當你從指令調色盤新增輸入和輸出時,對應的路徑會自動加入 asaproj.json 。 如果您直接在磁碟上新增或移除輸入或輸出,您必須手動從 asaproj.json 加以新增或移除。 你可以把輸入和輸出放在一個地方,然後透過在每個 asaproj.json 檔案中指定路徑,在不同的工作中引用它們。
定義轉換查詢
開啟 myASAproj.asaql 檔案並新增下列查詢:
SELECT *
INTO Output
FROM Input
WHERE Temperature > 27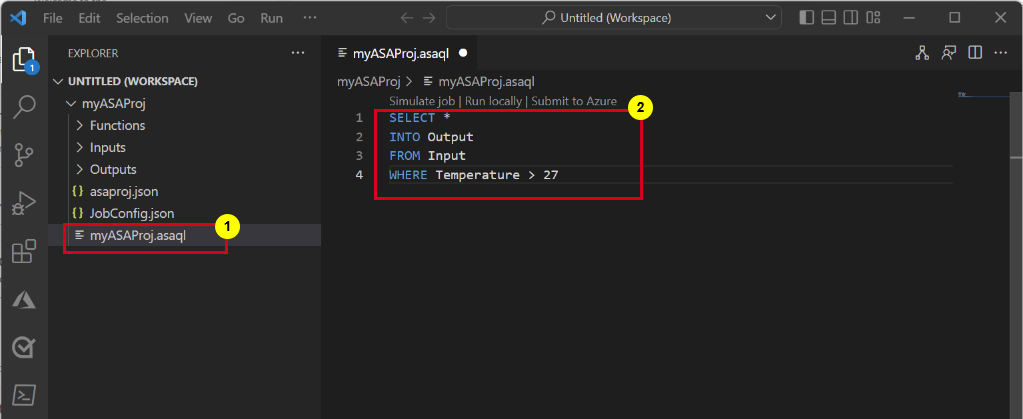

設定作業輸入
以滑鼠右鍵按一下您串流分析專案中的輸入資料夾。 然後從右鍵選單中選取 [ASA:新增輸入]。
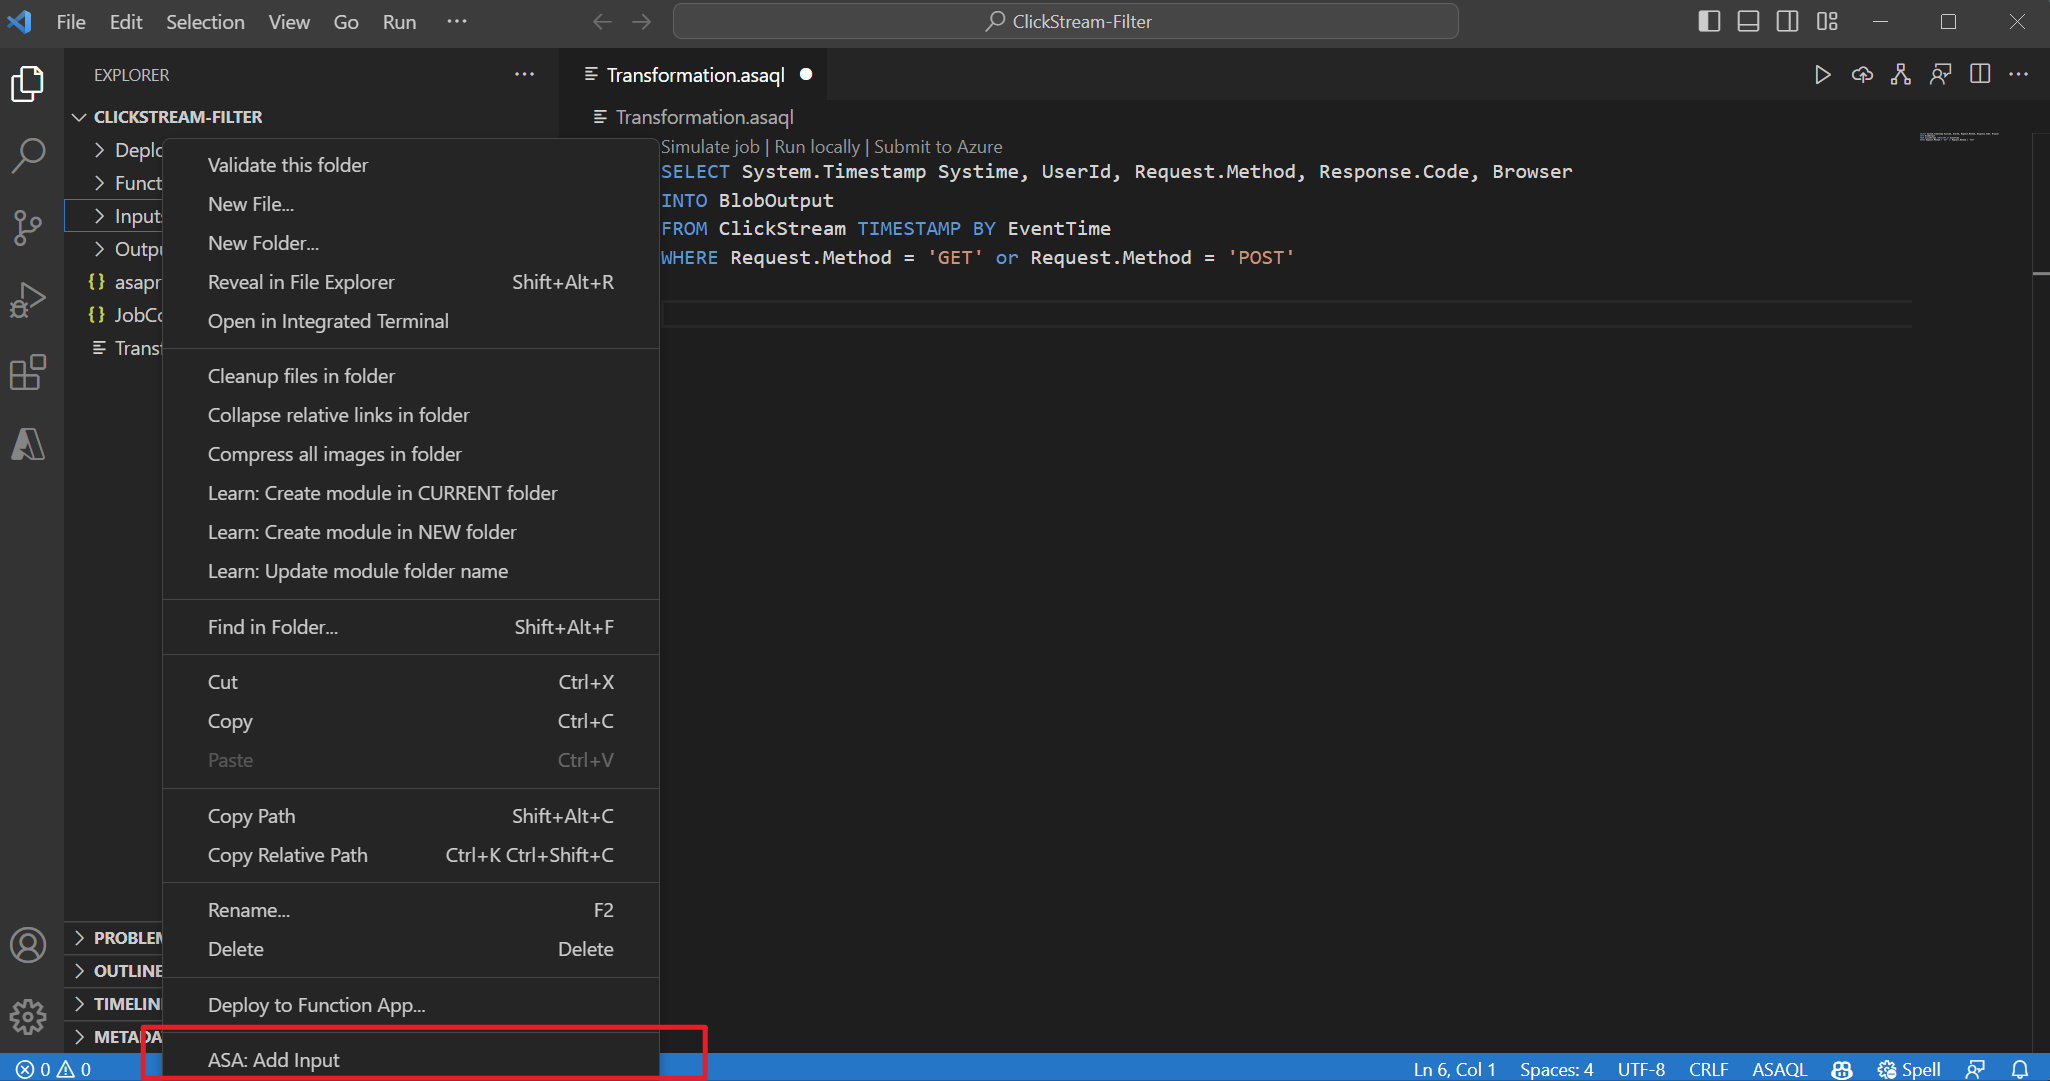
或者,按 Ctrl+Shift+P 以開啟命令選擇區,並輸入 ASA:新增輸入。
選擇 [IoT 中樞] 作為輸入類型。
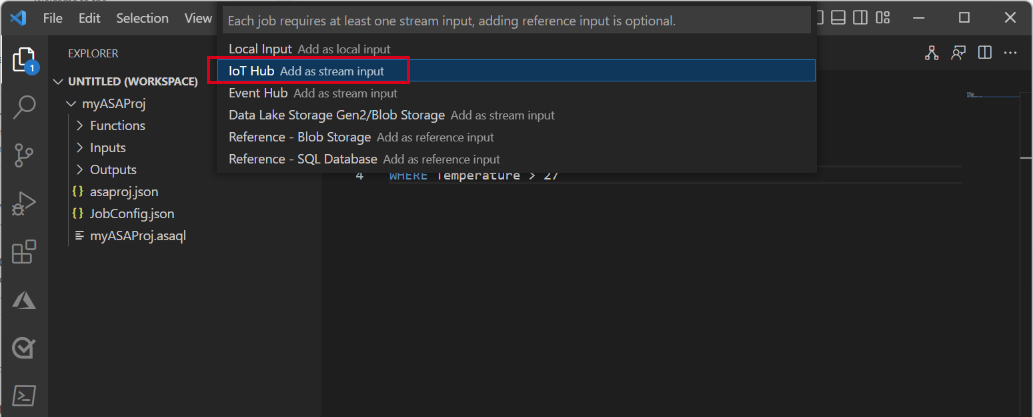
從下拉功能表中選擇 [從 Azure 訂用帳戶選取],然後按 ENTER 鍵。
輸入 輸入 名稱,然後按 ENTER。
在 Inputs 資料夾裡,你會看到一個 Input.json 檔案被建立。
在 JSON 檔案中,確認 [ 輸入 ] 已指定 [名稱]。
在Input.json 的 JSON 編輯器中,選取「從您的訂用帳戶選取」,然後選取具有 IoT 中樞的您的 Azure 訂用帳戶。
![顯示 JSON 編輯器的螢幕快照,其中顯示 [從訂用帳戶選取] 連結。](media/quick-create-visual-studio-code/select-from-your-azure-subscriptions.png)
在 JSON 編輯器中,選擇 [選取 IoT 中樞],然後選取您建立的 IoT 中樞。
根據預設,
SharedAccessPolicyName應該將 設定為iothubowner。 如果沒有,請選擇 [ 選取共用存取原則名稱 ] 鏈接,然後從下拉式清單中選取 [iothubowner ]。應該會自動設定
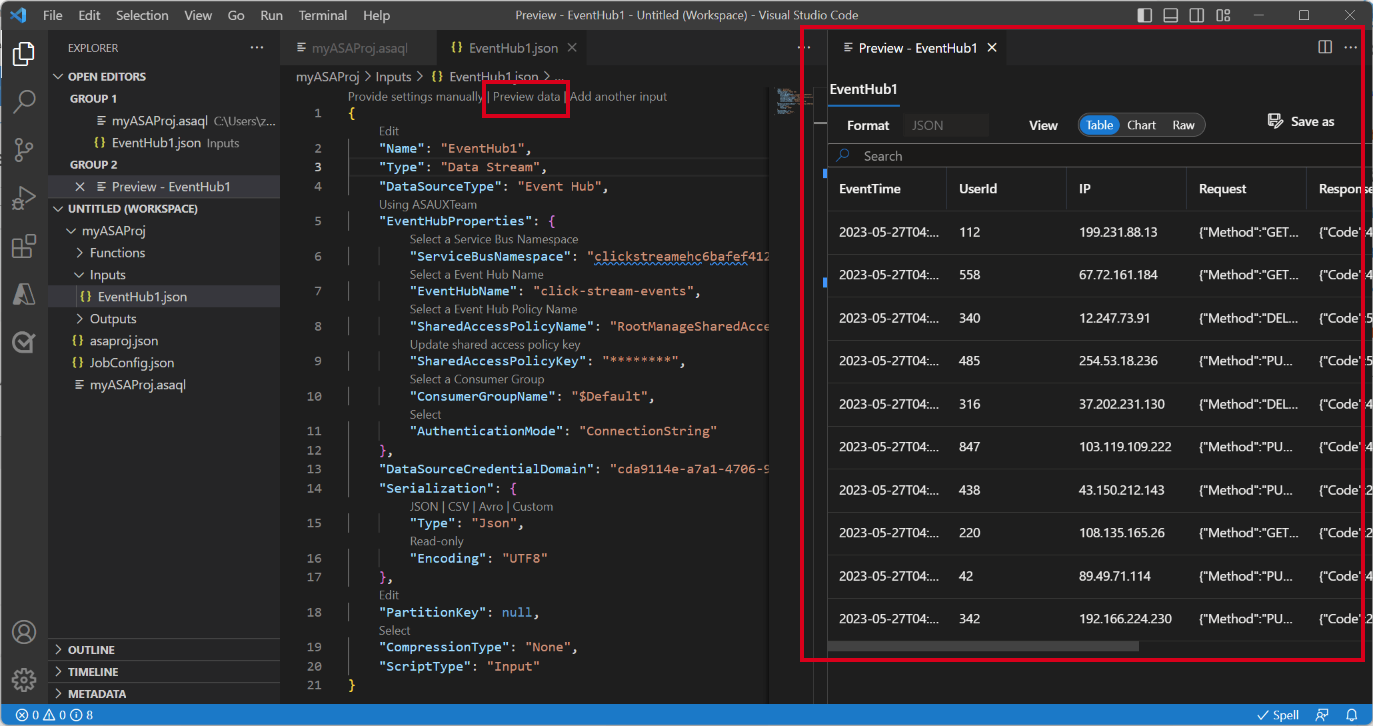
SharedAccessPolicyKey值。選取 [預覽資料],以查看是否已為您的作業成功設定輸入資料。 它將擷取 IoT 中樞範例,並在預覽視窗中顯示。


![顯示 JSON 編輯器的螢幕快照,其中顯示 [從訂用帳戶選取] 連結。](media/quick-create-visual-studio-code/select-from-your-azure-subscriptions.png#lightbox)


設定作業輸出
- 右鍵點擊資源管理器中的 輸出,然後選擇 ASA:新增輸出。
- 在下拉式清單中,針對接收器類型選擇 Data Lake Storage Gen2/Blob 儲存體。
- 選擇 從 Azure 訂閱中選擇。
- 輸入Output作為別名的名稱,然後按 ENTER。 此輸出名稱會用於查詢中的 INTO 陳述式。
- 在 Output.json 的 JSON 編輯器中,選擇「從您的訂閱中挑選」,然後選擇包含 Azure 儲存帳戶的 Azure 訂閱。
- 如果您需要變更自動填入的記憶體帳戶,請選擇 [選取記憶體帳戶],然後選取您的 Azure 儲存體 帳戶。 如果儲存體帳戶建立於相同訂閱中,系統會自動偵測其名稱。
- 如果您需要變更容器名稱,請選擇 [ 選取容器],然後選取您所建立的 Blob 容器。

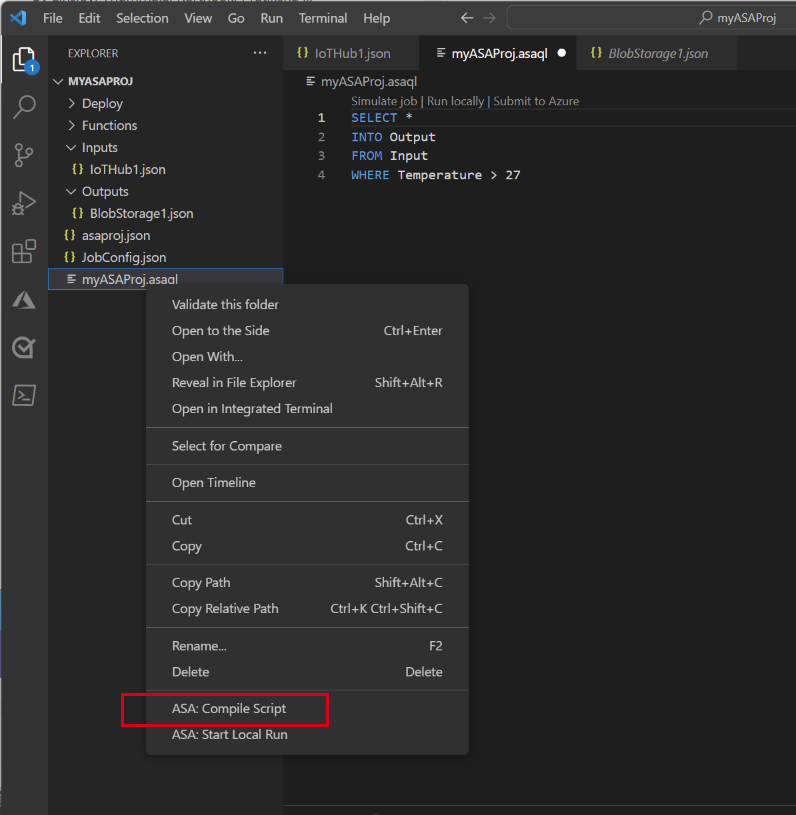
編譯腳本並提交到 Azure
指令碼編譯會檢查語法並產生自動化部署所需的 Azure Resource Manager 範本。
以滑鼠右鍵按兩下總管視窗中的腳本檔案,指向 ASA:編譯腳本,然後選取 ASA:ARM 樣本 V2 (建議使用)。
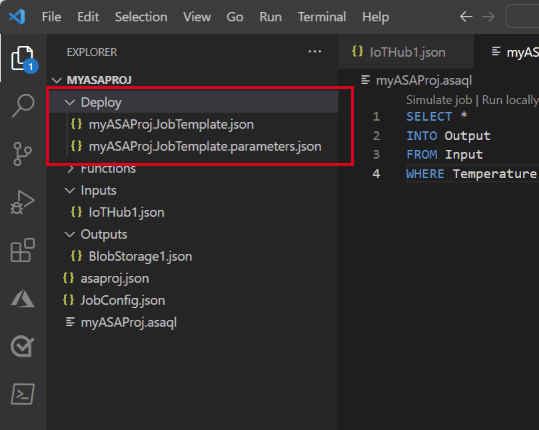
編譯之後,您會在專案底下看到 [部署] 資料夾,其中包含兩個 Azure Resource Manager 範本。 這兩個檔案會用於自動部署。
在查詢編輯器中,選取 [提交至 Azure]。
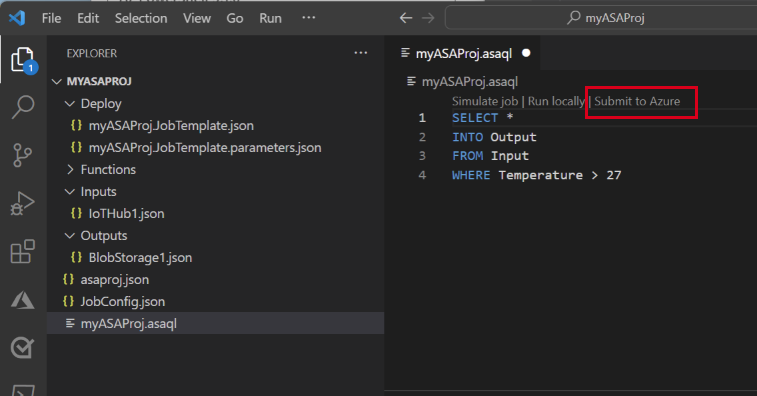
在 [ 提交 ] 視窗中,遵循下列步驟:
選取您的 Azure 訂用帳戶。
選取 Azure 資源群組。
選取您想要建立串流分析作業的區域。
然後,選取 [提交]。
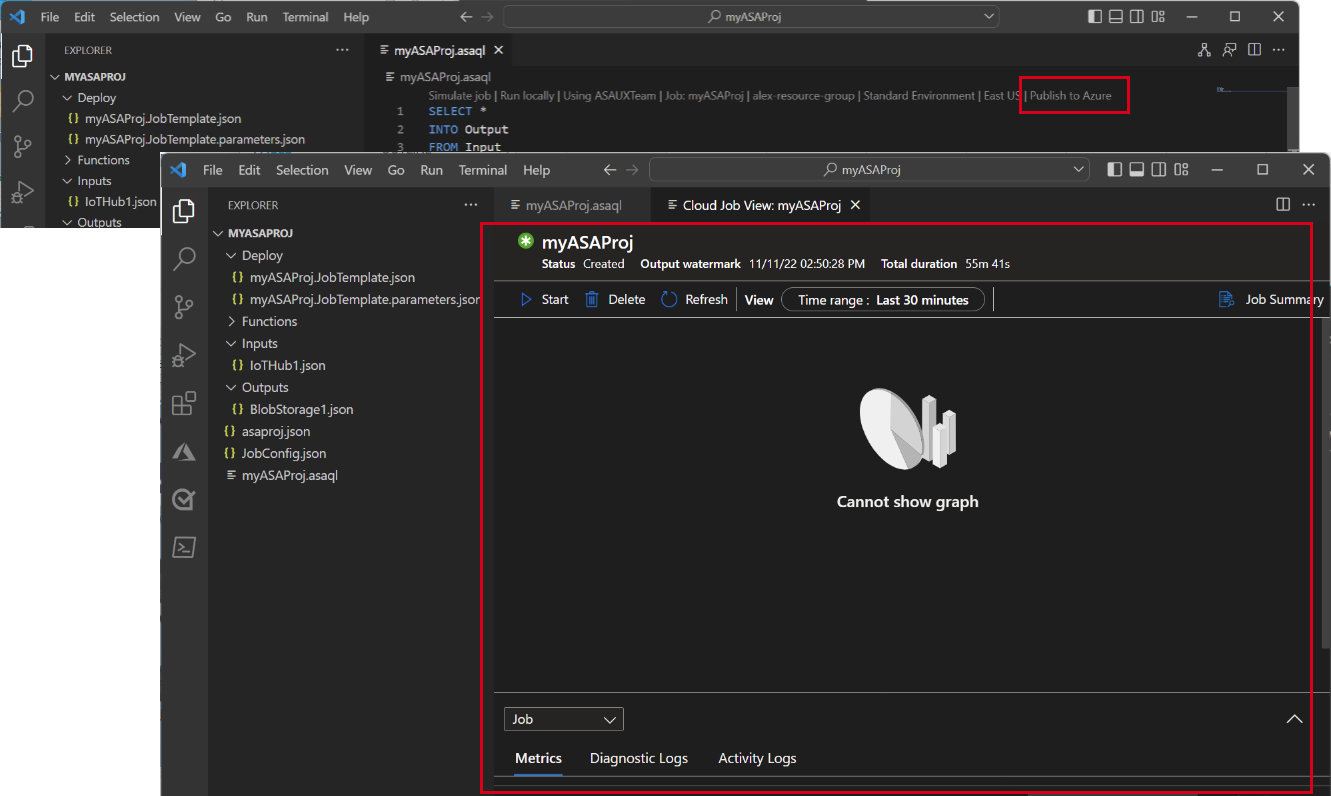
選取 [發行至 Azure],然後完成。 等候它開啟新的索引標籤 [雲端作業檢視],其中顯示您的作業狀態。


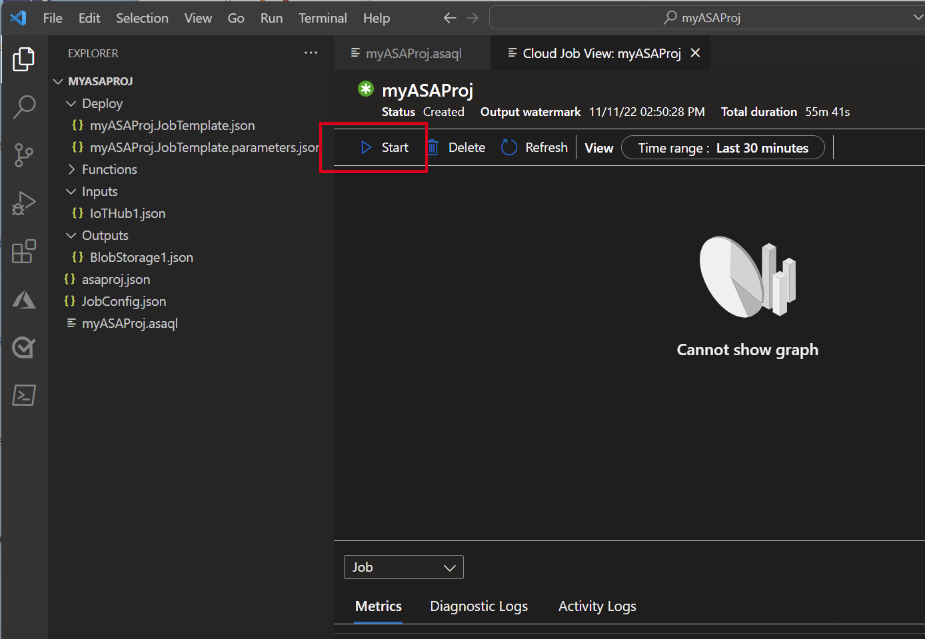
啟動串流分析工作並查看輸出
在 [雲端作業檢視] 索引標籤上,選取 [開始] 以在雲端中執行作業。
在 [ 開始串流作業 ] 視窗中,選取 [ 確定]。 這個程序可能需要幾分鐘的時間。
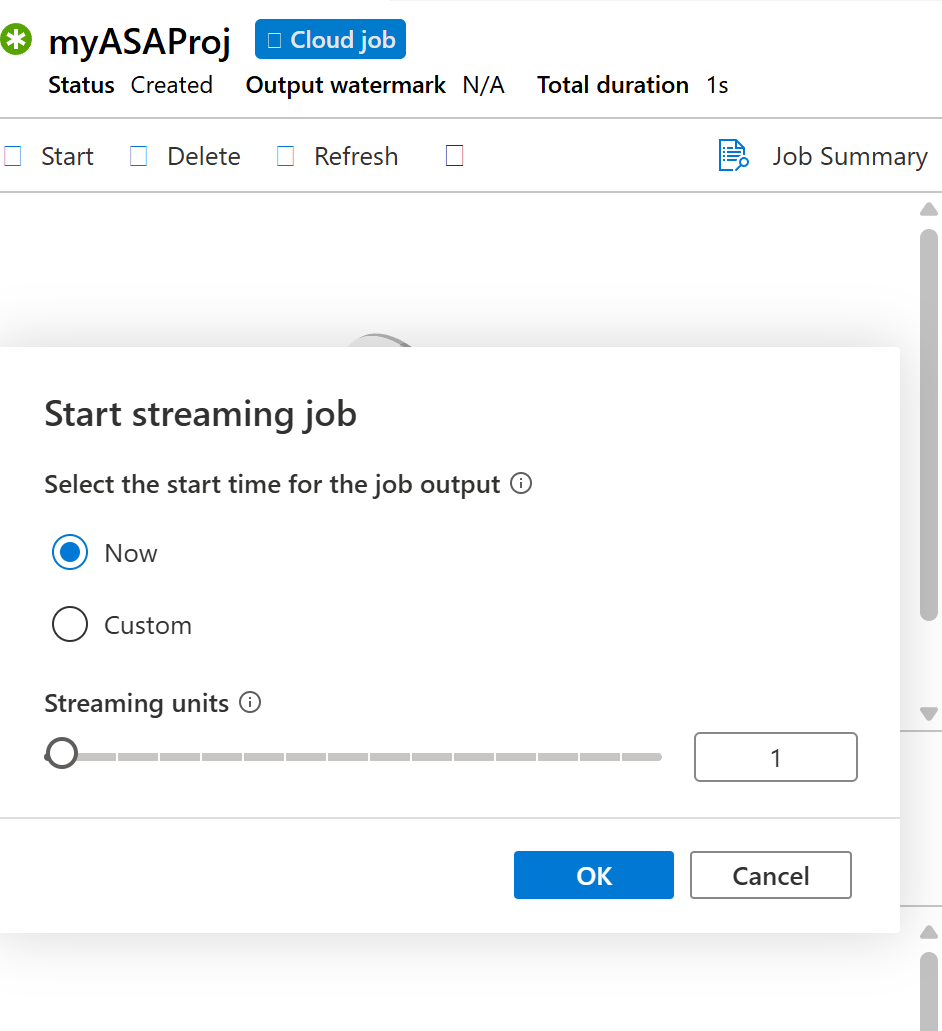
如果你的工作成功開始,工作狀態會變成「執行中」。 你會看到一個邏輯圖,顯示你的 ASA 工作是如何執行的。
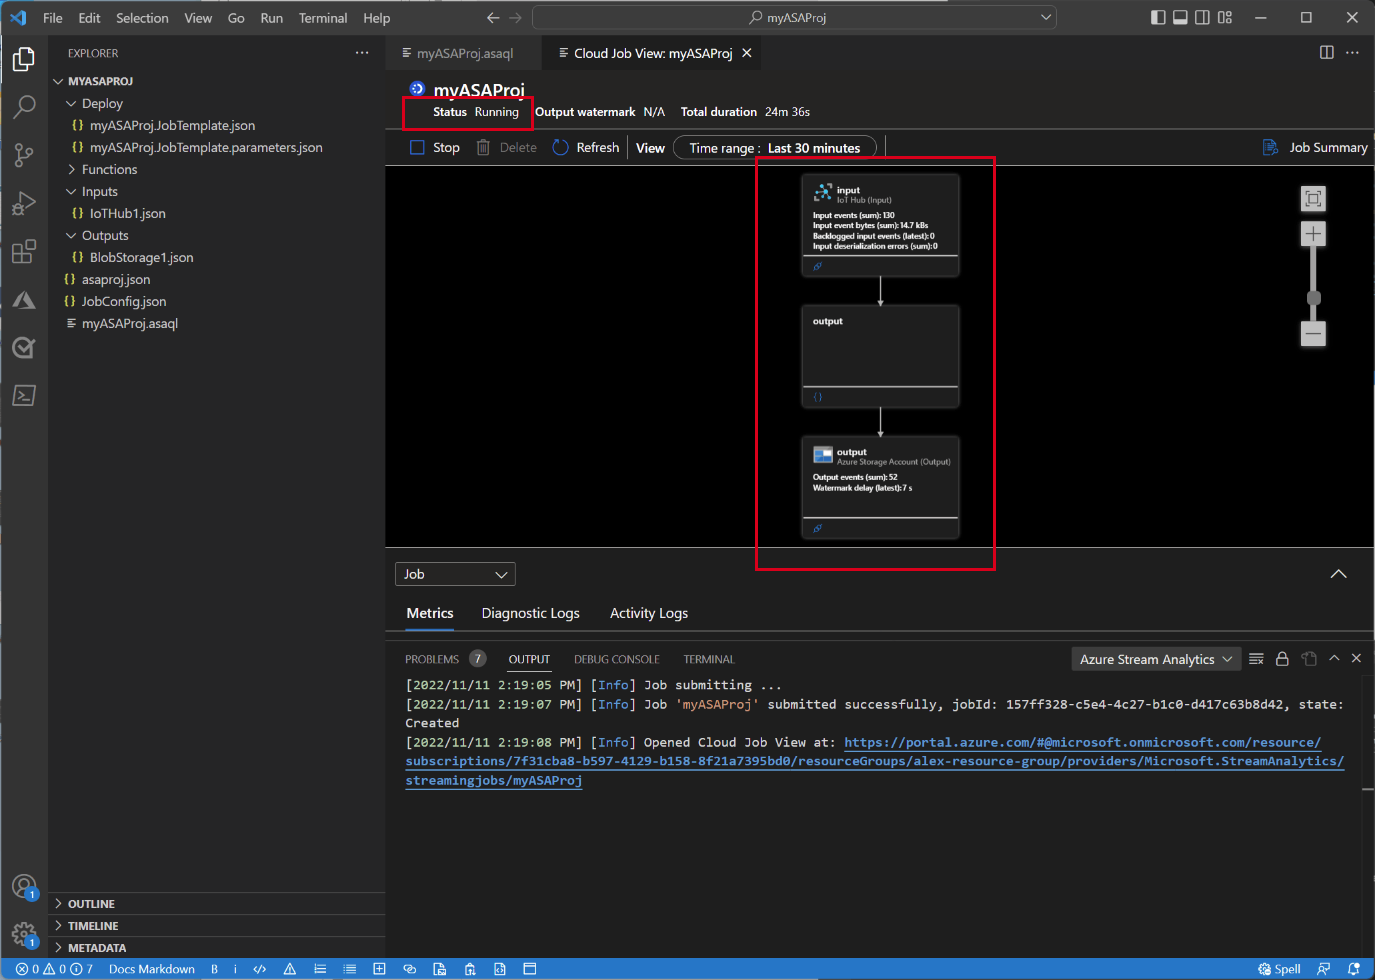
要查看輸出結果,請在 Visual Studio Code 擴充功能或 Azure 入口開啟 blob 儲存。
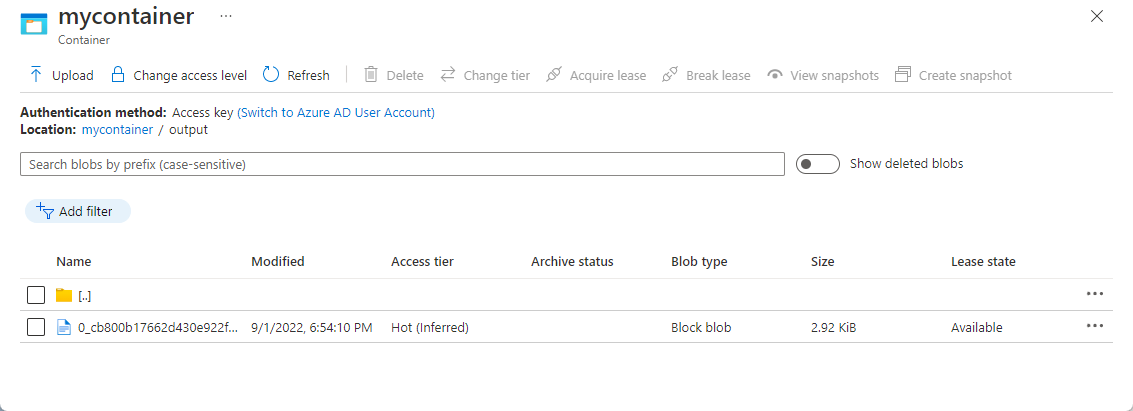
下載並開啟檔案以查看輸出。
{"messageId":11,"deviceId":"Raspberry Pi Web Client","temperature":28.165519323167562,"humidity":76.875393581654379,"EventProcessedUtcTime":"2022-09-01T22:53:58.1015921Z","PartitionId":3,"EventEnqueuedUtcTime":"2022-09-01T22:52:57.6250000Z","IoTHub":{"MessageId":null,"CorrelationId":null,"ConnectionDeviceId":"MyASAIoTDevice","ConnectionDeviceGenerationId":"637976642928634103","EnqueuedTime":"2022-09-01T22:52:57.6290000Z"}}
{"messageId":14,"deviceId":"Raspberry Pi Web Client","temperature":29.014941877871451,"humidity":64.93477299527828,"EventProcessedUtcTime":"2022-09-01T22:53:58.2421545Z","PartitionId":3,"EventEnqueuedUtcTime":"2022-09-01T22:53:03.6100000Z","IoTHub":{"MessageId":null,"CorrelationId":null,"ConnectionDeviceId":"MyASAIoTDevice","ConnectionDeviceGenerationId":"637976642928634103","EnqueuedTime":"2022-09-01T22:53:03.6140000Z"}}
{"messageId":17,"deviceId":"Raspberry Pi Web Client","temperature":28.032846241745975,"humidity":66.146114343897338,"EventProcessedUtcTime":"2022-09-01T22:53:58.2421545Z","PartitionId":3,"EventEnqueuedUtcTime":"2022-09-01T22:53:19.5960000Z","IoTHub":{"MessageId":null,"CorrelationId":null,"ConnectionDeviceId":"MyASAIoTDevice","ConnectionDeviceGenerationId":"637976642928634103","EnqueuedTime":"2022-09-01T22:53:19.5830000Z"}}
{"messageId":18,"deviceId":"Raspberry Pi Web Client","temperature":30.176185593576143,"humidity":72.697359909427419,"EventProcessedUtcTime":"2022-09-01T22:53:58.2421545Z","PartitionId":3,"EventEnqueuedUtcTime":"2022-09-01T22:53:21.6120000Z","IoTHub":{"MessageId":null,"CorrelationId":null,"ConnectionDeviceId":"MyASAIoTDevice","ConnectionDeviceGenerationId":"637976642928634103","EnqueuedTime":"2022-09-01T22:53:21.6140000Z"}}
{"messageId":20,"deviceId":"Raspberry Pi Web Client","temperature":27.851894248213021,"humidity":71.610229530268214,"EventProcessedUtcTime":"2022-09-01T22:53:58.2421545Z","PartitionId":3,"EventEnqueuedUtcTime":"2022-09-01T22:53:25.6270000Z","IoTHub":{"MessageId":null,"CorrelationId":null,"ConnectionDeviceId":"MyASAIoTDevice","ConnectionDeviceGenerationId":"637976642928634103","EnqueuedTime":"2022-09-01T22:53:25.6140000Z"}}
{"messageId":21,"deviceId":"Raspberry Pi Web Client","temperature":27.718624694772238,"humidity":66.540445035685153,"EventProcessedUtcTime":"2022-09-01T22:53:58.2421545Z","PartitionId":3,"EventEnqueuedUtcTime":"2022-09-01T22:53:48.0820000Z","IoTHub":{"MessageId":null,"CorrelationId":null,"ConnectionDeviceId":"MyASAIoTDevice","ConnectionDeviceGenerationId":"637976642928634103","EnqueuedTime":"2022-09-01T22:53:48.0830000Z"}}
{"messageId":22,"deviceId":"Raspberry Pi Web Client","temperature":27.7849054424326,"humidity":74.300662748167085,"EventProcessedUtcTime":"2022-09-01T22:54:09.3393532Z","PartitionId":3,"EventEnqueuedUtcTime":"2022-09-01T22:54:09.2390000Z","IoTHub":{"MessageId":null,"CorrelationId":null,"ConnectionDeviceId":"MyASAIoTDevice","ConnectionDeviceGenerationId":"637976642928634103","EnqueuedTime":"2022-09-01T22:54:09.2400000Z"}}
{"messageId":28,"deviceId":"Raspberry Pi Web Client","temperature":30.839892925680324,"humidity":76.237611741451786,"EventProcessedUtcTime":"2022-09-01T22:54:47.8053253Z","PartitionId":3,"EventEnqueuedUtcTime":"2022-09-01T22:54:47.6180000Z","IoTHub":{"MessageId":null,"CorrelationId":null,"ConnectionDeviceId":"MyASAIoTDevice","ConnectionDeviceGenerationId":"637976642928634103","EnqueuedTime":"2022-09-01T22:54:47.6150000Z"}}
{"messageId":29,"deviceId":"Raspberry Pi Web Client","temperature":30.561040300759053,"humidity":78.3845172058103,"EventProcessedUtcTime":"2022-09-01T22:54:49.8070489Z","PartitionId":3,"EventEnqueuedUtcTime":"2022-09-01T22:54:49.6030000Z","IoTHub":{"MessageId":null,"CorrelationId":null,"ConnectionDeviceId":"MyASAIoTDevice","ConnectionDeviceGenerationId":"637976642928634103","EnqueuedTime":"2022-09-01T22:54:49.5990000Z"}}
{"messageId":31,"deviceId":"Raspberry Pi Web Client","temperature":28.163585438418679,"humidity":60.0511571297096,"EventProcessedUtcTime":"2022-09-01T22:55:25.1528729Z","PartitionId":3,"EventEnqueuedUtcTime":"2022-09-01T22:55:24.9050000Z","IoTHub":{"MessageId":null,"CorrelationId":null,"ConnectionDeviceId":"MyASAIoTDevice","ConnectionDeviceGenerationId":"637976642928634103","EnqueuedTime":"2022-09-01T22:55:24.9120000Z"}}
{"messageId":32,"deviceId":"Raspberry Pi Web Client","temperature":31.00503387156985,"humidity":78.68821066044552,"EventProcessedUtcTime":"2022-09-01T22:55:43.2652127Z","PartitionId":3,"EventEnqueuedUtcTime":"2022-09-01T22:55:43.0480000Z","IoTHub":{"MessageId":null,"CorrelationId":null,"ConnectionDeviceId":"MyASAIoTDevice","ConnectionDeviceGenerationId":"637976642928634103","EnqueuedTime":"2022-09-01T22:55:43.0520000Z"}}


清除資源
當你不再需要資源時,刪除資源群組、串流分析工作以及所有相關資源。 刪除作業會停止對該作業所耗用的串流單位計費。 如果你打算未來繼續做這份工作,可以先停下來,之後需要時再重新開始。 如果您將不繼續使用此作業,請使用下列步驟,刪除本快速入門所建立的所有資源:
從 Azure 入口網站的左側功能表中,選取 [資源群組],然後選取您所建立資源的名稱。
在資源群組頁面上,選取 [刪除]。 在下一個視窗中輸入要刪除的資源名稱,然後選取 [刪除]。
下一步
欲了解更多關於 Visual Studio Code 的 ASA 工具擴充套件,請參閱以下文章: