將 ASP.NET Framework Web Forms 應用程式升級至 ASP.NET Core MVC
本文說明如何使用 Visual Studio .NET Upgrade Assistant 和累加式更新方法,將 ASP.NET Framework Web Forms 升級至 ASP.NET Core MVC。
如果您的 .NET Framework 專案在其解決方案中具有所需的支持連結庫,則應該盡可能將其升級為 .NET Standard 2.0。 如需詳細資訊,請參閱升級支援程式庫。
- 安裝 .NET Upgrade Assistant Visual Studio 延伸模組。
- 在 Visual Studio 中開啟 ASP.NET Web Forms 解決方案。
- 在 [方案總管] 中,以滑鼠右鍵按一下要升級的專案,然後選取 [升級]。 選取 [並存累加式專案升級],這是唯一的升級選項。
- 針對升級目標,選取 [新增專案]。
- 為專案命名並選取 [ASP.NET Core] 範本,然後選取 [下一步]
- 選取目標 Framework 版本,然後選取 [下一步]。 如需詳細資訊,請參閱 .NET 和 .NET Core 支援原則。
- 選取 [完成],然後選取 [完成]。
- [摘要] 步驟會顯示
<Framework Project>現在已透過 Yarp Proxy 連線至<Framework ProjectCore>。 - 選取要升級的元件,然後選取 [升級選取項目]。
累加式更新
請遵循開始從 ASP.NET 累加式移轉至 ASP.NET Core 中的步驟以繼續更新程序。
本文說明如何開始將 ASP.NET MVC 專案移轉至 ASP.NET Core MVC。 此程序會醒目提示來自 ASP.NET MVC 的相關變更。
從 ASP.NET MVC 移轉是一個多步驟的程序。 此文章涵蓋:
- 初始設定。
- 基本控制器和檢視。
- 靜態內容。
- 用戶端相依性。
如需移轉組態和 Identity 程式碼,請參閱將組態移轉至 ASP.NET Core 和將驗證及 Identity 移轉至 ASP.NET Core。
必要條件
- Visual Studio 2019 16.4 或更新版本,其中包含 ASP.NET 和網頁程式開發工作負載
- .NET Core 3.1 SDK
建立入門 ASP.NET MVC 專案
在 Visual Studio 中建立 ASP.NET MVC 專案的範例以進行移轉:
- 從 [檔案] 功能表選取 [新增] >[專案] 。
- 選取 [ASP.NET Web 應用程式 (.NET Framework)],然後選取 [下一步]。
- 將專案命名為 WebApp1,藉此使命名空間符合下一個步驟中建立的 ASP.NET Core 專案。 選取建立。
- 選取 [MVC],然後選取 [建立]。
建立 ASP.NET Core 專案
使用新的 ASP.NET Core 專案建立新的解決方案以移轉至:
- 啟動 Visual Studio 的第二個執行個體。
- 從 [檔案] 功能表選取 [新增] >[專案] 。
- 依序選取 [ASP.NET Core Web 應用程式] 和 [下一步]。
- 在 [設定新專案] 對話方塊中,將專案命名為 WebApp1。
- 將位置設定為與上一個專案不同的目錄,以便使用相同的專案名稱。 使用相同的命名空間可讓您更輕鬆地在兩個專案之間複製程式碼。 選取建立。
- 在 [建立新的 ASP.NET Core Web 應用程式] 對話方塊中,確認選取 [.NET Core] 和 [ASP.NET Core 3.1]。 選取 [Web 應用程式 (Model-View-Controller)] 專案範本,接著選取 [建立]。
將 ASP.NET Core 網站設定為使用 MVC
在 ASP.NET Core 3.0 和更新版本中,不再支援 .NET Framework 作為目標架構。 您的專案必須以 .NET Core 為目標。 包含 MVC 的 ASP.NET Core 共用架構是 .NET Core 執行階段安裝的一部分。 在專案檔中使用 Microsoft.NET.Sdk.Web SDK 時,將會自動參考共用架構:
<Project Sdk="Microsoft.NET.Sdk.Web">
如需詳細資訊,請參閱架構參考。
在 ASP.NET Core 中,類別 Startup 將會:
- 取代 Global.asax。
- 處理所有應用程式啟動工作。
如需詳細資訊,請參閱 ASP.NET Core 中的應用程式啟動。
在 ASP.NET Core 專案中,開啟 Startup.cs 檔案:
public class Startup
{
    public Startup(IConfiguration configuration)
    {
        Configuration = configuration;
    }

    public IConfiguration Configuration { get; }

    // This method gets called by the runtime. Use this method to add services to the container.
    public void ConfigureServices(IServiceCollection services)
    {
        services.AddControllersWithViews();
    }

    // This method gets called by the runtime. Use this method to configure the HTTP request pipeline.
    public void Configure(IApplicationBuilder app, IWebHostEnvironment env)
    {
        if (env.IsDevelopment())
        {
            app.UseDeveloperExceptionPage();
        }
        else
        {
            app.UseExceptionHandler("/Home/Error");
            // The default HSTS value is 30 days. You may want to change this for production scenarios, see https://aka.ms/aspnetcore-hsts.
            app.UseHsts();
        }
        app.UseHttpsRedirection();
        app.UseStaticFiles();

        app.UseRouting();

        app.UseAuthorization();

        app.UseEndpoints(endpoints =>
        {
            endpoints.MapControllerRoute(
                name: "default",
                pattern: "{controller=Home}/{action=Index}/{id?}");
        });
    }
}
ASP.NET Core 應用程式必須選擇透過中介軟體採用架構功能。 先前範本產生的程式碼會新增下列服務和中介軟體:
- AddControllersWithViews 擴充方法會註冊控制器、API 相關功能和檢視的 MVC 服務支援。 如需 MVC 服務註冊選項的詳細資訊,請參閱 MVC 服務註冊
- UseStaticFiles 擴充方法會新增靜態檔案處理常式
Microsoft.AspNetCore.StaticFiles。 必須在UseRouting之前呼叫UseStaticFiles擴充方法。 如需詳細資訊,請參閱 ASP.NET Core 中的靜態檔案。 - UseRouting 擴充方法會新增路由。 如需詳細資訊,請參閱 ASP.NET Core 中的路線規劃。
此現有設定包含移轉範例 ASP.NET MVC 專案所需的項目。 如需 ASP.NET Core 中介軟體選項的詳細資訊,請參閱 ASP.NET Core 中的應用程式啟動。
移轉控制器和檢視
在 ASP.NET Core 專案中,系統會新增空白控制器類別和檢視類別作為預留位置,藉此使用與移轉來源 ASP.NET MVC 專案控制器和檢視類別的相同名稱。
ASP.NET Core WebApp1 專案已經包含與 ASP.NET MVC 專案相同名稱的最低限度範例控制器和檢視。 因此,這些項目會作為從 ASP.NET MVC WebApp1 專案移轉之 ASP.NET MVC 控制器和檢視的預留位置。
- 複製 ASP.NET MVC
HomeController的方法,以取代新的 ASP.NET CoreHomeController方法。 無需變更動作方法的傳回類型。 在 ASP.NET MVC 中,內建範本的控制器動作方法傳回類型為 ActionResult;在 ASP.NET Core MVC 中,動作方法會改為傳回IActionResult。ActionResult會實作IActionResult。 - 在 ASP.NET Core 專案中,以滑鼠右鍵按一下 Views/Home 目錄,選取 [新增]>[現有項目]。
- 在 [新增現有項目] 對話方塊中,瀏覽至 ASP.NET MVC WebApp1 專案的 Views/Home 目錄。
- 選取
About.cshtml、Contact.cshtml和Index.cshtmlRazor 檢視檔案,然後選取 [新增],取代現有的檔案。
如需詳細資訊,請參閱在 ASP.NET Core MVC 中處理 ASP.NET 控制器要求和 ASP.NET Core MVC 中的檢視。
測試每個方法
每一個控制器端點都可以測試,但文件稍後會介紹版面配置和樣式。
- 執行 ASP.NET Core 應用程式。
- 若要在執行中 ASP.NET Core 應用程式的瀏覽器上叫用轉譯的檢視,請將目前的連接埠號碼取代為 ASP.NET Core 專案中所使用的連接埠號碼。 例如:
https://localhost:44375/home/about。
移轉靜態內容
在 ASP.NET MVC 5 和更早版本中,靜態內容是裝載自 Web 專案的根目錄,並與伺服器端檔案混用。 在 ASP.NET Core 中,靜態檔案會儲存在專案的 web root 目錄中。 預設目錄為 {content root}/wwwroot,但可以變更。 如需詳細資訊,請參閱 ASP.NET Core 中的靜態檔案。
將靜態內容從 ASP.NET MVC WebApp1 專案 複製到 ASP.NET Core WebApp1 專案中的 wwwroot 目錄:
- 在 ASP.NET Core 專案中,以滑鼠右鍵按一下 wwwroot 目錄,選取 [新增]>[現有項目]。
- 在 [新增現有項目] 對話方塊中,瀏覽至 ASP.NET MVC WebApp1 專案。
- 選取 favicon.ico 檔案,然後選取 [新增],取代現有的檔案。
移轉版面配置檔案
將 ASP.NET MVC 專案配置檔複製到 ASP.NET Core 專案:
- 在 ASP.NET Core 專案中,以滑鼠右鍵按一下 [檢視] 目錄,選取 [新增]>[現有項目]。
- 在 [新增現有項目] 對話方塊中,瀏覽至 ASP.NET MVC WebApp1 專案的 Views 目錄。
- 選取
_ViewStart.cshtml檔案,然後選取 [新增]。
將 ASP.NET MVC 專案共用版面配置檔案複製到 ASP.NET Core 專案:
- 在 ASP.NET Core 專案中,以滑鼠右鍵按一下 [檢視/共用] 目錄,選取 [新增]>[現有項目]。
- 在 [新增現有項目] 對話方塊中,瀏覽至 ASP.NET MVC WebApp1 專案的 Views/Shared 目錄。
- 選取檔案
_Layout.cshtml,然後選取 [新增],取代現有的檔案。
在 ASP.NET Core 專案中開啟 _Layout.cshtml 檔案。 進行下列變更以符合如下所示的完成程式碼:
更新 Bootstrap CSS 包含專案以符合下列完成後的程式碼:
- 將
@Styles.Render("~/Content/css")取代為<link>元素以載入bootstrap.css(請參閱下方)。 - 移除
@Scripts.Render("~/bundles/modernizr")。
Bootstrap CSS 包含完成後的取代標記:
<link rel="stylesheet"
    href="https://maxcdn.bootstrapcdn.com/bootstrap/3.3.7/css/bootstrap.css"
    integrity="sha384-BVYiiSIFeK1dGmJRAkycuHAHRg32OmUcww7on3RYdg4Va+PmSTsz/K68vbdEjh4u"
    crossorigin="anonymous">
更新 jQuery 和 Bootstrap JavaScript 包含以符合下列完成後的程式碼:
- 將
@Scripts.Render("~/bundles/jquery")取代為<script>元素 (請參閱下方)。 - 將
@Scripts.Render("~/bundles/bootstrap")取代為<script>元素 (請參閱下方)。
jQuery 和 Bootstrap JavaScript 包含完成後的取代標記:
<script src="https://code.jquery.com/jquery-3.3.1.js"></script>
<script src="https://maxcdn.bootstrapcdn.com/bootstrap/3.3.7/js/bootstrap.js"
    integrity="sha384-Tc5IQib027qvyjSMfHjOMaLkfuWVxZxUPnCJA7l2mCWNIpG9mGCD8wGNIcPD7Txa" crossorigin="anonymous"></script>
更新的 _Layout.cshtml 檔案如下所示:
<!DOCTYPE html>
<html>
<head>
<meta charset="utf-8" />
<meta name="viewport" content="width=device-width, initial-scale=1.0">
<title>@ViewBag.Title - My ASP.NET Application</title>
<link rel="stylesheet"
href="https://maxcdn.bootstrapcdn.com/bootstrap/3.3.7/css/bootstrap.css"
integrity="sha384-BVYiiSIFeK1dGmJRAkycuHAHRg32OmUcww7on3RYdg4Va+PmSTsz/K68vbdEjh4u"
crossorigin="anonymous">
</head>
<body>
<div class="navbar navbar-inverse navbar-fixed-top">
<div class="container">
<div class="navbar-header">
<button type="button" class="navbar-toggle" data-toggle="collapse" data-target=".navbar-collapse">
<span class="icon-bar"></span>
<span class="icon-bar"></span>
<span class="icon-bar"></span>
</button>
@Html.ActionLink("Application name", "Index", "Home", new { area = "" }, new { @class = "navbar-brand" })
</div>
<div class="navbar-collapse collapse">
<ul class="nav navbar-nav">
<li>@Html.ActionLink("Home", "Index", "Home")</li>
<li>@Html.ActionLink("About", "About", "Home")</li>
<li>@Html.ActionLink("Contact", "Contact", "Home")</li>
</ul>
</div>
</div>
</div>
<div class="container body-content">
@RenderBody()
<hr />
<footer>
<p>© @DateTime.Now.Year - My ASP.NET Application</p>
</footer>
</div>
<script src="https://code.jquery.com/jquery-3.3.1.js"></script>
<script src="https://maxcdn.bootstrapcdn.com/bootstrap/3.3.7/js/bootstrap.js"
integrity="sha384-Tc5IQib027qvyjSMfHjOMaLkfuWVxZxUPnCJA7l2mCWNIpG9mGCD8wGNIcPD7Txa" crossorigin="anonymous"></script>
@RenderSection("scripts", required: false)
</body>
</html>
在瀏覽器中檢視網站。 網站應該會以預期的樣式呈現。
設定統合和縮製
ASP.NET Core 與數個開放原始碼的統合和縮製解決方案相容,例如 WebOptimizer 和其他類似的程式庫。 ASP.NET Core 不提供原生統合和縮製解決方案。 如需設定統合和縮製的資訊,請參閱統合和縮製。
解決 HTTP 500 錯誤
如果 HTTP 500 錯誤訊息沒有包含問題來源的資訊,則可能的原因很多。 例如,如果 Views/_ViewImports.cshtml 檔案包含專案中不存在的命名空間,就會產生 HTTP 500 錯誤。 根據預設,在 ASP.NET Core 應用程式中,UseDeveloperExceptionPage 延伸模組會新增至 IApplicationBuilder,並在環境為「開發」時執行。 這在下列程式碼中詳述:
public class Startup
{
    public Startup(IConfiguration configuration)
    {
        Configuration = configuration;
    }

    public IConfiguration Configuration { get; }

    // This method gets called by the runtime. Use this method to add services to the container.
    public void ConfigureServices(IServiceCollection services)
    {
        services.AddControllersWithViews();
    }

    // This method gets called by the runtime. Use this method to configure the HTTP request pipeline.
    public void Configure(IApplicationBuilder app, IWebHostEnvironment env)
    {
        if (env.IsDevelopment())
        {
            app.UseDeveloperExceptionPage();
        }
        else
        {
            app.UseExceptionHandler("/Home/Error");
            // The default HSTS value is 30 days. You may want to change this for production scenarios, see https://aka.ms/aspnetcore-hsts.
            app.UseHsts();
        }
        app.UseHttpsRedirection();
        app.UseStaticFiles();

        app.UseRouting();

        app.UseAuthorization();

        app.UseEndpoints(endpoints =>
        {
            endpoints.MapControllerRoute(
                name: "default",
                pattern: "{controller=Home}/{action=Index}/{id?}");
        });
    }
}
ASP.NET Core 會將未處理的例外狀況轉換成 HTTP 500 錯誤回應。 這些回應中通常不會包含錯誤詳細資料,以防止洩漏伺服器的潛在敏感性資訊。 如需詳細資訊,請參閱開發人員例外狀況頁面。
下一步
其他資源
本文說明如何開始將 ASP.NET MVC 專案移轉至 ASP.NET Core MVC 2.2。 在此程序中,將會醒目提示 ASP.NET MVC 所變更的許多項目。 從 ASP.NET MVC 移轉是一個多步驟的程序。 此文章涵蓋:
- 初始設定
- 基本控制器和檢視
- 靜態內容
- 用戶端相依性。
如需移轉組態和 Identity 程式碼,請參閱將組態移轉至 ASP.NET Core 和將驗證及 Identity 移轉至 ASP.NET Core。
注意
範例中的版本號碼可能不是最新版,請將專案更新至最新版本。
建立入門 ASP.NET MVC 專案
為了示範如何升級,我們將從建立 ASP.NET MVC 應用程式開始。 請使用 WebApp1 名稱建立專案,藉此使命名空間符合下一個步驟中建立的 ASP.NET Core 專案。
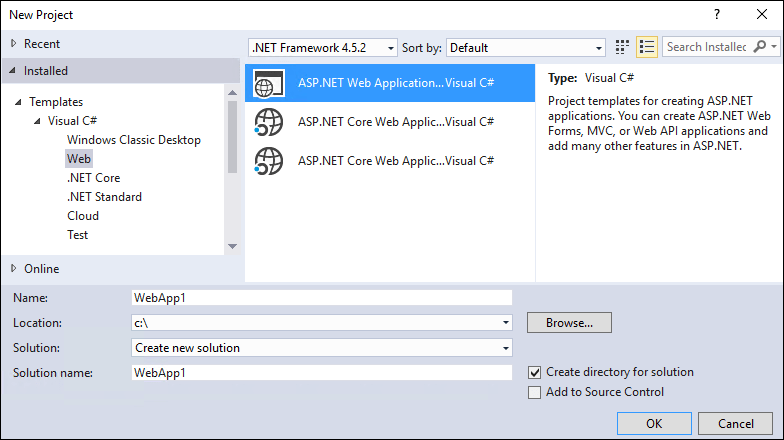
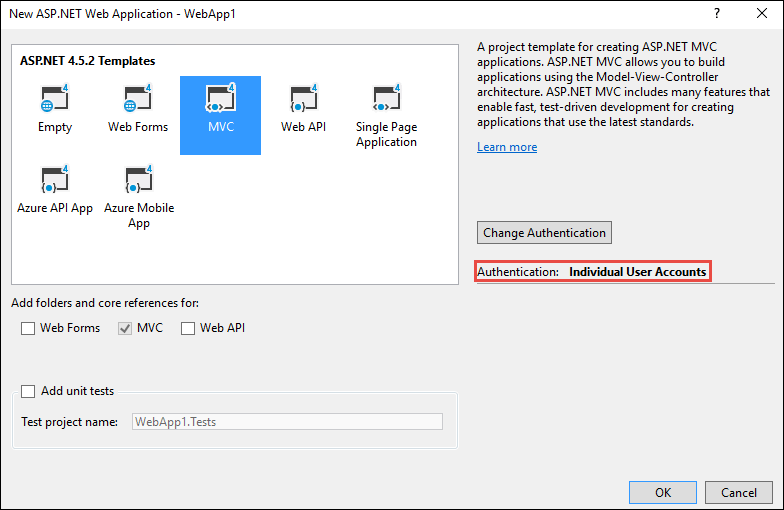
選擇性: 將方案的名稱從 WebApp1 變更為 Mvc5。 Visual Studio 會顯示新的方案名稱 (Mvc5),可讓您更輕鬆地分辨當前專案與下一個專案。
建立 ASP.NET Core 專案
建立與上一個專案名稱 (WebApp1) 相同的空白 ASP.NET Core Web 應用程式,藉此讓兩個專案中的命名空間相符。 採用相同的命名空間可讓您更輕鬆地在兩個專案之間複製程式碼。 在與上一個專案不同的目錄中建立此專案,以便使用相同的名稱。
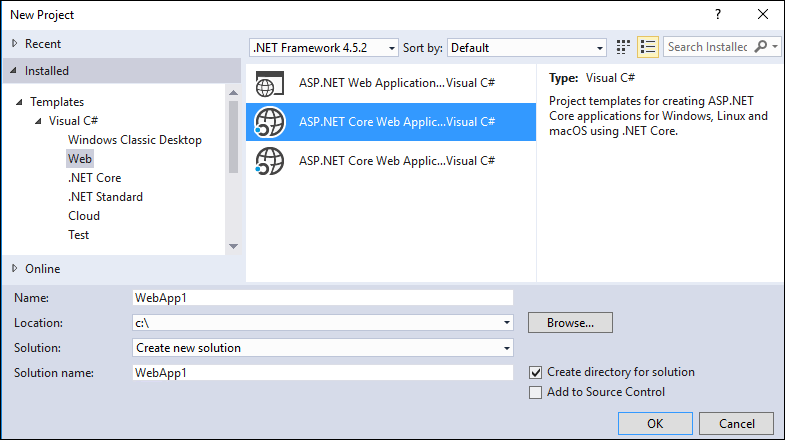
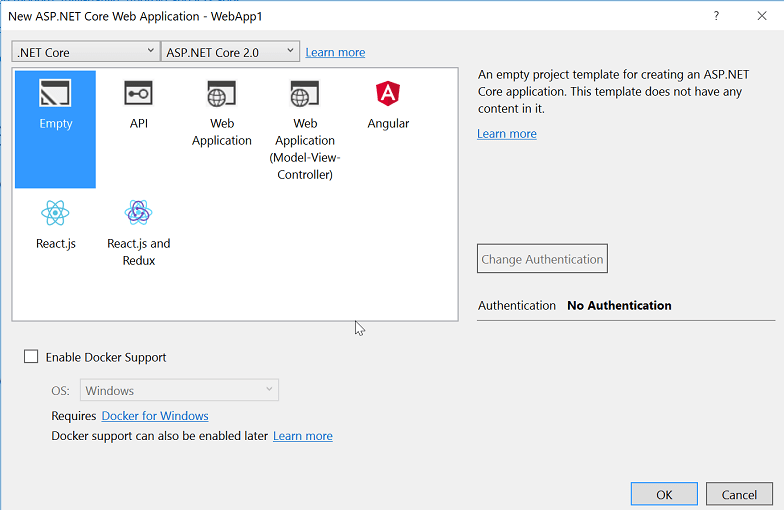
- 選擇性: 使用 Web 應用程式專案範本建立新的 ASP.NET Core 應用程式。 將專案命名為 WebApp1,然後選取 [個別使用者帳戶] 的驗證選項。 將此應用程式重新命名為 FullAspNetCore。 建立此專案可節省轉換時間。 您可以在範本產生的程式碼中檢視最終結果,而程式碼可以複製到轉換專案,或與範本產生的專案比較。
將網站設定為使用 MVC
- 以 .NET Core 為目標時,預設會參考 Microsoft.AspNetCore.App 中繼套件。 此套件包含 MVC 應用程式常用的套件。 如果以 .NET Framework 為目標,則必須在專案檔中個別列出套件參考。
Microsoft.AspNetCore.Mvc 是 ASP.NET Core MVC 架構。 Microsoft.AspNetCore.StaticFiles 是靜態檔案處理常式。 ASP.NET Core 應用程式需明確選擇是否使用中介軟體,例如提供靜態檔案。 如需詳細資訊,請參閱靜態檔案。
- 開啟
Startup.cs檔案並變更程式碼以符合下列所示:
public class Startup
{
    // This method gets called by the runtime. Use this method to add services to the container.
    // For more information on how to configure your application, visit https://go.microsoft.com/fwlink/?LinkID=398940
    public void ConfigureServices(IServiceCollection services)
    {
        services.AddMvc();
    }

    // This method gets called by the runtime. Use this method to configure the HTTP request pipeline.
    public void Configure(IApplicationBuilder app, IHostingEnvironment env)
    {
        if (env.IsDevelopment())
        {
            app.UseDeveloperExceptionPage();
        }

        app.UseStaticFiles();

        app.UseMvc(routes =>
        {
            routes.MapRoute(
                name: "default",
                template: "{controller=Home}/{action=Index}/{id?}");
        });
    }
}
UseStaticFiles 擴充方法會新增靜態檔案處理常式。 如需詳細資訊,請參閱應用程式啟動和路由。
新增控制器和檢視
在本節中將會新增最低限度的控制器和檢視,作為下一節中所移轉 ASP.NET MVC 控制器和檢視的預留位置。
新增 Controllers 目錄。
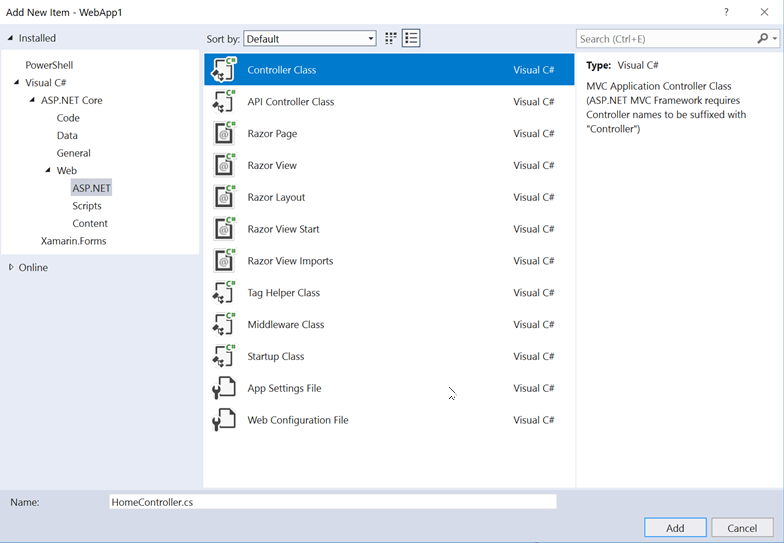
將名為 的控制器類別
HomeController.cs新增至 Controllers 目錄。
新增 Views 目錄。
新增 Views/Home 目錄。
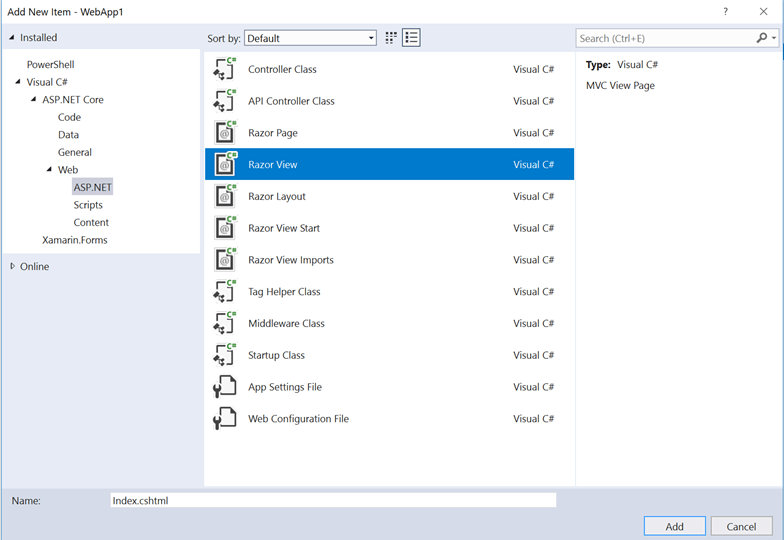
將名為
Index.cshtml的 Razor 檢視新增至 Views/Home 目錄。
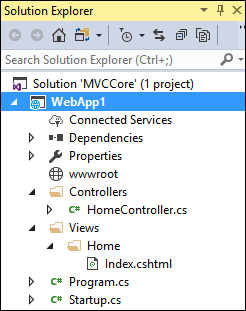
專案結構如下所示:
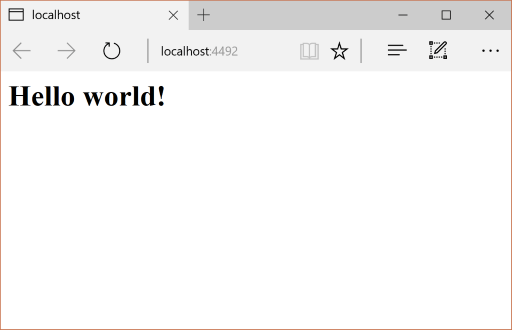
以下列標記取代 Views/Home/Index.cshtml 檔案的內容:
<h1>Hello world!</h1>
執行應用程式。
下列功能需要從範例 ASP.NET MVC 專案移轉至 ASP.NET Core 專案:
用戶端內容 (CSS、字型和指令碼)
控制器
檢視表
模型
統合
篩選
登入/登出,Identity (這會在下一個教學課程中完成。)
控制器和檢視
將每個方法從 ASP.NET MVC
HomeController複製到新的HomeController。 在 ASP.NET MVC 中,內建範本的控制器動作方法傳回類型為 ActionResult;在 ASP.NET Core MVC 中,動作方法會改為傳回IActionResult。ActionResult會實作IActionResult,因此無需變更動作方法的傳回類型。將
About.cshtml、Contact.cshtml和Index.cshtmlRazor 檢視檔案從 ASP.NET MVC 專案複製到 ASP.NET Core 專案。
測試每個方法
由於版面配置檔案和樣式尚未移轉,因此轉譯的檢視只會包含檢視檔案中的內容。 版面配置檔案產生的 About 和 Contact 檢視連結尚無法使用。
若要在執行中 ASP.NET Core 應用程式的瀏覽器上叫用轉譯的檢視,請將目前的連接埠號碼取代為 ASP.NET Core 專案中所使用的連接埠號碼。 例如: https://localhost:44375/home/about 。
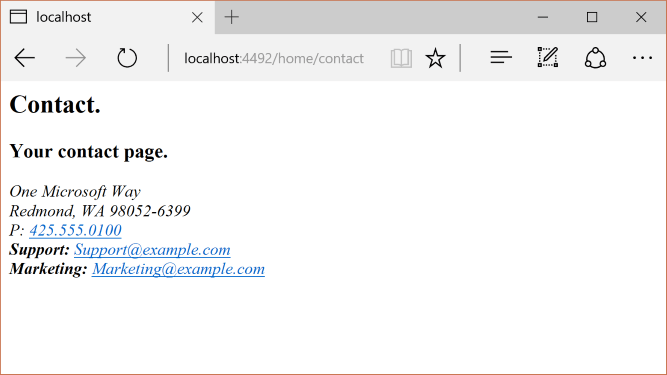
請注意還缺少樣式和功能表項目。 樣式將在下一節中修正。
靜態內容
在 ASP.NET MVC 5 和更早版本中,靜態內容是裝載自 Web 專案的根目錄,並與伺服器端檔案混用。 在 ASP.NET Core 中,靜態內容裝載於 wwwroot 目錄中。 將靜態內容從 ASP.NET MVC 應用程式複製到 ASP.NET Core 專案中的 wwwroot 目錄。 在此範例轉換中:
- 將 favicon.ico 檔案從 ASP.NET MVC 專案複製到 ASP.NET Core 專案中的 wwwroot 目錄。
ASP.NET MVC 專案會使用 Bootstrap 進行樣式設定,並將 Bootstrap 檔案儲存在 Content 和 Scripts 目錄中。 產生 ASP.NET MVC 專案的範本會參考版面配置檔 (Views/Shared/_Layout.cshtml) 中的 Bootstrap。 bootstrap.js 和 bootstrap.css 檔案可以從 ASP.NET MVC 專案複製到新專案中的 wwwroot 目錄。 作為替代,本文件會在下一節中使用 CDN 新增對的 Bootstrap (和其他用戶端程式庫) 的支援。
移轉版面配置檔案
將
_ViewStart.cshtml檔案從 ASP.NET MVC 專案的 Views 目錄複製到 ASP.NET Core 專案的 Views 目錄。 ASP.NET Core MVC 中的_ViewStart.cshtml檔案尚未變更。建立 Views/Shared 目錄。
選擇性:將
_ViewImports.cshtml從 FullAspNetCore MVC 專案的 Views 目錄複製到 ASP.NET Core 專案的 Views 目錄。 移除_ViewImports.cshtml檔案中的任何命名空間宣告。_ViewImports.cshtml會檔案提供所有檢視檔案的命名空間,並帶入標籤協助程式。 標籤協助程式會在新的版面配置檔案中使用。_ViewImports.cshtml檔案是 ASP.NET Core 的新功能。將
_Layout.cshtml檔案從 ASP.NET MVC 專案的 Views/Shared 目錄複製到 ASP.NET Core 專案的 Views/Shared 目錄。
開啟 _Layout.cshtml 檔案並進行下列變更 (完成後的程式碼如下所示):
將
@Styles.Render("~/Content/css")取代為<link>元素以載入bootstrap.css(請參閱下方)。移除
@Scripts.Render("~/bundles/modernizr")。將
@Html.Partial("_LoginPartial")行註解化 (以@*...*@括住該行)。 如需詳細資訊,請參閱 將驗證和 Identity 移轉至 ASP.NET Core將
@Scripts.Render("~/bundles/jquery")取代為<script>元素 (請參閱下方)。將
@Scripts.Render("~/bundles/bootstrap")取代為<script>元素 (請參閱下方)。
Bootstrap CSS 包含的取代標記:
<link rel="stylesheet"
    href="https://maxcdn.bootstrapcdn.com/bootstrap/3.3.7/css/bootstrap.css"
    integrity="sha384-BVYiiSIFeK1dGmJRAkycuHAHRg32OmUcww7on3RYdg4Va+PmSTsz/K68vbdEjh4u"
    crossorigin="anonymous">
jQuery 和 Bootstrap JavaScript 包含的取代標記:
<script src="https://code.jquery.com/jquery-3.3.1.js"></script>
<script src="https://maxcdn.bootstrapcdn.com/bootstrap/3.3.7/js/bootstrap.js"
    integrity="sha384-Tc5IQib027qvyjSMfHjOMaLkfuWVxZxUPnCJA7l2mCWNIpG9mGCD8wGNIcPD7Txa" crossorigin="anonymous"></script>
更新的 _Layout.cshtml 檔案如下所示:
<!DOCTYPE html>
<html>
<head>
<meta charset="utf-8" />
<meta name="viewport" content="width=device-width, initial-scale=1.0">
<title>@ViewBag.Title - My ASP.NET Application</title>
<link rel="stylesheet"
href="https://maxcdn.bootstrapcdn.com/bootstrap/3.3.7/css/bootstrap.css"
integrity="sha384-BVYiiSIFeK1dGmJRAkycuHAHRg32OmUcww7on3RYdg4Va+PmSTsz/K68vbdEjh4u"
crossorigin="anonymous">
</head>
<body>
<div class="navbar navbar-inverse navbar-fixed-top">
<div class="container">
<div class="navbar-header">
<button type="button" class="navbar-toggle" data-toggle="collapse" data-target=".navbar-collapse">
<span class="icon-bar"></span>
<span class="icon-bar"></span>
<span class="icon-bar"></span>
</button>
@Html.ActionLink("Application name", "Index", "Home", new { area = "" }, new { @class = "navbar-brand" })
</div>
<div class="navbar-collapse collapse">
<ul class="nav navbar-nav">
<li>@Html.ActionLink("Home", "Index", "Home")</li>
<li>@Html.ActionLink("About", "About", "Home")</li>
<li>@Html.ActionLink("Contact", "Contact", "Home")</li>
</ul>
@*@Html.Partial("_LoginPartial")*@
</div>
</div>
</div>
<div class="container body-content">
@RenderBody()
<hr />
<footer>
<p>© @DateTime.Now.Year - My ASP.NET Application</p>
</footer>
</div>
<script src="https://code.jquery.com/jquery-3.3.1.js"></script>
<script src="https://maxcdn.bootstrapcdn.com/bootstrap/3.3.7/js/bootstrap.js"
integrity="sha384-Tc5IQib027qvyjSMfHjOMaLkfuWVxZxUPnCJA7l2mCWNIpG9mGCD8wGNIcPD7Txa"
crossorigin="anonymous"></script>
@RenderSection("scripts", required: false)
</body>
</html>
在瀏覽器中檢視網站。 網站現在應該會正確載入,並具有預期的樣式。
- 選擇性:嘗試使用新的版面配置檔案。 複製 FullAspNetCore 專案的版面配置檔案。 新的版面配置檔案會使用標籤協助程式,並提供其他改進功能。
設定統合和縮製
關於如何設定統合和縮製的詳細資訊,請參閱統合和縮製。
解決 HTTP 500 錯誤
如果 HTTP 500 錯誤訊息沒有包含問題來源的資訊,則可能的原因很多。 例如,如果 Views/_ViewImports.cshtml 檔案包含專案中不存在的命名空間,就會產生 HTTP 500 錯誤。 根據預設,在 ASP.NET Core 應用程式中,UseDeveloperExceptionPage 延伸模組會新增至 IApplicationBuilder,並在組態為「開發」時執行。 請參閱下列程式碼中的範例:
public class Startup
{
    // This method gets called by the runtime. Use this method to add services to the container.
    // For more information on how to configure your application, visit https://go.microsoft.com/fwlink/?LinkID=398940
    public void ConfigureServices(IServiceCollection services)
    {
        services.AddMvc();
    }

    // This method gets called by the runtime. Use this method to configure the HTTP request pipeline.
    public void Configure(IApplicationBuilder app, IHostingEnvironment env)
    {
        if (env.IsDevelopment())
        {
            app.UseDeveloperExceptionPage();
        }

        app.UseStaticFiles();

        app.UseMvc(routes =>
        {
            routes.MapRoute(
                name: "default",
                template: "{controller=Home}/{action=Index}/{id?}");
        });
    }
}
ASP.NET Core 會將未處理的例外狀況轉換成 HTTP 500 錯誤回應。 這些回應中通常不會包含錯誤詳細資料,以防止洩漏伺服器的潛在敏感性資訊。 如需詳細資訊,請參閱開發人員例外狀況頁面。
其他資源
本文說明如何開始將 ASP.NET MVC 專案移轉至 ASP.NET Core MVC 2.1。 在此程序中,將會醒目提示 ASP.NET MVC 所變更的許多項目。 從 ASP.NET MVC 移轉是一個多步驟的程序。 此文章涵蓋:
- 初始設定
- 基本控制器和檢視
- 靜態內容
- 用戶端相依性。
如需移轉組態和 Identity 程式碼,請參閱將組態移轉至 ASP.NET Core 和將驗證及 Identity 移轉至 ASP.NET Core。
注意
範例中的版本號碼可能不是最新版,請將專案更新至最新版本。
建立入門 ASP.NET MVC 專案
為了示範如何升級,我們將從建立 ASP.NET MVC 應用程式開始。 請使用 WebApp1 名稱建立專案,藉此使命名空間符合下一個步驟中建立的 ASP.NET Core 專案。


選擇性: 將方案的名稱從 WebApp1 變更為 Mvc5。 Visual Studio 會顯示新的方案名稱 (Mvc5),可讓您更輕鬆地分辨當前專案與下一個專案。
建立 ASP.NET Core 專案
建立與上一個專案名稱 (WebApp1) 相同的空白 ASP.NET Core Web 應用程式,藉此讓兩個專案中的命名空間相符。 採用相同的命名空間可讓您更輕鬆地在兩個專案之間複製程式碼。 在與上一個專案不同的目錄中建立此專案,以便使用相同的名稱。


- 選擇性: 使用 Web 應用程式專案範本建立新的 ASP.NET Core 應用程式。 將專案命名為 WebApp1,然後選取 [個別使用者帳戶] 的驗證選項。 將此應用程式重新命名為 FullAspNetCore。 建立此專案可節省轉換時間。 您可以在範本產生的程式碼中檢視最終結果,而程式碼可以複製到轉換專案,或與範本產生的專案比較。
將網站設定為使用 MVC
- 以 .NET Core 為目標時,預設會參考 Microsoft.AspNetCore.App 中繼套件。 此套件包含 MVC 應用程式常用的套件。 如果以 .NET Framework 為目標,則必須在專案檔中個別列出套件參考。
Microsoft.AspNetCore.Mvc 是 ASP.NET Core MVC 架構。 Microsoft.AspNetCore.StaticFiles 是靜態檔案處理常式。 ASP.NET Core 應用程式需明確選擇是否使用中介軟體,例如提供靜態檔案。 如需詳細資訊,請參閱靜態檔案。
- 開啟
Startup.cs檔案並變更程式碼以符合下列所示:
public class Startup
{
    // This method gets called by the runtime. Use this method to add services to the container.
    // For more information on how to configure your application, visit https://go.microsoft.com/fwlink/?LinkID=398940
    public void ConfigureServices(IServiceCollection services)
    {
        services.AddMvc();
    }

    // This method gets called by the runtime. Use this method to configure the HTTP request pipeline.
    public void Configure(IApplicationBuilder app, IHostingEnvironment env)
    {
        if (env.IsDevelopment())
        {
            app.UseDeveloperExceptionPage();
        }

        app.UseStaticFiles();

        app.UseMvc(routes =>
        {
            routes.MapRoute(
                name: "default",
                template: "{controller=Home}/{action=Index}/{id?}");
        });
    }
}
UseStaticFiles 擴充方法會新增靜態檔案處理常式。 UseMvc 擴充方法會新增路由。 如需詳細資訊,請參閱應用程式啟動和路由。
新增控制器和檢視
在本節中將會新增最低限度的控制器和檢視,作為下一節中所移轉 ASP.NET MVC 控制器和檢視的預留位置。
新增 Controllers 目錄。
將名為 的控制器類別
HomeController.cs新增至 Controllers 目錄。

新增 Views 目錄。
新增 Views/Home 目錄。
將名為
Index.cshtml的 Razor 檢視新增至 Views/Home 目錄。

專案結構如下所示:

以下列標記取代 Views/Home/Index.cshtml 檔案的內容:
<h1>Hello world!</h1>
執行應用程式。

下列功能需要從範例 ASP.NET MVC 專案移轉至 ASP.NET Core 專案:
用戶端內容 (CSS、字型和指令碼)
控制器
檢視表
模型
統合
篩選
登入/登出,Identity (這會在下一個教學課程中完成。)
控制器和檢視
將每個方法從 ASP.NET MVC
HomeController複製到新的HomeController。 在 ASP.NET MVC 中,內建範本的控制器動作方法傳回類型為 ActionResult;在 ASP.NET Core MVC 中,動作方法會改為傳回IActionResult。ActionResult會實作IActionResult,因此無需變更動作方法的傳回類型。將
About.cshtml、Contact.cshtml和Index.cshtmlRazor 檢視檔案從 ASP.NET MVC 專案複製到 ASP.NET Core 專案。
測試每個方法
由於版面配置檔案和樣式尚未移轉,因此轉譯的檢視只會包含檢視檔案中的內容。 版面配置檔案產生的 About 和 Contact 檢視連結尚無法使用。
- 若要在執行中 ASP.NET Core 應用程式的瀏覽器上叫用轉譯的檢視,請將目前的連接埠號碼取代為 ASP.NET Core 專案中所使用的連接埠號碼。 例如:
https://localhost:44375/home/about。

請注意還缺少樣式和功能表項目。 樣式將在下一節中修正。
靜態內容
在 ASP.NET MVC 5 和更早版本中,靜態內容是裝載自 Web 專案的根目錄,並與伺服器端檔案混用。 在 ASP.NET Core 中,靜態內容裝載於 wwwroot 目錄中。 將靜態內容從 ASP.NET MVC 應用程式複製到 ASP.NET Core 專案中的 wwwroot 目錄。 在此範例轉換中:
- 將 favicon.ico 檔案從 ASP.NET MVC 專案複製到 ASP.NET Core 專案中的 wwwroot 目錄。
ASP.NET MVC 專案會使用 Bootstrap 進行樣式設定,並將 Bootstrap 檔案儲存在 Content 和 Scripts 目錄中。 產生 ASP.NET MVC 專案的範本會參考版面配置檔 (Views/Shared/_Layout.cshtml) 中的 Bootstrap。 bootstrap.js 和 bootstrap.css 檔案可以從 ASP.NET MVC 專案複製到新專案中的 wwwroot 目錄。 作為替代,本文件會在下一節中使用 CDN 新增對的 Bootstrap (和其他用戶端程式庫) 的支援。
移轉版面配置檔案
將
_ViewStart.cshtml檔案從 ASP.NET MVC 專案的 Views 目錄複製到 ASP.NET Core 專案的 Views 目錄。 ASP.NET Core MVC 中的_ViewStart.cshtml檔案尚未變更。建立 Views/Shared 目錄。
選擇性:將
_ViewImports.cshtml從 FullAspNetCore MVC 專案的 Views 目錄複製到 ASP.NET Core 專案的 Views 目錄。 移除_ViewImports.cshtml檔案中的任何命名空間宣告。_ViewImports.cshtml會檔案提供所有檢視檔案的命名空間,並帶入標籤協助程式。 標籤協助程式會在新的版面配置檔案中使用。_ViewImports.cshtml檔案是 ASP.NET Core 的新功能。將
_Layout.cshtml檔案從 ASP.NET MVC 專案的 Views/Shared 目錄複製到 ASP.NET Core 專案的 Views/Shared 目錄。
開啟 _Layout.cshtml 檔案並進行下列變更 (完成後的程式碼如下所示):
將
@Styles.Render("~/Content/css")取代為<link>元素以載入bootstrap.css(請參閱下方)。移除
@Scripts.Render("~/bundles/modernizr")。將
@Html.Partial("_LoginPartial")行註解化 (以@*...*@括住該行)。 如需詳細資訊,請參閱 將驗證和 Identity 移轉至 ASP.NET Core將
@Scripts.Render("~/bundles/jquery")取代為<script>元素 (請參閱下方)。將
@Scripts.Render("~/bundles/bootstrap")取代為<script>元素 (請參閱下方)。
Bootstrap CSS 包含的取代標記:
<link rel="stylesheet"
    href="https://maxcdn.bootstrapcdn.com/bootstrap/3.3.7/css/bootstrap.css"
    integrity="sha384-BVYiiSIFeK1dGmJRAkycuHAHRg32OmUcww7on3RYdg4Va+PmSTsz/K68vbdEjh4u"
    crossorigin="anonymous">
jQuery 和 Bootstrap JavaScript 包含的取代標記:
<script src="https://code.jquery.com/jquery-3.3.1.js"></script>
<script src="https://maxcdn.bootstrapcdn.com/bootstrap/3.3.7/js/bootstrap.js"
    integrity="sha384-Tc5IQib027qvyjSMfHjOMaLkfuWVxZxUPnCJA7l2mCWNIpG9mGCD8wGNIcPD7Txa" crossorigin="anonymous"></script>
更新的 _Layout.cshtml 檔案如下所示:
<!DOCTYPE html>
<html>
<head>
<meta charset="utf-8" />
<meta name="viewport" content="width=device-width, initial-scale=1.0">
<title>@ViewBag.Title - My ASP.NET Application</title>
<link rel="stylesheet"
href="https://maxcdn.bootstrapcdn.com/bootstrap/3.3.7/css/bootstrap.css"
integrity="sha384-BVYiiSIFeK1dGmJRAkycuHAHRg32OmUcww7on3RYdg4Va+PmSTsz/K68vbdEjh4u"
crossorigin="anonymous">
</head>
<body>
<div class="navbar navbar-inverse navbar-fixed-top">
<div class="container">
<div class="navbar-header">
<button type="button" class="navbar-toggle" data-toggle="collapse" data-target=".navbar-collapse">
<span class="icon-bar"></span>
<span class="icon-bar"></span>
<span class="icon-bar"></span>
</button>
@Html.ActionLink("Application name", "Index", "Home", new { area = "" }, new { @class = "navbar-brand" })
</div>
<div class="navbar-collapse collapse">
<ul class="nav navbar-nav">
<li>@Html.ActionLink("Home", "Index", "Home")</li>
<li>@Html.ActionLink("About", "About", "Home")</li>
<li>@Html.ActionLink("Contact", "Contact", "Home")</li>
</ul>
@*@Html.Partial("_LoginPartial")*@
</div>
</div>
</div>
<div class="container body-content">
@RenderBody()
<hr />
<footer>
<p>© @DateTime.Now.Year - My ASP.NET Application</p>
</footer>
</div>
<script src="https://code.jquery.com/jquery-3.3.1.js"></script>
<script src="https://maxcdn.bootstrapcdn.com/bootstrap/3.3.7/js/bootstrap.js"
integrity="sha384-Tc5IQib027qvyjSMfHjOMaLkfuWVxZxUPnCJA7l2mCWNIpG9mGCD8wGNIcPD7Txa"
crossorigin="anonymous"></script>
@RenderSection("scripts", required: false)
</body>
</html>
在瀏覽器中檢視網站。 網站現在應該會正確載入,並具有預期的樣式。
- 選擇性:嘗試使用新的版面配置檔案。 複製 FullAspNetCore 專案的版面配置檔案。 新的版面配置檔案會使用標籤協助程式,並提供其他改進功能。
設定統合和縮製
關於如何設定統合和縮製的詳細資訊,請參閱統合和縮製。
解決 HTTP 500 錯誤
如果 HTTP 500 錯誤訊息沒有包含問題來源的資訊,則可能的原因很多。 例如,如果 Views/_ViewImports.cshtml 檔案包含專案中不存在的命名空間,就會產生 HTTP 500 錯誤。 根據預設,在 ASP.NET Core 應用程式中,UseDeveloperExceptionPage 延伸模組會新增至 IApplicationBuilder,並在組態為「開發」時執行。 請參閱下列程式碼中的範例:
public class Startup
{
    // This method gets called by the runtime. Use this method to add services to the container.
    // For more information on how to configure your application, visit https://go.microsoft.com/fwlink/?LinkID=398940
    public void ConfigureServices(IServiceCollection services)
    {
        services.AddMvc();
    }

    // This method gets called by the runtime. Use this method to configure the HTTP request pipeline.
    public void Configure(IApplicationBuilder app, IHostingEnvironment env)
    {
        if (env.IsDevelopment())
        {
            app.UseDeveloperExceptionPage();
        }

        app.UseStaticFiles();

        app.UseMvc(routes =>
        {
            routes.MapRoute(
                name: "default",
                template: "{controller=Home}/{action=Index}/{id?}");
        });
    }
}
ASP.NET Core 會將未處理的例外狀況轉換成 HTTP 500 錯誤回應。 這些回應中通常不會包含錯誤詳細資料,以防止洩漏伺服器的潛在敏感性資訊。 如需詳細資訊,請參閱開發人員例外狀況頁面。
