在本教學課程中,我們將探討如何將標準 TextBox 和 CheckBox 控件取代為替代輸入 Web 控件,以自定義可編輯 GridView 的介面。
簡介
GridView 和 DetailsView 控件所使用的 BoundFields 和 CheckBoxFields 可簡化修改數據的程式,因為其能夠轉譯只讀、可編輯和可插入的介面。 您可以轉譯這些介面,而不需要新增任何額外的宣告式標記或程序代碼。 不過,BoundField 和 CheckBoxField 的介面缺乏實際案例中通常需要的可自定義性。 若要在 GridView 或 DetailsView 中自定義可編輯或可插入的介面,我們需要改用 TemplateField。
在上一個教學課程中,我們已瞭解如何藉由新增驗證 Web 控件來自定義數據修改介面。 在本教學課程中,我們將探討如何自定義實際的數據收集 Web 控件,以替代輸入 Web 控件取代 BoundField 和 CheckBoxField 的標準 TextBox 和 CheckBox 控制件。 特別是,我們將建置可編輯的 GridView,以允許更新產品的名稱、類別、供應商和已停止狀態。 編輯特定數據列時,類別和供應商欄位會轉譯為DropDownLists,其中包含一組可用的類別和供應商可供選擇。 此外,我們將以 RadioButtonList 控件取代 CheckBoxField 的預設 CheckBox,其提供兩個選項:“Active” 和 “Discontinued”。

圖 1:GridView 的編輯介面包含 DropDownLists 和 RadioButtons (按兩下以檢視完整大小的影像)
步驟 1:建立適當的UpdateProduct多載
在本教學課程中,我們將建置可編輯的 GridView,以允許編輯產品名稱、類別、供應商和已停止的狀態。 因此,我們需要接受五個輸入參數的多載,這四個 UpdateProduct 乘積值加上 ProductID。 就像先前的多載一樣,此多載會:
- 從資料庫中擷取指定
ProductID的產品資訊。 -
ProductName更新、CategoryID、SupplierID和Discontinued欄位和 - 透過 TableAdapter 的
Update()方法將更新要求傳送至 DAL。
為了簡潔起見,針對這個特定多載,我省略了商務規則檢查,確保標示為已停止的產品不是其供應商唯一提供的產品。 如果您偏好或理想情況下,請將邏輯重構為個別方法,請隨意將其新增至 。
下列程式代碼顯示 類別中的UpdateProduct新ProductsBLL多載:
<System.ComponentModel.DataObjectMethodAttribute(System.ComponentModel.DataObjectMethodType.Update, False)>
Public Function UpdateProduct(
    ByVal productName As String, ByVal categoryID As Nullable(Of Integer),
    ByVal supplierID As Nullable(Of Integer), ByVal discontinued As Boolean,
    ByVal productID As Integer)
    As Boolean
    Dim products As Northwind.ProductsDataTable = Adapter.GetProductByProductID(productID)
    If products.Count = 0 Then
        Return False
    End If
    Dim product As Northwind.ProductsRow = products(0)
    product.ProductName = productName
    If Not supplierID.HasValue Then
        product.SetSupplierIDNull()
    Else
        product.SupplierID = supplierID.Value
    End If
    If Not categoryID.HasValue Then
        product.SetCategoryIDNull()
    Else
        product.CategoryID = categoryID.Value
    End If
    product.Discontinued = discontinued
    Dim rowsAffected As Integer = Adapter.Update(product)
    Return rowsAffected = 1
End Function
步驟 2:製作可編輯的 GridView
新增多載之後 UpdateProduct ,我們即可建立可編輯的 GridView。
CustomizedUI.aspx開啟資料夾中的頁面,EditInsertDelete並將 GridView 控制項新增至設計工具。 接下來,從 GridView 的智慧標記建立新的 ObjectDataSource。 將 ObjectDataSource 設定為透過 ProductBLL 類別的 方法擷取產品資訊,並使用我們剛才建立的多 GetProducts() 載來更新產品數據 UpdateProduct 。 從 [插入] 和 [刪除] 索引標籤中,從下拉式清單中選取 [無]。
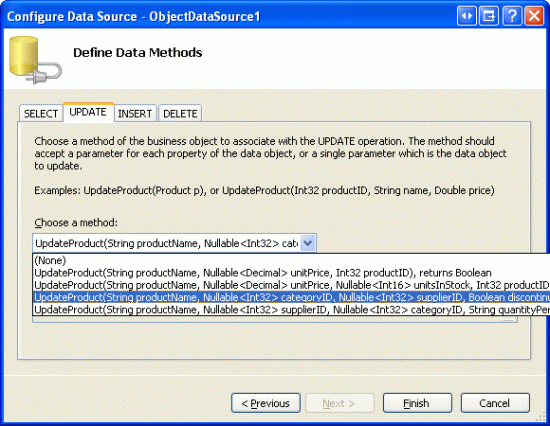
圖 2:將 ObjectDataSource 設定為使用剛建立的多 UpdateProduct 載 (按兩下即可檢視完整大小的影像)
如同我們在整個數據修改教學課程中所見,Visual Studio 所建立之 ObjectDataSource 的宣告式語法會將 OldValuesParameterFormatString 屬性指派給 original_{0}。 當然,這不適用於我們的商業規則層,因為我們的方法不會預期原始 ProductID 值會傳入。 因此,如同我們在先前的教學課程中所做的,請花點時間從宣告式語法中移除這個屬性指派,或改為將此屬性的值設定為 {0}。
在這項變更之後,ObjectDataSource 的宣告式標記看起來應該如下所示:
<asp:ObjectDataSource ID="ObjectDataSource1" runat="server"
    SelectMethod="GetProducts" TypeName="ProductsBLL"
    UpdateMethod="UpdateProduct">
    <UpdateParameters>
        <asp:Parameter Name="productName" Type="String" />
        <asp:Parameter Name="categoryID" Type="Int32" />
        <asp:Parameter Name="supplierID" Type="Int32" />
        <asp:Parameter Name="discontinued" Type="Boolean" />
        <asp:Parameter Name="productID" Type="Int32" />
    </UpdateParameters>
</asp:ObjectDataSource>
請注意,OldValuesParameterFormatString已移除 屬性,而且Parameter我們的多載所預期的UpdateParameters每個輸入參數集合中有 UpdateProduct 。
雖然 ObjectDataSource 設定為只更新產品值的子集,但 GridView 目前會顯示 所有 產品欄位。 請花點時間編輯 GridView,以便:
- 它只包含
ProductName、 、SupplierNameCategoryNameBoundFields 和DiscontinuedCheckBoxField -
CategoryName要出現在 CheckBoxField 之前 (左邊) 的SupplierName和Discontinued欄位 -
CategoryName和SupplierNameBoundFields 的HeaderText屬性分別設定為 “Category” 和 “Supplier”。 - 已開啟編輯支援(核取 GridView 智慧標記中的[啟用編輯] 複選框)
這些變更之後,設計工具看起來會類似圖 3,GridView 的宣告式語法如下所示。

圖 3:從 GridView 移除不必要的字段 (按兩下以檢視完整大小的影像)
<asp:GridView ID="GridView1" runat="server" AutoGenerateColumns="False"
    DataKeyNames="ProductID" DataSourceID="ObjectDataSource1">
    <Columns>
        <asp:BoundField DataField="ProductName"
           HeaderText="ProductName" SortExpression="ProductName" />
        <asp:BoundField DataField="CategoryName" HeaderText="Category"
           ReadOnly="True"
           SortExpression="CategoryName" />
        <asp:BoundField DataField="SupplierName" HeaderText="Supplier"
           ReadOnly="True"
           SortExpression="SupplierName" />
        <asp:CheckBoxField DataField="Discontinued"
           HeaderText="Discontinued" SortExpression="Discontinued" />
    </Columns>
</asp:GridView>
此時 GridView 的唯讀行為已完成。 檢視數據時,每個產品都會轉譯為 GridView 中的數據列,其中顯示產品的名稱、類別、供應商和已中止狀態。

圖 4:GridView 的只讀介面已完成 (按兩下以檢視完整大小的影像)
注意
如插入、更新和刪除數據概觀教學課程中所述,必須啟用 GridView 的檢視狀態(預設行為)。 如果您將 GridView 的 EnableViewState 屬性設定為 false,您就會有不小心刪除或編輯記錄的並行用戶風險。
步驟 3:針對類別和供應商編輯介面使用DropDownList
回想一下,ProductsRow物件包含CategoryID、 CategoryNameSupplierID和 SupplierName 屬性,這些屬性會在資料庫數據表中Products提供實際的外鍵識別碼,以及和 Name 數據表中的Categories對應Suppliers值。
ProductRow和 CategoryIDSupplierID 可以讀取和寫入,而 CategoryName 和 SupplierName 屬性則標示為唯讀。
由於和 屬性的CategoryName唯讀狀態,對應的 BoundFields 已SupplierName將其 屬性設定為 ReadOnly,以防止編輯數據列時修改這些True值。 雖然我們可以將 ReadOnly 屬性設定為 False,但在編輯期間將 和 CategoryName BoundFields 轉SupplierName譯為 TextBoxes,但當使用者嘗試更新產品時,這類方法會導致例外狀況,因為沒有任何UpdateProduct多載會採用 CategoryName 和 SupplierName 輸入。 事實上,我們不想基於兩個原因建立這樣的多載:
- 資料表
Products沒有SupplierName或CategoryName欄位,但SupplierID和CategoryID。 因此,我們想要將方法傳遞給這些特定的標識符值,而不是其查閱表格的值。 - 要求使用者輸入供應商或類別的名稱並不理想,因為用戶必須知道可用的類別和供應商及其正確的拼字。
當處於唯讀模式時,供應商和類別欄位應該會顯示類別和供應商的名稱(如同現在一樣),以及編輯時適用選項的下拉式清單。 使用下拉式清單,用戶可以快速查看有哪些類別和供應商可供選擇,並更輕鬆地進行選擇。
若要提供此行為,我們需要將 和 BoundFields 轉換成 SupplierName TemplateFields,其CategoryName會發出 ItemTemplate 和 SupplierNameCategoryName 值,並使用 EditItemTemplate DropDownList 控件來列出可用的類別和供應商。
Categories新增和SuppliersDropDownLists
從將 SupplierName 和 CategoryName BoundFields 轉換成 TemplateFields 開始,方法是:按兩下 GridView 智慧標記中的 [編輯資料行] 連結;從左下方的清單選取 BoundField;然後按兩下 [將此欄位轉換成 TemplateField] 連結。 轉換程式會建立同時具有 ItemTemplate 和 EditItemTemplate的 TemplateField,如下列宣告式語法所示:
<asp:TemplateField HeaderText="Category" SortExpression="CategoryName">
    <EditItemTemplate>
        <asp:Label ID="Label1" runat="server"
          Text='<%# Eval("CategoryName") %>'></asp:Label>
    </EditItemTemplate>
    <ItemTemplate>
        <asp:Label ID="Label1" runat="server"
          Text='<%# Bind("CategoryName") %>'></asp:Label>
    </ItemTemplate>
</asp:TemplateField>
由於 BoundField 已標示為唯讀, ItemTemplate 因此和 EditItemTemplate 包含標籤 Web 控件,其 Text 屬性系結至適用的數據欄位(CategoryName如上述語法)。 我們需要修改 EditItemTemplate,以DropDownList控件取代 Label Web 控件。
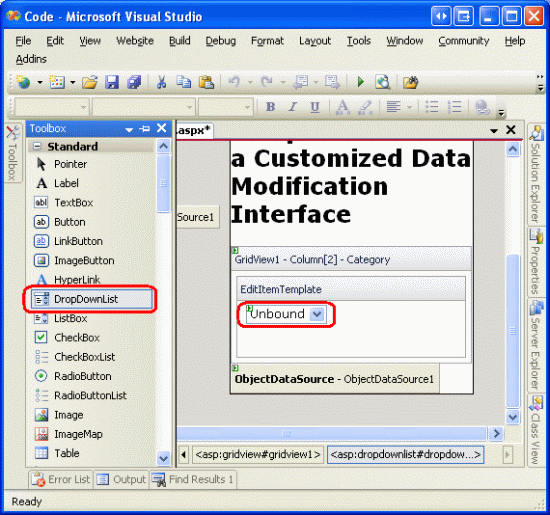
如先前教學課程中所見,範本可以透過設計工具編輯,或直接從宣告式語法進行編輯。 若要透過設計工具編輯它,請按下 GridView 智慧標記中的 [編輯範本] 連結,然後選擇使用 [類別] 字段的 EditItemTemplate。 移除標籤 Web 控制件,並將它取代為 DropDownList 控制項,並將 DropDownList 的 ID 屬性設定為 Categories。

圖 5:移除 TexBox 並將 DropDownList 新增至 EditItemTemplate (按兩下以檢視完整大小的影像)
接下來,我們需要使用可用的類別填入DropDownList。 按兩下DropDownList智慧標記中的 [選擇資料源] 連結,並選擇建立名為 CategoriesDataSource的新 ObjectDataSource。

圖 6:建立名為 CategoriesDataSource 的新 ObjectDataSource 控件 (按兩下以檢視完整大小的影像)
若要讓這個 ObjectDataSource 傳回所有類別,請將它系結至 CategoriesBLL 類別的 GetCategories() 方法。

圖 7:將 ObjectDataSource 系結至 CategoriesBLL的 GetCategories() 方法(按兩下以檢視完整大小的影像)
最後,設定DropDownList的設定, CategoryName 讓欄位顯示在每一個DropDownList ListItem 中,並顯示 CategoryID 做為值的欄位。

圖 8:已顯示欄位,並使用 CategoryName 做為值 (CategoryID)
進行這些變更之後,TemplateField 中的 EditItemTemplate 宣告式標記CategoryName會同時包含DropDownList和 ObjectDataSource:
<asp:TemplateField HeaderText="Category" SortExpression="CategoryName">
    <EditItemTemplate>
        <asp:DropDownList ID="Categories" runat="server"
          DataSourceID="CategoriesDataSource"
          DataTextField="CategoryName" DataValueField="CategoryID">
        </asp:DropDownList>
        <asp:ObjectDataSource ID="CategoriesDataSource" runat="server"
            OldValuesParameterFormatString="original_{0}"
            SelectMethod="GetCategories" TypeName="CategoriesBLL">
        </asp:ObjectDataSource>
    </EditItemTemplate>
    <ItemTemplate>
        <asp:Label ID="Label1" runat="server"
          Text='<%# Bind("CategoryName") %>'></asp:Label>
    </ItemTemplate>
</asp:TemplateField>
注意
中的 EditItemTemplate DropDownList必須啟用其檢視狀態。 我們很快就會將數據系結語法新增至DropDownList的宣告式語法和數據系結命令,例如 Eval() ,而且 Bind() 只能出現在已啟用檢視狀態的控件中。
重複這些步驟,將名為 Suppliers 的 DropDownList 新增至 SupplierName TemplateField 的 EditItemTemplate。 這將牽涉到將DropDownList新增至 , EditItemTemplate 並建立另一個 ObjectDataSource。
Suppliers不過,DropDownList 的 ObjectDataSource 應該設定為叫SuppliersBLL用類別的 GetSuppliers() 方法。 此外,將 Suppliers DropDownList設定為顯示 CompanyName 欄位,並使用 SupplierID 字段作為其 ListItem 值。
將 DropDownLists 新增至兩 EditItemTemplate 個 s 之後,請在瀏覽器中載入頁面,然後按兩下 Chef Anton 的 Cajun 調味品的 [編輯] 按鈕。 如圖 9 所示,產品的類別和供應商數據行會轉譯為下拉式清單,其中包含可供選擇的可用類別和供應商。 不過,請注意 ,預設會選取這兩個下拉式清單中的第一 個專案(類別的飲料和異國情調的液體作為供應商),即使廚師安東的卡瓊調味是新奧爾良卡瓊喜悅提供的調味品。

圖 9:下拉式清單中的第一個項目預設為已選取 (按兩下以檢視完整大小的影像)
此外,如果您按兩下 [更新],您會發現產品的 CategoryID 和 SupplierID 值會設定為 NULL。 造成這兩個不想要的行為,因為 中的DropDownLists EditItemTemplate 不會系結至基礎產品數據中的任何數據欄位。
將DropDownLists系結至CategoryID和SupplierID數據欄位
若要將已編輯的產品類別和供應商下拉式清單設定為適當的值,並在按兩下 [更新] 時將這些值傳回 BLL UpdateProduct 的方法,我們需要使用雙向數據系結,將 DropDownLists SelectedValue 的屬性系結至 CategoryID 和 SupplierID 數據欄位。 若要使用 Categories DropDownList來完成這項作業,您可以直接新增 SelectedValue='<%# Bind("CategoryID") %>' 至宣告式語法。
或者,您可以透過設計工具編輯範本,然後按兩下DropDownList智慧標記中的 [編輯 DataBindings] 連結,以設定 DropDownList 的數據系結。 接下來,表示 SelectedValue 屬性應該使用雙向數據系結系結系結至 CategoryID 字段(請參閱圖 10)。 重複宣告式或設計工具程式,將數據 SupplierID 欄位系結至 Suppliers DropDownList。

圖 10:使用雙向數據系結將 系結 CategoryID 至 DropDownList 的屬性 SelectedValue (按兩下以檢視完整大小的影像)
一旦系結套用至 SelectedValue 兩個DropDownLists的屬性,編輯的產品類別和供應商數據行就會預設為目前產品的值。 按兩下 [更新] 時, CategoryID 所選取下拉式清單專案的 和 SupplierID 值將會傳遞至 UpdateProduct 方法。 圖 11 顯示新增數據系結語句之後的教學課程;請注意,Chef Anton 的 Cajun 調味料的所選下拉式清單專案如何正確為 Condiment 和新奧爾良 Cajun 喜悅。

圖 11:依預設會選取已編輯產品的目前類別和供應商值(按兩下以檢視完整大小的影像)
處理NULL值
CategoryID數據表中的 SupplierID 和 Products 數據行可以是 NULL,但是 中的 EditItemTemplate DropDownLists不包含代表值的清單專案NULL。 這有兩個後果:
- 使用者無法使用我們的介面,將產品的類別或供應商從非值變更為非
NULLNULL值 - 如果產品有
NULLCategoryID或SupplierID,按兩下 [編輯] 按鈕將會導致例外狀況。 這是因為NULL語句中CategoryID由 (或SupplierID) 傳Bind()回的值不會對應至DropDownList中的值(當DropDownList 屬性設定為不在SelectedValue時,DropDownList 會擲回例外狀況。
為了支援 NULLCategoryID 和 SupplierID 值,我們需要將另一個 ListItem 新增至每個DropDownList來表示 NULL 值。 在 Master/Detail Filtering With a DropDownList 教學課程中,我們已瞭解如何將其他新增 ListItem 至數據系結 DropDownList,其中涉及將 DropDownList 的 AppendDataBoundItems 屬性設定為 True ,並手動新增其他 ListItem。 不過,在上一個教學課程中,我們已使用 ListItemValue的 新增 -1 。 不過,ASP.NET 中的數據系結邏輯會自動將空白字串 NULL 轉換成值,反之亦然。 因此,在本教學課程中,我們希望 ListItem的 Value 是空字串。
首先,將 DropDownLists 的 AppendDataBoundItems 屬性設定為 True。 接下來,NULLListItem將下列<asp:ListItem>元素新增至每個DropDownList,讓宣告式標記看起來像這樣:
<asp:DropDownList ID="Categories" runat="server"
    DataSourceID="CategoriesDataSource" DataTextField="CategoryName"
    DataValueField="CategoryID" SelectedValue='<%# Bind("CategoryID") %>'
    AppendDataBoundItems="True">
    <asp:ListItem Value="">(None)</asp:ListItem>
</asp:DropDownList>
我選擇使用 “(None)” 作為此 ListItem的 Text 值,但如果您想要的話,您可以將它變更為空白字串。
注意
如我們在 Master/Detail Filtering With a DropDownList 教學課程中所,方法是按兩下 屬性視窗 中的 DropDownList ListItem 屬性(這會顯示Items集合編輯器)。 不過,請務必透過宣告式語法新增NULLListItem本教學課程的 。 如果您使用 ListItem 集合編輯器,產生的宣告式語法會在指派空白字串時完全省略 Value 設定,並建立宣告式標記,例如: <asp:ListItem>(None)</asp:ListItem>。 雖然這看起來可能無害,但遺漏的 Value 會導致DropDownList在其位置使用 Text 屬性值。 這表示如果選取此選項NULLListItem,將會嘗試將值 “(None)” 指派給 CategoryID,這會導致例外狀況。 藉由明確設定 Value="",NULL會在選取 時CategoryIDNULL指派ListItem值。
針對供應商 DropDownList 重複這些步驟。
有了這個額外的 ListItem,編輯介面現在可以將值指派 NULL 給 Product 的 CategoryID 和 SupplierID 欄位,如圖 12 所示。
![選擇 [無] 以指派產品類別或供應商的 NULL 值](customizing-the-data-modification-interface-vb/_static/image34.png)
圖 12:選擇 [無] 以指派 NULL 產品類別或供貨商的值(按兩下以檢視完整大小的影像)
步驟 4:針對已停止狀態使用 RadioButtons
目前產品 Discontinued 的數據欄位會使用 CheckBoxField 來表示,這會轉譯唯讀數據列的停用複選框,以及正在編輯之數據列的已啟用複選框。 雖然此使用者介面通常適合,但我們可以視需要使用TemplateField加以自定義。 在本教學課程中,讓我們將 CheckBoxField 變更為使用 RadioButtonList 控件的 TemplateField,其中包含兩個選項 “Active” 和 “Discontinued”,使用者可以從中指定產品 Discontinued 的值。
首先,將 Discontinued CheckBoxField 轉換成 TemplateField,這會建立具有 和ItemTemplate的 EditItemTemplate TemplateField。 這兩個範本都包含 CheckBox,其 Checked 屬性系結至 Discontinued 數據欄位,這兩個範本的唯一差異在於 ItemTemplate's CheckBox 的 Enabled 屬性設定為 False。
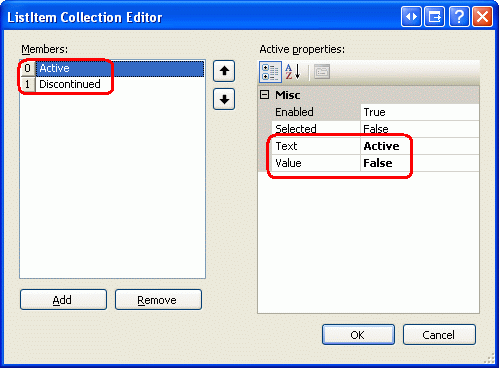
將 和 中的 ItemTemplate CheckBox 取代為 RadioButtonList 控件,並將 RadioButtonLists EditItemTemplate 的屬性設定為 ID。DiscontinuedChoice 接下來,指出 RadioButtonLists 應該各包含兩個單選按鈕,一個標示為 「作用中」且值為 “False”,另一個標示為 “Discontinued” 且值為 “True”。 若要達成此目的,您可以直接透過宣告式語法輸入 <asp:ListItem> 中的專案,或使用 ListItem 設計工具中的集合編輯器。 圖 13 顯示已指定兩個單選按鈕選項之後的 ListItem 集合編輯器。

圖 13:將作用中和已停止的選項新增至 RadioButtonList (按兩下以檢視完整大小的影像)
由於 中的 ItemTemplate RadioButtonList 不應該編輯,請將其 Enabled 屬性設定為 False,將 屬性保留 Enabled 為 True 中 EditItemTemplateRadioButtonList 的 [預設值]。 這會將非編輯數據列中的單選按鈕設為唯讀,但會允許使用者變更已編輯數據列的 RadioButton 值。
我們仍然需要指派 RadioButtonList 控件 SelectedValue 的屬性,以便根據產品 Discontinued 的數據欄位選取適當的單選按鈕。 如同本教學課程稍早所檢查的DropDownLists,此數據系結語法可以直接新增至宣告式標記,或透過 RadioButtonLists 智慧標記中的 Edit DataBindings 連結。
新增兩個 RadioButtonList 並加以設定之後, Discontinued TemplateField 的宣告式標記看起來應該像這樣:
<asp:TemplateField HeaderText="Discontinued" SortExpression="Discontinued">
    <ItemTemplate>
        <asp:RadioButtonList ID="DiscontinuedChoice" runat="server"
          Enabled="False" SelectedValue='<%# Bind("Discontinued") %>'>
            <asp:ListItem Value="False">Active</asp:ListItem>
            <asp:ListItem Value="True">Discontinued</asp:ListItem>
        </asp:RadioButtonList>
    </ItemTemplate>
    <EditItemTemplate>
        <asp:RadioButtonList ID="DiscontinuedChoice" runat="server"
            SelectedValue='<%# Bind("Discontinued") %>'>
            <asp:ListItem Value="False">Active</asp:ListItem>
            <asp:ListItem Value="True">Discontinued</asp:ListItem>
        </asp:RadioButtonList>
    </EditItemTemplate>
</asp:TemplateField>
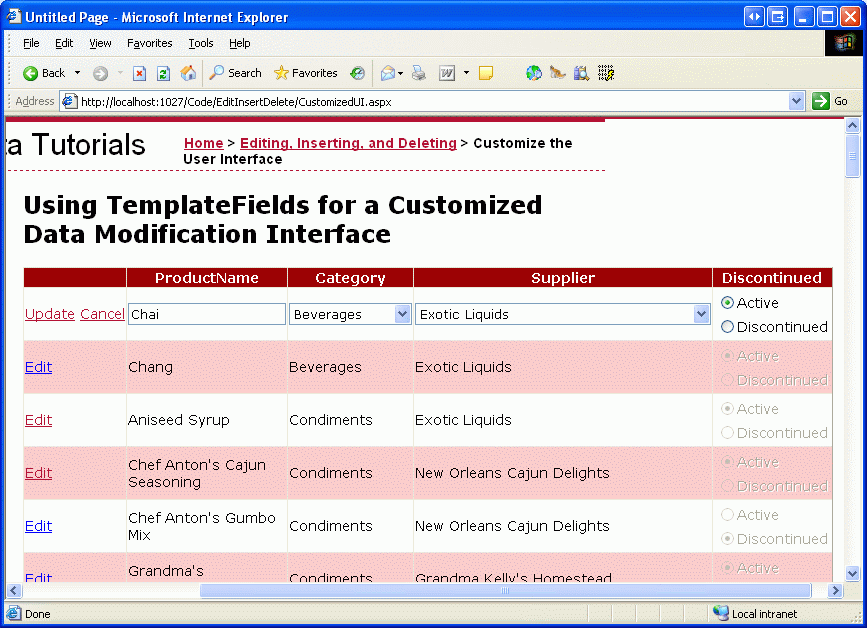
有了這些變更,數據 Discontinued 行已從複選框清單轉換成單選按鈕組清單(請參閱圖 14)。 編輯產品時,會選取適當的單選按鈕,並選取其他單選按鈕並按兩下 [更新],以更新產品的已停止狀態。

圖 14:已停止的 CheckBox 已由單選按鈕組取代 (按兩下以檢視完整大小的影像)
注意
由於資料庫中的數據DiscontinuedProducts行不能有NULL值,因此我們不需要擔心在 介面中擷NULL取資訊。 不過, Discontinued 如果數據行可能包含 NULL 我們想要將第三個單選按鈕新增至清單,並將它 Value 設定為空字串串 (Value=""),就像類別和供應商DropDownLists一樣。
摘要
雖然 BoundField 和 CheckBoxField 會自動轉譯唯讀、編輯和插入介面,但它們缺乏自定義功能。 不過,我們通常必須自定義編輯或插入介面,或許可以新增驗證控件(如上一個教學課程中所見),或自定義數據收集使用者介面(如本教學課程所示)。 使用 TemplateField 自定義介面可以總結為下列步驟:
- 新增 TemplateField 或將現有的 BoundField 或 CheckBoxField 轉換成 TemplateField
- 視需要擴充介面
- 使用雙向數據系結,將適當的數據欄位系結至新加入的Web控件
除了使用內建 ASP.NET Web 控制項之外,您也可以使用自訂、編譯的伺服器控制項和使用者控制項來自定義 TemplateField 的範本。
祝您程式設計愉快!
關於作者
斯科特·米切爾,七本 ASP/ASP.NET 書籍和 4GuysFromRolla.com 創始人的作者,自1998年以來一直與Microsoft Web 技術合作。 Scott 擔任獨立顧問、講師和作家。 他的新書是 Sams Teach Yourself ASP.NET 2.0 in 24 Hours。 可以透過 mitchell@4GuysFromRolla.com 聯絡他。