了解如何在單一操作中更新多個資料庫記錄。 在使用者介面層中,我們建立一個 GridView,其中每一行都是可編輯的。 在資料存取層中,我們將多個更新操作包裝在一個交易中,以確保所有更新成功或所有更新都會回滾。
簡介
在先前的教學課程中,我們了解了如何擴展資料存取層以新增對資料庫交易的支援。 資料庫交易可保證一系列資料修改陳述式將被視為一個原子操作,這確保所有修改都會失敗或全部成功。 隨著這種低階 DAL 功能的出現,我們準備將注意力轉向建立批次資料修改介面。
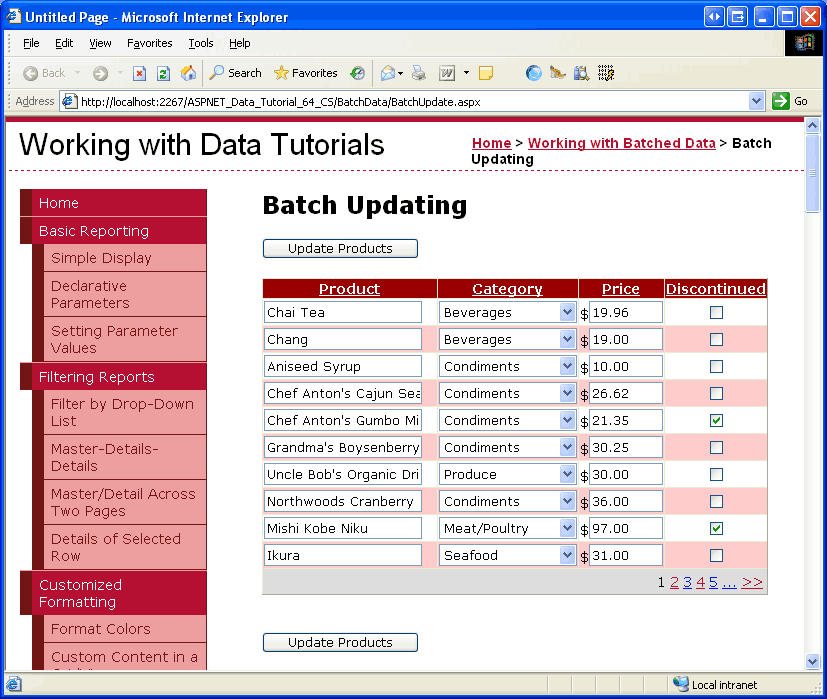
在本教學課程中,我們將建立一個 GridView,其中每行都是可編輯的 (請參閱圖 1)。 由於每一行都在其編輯介面中呈現,因此不需要一列「編輯」、「更新」和「取消」按鈕。 相反,頁面上有兩個「更新產品」按鈕,當點擊這些按鈕時,將列舉 GridView 行並更新資料庫。

圖 1:GridView 中的每一行都是可編輯的 (點擊查看完整圖片)
現在就開始吧!
注意
在執行批次更新教學課程中,我們使用 DataList 控制項建立了一個批次編輯介面。 本教學課程與上一教學課程的不同之處在於使用了 GridView,且批次更新是在交易範圍內執行的。 完成本教學課程後,我鼓勵您返回到前面的教學課程並更新它以使用前面教學課程中新增的與資料庫交易相關的功能。
檢查使所有 GridView 行可編輯的步驟
如同「插入、更新和刪除資料概述」教學課程中所討論的,GridView 提供了對按行編輯其基礎資料的內建支援。 在內部,GridView 透過其 EditIndex 屬性記錄哪些行是可編輯的。 當 GridView 繫結到其資料來源時,它會檢查每一行以查看該行的索引是否等於 EditIndex 的值。 如果是這樣,則使用其編輯介面來呈現該行的欄位。 對於 BoundFields,編輯介面是一個 TextBox,其 Text 屬性被指派由 BoundField 的 DataField 屬性指定的資料欄位的值。 對於 TemplateFields,使用 EditItemTemplate 代替 ItemTemplate。
回想一下,當使用者點擊行的「編輯」按鈕時,編輯工作流程就會啟動。 這會導致回傳,將 GridView 的 EditIndex 屬性設定為按一下行的索引,並將資料重新繫結到網格。 當您按一下行的「取消」按鈕時,在將資料重新繫結到網格之前,回傳時 EditIndex 將設定為 -1 值。 由於 GridView 的行從零開始編製索引,因此將 EditIndex 設為 -1 將使 GridView 顯示為只讀模式。
此 EditIndex 屬性適用於每行編輯,但不適用於批次編輯。 為了讓整個 GridView 可編輯,我們需要使用其編輯介面呈現每一行。 實現此目的的最簡單方法是建立每個可編輯欄位作為 TemplateField 實作,並在 ItemTemplate 中定義其編輯介面
在接下來的幾個步驟中,我們將建立一個完全可編輯的 GridView。 在步驟 1 中,我們將先建立 GridView 及其 ObjectDataSource,並將其 BoundFields 和 CheckBoxField 轉換為 TemplateFields。 在步驟 2 和步驟 3 中,我們將把編輯介面從 TemplateFields 的 EditItemTemplate 移至其 ItemTemplate 中。
步驟 1:顯示產品資訊
在我們擔心建立行可編輯的 GridView 之前,讓我們先簡單地顯示產品資訊。 打開 BatchUpdate.aspx 資料夾中的 BatchData 頁面,並將 GridView 從工具箱拖曳到設計器上。 將 GridView 的 ID 設為 ProductsGrid,並從其智慧標籤中選擇將其繫結到名為 ProductsDataSource 的新 ObjectDataSource。 設定 ObjectDataSource 以從 ProductsBLL 類別的 GetProducts 方法檢索其資料。

圖 2:設定 ObjectDataSource 以使用 ProductsBLL 類別 (點擊查看完整圖片)

圖 3:使用 GetProducts 方法檢索產品資料 (點擊查看完整圖片)
與 GridView 一樣,ObjectDataSource 的修改功能設計為按行運作。 為了更新一組記錄,我們需要在 ASP.NET 頁面的程式碼隱藏類別中編寫一些程式碼,用於批次資料並將其傳遞到 BLL。 因此,將 ObjectDataSource 的 UPDATE、INSERT 和 DELETE 標籤中的下拉式清單設為 (無)。 按一下 [完成] 以完成程序。

圖 4:將 UPDATE、INSERT 和 DELETE 標籤中的下拉式清單設為 (無) (點擊查看完整圖片)
完成「設定資料來源」精靈後,ObjectDataSource 的宣告式標記應如下所示:
<asp:ObjectDataSource ID="ProductsDataSource" runat="server"
    OldValuesParameterFormatString="original_{0}"
    SelectMethod="GetProducts" TypeName="ProductsBLL">
</asp:ObjectDataSource>
完成「設定資料來源」精靈也會導致 Visual Studio 為 GridView 中的產品資料欄位建立 BoundFields 和 CheckBoxField。 在本教學課程中,我們只允許使用者查看和編輯產品的名稱、類別、價格和停產狀態。 移除 ProductName、CategoryName、UnitPrice 和 Discontinued 欄位之外的所有欄位,並將前三個欄位的 HeaderText 屬性分別重新命名為 Product、Category 和 Price。 最後,選取 GridView 智慧標籤中的「啟用分頁」和「啟用排序」核取方塊。
此時 GridView 有三個 BoundField (ProductName、CategoryName 和 UnitPrice) 和一個 CheckBoxField (Discontinued)。 我們需要將這四個欄位轉換為 TemplateFields,然後將編輯介面從 TemplateField 的 EditItemTemplate 移至其 ItemTemplate。
注意
我們在「自訂資料修改介面」教學課程中探索了建立和自訂 TemplateFields。 我們將逐步完成將 BoundFields 和 CheckBoxField 轉換為 TemplateFields 並在其 ItemTemplate 中定義其編輯介面的步驟,但如果您遇到困難或需要複習,請隨時參考先前的教學課程。
從 GridView 的智慧標籤中,按一下「編輯列」連結以開啟「欄位」對話方塊。 接下來,選擇每個欄位,並點擊「將此欄位轉換為 TemplateField」連結。
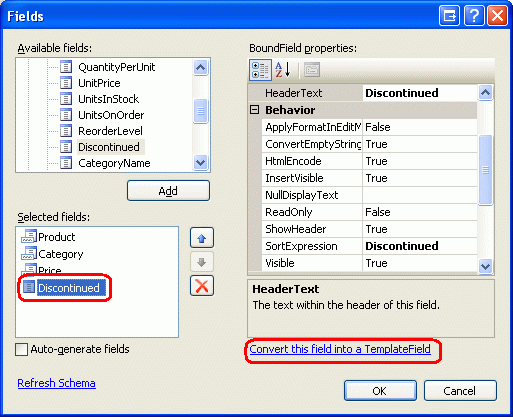
圖 5:將現有的 BoundFields 和 CheckBoxField 轉換為 TemplateFields
現在每個欄位都是 TemplateField,我們準備將編輯介面從 EditItemTemplate 移至 ItemTemplate。
步驟 2:建立 ProductName、UnitPrice 和Discontinued編輯介面
建立 ProductName、UnitPrice 和 Discontinued 編輯介面是此步驟的主題,而且非常簡單,因為每個介面都已在 TemplateField 的 EditItemTemplate 中定義。 建立 CategoryName 編輯介面有點複雜,因為我們需要建立適用類別的 DropDownList。 這個 CategoryName 編輯介面將在步驟 3 中處理。
讓我們從 ProductName TemplateField 開始。 點擊 GridView 智慧標籤中的「編輯範本」連結,然後深入到 ProductName TemplateField 的 EditItemTemplate。 選擇 TextBox,將其複製到剪貼簿,然後將其貼上到 ProductName TemplateField 的 ItemTemplate。 將 TextBox 的 ID 屬性改為 ProductName。
接下來,將 RequiredFieldValidator 新增到 ItemTemplate,以確保使用者為每個產品的名稱提供一個值。 將 ControlToValidate 屬性設定為 ProductName,將 ErrorMessage 屬性設定為「您必須提供產品的名稱」。 並將 Text 屬性設為 *。 將這些新內容新增至後 ItemTemplate,您的畫面看起來應該會類似圖 6。
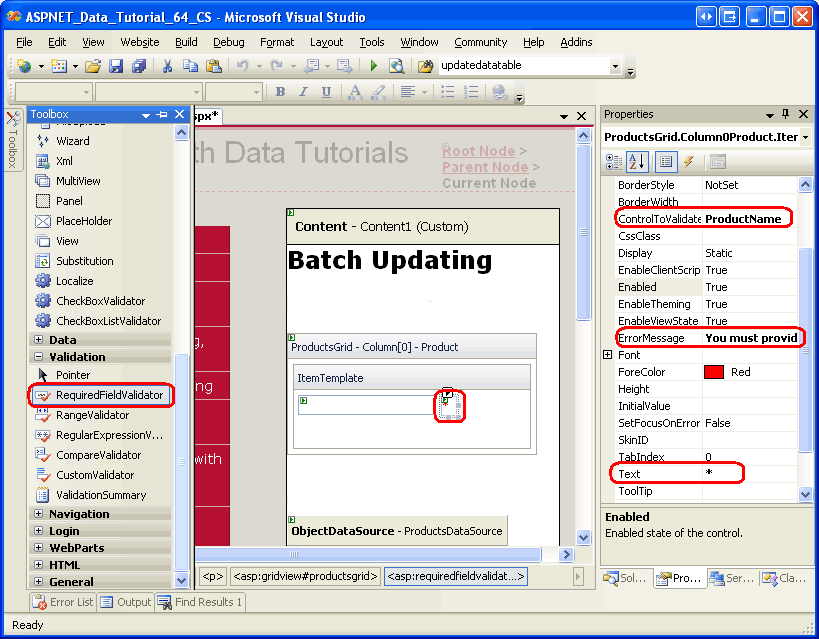
圖 6:ProductName TemplateField 現在包括一個 TextBox 和一個 RequiredFieldValidator (點擊查看完整圖片)
對於 UnitPrice 編輯介面,請先將 TextBox 從 EditItemTemplate 複製到 ItemTemplate。 接下來,在 TextBox 前面放置一個 $,並將其 ID 屬性設為 UnitPrice,將其 Columns 屬性設為 8。
也要在 UnitPrice 的 ItemTemplate 中加入一個 CompareValidator,以確保使用者輸入的值是大於或等於 $0.00 的有效貨幣值。 將驗證程式的 ControlToValidate 屬性設為 UnitPrice,將其 ErrorMessage 屬性設為「您必須輸入有效的貨幣值」。 請省略任何貨幣符號,其 Text 屬性為 *,其 Type 屬性為 Currency,其 Operator 屬性為 GreaterThanEqual,其 ValueToCompare 屬性為 0。

圖 7:加入 CompareValidator 以確保輸入的價格是非負貨幣值 (按一下以查看全尺寸影像)
對於 Discontinued TemplateField,您可以使用已在 ItemTemplate 定義的 CheckBox。 只需將其 ID 設為 Discontinued,並將其 Enabled 屬性設為 True。
步驟 3:建立CategoryName編輯介面
CategoryName TemplateField 的 EditItemTemplate 中的編輯介面包含一個顯示資料 CategoryName 欄位值的文字輸入框。 我們需要將其替換為列出可能類別的 DropDownList。
注意
「自訂資料修改介面」教學課程包含了更詳細和完整的討論,說明如何自訂範本以包含 DropDownList,而不是 TextBox。 雖然這裡的步驟是完整的,但表達得相當簡潔。 若要更深入了解建立和設定類別 DropDownList,請參閱「自訂資料修改介面」教學課程。
將 DropDownList 從工具箱拖曳到 CategoryName TemplateField 的 ItemTemplate 上,並將其 ID 設為 Categories。 此時,我們通常會透過其智慧標籤定義 DropDownLists 的資料來源,建立一個新的 ObjectDataSource。 但是,這將在 ItemTemplate 中新增 ObjectDataSource,導致為每個 GridView 行建立 ObjectDataSource 執行個體。 相反,讓我們在 GridView 的 TemplateFields 之外建立 ObjectDataSource。 結束範本編輯,並從工具箱中將 ObjectDataSource 拖曳到設計器中,位於 ProductsDataSource ObjectDataSource 的下方。 命名新的 ObjectDataSource CategoriesDataSource,並將其設定為使用 CategoriesBLL 類別的 GetCategories 方法。

圖 8:設定 ObjectDataSource 以使用 CategoriesBLL 類別 (點擊查看完整圖片)

圖 9:使用 GetCategories 方法檢索類別資料 (點擊查看完整圖片)
由於此 ObjectDataSource 僅用於檢索資料,因此請將 UPDATE 和 DELETE 標籤中的下拉式清單設為 (無)。 按一下 [完成] 以完成程序。

圖 10:將 UPDATE 和 DELETE 標籤中的下拉式清單設為 (無) (點擊查看完整圖片)
完成精靈後,CategoriesDataSource 的宣告式標記應如下所示:
<asp:ObjectDataSource ID="CategoriesDataSource" runat="server"
    OldValuesParameterFormatString="original_{0}"
    SelectMethod="GetCategories" TypeName="CategoriesBLL">
</asp:ObjectDataSource>
CategoriesDataSource 建立並設定完畢後,返回 CategoryName TemplateField 的 ItemTemplate,然後從 DropDownList 智慧標籤中點擊「選擇資料來源」連結。 在資料來源設定精靈中,從第一個下拉式清單中選擇 CategoriesDataSource 選項,然後選擇 CategoryName 進行顯示,以及 CategoryID 作為值。

圖 11:將 DropDownList 繫結到 CategoriesDataSource (點擊查看完整圖片)
此時,Categories DropDownList 會列出所有類別,但它尚未自動為繫結到 GridView 行的產品選擇適當的類別。 為了實現這一點,我們需要將 Categories DropDownList 的 SelectedValue 設定為產品的 CategoryID 值。 點擊 DropDownList 智慧標籤中的 Edit DataBindings 連結,並將 SelectedValue 屬性與 CategoryID 資料欄位關聯起來,如圖 12 所示。
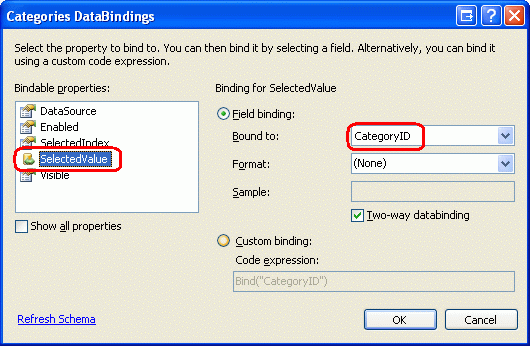
圖 12:將 Product 的 CategoryID 值繫結到 DropDownList 的 SelectedValue 屬性
還有一個最後的問題:如果產品沒有指定 CategoryID 值,那麼在 SelectedValue 上的資料繫結陳述式將導致例外狀況。 這是因為 DropDownList 僅包含類別項目,並未提供對於那些在 NULL 上有 CategoryID 資料庫值的產品的選項。 若要解決此問題,請將 DropDownList 的 AppendDataBoundItems 屬性設為 True,並將新項目新增至 DropDownList,並從宣告式語法中省略 Value 屬性。 也就是說,確保 Categories DropDownList 的宣告式語法如下所示:
<asp:DropDownList ID="Categories" runat="server" AppendDataBoundItems="True"
    DataSourceID="CategoriesDataSource" DataTextField="CategoryName"
    DataValueField="CategoryID" SelectedValue='<%# Bind("CategoryID") %>'>
    <asp:ListItem Value=">-- Select One --</asp:ListItem>
</asp:DropDownList>
請注意,「<asp:ListItem Value="">-- Select One --Value」屬性明確設定為空字串。 請參閱「自訂資料修改介面」教學課程,以更深入地討論為什麼需要這個額外的 DropDownList 項目來處理 NULL 情況,以及為什麼必須將 Value 屬性指派給空字串。
注意
這裡有一個值得提及的潛在效能和可擴展性問題。 由於每一行都有一個下拉式清單,其資料來源使用 CategoriesDataSource,因此 CategoriesBLL 類別的 GetCategories 方法將在每次頁面造訪時呼叫 n 次,其中 n 是 GridView 中的行數。 這 n 個對 GetCategories 的呼叫導致對資料庫的 n 個查詢。 透過在每個請求快取中快取傳回的類別,或透過使用 SQL 快取依賴項或非常短的基於時間的過期時間的快取層,可以減少對資料庫的影響。
步驟 4:完成編輯介面
我們對 GridView 範本進行了許多更改,但沒有停下來查看進度。 花點時間透過瀏覽器查看我們的進度。 如圖 13 所示,每行都使用其 ItemTemplate 來呈現,其中包含儲存格的編輯介面。

圖 13:每個 GridView 行都是可編輯的 (點擊查看完整圖片)
現在,有幾個小的格式問題需要處理。 首先,請注意 UnitPrice 值包含四個小數點。 要解決此問題,請返回 UnitPrice TemplateField 的 ItemTemplate,然後從 TextBox 的智慧標籤中按一下「編輯資料繫結」連結。 接下來,指定 Text 屬性應格式化為數字。
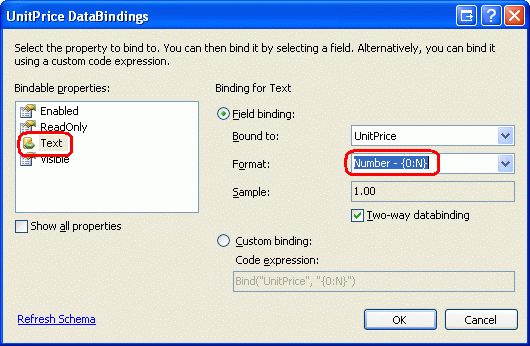
圖 14:將 Text 屬性設定為數字格式
其次,讓我們將核取方塊置於 Discontinued 列中央 (而不是左對齊)。 點擊 GridView 智慧標籤中的「編輯列」,然後從左下角的欄位清單中選擇 Discontinued TemplateField。 深入查看 ItemStyle,並將 HorizontalAlign 屬性設為 Center,如圖 15 所示。

圖 15:將 Discontinued 的核取方塊置中
接下來,將 ValidationSummary 控制項新增至頁面,並將其 ShowMessageBox 屬性設為 True,並將其 ShowSummary 屬性設為 False。 也新增按鈕 Web 控制項,按一下該控制項將更新使用者的變更。 具體來說,新增兩個 Button Web 控制項,一個位於 GridView 上方,一個位於 GridView 下方,並將這兩個控制項 Text 屬性設為 Update Products。
由於 GridView 的編輯介面是在其 TemplateFields 的 ItemTemplate 中定義的,因此這些 EditItemTemplate 是多餘的,可以刪除。
進行上述格式變更、新增 Button 控制項並刪除不必要的 EditItemTemplate 後,頁面的宣告式語法應如下所示:
<p>
    <asp:Button ID="UpdateAllProducts1" runat="server" Text="Update Products" />
</p>
<p>
    <asp:GridView ID="ProductsGrid" runat="server" AutoGenerateColumns="False"
        DataKeyNames="ProductID" DataSourceID="ProductsDataSource"
        AllowPaging="True" AllowSorting="True">
        <Columns>
            <asp:TemplateField HeaderText="Product" SortExpression="ProductName">
                <ItemTemplate>
                    <asp:TextBox ID="ProductName" runat="server"
                        Text='<%# Bind("ProductName") %>'></asp:TextBox>
                    <asp:RequiredFieldValidator ID="RequiredFieldValidator1"
                        ControlToValidate="ProductName"
                        ErrorMessage="You must provide the product's name."
                        runat="server">*</asp:RequiredFieldValidator>
                </ItemTemplate>
            </asp:TemplateField>
            <asp:TemplateField HeaderText="Category"
                SortExpression="CategoryName">
                <ItemTemplate>
                    <asp:DropDownList ID="Categories" runat="server"
                        AppendDataBoundItems="True"
                        DataSourceID="CategoriesDataSource"
                        DataTextField="CategoryName"
                        DataValueField="CategoryID"
                        SelectedValue='<%# Bind("CategoryID") %>'>
                        <asp:ListItem>-- Select One --</asp:ListItem>
                    </asp:DropDownList>
                </ItemTemplate>
            </asp:TemplateField>
            <asp:TemplateField HeaderText="Price"
                SortExpression="UnitPrice">
                <ItemTemplate>
                    $<asp:TextBox ID="UnitPrice" runat="server" Columns="8"
                        Text='<%# Bind("UnitPrice", "{0:N}") %>'></asp:TextBox>
                    <asp:CompareValidator ID="CompareValidator1" runat="server"
                        ControlToValidate="UnitPrice"
                        ErrorMessage="You must enter a valid currency value.
                                      Please omit any currency symbols."
                        Operator="GreaterThanEqual" Type="Currency"
                        ValueToCompare="0">*</asp:CompareValidator>
                </ItemTemplate>
            </asp:TemplateField>
            <asp:TemplateField HeaderText="Discontinued" SortExpression="Discontinued">
                <ItemTemplate>
                    <asp:CheckBox ID="Discontinued" runat="server"
                        Checked='<%# Bind("Discontinued") %>' />
                </ItemTemplate>
                <ItemStyle HorizontalAlign="Center" />
            </asp:TemplateField>
        </Columns>
    </asp:GridView>
</p>
<p>
    <asp:Button ID="UpdateAllProducts2" runat="server" Text="Update Products" />
    <asp:ObjectDataSource ID="ProductsDataSource" runat="server"
        OldValuesParameterFormatString="original_{0}"
        SelectMethod="GetProducts" TypeName="ProductsBLL">
    </asp:ObjectDataSource>
    <asp:ObjectDataSource ID="CategoriesDataSource" runat="server"
        OldValuesParameterFormatString="original_{0}"
        SelectMethod="GetCategories" TypeName="CategoriesBLL">
    </asp:ObjectDataSource>
    <asp:ValidationSummary ID="ValidationSummary1" runat="server"
        ShowMessageBox="True" ShowSummary="False" />
</p>
圖 16 顯示了新增 Button Web 控制項並進行格式變更後透過瀏覽器檢視的頁面。

圖 16:該頁面現在包含兩個更新產品按鈕 (點擊查看完整圖片)
步驟 5:更新產品
當使用者造訪此頁面時,他們將進行修改,然後點擊兩個更新產品按鈕之一。 此時,我們需要以某種方式將使用者輸入的每行值儲存到 ProductsDataTable 執行個體中,然後將其傳遞給 BLL 方法,該方法隨後將該 ProductsDataTable 執行個體傳遞給 DAL 的 UpdateWithTransaction 方法。 我們在UpdateWithTransaction中建立的 方法可確保批次變更將作為原子操作進行更新。
在 BatchUpdate 中建立名為 BatchUpdate.aspx.vb 的方法,並新增以下程式碼:
Private Sub BatchUpdate()
    ' Enumerate the GridView's Rows collection and create a ProductRow
    Dim productsAPI As New ProductsBLL()
    Dim products As Northwind.ProductsDataTable = productsAPI.GetProducts()
    For Each gvRow As GridViewRow In ProductsGrid.Rows
        ' Find the ProductsRow instance in products that maps to gvRow
        Dim productID As Integer = _
            Convert.ToInt32(ProductsGrid.DataKeys(gvRow.RowIndex).Value)
        Dim product As Northwind.ProductsRow = products.FindByProductID(productID)
        If product IsNot Nothing Then
            ' Programmatically access the form field elements in the
            ' current GridViewRow
            Dim productName As TextBox = _
                CType(gvRow.FindControl("ProductName"), TextBox)
            Dim categories As DropDownList = _
                CType(gvRow.FindControl("Categories"), DropDownList)
            Dim unitPrice As TextBox = _
                CType(gvRow.FindControl("UnitPrice"), TextBox)
            Dim discontinued As CheckBox = _
                CType(gvRow.FindControl("Discontinued"), CheckBox)
            ' Assign the user-entered values to the current ProductRow
            product.ProductName = productName.Text.Trim()
            If categories.SelectedIndex = 0 Then
                product.SetCategoryIDNull()
            Else
                product.CategoryID = Convert.ToInt32(categories.SelectedValue)
            End If
            If unitPrice.Text.Trim().Length = 0 Then
                product.SetUnitPriceNull()
            Else
                product.UnitPrice = Convert.ToDecimal(unitPrice.Text)
            End If
            product.Discontinued = discontinued.Checked
        End If
    Next
    ' Now have the BLL update the products data using a transaction
    productsAPI.UpdateWithTransaction(products)
End Sub
該方法會先透過呼叫 BLL 的 ProductsDataTable 方法來獲取所有的產品,並傳回一個 GetProducts。 然後它會列舉 ProductGrid GridView 的 Rows 集合。
Rows 集合包含 GridView 中顯示的每一行的 GridViewRow 執行個體。 由於我們每頁最多顯示十行,因此 GridView 的 Rows 集合項目數不會超過十個。
對於每一行,ProductID 是從 DataKeys 集合中抓取的,並從 ProductsRow 中選擇適當的行,該行來自 ProductsDataTable。 四個 TemplateField 輸入控制項會以程式設計方式參考,並將它們的值指派給 ProductsRow 執行個體的屬性。 在使用每個 GridView 行的值更新 ProductsDataTable 後,它會傳遞到 BLL 的 UpdateWithTransaction 方法,正如我們在前面的教學課程中看到的,該方法只是向下呼叫 DAL 的 UpdateWithTransaction 方法。
本教學課程所使用的批次更新演算法會更新 ProductsDataTable 中與 GridView 中的一行相對應的每一行,無論產品資訊是否已變更。 雖然這種盲目更新通常不是效能問題,但如果您正在審核對資料庫表的更改,它們可能會導致多餘的記錄。 之前在「執行批次更新」教學課程,我們探索了使用 DataList 的批次更新介面,並新增了僅更新使用者實際修改的記錄的程式碼。 如果需要,請隨意使用「執行批次更新」中的技術來更新本教學課程中的程式碼。
注意
透過智慧標籤將資料來源繫結到 GridView 時,Visual Studio 會自動將資料來源的主索引鍵值指派給 GridView 的 DataKeyNames 屬性。 如果您沒有依照步驟 1 所述透過 GridView 的 DataKeyNames 智慧標籤,將 ObjectDataSource 繫結到 GridView,則需要手動將 GridView 的屬性設定為 ProductID,以便透過 ProductID 集合存取每行的 DataKeys 值。
BatchUpdate 中使用的程式碼與 BLL 的 UpdateProduct 方法中使用的程式碼類似,主要差異在於 UpdateProduct 方法中僅從架構中檢索單一 ProductRow 執行個體。
ProductRow 方法和 UpdateProducts 中 For Each 循環內的程式碼之間分配 BatchUpdate 屬性的程式碼是相同的,整體模式也是如此。
為了完成本教學課程,我們需要在點擊任一「更新產品」按鈕時,叫用 BatchUpdate 方法。 為這兩個 Button 控制項的 Click 事件會建立事件處理常式,並在事件處理常式中加入以下程式碼:
BatchUpdate()
ClientScript.RegisterStartupScript(Me.GetType(), "message", _
    "alert('The products have been updated.');", True)
首先會呼叫 BatchUpdate。 接下來,使用 ClientScript 屬性注入 JavaScript,該 JavaScript 將顯示一個訊息框,其中顯示產品已更新。
花一點時間測試這段程式碼。 透過瀏覽器造訪 BatchUpdate.aspx,編輯多行,然後點擊其中一個「更新產品」按鈕。 假設沒有輸入驗證錯誤,您應該會看到一個訊息框,上面寫著「產品已更新」。 若要驗證更新的原子性,請考慮新增隨機 CHECK 條件約束,例如不允許 UnitPrice 的值為 1234.56。 然後從 BatchUpdate.aspx 編輯多筆記錄,確保將其中一個產品的 UnitPrice 值設為禁止的值 (1234.56)。 當按一下「更新產品」並將批次操作期間的其他變更回滾到其原始值時,這應該會導致錯誤。
另一種BatchUpdate方法
我們剛剛測試的 BatchUpdate 方法是從 BLL 的 方法檢索GetProducts產品,然後僅更新 GridView 中出現的那些記錄。 如果 GridView 不使用分頁,則此方法是理想的,但如果使用分頁,則可能有數百、數千或數萬個產品,但 GridView 中只有十行。 在這種情況下,從資料庫中取得所有產品僅修改其中 10 個產品並不理想。
對於這類情況,請考慮使用以下 BatchUpdateAlternate 方法:
Private Sub BatchUpdateAlternate()
    ' Enumerate the GridView's Rows collection and create a ProductRow
    Dim productsAPI As New ProductsBLL()
    Dim products As New Northwind.ProductsDataTable()
    For Each gvRow As GridViewRow In ProductsGrid.Rows
        ' Create a new ProductRow instance
        Dim productID As Integer = _
            Convert.ToInt32(ProductsGrid.DataKeys(gvRow.RowIndex).Value)
        Dim currentProductDataTable As Northwind.ProductsDataTable = _
            productsAPI.GetProductByProductID(productID)
        If currentProductDataTable.Rows.Count > 0 Then
            Dim product As Northwind.ProductsRow = currentProductDataTable(0)
            Dim productName As TextBox = _
                CType(gvRow.FindControl("ProductName"), TextBox)
            Dim categories As DropDownList = _
                CType(gvRow.FindControl("Categories"), DropDownList)
            Dim unitPrice As TextBox = _
                CType(gvRow.FindControl("UnitPrice"), TextBox)
            Dim discontinued As CheckBox = _
                CType(gvRow.FindControl("Discontinued"), CheckBox)
            ' Assign the user-entered values to the current ProductRow
            product.ProductName = productName.Text.Trim()
            If categories.SelectedIndex = 0 Then
                product.SetCategoryIDNull()
            Else
                product.CategoryID = Convert.ToInt32(categories.SelectedValue)
            End If
            If unitPrice.Text.Trim().Length = 0 Then
                product.SetUnitPriceNull()
            Else
                product.UnitPrice = Convert.ToDecimal(unitPrice.Text)
            End If
            product.Discontinued = discontinued.Checked
            ' Import the ProductRow into the products DataTable
            products.ImportRow(product)
        End If
    Next
    ' Now have the BLL update the products data using a transaction
    productsAPI.UpdateProductsWithTransaction(products)
End Sub
BatchMethodAlternate 先建立一個名為 ProductsDataTable 的新空白 products。 然後,它逐步遍歷 GridView 的 Rows 集合,並使用 BLL 的 GetProductByProductID(productID) 方法為每一行獲取特定產品資訊。 檢索到的 ProductsRow 執行個體的屬性以與 BatchUpdate 相同的方式更新,但在更新行後,它會透過 DataTable 的 products匯入到 ProductsDataTableImportRow(DataRow) 中。
For Each 循環完成後,products 會包含一個對應於 GridView 中每一行的 ProductsRow 執行個體。 由於每個 ProductsRow 執行個體都已新增至 products (而不是更新),因此如果我們盲目地將其傳遞給 UpdateWithTransaction 方法,ProductsTableAdapter 將嘗試將每筆記錄插入資料庫中。 相反,我們需要指定這些行中的每一行都已被修改 (而不是新增)。
這可以透過向名為 UpdateProductsWithTransaction 的 BLL 新增方法來完成。 如下所示,UpdateProductsWithTransaction 會將 RowState 中每個 ProductsRow 執行個體的 ProductsDataTable 設定為 Modified,然後將 ProductsDataTable 傳遞給 DAL 的 UpdateWithTransaction 方法。
Public Function UpdateProductsWithTransaction _
    (ByVal products As Northwind.ProductsDataTable) As Integer
    ' Mark each product as Modified
    products.AcceptChanges()
    For Each product As Northwind.ProductsRow In products
        product.SetModified()
    Next
    ' Update the data via a transaction
    Return UpdateWithTransaction(products)
End Function
摘要
GridView 提供內建的每行編輯功能,但缺乏對建立完全可編輯介面的支援。 正如我們在本教學課程中所見,這樣的介面是可行的,但需要花費一些時間和精力。 要建立每行都可編輯的 GridView,我們需要將 GridView 的欄位轉換為 TemplateFields 並在 ItemTemplate 中定義編輯介面。 此外,必須將「全部更新」類型的按鈕 Web 控制項新增至頁面中,與 GridView 分開。 這些按鈕 Click 事件處理常式需要列舉 GridView 的 Rows 集合,將變更儲存在 ProductsDataTable 中,並將更新的資訊傳遞到對應的 BLL 方法中。
在下一個教學課程中,我們將看到如何建立批次刪除的介面。 特別是,每個 GridView 行都將包含一個核取方塊,並且我們將擁有一個「刪除所選行」按鈕,而不是「全部更新」類型的按鈕。
祝您程式設計愉快!
關於作者
斯科特·米切爾,七本 ASP/ASP.NET 書籍和 4GuysFromRolla.com 創始人的作者,自1998年以來一直與Microsoft Web 技術合作。 Scott 擔任獨立顧問、講師和作家。 他的新書是 Sams Teach Yourself ASP.NET 2.0 in 24 Hours。 可以透過 mitchell@4GuysFromRolla.com 聯絡他。
特別感謝
本教學課程系列已經過許多熱心的檢閱者檢閱。 本教學課程的主要審閱者是 Teresa Murphy 和 David Suru。 有興趣檢閱我即將推出的 MSDN 文章嗎? 如果是,請在 mitchell@4GuysFromRolla.com給我留言。