本教學課程系列示範搭配 ASP.NET Web Forms專案使用模型系結的基本層面。 模型系結讓資料互動比處理資料來源物件更直接, (例如 ObjectDataSource 或 SqlDataSource) 。 本系列從簡介內容開始,並在稍後的教學課程中移至更進階的概念。
本教學課程示範如何透過模型系結新增資料的排序、分頁和篩選。
本教學課程是以系列第一 個部分中 建立的專案為基礎。
您可以在 C# 或 VB 中 下載 完整的專案。 可下載的程式碼適用于 Visual Studio 2012 或 Visual Studio 2013。 它會使用 Visual Studio 2012 範本,這與本教學課程所示的Visual Studio 2013範本稍有不同。
您將建置什麼
在本教學課程中,您將會:
- 啟用資料的排序和分頁
- 根據使用者的選取範圍啟用資料篩選
新增排序
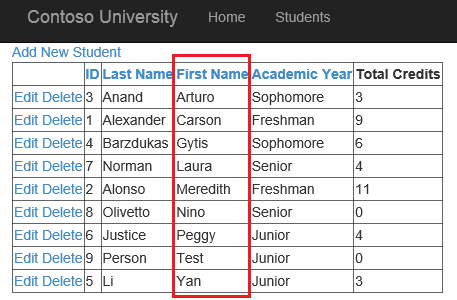
在 GridView 中啟用排序非常簡單。 在 Student.aspx 檔案中,只要在 GridView 中將 AllowSorting 設定為 true 即可。 您不需要為每個資料行設定 SortExpression 值,因為會自動使用 DataField。 GridView 會修改查詢,以包含依選取的值排序資料。 以下醒目提示的程式碼顯示啟用排序所需的新增專案。
<asp:GridView runat="server" ID="studentsGrid"
    ItemType="ContosoUniversity.Models.Student" DataKeyNames="StudentID"
    SelectMethod="studentsGrid_GetData"
    UpdateMethod="studentsGrid_UpdateItem" DeleteMethod="studentsGrid_DeleteItem"
    AllowSorting="true"
    AutoGenerateEditButton="true" AutoGenerateDeleteButton="true"
    AutoGenerateColumns="false">
  <Columns>
    <asp:DynamicField DataField="StudentID" />
    <asp:DynamicField DataField="LastName" />
    <asp:DynamicField DataField="FirstName" />
    <asp:DynamicField DataField="Year" />
    <asp:TemplateField HeaderText="Total Credits">
      <ItemTemplate>
        <asp:Label Text="<%# Item.Enrollments.Sum(en => en.Course.Credits) %>"
            runat="server" />
      </ItemTemplate>
    </asp:TemplateField>
  </Columns>
</asp:GridView>
執行 Web 應用程式,並依不同資料行中的值測試排序學生記錄。
新增分頁
啟用分頁也非常簡單。 在 GridView 中,將 AllowPaging 屬性設定為 true ,並將 PageSize 屬性設定為您想要在每個頁面上顯示的記錄數目。 在本教學課程中,您可以將它設定為 4。
<asp:GridView runat="server" ID="studentsGrid"
    ItemType="ContosoUniversity.Models.Student" DataKeyNames="StudentID"
    SelectMethod="studentsGrid_GetData"
    UpdateMethod="studentsGrid_UpdateItem" DeleteMethod="studentsGrid_DeleteItem"
    AllowSorting="true" AllowPaging="true" PageSize="4"
    AutoGenerateEditButton="true" AutoGenerateDeleteButton="true"
    AutoGenerateColumns="false">
執行 Web 應用程式,並請注意,現在記錄會分割成多個頁面,且單一頁面上顯示不超過 4 筆記錄。
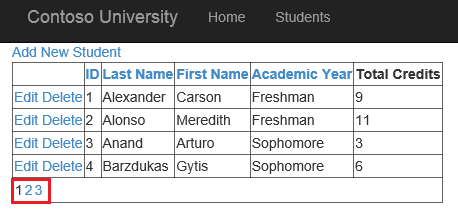
延後查詢執行可改善應用程式效率。 GridView 會修改查詢,只擷取目前頁面的記錄,而不是擷取整個資料集。
依使用者選取範圍篩選記錄
模型系結會新增數個屬性,讓您指定如何在模型系結方法中設定參數的值。 這些屬性位於 System.Web.ModelBinding 命名空間中。 包括:
- 控制
- Cookie
- 表單
- 設定檔
- QueryString
- RouteData
- 工作階段
- UserProfile
- ViewState
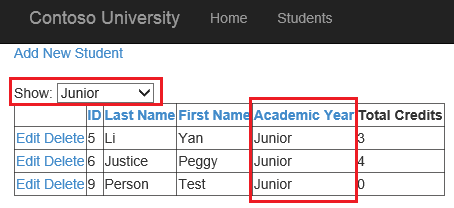
在本教學課程中,您將使用控制項的值來篩選 GridView 中顯示的記錄。 您會將 Control 屬性新增至您稍早建立的查詢方法。 在 稍後 的教學課程中,您會將 QueryString 屬性套用至參數,以指定參數值來自查詢字串值。
首先,在 ValidationSummary 上方,新增下拉式清單以篩選要顯示哪些學生。
<asp:HyperLink runat="server" NavigateUrl="~/AddStudent" Text="Add New Student" />

<br /><br />
<asp:Label runat="server" Text="Show:" />
<asp:DropDownList runat="server" AutoPostBack="true" ID="DisplayYear">
    <asp:ListItem Text="All" Value="" />
    <asp:ListItem Text="Freshman" />
    <asp:ListItem Text="Sophomore" />
    <asp:ListItem Text="Junior" />
    <asp:ListItem Text="Senior" />
</asp:DropDownList>

<asp:ValidationSummary runat="server" ShowModelStateErrors="true"/>
在程式碼後置檔案中,修改 select 方法以接收控制項中的值,並將 參數的名稱設定為提供值的控制項名稱。
您必須為System.Web.ModelBinding命名空間新增using語句,才能解析 Control 屬性。
using System.Web.ModelBinding;
下列程式碼顯示 select 方法已重新運作,可根據下拉式清單的值篩選傳回的資料。 在參數之前新增控制項屬性,指定此參數的值來自具有相同名稱的控制項。
public IQueryable<Student> studentsGrid_GetData([Control] AcademicYear? displayYear)
{
    SchoolContext db = new SchoolContext();
    var query = db.Students.Include(s => s.Enrollments.Select(e => e.Course));

    if (displayYear != null)
    {
        query = query.Where(s => s.Year == displayYear);
    }

    return query;
}
執行 Web 應用程式,並從下拉式清單中選取不同的值,以篩選學生清單。
結論
在本教學課程中,您已啟用資料的排序和分頁。 您也可以透過 控制項的值來啟用篩選資料。
在下一個 教學課程 中,您將 JQuery UI 小工具整合到動態資料範本中,以增強 UI。