本教學課程系列示範搭配 ASP.NET Web Forms專案使用模型系結的基本層面。 模型系結讓資料互動比處理資料來源物件更直接, (例如 ObjectDataSource 或 SqlDataSource) 。 本系列從簡介內容開始,並在稍後的教學課程中移至更進階的概念。
本教學課程示範如何使用模型系結來建立、更新和刪除資料。 您將設定下列屬性:
- DeleteMethod
- InsertMethod
- UpdateMethod
這些屬性會接收處理對應作業的方法名稱。 在該方法中,您會提供與資料互動的邏輯。
本教學課程是以系列第一 個部分中 建立的專案為基礎。
您可以在 C# 或 VB 中 下載 完整的專案。 可下載的程式碼適用于 Visual Studio 2012 或 Visual Studio 2013。 它會使用 Visual Studio 2012 範本,這與本教學課程所示的Visual Studio 2013範本稍有不同。
您將建置什麼
在本教學課程中,您將會:
- 新增動態資料範本
- 透過模型系結方法啟用更新和刪除資料
- 套用資料驗證規則 - 啟用在資料庫中建立新記錄
新增動態資料範本
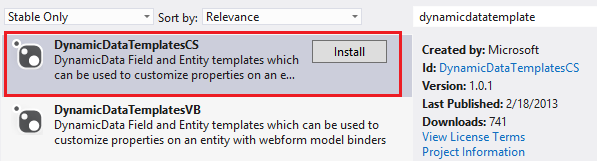
為了提供最佳的使用者體驗,並將程式碼重複降至最低,您將使用動態資料範本。 您可以藉由安裝 NuGet 套件,輕鬆地將預先建置的動態資料範本整合到現有的月臺。
從 [管理 NuGet 套件],安裝 DynamicDataTemplatesCS。
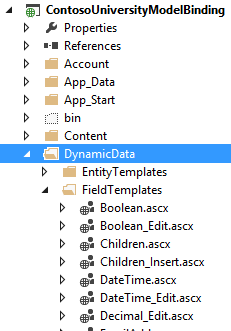
請注意,您的專案現在包含名為 DynamicData的資料夾。 在該資料夾中,您會發現會自動套用至 Web 表單中動態控制項的範本。
啟用更新和刪除
讓使用者更新和刪除資料庫中的記錄,與擷取資料的程式非常類似。 在 UpdateMethod 和 DeleteMethod 屬性中,您可以指定執行這些作業的方法名稱。 使用 GridView 控制項,您也可以指定自動產生編輯和刪除按鈕。 下列醒目提示的程式碼會顯示 GridView 程式碼的新增專案。
<asp:GridView runat="server" ID="studentsGrid"
    ItemType="ContosoUniversityModelBinding.Models.Student" DataKeyNames="StudentID"
    SelectMethod="studentsGrid_GetData"
    UpdateMethod="studentsGrid_UpdateItem" DeleteMethod="studentsGrid_DeleteItem"
    AutoGenerateEditButton="true" AutoGenerateDeleteButton="true"
    AutoGenerateColumns="false">
在程式碼後置檔案中,新增 System.Data.Entity.Infrastructure的 using 語句。
using System.Data.Entity.Infrastructure;
然後,新增下列更新和刪除方法。
public void studentsGrid_UpdateItem(int studentID)
{
    using (SchoolContext db = new SchoolContext())
    {
        Student item = null;
        item = db.Students.Find(studentID);
        if (item == null)
        {
            ModelState.AddModelError("",
              String.Format("Item with id {0} was not found", studentID));
            return;
        }

        TryUpdateModel(item);
        if (ModelState.IsValid)
        {
            db.SaveChanges();
        }
    }
}

public void studentsGrid_DeleteItem(int studentID)
{
    using (SchoolContext db = new SchoolContext())
    {
        var item = new Student { StudentID = studentID };
        db.Entry(item).State = EntityState.Deleted;
        try
        {
            db.SaveChanges();
        }
        catch (DbUpdateConcurrencyException)
        {
            ModelState.AddModelError("",
              String.Format("Item with id {0} no longer exists in the database.", studentID));
        }
    }
}
TryUpdateModel方法會將來自 Web 表單的相符資料系結值套用至資料項目。 資料項目是根據 id 參數的值來擷取。
強制執行驗證需求
您套用至 Student 類別中 FirstName、LastName 和 Year 屬性的驗證屬性會在更新資料時自動強制執行。 DynamicField 控制項會根據驗證屬性新增用戶端和伺服器驗證程式。 FirstName 和 LastName 屬性都是必要的。 FirstName 長度不能超過 20 個字元,而 LastName 不能超過 40 個字元。 Year 必須是 AcademicYear 列舉的有效值。
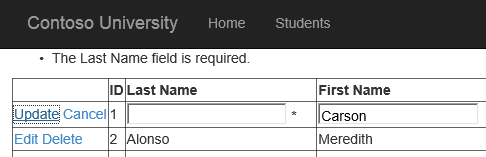
如果使用者違反其中一個驗證需求,則不會繼續更新。 若要查看錯誤訊息,請在 GridView 上方新增 ValidationSummary 控制項。 若要顯示來自模型系結的驗證錯誤,請將 ShowModelStateErrors 屬性設定為 true。
<asp:ValidationSummary ShowModelStateErrors="true" runat="server" />
執行 Web 應用程式,並更新並刪除任何記錄。
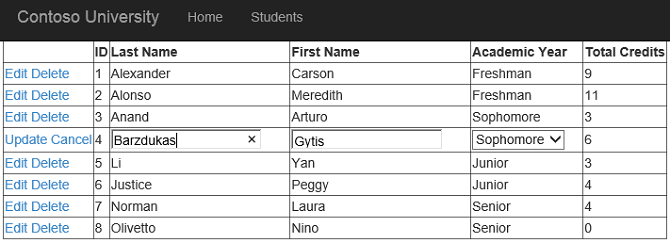
請注意,在編輯模式中,Year 屬性的值會自動轉譯為下拉式清單。 Year 屬性是列舉值,而列舉值的動態資料範本會指定要編輯的下拉式清單。 您可以在DynamicData/FieldTemplates資料夾中開啟Enumeration_Edit.ascx檔案,以找到該範本。
如果您提供有效的值,更新就會順利完成。 如果您違反其中一個驗證需求,則更新不會繼續,而且會在方格上方顯示錯誤訊息。
新增記錄
GridView 控制項不包含 InsertMethod 屬性,因此無法用於新增具有模型系結的新記錄。 您可以在 FormView、 DetailsView或 ListView 控制項中找到 InsertMethod 屬性。 在本教學課程中,您將使用 FormView 控制項來新增記錄。
首先,將連結新增至您將建立以新增記錄的新頁面。 在 ValidationSummary 上方,新增:
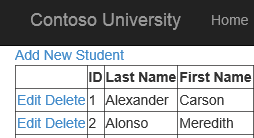
<asp:HyperLink NavigateUrl="~/AddStudent" Text="Add New Student" runat="server" />
新連結會出現在 Students 頁面的內容頂端。
然後,使用主版頁面新增 Web 表單,並將其命名為 AddStudent。 選取 [Site.Master] 作為主版頁面。
您將使用 DynamicEntity 控制項來轉譯欄位來新增學生。 DynamicEntity 控制項會轉譯 ItemType 屬性中指定的類別中可編輯的屬性。 StudentID 屬性標示為 [ScaffoldColumn (false) ] 屬性,因此不會轉譯。 在 AddStudent 頁面的 MainContent 預留位置中,新增下列程式碼。
<asp:ValidationSummary runat="server" ShowModelStateErrors="true" />
<asp:FormView runat="server" ID="addStudentForm"
    ItemType="ContosoUniversityModelBinding.Models.Student"
    InsertMethod="addStudentForm_InsertItem" DefaultMode="Insert"
    RenderOuterTable="false" OnItemInserted="addStudentForm_ItemInserted">
    <InsertItemTemplate>
        <fieldset>
            <ol>
                <asp:DynamicEntity runat="server" Mode="Insert" />
            </ol>
            <asp:Button runat="server" Text="Insert" CommandName="Insert" />
            <asp:Button runat="server" Text="Cancel" CausesValidation="false" OnClick="cancelButton_Click" />
        </fieldset>
    </InsertItemTemplate>
</asp:FormView>
在程式碼後置檔案 (AddStudent.aspx.cs) 中,新增ContosoUniversityModelBinding.Models命名空間的using語句。
using ContosoUniversityModelBinding.Models;
然後,新增下列方法來指定如何插入新記錄和取消按鈕的事件處理常式。
public void addStudentForm_InsertItem()
{
    var item = new Student();

    TryUpdateModel(item);
    if (ModelState.IsValid)
    {
        using (SchoolContext db = new SchoolContext())
        {
            db.Students.Add(item);
            db.SaveChanges();
        }
    }
}

protected void cancelButton_Click(object sender, EventArgs e)
{
    Response.Redirect("~/Students");
}

protected void addStudentForm_ItemInserted(object sender, FormViewInsertedEventArgs e)
{
    Response.Redirect("~/Students");
}
儲存所有變更。
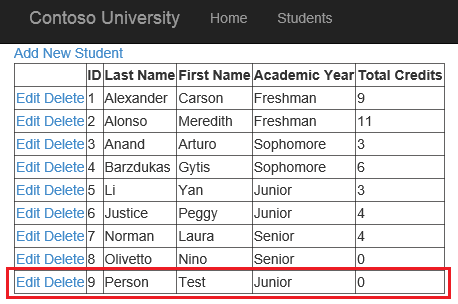
執行 Web 應用程式並建立新的學生。
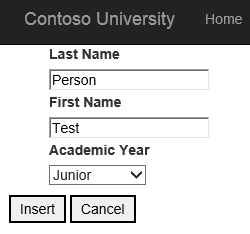
按一下 [插入 ],並注意已建立新的學生。
結論
在本教學課程中,您已啟用更新、刪除和建立資料。 您確定會在與資料互動時套用驗證規則。
在此系列中的下一個教學 課程 中,您將啟用排序、分頁和篩選資料。