Azure App Service 提供可高度擴充、自我修補的 Web 應用程式裝載服務。 在本快速入門中,您會使用 適用於 Azure App Service Web Apps 的 Maven 外掛程式 ,將 Java Web 應用程式部署至 Azure App Service 中的 Linux Tomcat 伺服器。
如果 Maven 不是您慣用的開發工具,請參閱 Java 開發人員的類似文章:
先決條件
-
如果您沒有 Azure 帳戶,請在開始之前建立 免費帳戶 。
使用 Azure Cloud Shell 執行此快速入門中的命令列指令,Azure Cloud Shell 是一個互動式 Shell,您可以透過瀏覽器來使用 Azure 服務。 若要使用 Cloud Shell:
選取下列 [ 啟動 Cloud Shell ] 按鈕,或移至在 https://shell.azure.com 瀏覽器中開啟 Cloud Shell。

如有必要,請登入 Azure,並確定您位於 Cloud Shell 的 Bash 環境中。
選取程式代碼區塊中的 [複製 ],將程式代碼貼到 Cloud Shell 中,然後加以執行。
建立 Java 應用程式
在 Cloud Shell 中執行下列 Maven 命令,以建立名為 helloworld的新應用程式:
mvn archetype:generate "-DgroupId=example.demo" "-DartifactId=helloworld" "-DarchetypeArtifactId=maven-archetype-webapp" "-DarchetypeVersion=1.4" "-Dversion=1.0-SNAPSHOT"
然後執行 cd helloworld,將您的工作目錄變更為項目資料夾。
設定 Maven 外掛程式
App Service 部署程式會自動使用 Cloud Shell 中的 Azure 認證。 Maven 外掛程式會向 OAuth 或裝置登入進行驗證。 如需詳細資訊,請參閱 驗證。
執行下列 Maven 命令,藉由設定 App Service 作業系統、Java 版本和 Tomcat 版本來設定部署。
mvn com.microsoft.azure:azure-webapp-maven-plugin:2.14.1:config
- 針對 [建立新的執行組態],輸入 Y ,然後按 Enter。
- 針對 定義 OS 的值,輸入 2 為 Linux,然后按 Enter。
- 針對 定義 javaVersion 的值,輸入 1 表示 Java 21,然後按下 Enter。
- 針對 [定義 webContainer 的值],針對 Tomcat 10.1 輸入 1 ,然後按 Enter。
- 針對 定義 pricingTier 的值,輸入 3 為 P1V2,然後按 Enter。
- 針對 [確認],輸入 Y ,然後按 Enter。
輸出看起來應該類似下列程式代碼:
Please confirm webapp properties
AppName : helloworld-1745408005556
ResourceGroup : helloworld-1745408005556-rg
Region : centralus
PricingTier : P1V2
OS : Linux
Java Version: Java 21
Web server stack: Tomcat 10.1
Deploy to slot : false
Confirm (Y/N) [Y]:
[INFO] Saving configuration to pom.
[INFO] ------------------------------------------------------------------------
[INFO] BUILD SUCCESS
[INFO] ------------------------------------------------------------------------
[INFO] Total time:  01:36 min
[INFO] Finished at: 2025-04-23T11:34:44Z
[INFO] ------------------------------------------------------------------------
確認您的選擇之後,外掛程式會將外掛程式元素和必要設定新增至專案的 pom.xml 檔案,以設定 Web 應用程式以在 App Service 中執行。
pom.xml 檔案的相關部分看起來應該類似下列範例。
<build>
    <plugins>
        <plugin>
            <groupId>com.microsoft.azure</groupId>
            <artifactId>>azure-webapp-maven-plugin</artifactId>
            <version>x.xx.x</version>
            <configuration>
                <schemaVersion>v2</schemaVersion>
                <resourceGroup>helloworld-1745408005556-rg</resourceGroup>
                <appName>helloworld-1745408005556</appName>
            ...
            </configuration>
        </plugin>
    </plugins>
</build>
稍後會使用示範應用程式中<appName>和<resourceGroup>、helloworld-1745408005556和helloworld-1745408005556-rg的值。
您可以直接在 pom.xml 檔案中修改 App Service 的組態。
- 如需組態的完整清單,請參閱 一般組態。
- 如需 App Service 特定的組態,請參閱 Azure Web 應用程式:組態詳細資料。
部署應用程式
在 pom.xml 檔案中備妥所有組態後,您可以使用下列單一命令,將 Java 應用程式部署至 Azure。
mvn package azure-webapp:deploy
從可用的訂用帳戶清單中選取之後,Maven 就會部署到 Azure App Service。 部署完成時,您的應用程式便已就緒。
在這裡示範中,URL 為 http://helloworld-1745408005556.azurewebsites.net。 當您使用本機網頁瀏覽器開啟 URL 時,您應該會看到下列應用程式:
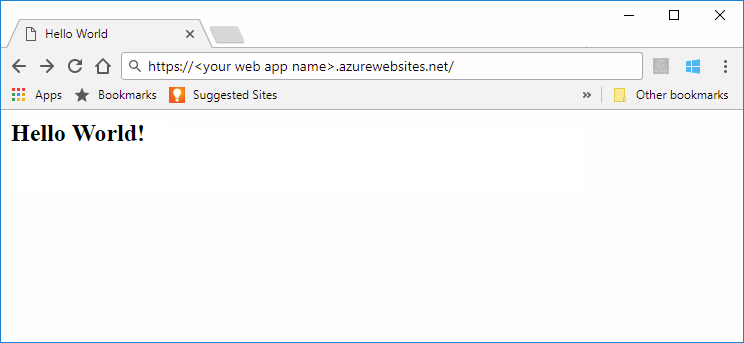
恭喜! 您已將 Java 應用程式部署至 App Service。
清理資源
您已在 Azure 資源群組中建立本教學課程的資源。 如果您不再需要它們,您可以在 Cloud Shell 中執行下列 Azure CLI 命令,以刪除資源群組及其所有資源。
az group delete --name helloworld-1745408005556-rg --yes
命令可能需要一些時間才能執行。
Azure App Service 提供可高度擴充、自我修補的 Web 應用程式裝載服務。 在本快速入門中,您會使用 適用於 Azure App Service Web Apps 的 Maven 外掛程式 ,將內嵌的 Spring Boot、Quarkus 或 Tomcat 伺服器部署至 App Service 的 Java Web 應用程式。 如需詳細資訊,請參閱 azure-webapp-maven-plugin。
如果 Maven 不是您慣用的開發工具,請參閱 Java 開發人員的類似文章:
先決條件
-
如果您沒有 Azure 帳戶,請在開始之前建立 免費帳戶 。
使用 Azure Cloud Shell 執行此快速入門中的命令列指令,Azure Cloud Shell 是一個互動式 Shell,您可以透過瀏覽器來使用 Azure 服務。 若要使用 Cloud Shell:
選取下列 [ 啟動 Cloud Shell ] 按鈕,或移至在 https://shell.azure.com 瀏覽器中開啟 Cloud Shell。
如有必要,請登入 Azure,並確定您位於 Cloud Shell 的 Bash 環境中。
選取程式代碼區塊中的 [複製 ],將程式代碼貼到 Cloud Shell 中,然後加以執行。
取得範例應用程式
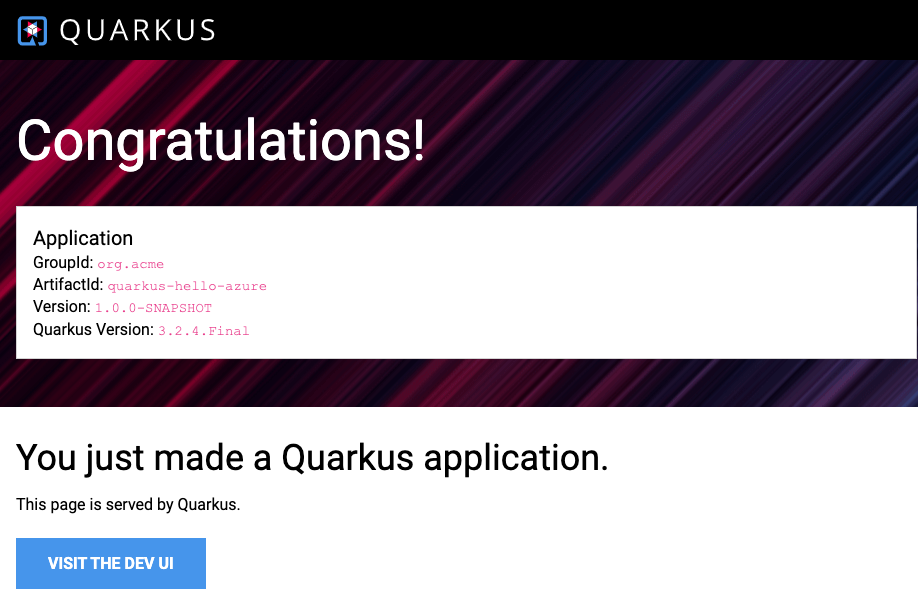
選擇適當的索引標籤,並遵循指示來取得範例 Spring Boot、Quarkus 或 Embedded Tomcat Web 應用程式。
下載並擷取 預設的 Spring Boot Web 應用程式範本,或執行下列命令加以複製。 執行 Spring CLI 命令 spring boot new my-webapp 也會複製 Web 應用程式。
git clone https://github.com/rd-1-2022/rest-service my-webapp
然後執行 cd my-webapp,將您的工作目錄變更為項目資料夾。
設定 Maven 外掛程式
App Service 部署程式會自動使用 Cloud Shell 中的 Azure 認證。 Maven 外掛程式會向 OAuth 或裝置登入進行驗證。 如需詳細資訊,請參閱 驗證。
執行以下 Maven 命令,藉由設定 App Service 作業系統和 Java 版本來配置部署。
mvn com.microsoft.azure:azure-webapp-maven-plugin:2.14.1:config
- 針對 [建立新的執行組態],輸入 Y ,然後按 Enter。
- 針對 定義 OS 的值,輸入 2 為 Linux,然后按 Enter。
- 針對 定義 javaVersion 的值,輸入 1 表示 Java 21,然後按下 Enter。
- 針對 定義 pricingTier 的值,輸入 3 以選擇 P1v2,然後按 Enter。
- 針對 [確認],輸入 Y ,然後按 Enter。
輸出看起來應該類似下列程式代碼:
Please confirm webapp properties
AppName : <generated-app-name>
ResourceGroup : <generated-app-name>-rg
Region : centralus
PricingTier : P1v2
OS : Linux
Java Version: Java 21
Web server stack: Java SE
Deploy to slot : false
Confirm (Y/N) [Y]:
[INFO] Saving configuration to pom.
[INFO] ------------------------------------------------------------------------
[INFO] BUILD SUCCESS
[INFO] ------------------------------------------------------------------------
[INFO] Total time:  47.533 s
[INFO] Finished at: 2025-04-23T12:20:08Z
[INFO] ------------------------------------------------------------------------
確認您的選擇之後,外掛程式會將外掛程式元素和必要設定新增至專案的 pom.xml 檔案,以設定 Web 應用程式以在 App Service 中執行。
pom.xml 檔案的相關部分看起來應該類似下列範例。
<build>
    <plugins>
        <plugin>
            <groupId>com.microsoft.azure</groupId>
            <artifactId>>azure-webapp-maven-plugin</artifactId>
            <version>x.xx.x</version>
            <configuration>
                <schemaVersion>v2</schemaVersion>
                <resourceGroup>generated-app-name-rg</resourceGroup>
                <appName>generated-app-name</appName>
            ...
            </configuration>
        </plugin>
    </plugins>
</build>
<appName> 和 <resourceGroup> 的值稍後會使用。
您可以直接在 pom.xml 檔案中修改 App Service 的組態。
- 如需組態的完整清單,請參閱 一般組態。
- 如需 App Service 特定的組態,請參閱 Azure Web 應用程式:組態詳細資料。
部署應用程式
在 pom.xml 檔案中備妥所有設定後,您可以將 Java 應用程式部署至 Azure。
使用下列命令建置 JAR 檔案。
mvn clean package秘訣
Spring Boot 會產生兩個具有
mvn package的 JAR 檔案,但azure-webapp-maven-plugin會挑選正確的 JAR 檔案來自動部署。使用下列命令將應用程式部署至 Azure:
mvn azure-webapp:deploy從可用的訂用帳戶清單中選取之後,Maven 就會部署到 Azure App Service。 部署完成時,您的應用程式已就緒,您會看到下列輸出:
[INFO] Successfully deployed the artifact to <URL>
[INFO] ------------------------------------------------------------------------
[INFO] BUILD SUCCESS
[INFO] ------------------------------------------------------------------------
[INFO] Total time:  02:20 min
[INFO] Finished at: 2023-07-26T12:47:50Z
[INFO] ------------------------------------------------------------------------
從 Azure 入口網站中的 [概 觀 ] 頁面開啟應用程式的預設網域,並附加
/greeting至 URL。 您應該會看到下列應用程式: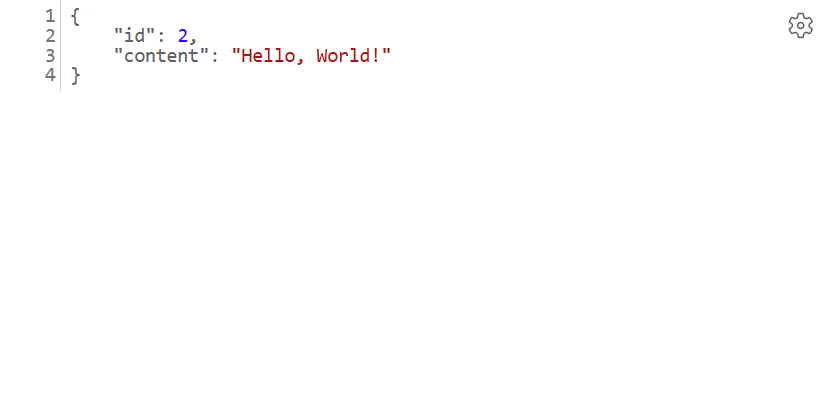
恭喜! 您已將 Java 應用程式部署至 App Service。
清理資源
您已在 Azure 資源群組中建立本教學課程的資源。 如果您不再需要它們,您可以在 Cloud Shell 中執行下列 Azure CLI 命令,以刪除資源群組及其所有資源。
az group delete --name <resource group name> --yes
例如,請執行 az group delete --name quarkus-hello-azure-1690375364238-rg --yes。 此命令可能需要一些時間才能執行。
Azure App Service 提供可高度擴充、自我修補的 Web 應用程式裝載服務。 在本快速入門中,您會使用 適用於 Azure App Service Web Apps 的 Maven 外掛程式 ,將 Java Web 應用程式部署至 Azure App Service 中的 Linux JBoss EAP 伺服器。
備註
App Service 上的 JBoss EAP 現在支援「自備授權」(BYOL) 計費,這可讓擁有現有 Red Hat 訂閱的客戶將這些授權直接套用至 Azure App Service 上的 JBoss EAP 部署。 深入瞭解。
如果 Maven 不是您慣用的開發工具,請參閱 Java 開發人員的類似文章:
先決條件
-
如果您沒有 Azure 帳戶,請在開始之前建立 免費帳戶 。
使用 Azure Cloud Shell 執行此快速入門中的命令列指令,Azure Cloud Shell 是一個互動式 Shell,您可以透過瀏覽器來使用 Azure 服務。 若要使用 Cloud Shell:
選取下列 [ 啟動 Cloud Shell ] 按鈕,或移至在 https://shell.azure.com 瀏覽器中開啟 Cloud Shell。
如有必要,請登入 Azure,並確定您位於 Cloud Shell 的 Bash 環境中。
選取程式代碼區塊中的 [複製 ],將程式代碼貼到 Cloud Shell 中,然後加以執行。
建立 Java 應用程式
複製 Pet Store 示範應用程式。
git clone https://github.com/Azure-Samples/app-service-java-quickstart將目錄變更為已完成
petstore-ee7的專案並加以建置。cd app-service-java-quickstart git checkout 20230308 cd petstore-ee7 mvn clean install若看到有關處於「HEAD 中斷連結」狀態的訊息,可忽略此訊息。 您在此快速入門中不會進行任何 Git 認可,因此中斷連結的 HEAD 狀態是適當的。
秘訣
此
petstore-ee7範例需要 Java 11 或更新版本。 範例booty-duke-app-service專案需要 Java 17。 如果您安裝的 Java 版本小於 17,請從 petstore-ee7 目錄中執行組建,而不是在最上層執行。
設定 Maven 外掛程式
App Service 部署程式會自動使用 Cloud Shell 中的 Azure 認證。 Maven 外掛程式會向 OAuth 或裝置登入進行驗證。 如需詳細資訊,請參閱 驗證。
執行下列 Maven 命令以設定部署,設定 App Service 作業系統、Java 版本和 JBoss EAP 版本。
mvn com.microsoft.azure:azure-webapp-maven-plugin:2.14.1:config
- 針對 [建立新的執行組態],輸入 Y ,然後按 Enter。
- 針對 定義 OS 的值,輸入 2 為 Linux,然后按 Enter。
- 針對 定義 javaVersion 的值,輸入 2 代表 Java 17,然後按 Enter。 如果您選取 [Java 21],稍後就不會看到 Jbosseap 做為選項。
- 針對 定義 webContainer 的值,在 Jbosseap 7 中輸入 4,然後按 Enter。
- 針對 [定義 pricingTier 的值],在 P1v3 輸入 1,然後按 Enter。
- 針對 [確認],輸入 Y ,然後按 Enter。
輸出看起來應該類似下列程式代碼:
Please confirm webapp properties
AppName : petstoreee7-1745409173307
ResourceGroup : petstoreee7-1745409173307-rg
Region : centralus
PricingTier : P1v3
OS : Linux
Java Version: Java 17
Web server stack: Jbosseap 4
Deploy to slot : false
Confirm (Y/N) [Y]:
[INFO] Saving configuration to pom.
[INFO] ------------------------------------------------------------------------
[INFO] BUILD SUCCESS
[INFO] ------------------------------------------------------------------------
[INFO] Total time:  01:36 min
[INFO] Finished at: 2025-04-23T11:54:22Z
[INFO] ------------------------------------------------------------------------
確認您的選擇之後,外掛程式會將外掛程式元素和必要設定新增至專案的 pom.xml 檔案,以設定 Web 應用程式以在 App Service 中執行。
pom.xml 檔案的相關部分看起來應該類似下列範例。
<build>
    <plugins>
        <plugin>
            <groupId>com.microsoft.azure</groupId>
            <artifactId>>azure-webapp-maven-plugin</artifactId>
            <version>x.xx.x</version>
            <configuration>
                <schemaVersion>v2</schemaVersion>
                <resourceGroup>petstoreee7-1745409173307-rg</resourceGroup>
                <appName>petstoreee7-1745409173307</appName>
            ...
            </configuration>
        </plugin>
    </plugins>
</build>
在示範應用程式中,<appName> 和 <resourceGroup>、petstoreee7-1745409173307 和 petstoreee7-1745409173307-rg 的值會稍後使用。
您可以直接在 pom.xml 檔案中修改 App Service 的組態。
- 如需組態的完整清單,請參閱 一般組態。
- 如需 App Service 特定的組態,請參閱 Azure Web 應用程式:組態詳細資料。
部署應用程式
在pom.xml檔案中備妥所有組態後,您可以使用下列單 一 命令,將 Java 應用程式部署至 Azure。
# Disable testing, as it requires Wildfly to be installed locally.
mvn package azure-webapp:deploy -DskipTests
從可用的訂用帳戶清單中選取之後,Maven 就會部署到 Azure App Service。 部署完成時,您的應用程式便已就緒。
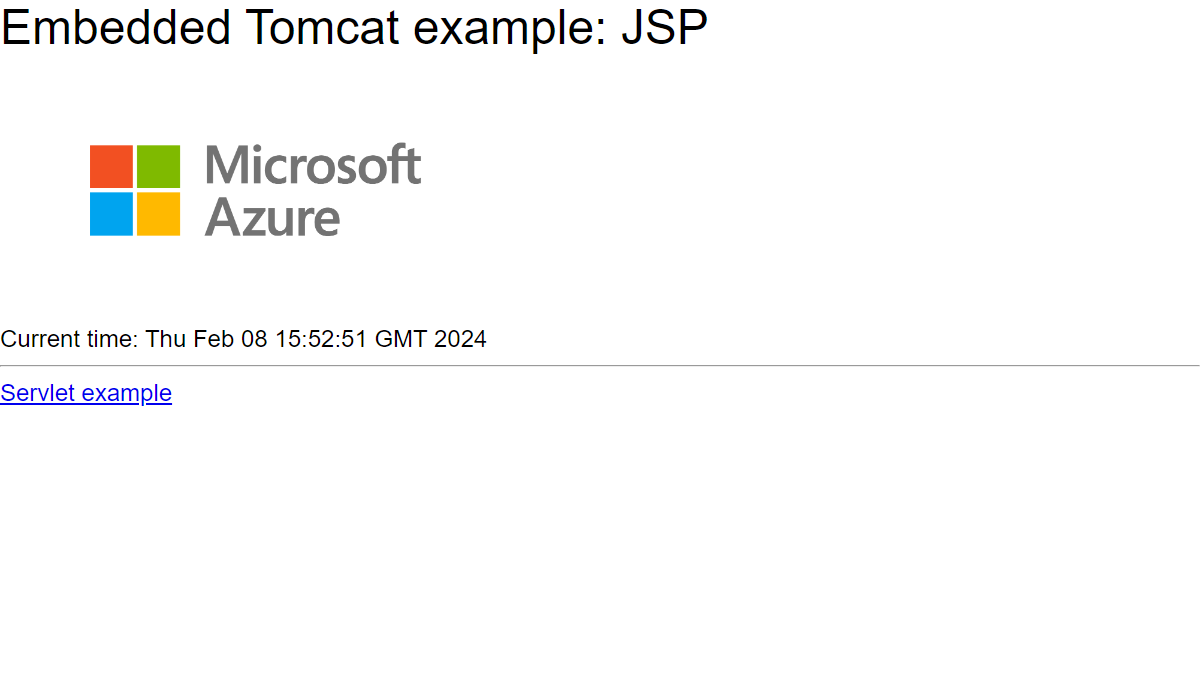
針對此示範應用程式,URL 為 http://petstoreee7-1745409173307.azurewebsites.net。 當您使用本機網頁瀏覽器開啟 URL 時,您應該會看到下列應用程式:
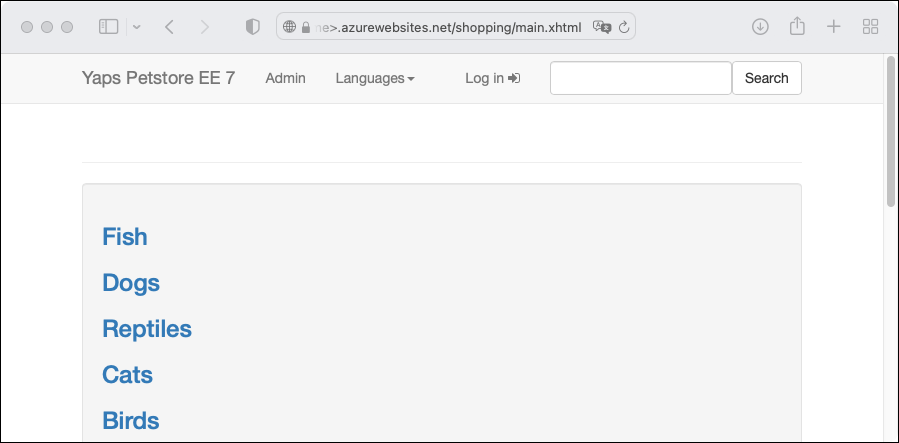
恭喜! 您已將 Java 應用程式部署至 App Service。
清理資源
您已在 Azure 資源群組中建立本教學課程的資源。 如果您不再需要它們,您可以在 Cloud Shell 中執行下列 Azure CLI 命令,以刪除資源群組及其所有資源。
az group delete --name petstoreee7-1745409173307-rg --yes
命令可能需要一些時間才能執行。
相關內容
- 教學課程:使用 Linux 上的 App Service 和 MySQL 建置 Tomcat Web 應用程式
- 教學課程:使用 Linux 上的 Azure App Service 和 Azure Cosmos DB 建置 Java Spring Boot Web 應用程式
- 設定持續部署至 Azure App Service
- Linux 上的 Azure App Service 定價
- 在 Azure App Service 中啟用應用程式的診斷日誌
- 在 Azure App Service 中擴大應用程式
- 適用於 Java 的 Azure 開發人員文件
- 在 Azure App Service 中部署及設定 Java SE、Tomcat 或 JBoss EAP 應用程式
- 教學課程:使用自定義網域和受控憑證來保護您的應用程式