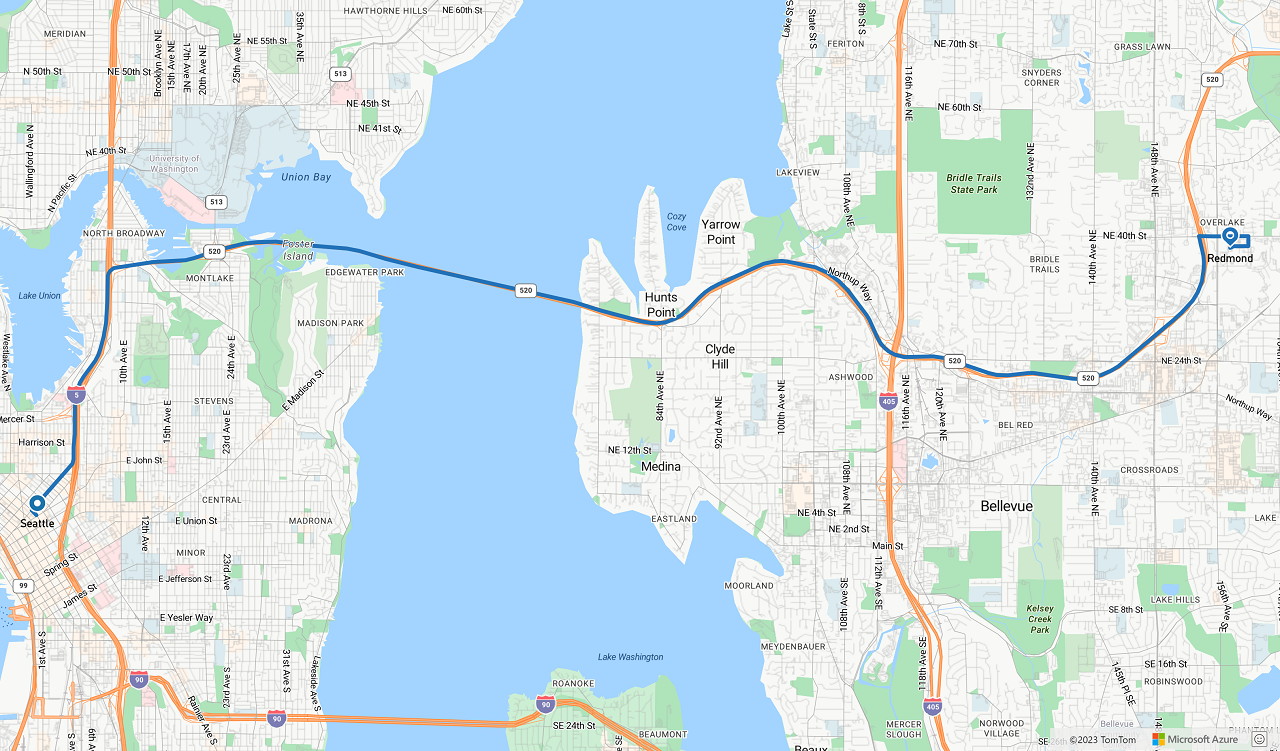
顯示從甲地到乙地的指示
本文說明如何提出路線要求,並在地圖上顯示路線。
有兩種方式可以這麼做。 第一種方式是使用 TypeScript REST SDK @azure-rest/maps-route 查詢 Get Route Directions API。 第二種方式是使用 Fetch API 向 Get Route Directions API 發出搜尋要求。 本文將說明這兩種方式。
透過擷取 REST SDK 查詢路線
import * as atlas from "azure-maps-control";
import MapsRoute, { toColonDelimitedLatLonString } from "@azure-rest/maps-route";
import "azure-maps-control/dist/atlas.min.css";

const onload = () => {
  // Initialize a map instance.
  const map = new atlas.Map("map", {
    view: "Auto",
    // Add authentication details for connecting to Azure Maps.
    authOptions: {
      // Use Azure Active Directory authentication.
      authType: "aad",
      clientId: "<Your Azure Maps Client Id>",
      aadAppId: "<Your Azure Active Directory Client Id>",
      aadTenant: "<Your Azure Active Directory Tenant Id>"
    }
  });

  map.events.add("load", async () => {
    // Use the access token from the map and create an object that implements the TokenCredential interface.
    const credential = {
      getToken: () => {
        return {
          token: map.authentication.getToken()
        };
      }
    };

    // Create a Route client.
    const client = MapsRoute(credential, "<Your Azure Maps Client Id>");

    // Create a data source and add it to the map.
    const dataSource = new atlas.source.DataSource();
    map.sources.add(dataSource);

    // Create the GeoJSON objects which represent the start and end points of the route.
    const startPoint = new atlas.data.Feature(new atlas.data.Point([-122.130137, 47.644702]), {
      title: "Redmond",
      icon: "pin-blue"
    });

    const endPoint = new atlas.data.Feature(new atlas.data.Point([-122.3352, 47.61397]), {
      title: "Seattle",
      icon: "pin-round-blue"
    });

    // Add the data to the data source.
    dataSource.add([startPoint, endPoint]);

    // Create a layer for rendering the route line under the road labels.
    map.layers.add(
      new atlas.layer.LineLayer(dataSource, null, {
        strokeColor: "#2272B9",
        strokeWidth: 5,
        lineJoin: "round",
        lineCap: "round"
      }),
      "labels"
    );

    // Create a layer for rendering the start and end points of the route as symbols.
    map.layers.add(
      new atlas.layer.SymbolLayer(dataSource, null, {
        iconOptions: {
          image: ["get", "icon"],
          allowOverlap: true,
          ignorePlacement: true
        },
        textOptions: {
          textField: ["get", "title"],
          offset: [0, 1.2]
        },
        filter: ["any", ["==", ["geometry-type"], "Point"], ["==", ["geometry-type"], "MultiPoint"]] //Only render Point or MultiPoints in this layer.
      })
    );

    // Get the coordinates of the start and end points.
    const coordinates = [
      [startPoint.geometry.coordinates[1], startPoint.geometry.coordinates[0]],
      [endPoint.geometry.coordinates[1], endPoint.geometry.coordinates[0]]
    ];

    // Get the route directions between the start and end points.
    const response = await client.path("/route/directions/{format}", "json").get({
      queryParameters: {
        query: toColonDelimitedLatLonString(coordinates)
      }
    });

    // Get the GeoJSON feature collection of the route.
    const data = getFeatures(response.body.routes);

    // Add the route data to the data source.
    dataSource.add(data);

    // Update the map view to center over the route.
    map.setCamera({
      bounds: data.bbox,
      padding: 40
    });
  });
};

/**
 * Helper function to convert a route response into a GeoJSON FeatureCollection.
 */
const getFeatures = (routes) => {
  const bounds = [];
  const features = routes.map((route, index) => {
    const multiLineCoords = route.legs.map((leg) => {
      return leg.points.map((coord) => {
        const position = [coord.longitude, coord.latitude];
        bounds.push(position);
        return position;
      });
    });

    // Include all properties on the route object except legs.
    // Legs is used to create the MultiLineString, so we only need the summaries.
    // The legSummaries property replaces the legs property with just summary data.
    const props = {
      ...route,
      legSummaries: route.legs.map((leg) => leg.summary),
      resultIndex: index
    };
    delete props.legs;

    return {
      type: "Feature",
      geometry: {
        type: "MultiLineString",
        coordinates: multiLineCoords
      },
      properties: props
    };
  });

  return {
    type: "FeatureCollection",
    features: features,
    bbox: new atlas.data.BoundingBox.fromLatLngs(bounds)
  };
};

document.body.onload = onload;
在上述程式碼範例中,第一個區塊會建構地圖物件,並將驗證機制設為使用 Microsoft Entra ID。 如需相關指示,您可以查看建立對應。
第二個程式碼區塊會建立實作 TokenCredential 的物件,以使用存取權杖來驗證對 Azure 地圖服務的 HTTP 要求。 然後,其會將認證物件傳遞至 MapsRoute,並建立用戶端的執行個體。
第三個程式碼區塊會建立 DataSource 物件並將其新增至地圖。
第四個程式碼區塊會建立開始和結束點物件,並將其新增至 dataSource 物件。
線條是 LineString 的功能。 LineLayer 會將包裝在 DataSource 中的線條物件轉譯為地圖上的線條。 第四個程式碼區塊會建立線條圖層,並將其新增至地圖。 請在 LinestringLayerOptions 查看線條圖層的屬性。
符號圖層會使用文字或圖示,將包裝在 DataSource 中的點式資料進行轉譯。 文字或圖示會轉譯為地圖上的符號。 第五個程式碼區塊會建立符號圖層,並將其新增至地圖。
第六個程式碼區塊會查詢 Azure 地圖服務路線規劃服務,其為 MapsRoute 用戶端的一部分。 GET 要求可用來取得開始與結束點之間的路線。 接著,系統會使用 getFeatures() 協助程式函式擷取回應中的 GeoJSON 特徵集合,並將其新增至資料來源。 然後,它會將回應呈現為地圖上的路線。 如需有關將線條新增至地圖的詳細資訊,請參閱在地圖上新增線條。
最後一個程式碼區塊會使用地圖的 setCamera 屬性來設定地圖的界限。
路線查詢、資料來源、符號、線條圖層和相機繫結皆於事件接聽程式內建立。 此程式碼結構可確保僅在地圖完全載入後才會顯示結果。
透過擷取 API 查詢路線
import * as atlas from "azure-maps-control";
import "azure-maps-control/dist/atlas.min.css";

const onload = () => {
  // Initialize a map instance.
  const map = new atlas.Map("map", {
    view: "Auto",
    // Add authentication details for connecting to Azure Maps.
    authOptions: {
      // Use Azure Active Directory authentication.
      authType: "aad",
      clientId: "<Your Azure Maps Client Id>",
      aadAppId: "<Your Azure Active Directory Client Id>",
      aadTenant: "<Your Azure Active Directory Tenant Id>"
    }
  });

  map.events.add("load", async () => {
    // Create a data source and add it to the map.
    const dataSource = new atlas.source.DataSource();
    map.sources.add(dataSource);

    // Create the GeoJSON objects which represent the start and end points of the route.
    const startPoint = new atlas.data.Feature(new atlas.data.Point([-122.130137, 47.644702]), {
      title: "Redmond",
      icon: "pin-blue"
    });

    const endPoint = new atlas.data.Feature(new atlas.data.Point([-122.3352, 47.61397]), {
      title: "Seattle",
      icon: "pin-round-blue"
    });

    // Add the data to the data source.
    dataSource.add([startPoint, endPoint]);

    // Create a layer for rendering the route line under the road labels.
    map.layers.add(
      new atlas.layer.LineLayer(dataSource, null, {
        strokeColor: "#2272B9",
        strokeWidth: 5,
        lineJoin: "round",
        lineCap: "round"
      }),
      "labels"
    );

    // Create a layer for rendering the start and end points of the route as symbols.
    map.layers.add(
      new atlas.layer.SymbolLayer(dataSource, null, {
        iconOptions: {
          image: ["get", "icon"],
          allowOverlap: true,
          ignorePlacement: true
        },
        textOptions: {
          textField: ["get", "title"],
          offset: [0, 1.2]
        },
        filter: ["any", ["==", ["geometry-type"], "Point"], ["==", ["geometry-type"], "MultiPoint"]] //Only render Point or MultiPoints in this layer.
      })
    );

    // Send a request to the route API
    let url = "https://atlas.microsoft.com/route/directions/json?";
    url += "&api-version=1.0";
    url +=
      "&query=" +
      startPoint.geometry.coordinates[1] +
      "," +
      startPoint.geometry.coordinates[0] +
      ":" +
      endPoint.geometry.coordinates[1] +
      "," +
      endPoint.geometry.coordinates[0];

    // Process request
    fetch(url, {
      headers: {
        Authorization: "Bearer " + map.authentication.getToken(),
        "x-ms-client-id": "<Your Azure Maps Client Id>"
      }
    })
      .then((response) => response.json())
      .then((response) => {
        const bounds = [];
        const route = response.routes[0];

        // Create an array to store the coordinates of each turn
        let routeCoordinates = [];
        route.legs.forEach((leg) => {
          const legCoordinates = leg.points.map((point) => {
            const position = [point.longitude, point.latitude];
            bounds.push(position);
            return position;
          });
          // Add each turn coordinate to the array
          routeCoordinates = routeCoordinates.concat(legCoordinates);
        });

        // Add route line to the dataSource
        dataSource.add(new atlas.data.Feature(new atlas.data.LineString(routeCoordinates)));

        // Update the map view to center over the route.
        map.setCamera({
          bounds: new atlas.data.BoundingBox.fromLatLngs(bounds),
          padding: 40
        });
      });
  });
};

document.body.onload = onload;
在上述程式碼範例中,第一個程式碼區塊會建構地圖物件,並將驗證機制設為使用 Microsoft Entra ID。 如需相關指示,您可以查看建立對應。
第二個程式碼區塊會建立 DataSource 物件並將其新增至地圖。
第三個程式碼區塊會建立路線的起點和目的地點。 然後,將其新增至資料來源。 如需詳細資訊,請參閱在地圖上新增釘選。
LineLayer 會將包裝在 DataSource 中的線條物件轉譯為地圖上的線條。 第四個程式碼區塊會建立線條圖層,並將其新增至地圖。 請在 LineLayerOptions 查看線條圖層的屬性。
符號層會使用文字或圖示,將包裝在 DataSource 中的點式資料轉譯為地圖上的符號。 第五個程式碼區塊會建立符號圖層,並將其新增至地圖。 請在 SymbolLayerOptions 上查看符號圖層的屬性。
下一個程式碼區塊會使用Fetch API 向 Get Route Directions 發出搜尋要求。 接著便會剖析回應。 如果回應成功,則會使用緯度和經度資訊,透過連接這些點來建立線條。 然後,線條資料會新增至資料來源,以在地圖上轉譯為路線。 如需詳細資訊,請參閱在地圖上新增線條。
最後一個程式碼區塊會使用地圖的 setCamera 屬性來設定地圖的界限。
路線查詢、資料來源、符號、線條圖層和相機繫結皆於事件接聽程式內建立。 同樣地,我們要確保在地圖完全載入後顯示結果。
下圖顯示兩個程式碼範例結果的螢幕擷取畫面。
下一步
深入了解本文使用的類別和方法:
請參閱下列文章中的完整程式碼範例: