本教學課程將引導您完成使用 Azure 地圖服務建立簡單商店定位器的程序。
在本教學課程中,您將了解如何:
- 使用 Azure 地圖控制項 API 建立新的網頁。
- 從檔案載入自訂資料,並顯示在地圖上。
- 使用 Azure 地圖服務搜尋服務來尋找地址或輸入查詢。
- 從瀏覽器取得使用者的位置,並將其顯示在地圖上。
- 結合多個圖層以建立地圖上的自訂符號。
- 叢集資料點。
- 將縮放控制項新增至地圖。
Prerequisites
- 建議針對本教學課程使用 Visual Studio Code,但您可以使用任何適當的整合式開發環境 (IDE)。
- Azure 地圖服務帳戶
- 訂用帳戶金鑰
Note
如需 Azure 地圖服務中驗證的詳細資訊,請參閱管理 Azure 地圖服務中的驗證。
Sample code
本教學課程示範如何為名為 Contoso Coffee的虛構公司建立商店定位器,以及使用其他功能的秘訣來擴充商店定位器。
若要查看您會在本教學課程中建立哪些內容的即時範例,請參閱 Azure 地圖服務程式碼範例網站上的簡單商店定位器 (英文)。
若要更輕鬆地遵循並參與本教學課程,請下載下列資源:
商店定位器功能
本節列出在本教學課程中建立之 Contoso Coffee 商店定位器應用程式中示範的 Azure 地圖服務功能。
使用者介面功能
- 標頭上的商店標誌
- 支援移動瀏覽和縮放的地圖
- [我的位置] 按鈕,可搜尋使用者的目前位置。
- 根據裝置畫面寬度調整的頁面版面配置
- 搜尋方塊和搜尋按鈕
Functionality features
- 新增至搜尋方塊的
keypress事件會在使用者按下 Enter 鍵時觸發搜尋。 - 當地圖移動時,系統會重新計算從地圖中心點到各個位置的距離。 結果清單會進行更新,並在地圖頂端顯示最接近的位置。
- 當使用者選取結果清單中的結果時,地圖將會以選取的位置作為中心點,並且在快顯視窗中顯示該位置的相關資訊。
- 當使用者選取特定位置時,地圖會觸發快顯視窗。
- 使用者縮小地圖時,位置會分組到叢集中。 每個叢集會以圓圈及圓圈內的數字表示。 叢集會隨著使用者變更縮放層級而形成和分隔。
- 選取某個叢集時,會將地圖放大兩個層級,並以該叢集的位置作為中心點。
商店定位器設計
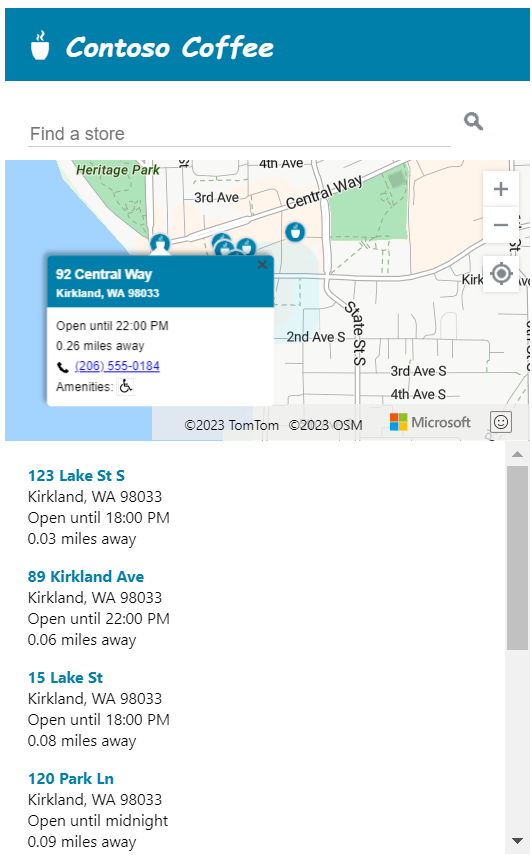
下列螢幕擷取畫面顯示 Contoso Coffee 商店定位器應用程式的一般配置。 若要檢視即時範例並與其互動,請參閱 Azure 地圖服務程式碼範例網站上的簡單商店定位器範例應用程式 (英文)。

為了充分發揮此商店定位器的實用性,我們加入了回應式配置,可在使用者的螢幕寬度小於 700 個像素時進行調整。 回應式配置可方便您在小型螢幕上使用商店定位器,例如行動裝置。 以下是顯示小型螢幕配置範例的螢幕擷取畫面:

建立商店位置資料集
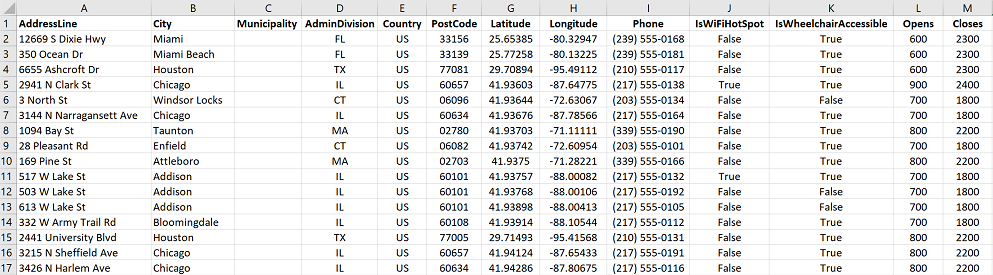
本節說明如何建立您要在地圖上顯示的商店資料集。 Contoso Coffee 定位器的資料集會在 Excel 活頁簿內建立。 資料集中包含 10,213 個遍布於九個國家或地區的 Contoso Coffee 咖啡廳所在位置:美國、加拿大、英國、法國、德國、義大利、荷蘭、丹麥和西班牙。 其資料如下列螢幕擷取畫面所示:
從 GitHub 之 Azure 地圖服務程式碼範例存放庫的 data 資料夾中,下載包含 Contoso Coffee 定位器範例應用程式完整資料集的 Excel 檔案。
從上述資料螢幕擷取畫面,我們可以進行下列觀察:
- 位置資訊會儲存在下列六個資料行中:[AddressLine]、[City]、[Municipality] (縣/市)、[AdminDivision] (州/省)、[PostCode] (郵遞區號) 和 [Country]。
- [Latitude] 和 [Longitude] 資料行包含每個 Contoso Coffee 位置的座標。 如果您沒有座標資訊,您可以使用搜尋服務來決定位置座標。
- 此外還有一些其他包含咖啡廳相關中繼資料的資料行:電話號碼、布林值資料行,以及 24 小時格式的開店和關店時間。 布林值資料行用於 Wi-Fi 和殘障人士協助工具。 您可以建立的資料行,並納入與您的位置資料更為相關的中繼資料。
載入 Contoso Coffee 商店定位器資料集
Contoso Coffee shop 定位器資料集很小,因此可以在應用程式載入時,將其轉換成瀏覽器下載的製表符分隔文字檔。
Tip
如果您的資料集太大導致用戶端無法下載,或是經常更新,您可以考慮將資料集儲存在資料庫中。 將資料載入資料庫之後,您可以接著設定 Web 服務來接受資料的查詢,然後將結果傳送至使用者的瀏覽器。
將資料轉換成定位字元分隔的文字檔
若要將 Contoso Coffee 商店位置資料從 Excel 活頁簿轉換成定位字元分隔的文字檔:
下載 Excel 活頁簿 ContosoCoffee.xlsx 並在 Excel 中開啟。
選取 [檔案] > [另存新檔...]。
在 [存檔類型] 下拉式清單中,選取 [文字 (Tab 鍵分隔) (*.txt)]。
將檔案命名為 ContosoCoffee。
![[存檔類型] 對話方塊的螢幕擷取畫面。](media/tutorial-create-store-locator/data-delimited-text.png)
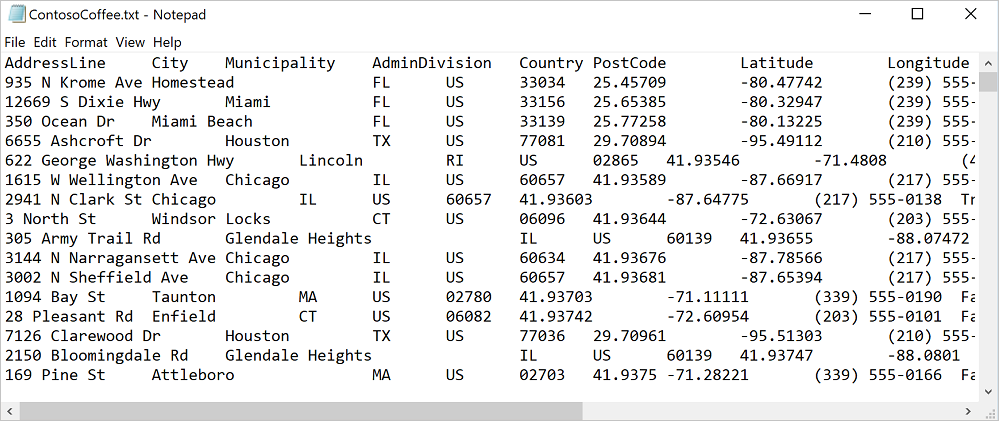
如果您在記事本中開啟文字檔,該檔案看起來類似下列文字:
設定專案
開啟 Visual Studio Code 或您選擇的開發環境。
選取 [檔案] > [開啟工作區...]。
建立名為 ContosoCoffee 的新資料夾。
在檔案總管中選取 [ContosoCoffee]。
建立下列三個檔案,以定義應用程式的配置、樣式和邏輯:
- index.html
- index.css
- index.js
建立名為 data 的資料夾。
將您先前從 Excel 活頁簿 ContosoCoffee.xlsx 建立的 ContosoCoffee.txt 檔案新增至 data 資料夾。
建立名為 images 的另一個資料夾。
如果您尚未這麼做,請從 GitHub 存放庫中的 images 目錄下載 10 個地圖影像,並將其新增至 images 資料夾。
您的工作區資料夾現在看起來應該類似下列螢幕擷取畫面:


建立 HTML
若要建立 HTML:
將下列
meta標記新增至head的 :<meta charset="utf-8"> <meta http-equiv="x-ua-compatible" content="IE=Edge"> <meta name="viewport" content="width=device-width, initial-scale=1, shrink-to-fit=no">新增 Azure 地圖服務 Web 控制項 JavaScript 和 CSS 檔案的參考:
<!-- Add references to the Azure Maps Map control JavaScript and CSS files. -->
<link rel="stylesheet" href="https://atlas.microsoft.com/sdk/javascript/mapcontrol/3/atlas.min.css" type="text/css">
<script src="https://atlas.microsoft.com/sdk/javascript/mapcontrol/3/atlas.min.js"></script>
新增 index.js 和 index.css 的參考。
<!-- Add references to the store locator JavaScript and CSS files. -->
<link rel="stylesheet" href="index.css" type="text/css">
<script src="index.js"></script>
在文件本文中,新增
header標記。 在header標記內,新增標誌和公司名稱。<header> <img src="images/Logo.png" /> <span>Contoso Coffee</span> </header>新增
main標記,並建立具有文字對話方塊和搜尋按鈕的搜尋面板。 此外,新增地圖、清單面板和 [我的位置 GPS] 按鈕的div參考。<main> <div class="searchPanel"> <div> <input id="searchTbx" type="search" placeholder="Find a store" /> <button id="searchBtn" title="Search"></button> </div> </div> <div id="listPanel"></div> <div id="myMap"></div> <button id="myLocationBtn" title="My Location"></button> </main>
完成之後,index.html 應該看起來像教學課程範例程式代碼中的 Simple Store Locator.html。
定義 CSS 樣式
下一個步驟是定義 CSS 樣式。 CSS 樣式會定義應用程式元件的配置方式,和應用程式的外觀。
Open index.css.
新增下列 css 程式碼:
Note
@media樣式會定義螢幕寬度小於 700 個像素時所要使用的替代樣式選項。html, body { padding: 0; margin: 0; font-family: Gotham, Helvetica, sans-serif; overflow-x: hidden; } header { width: calc(100vw - 10px); height: 30px; padding: 15px 0 20px 20px; font-size: 25px; font-style: italic; font-family: "Comic Sans MS", cursive, sans-serif; line-height: 30px; font-weight: bold; color: white; background-color: #007faa; } header span { vertical-align: middle; } header img { height: 30px; vertical-align: middle; } .searchPanel { position: relative; width: 350px; } .searchPanel div { padding: 20px; } .searchPanel input { width: calc(100% - 50px); font-size: 16px; border: 0; border-bottom: 1px solid #ccc; } #listPanel { position: absolute; top: 135px; left: 0px; width: 350px; height: calc(100vh - 135px); overflow-y: auto; } #myMap { position: absolute; top: 65px; left: 350px; width: calc(100vw - 350px); height: calc(100vh - 65px); } .statusMessage { margin: 10px; } #myLocationBtn, #searchBtn { margin: 0; padding: 0; border: none; border-collapse: collapse; width: 32px; height: 32px; text-align: center; cursor: pointer; line-height: 32px; background-repeat: no-repeat; background-size: 20px; background-position: center center; z-index: 200; } #myLocationBtn { position: absolute; top: 150px; right: 10px; box-shadow: 0px 0px 4px rgba(0,0,0,0.16); background-color: white; background-image: url("images/GpsIcon.png"); } #myLocationBtn:hover { background-image: url("images/GpsIcon-hover.png"); } #searchBtn { background-color: transparent; background-image: url("images/SearchIcon.png"); } #searchBtn:hover { background-image: url("images/SearchIcon-hover.png"); } .listItem { height: 50px; padding: 20px; font-size: 14px; } .listItem:hover { cursor: pointer; background-color: #f1f1f1; } .listItem-title { color: #007faa; font-weight: bold; } .storePopup { min-width: 150px; } .storePopup .popupTitle { border-top-left-radius: 4px; border-top-right-radius: 4px; padding: 8px; height: 30px; background-color: #007faa; color: white; font-weight: bold; } .storePopup .popupSubTitle { font-size: 10px; line-height: 12px; } .storePopup .popupContent { font-size: 11px; line-height: 18px; padding: 8px; } .storePopup img { vertical-align:middle; height: 12px; margin-right: 5px; } /* Adjust the layout of the page when the screen width is fewer than 700 pixels. */ @media screen and (max-width: 700px) { .searchPanel { width: 100vw; } #listPanel { top: 385px; width: 100%; height: calc(100vh - 385px); } #myMap { width: 100vw; height: 250px; top: 135px; left: 0px; } #myLocationBtn { top: 220px; } } .mapCenterIcon { display: block; width: 10px; height: 10px; border-radius: 50%; background: orange; border: 2px solid white; cursor: pointer; box-shadow: 0 0 0 rgba(0, 204, 255, 0.4); animation: pulse 3s infinite; } @keyframes pulse { 0% { box-shadow: 0 0 0 0 rgba(0, 204, 255, 0.4); } 70% { box-shadow: 0 0 0 50px rgba(0, 204, 255, 0); } 100% { box-shadow: 0 0 0 0 rgba(0, 204, 255, 0); } }
如果您立即執行應用程式,此時會出現標頭、搜尋方塊和搜尋按鈕。 不過,由於地圖尚未載入,因此不會顯示。 如果您嘗試執行搜尋,將不會有任何動作。 下一節會說明新增存取商店定位器所有功能所需的 JavaScript 邏輯。
新增 JavaScript 程式碼
Contoso Coffee 商店定位器應用程式中的 JavaScript 程式碼可啟用下列程序:
新增名為 的
ready,等到頁面完成載入程序為止。 頁面載入完成時,事件處理常式會建立更多事件接聽程式來監視地圖的載入,並提供搜尋功能和 [我的位置] 按鈕。當使用者選取搜尋按鈕,或是在搜尋方塊中輸入位置然後按下 Enter 鍵時,就會開始使用者查詢的模糊搜尋。 此程式碼會將國家/地區 ISO 2 值的陣列傳入
countrySet選項,將搜尋結果限制在這些國家/地區。 限制要搜尋的國家/地區,有助於提高傳回結果的精確度。搜尋完成之後,第一個位置結果會作為地圖的中心焦點。 當使用者選取 [我的位置] 按鈕時,程式碼會使用瀏覽器中內建的 HTML5 地理位置 API 來擷取使用者的位置。 收到位置之後,程式碼會以使用者的位置作為地圖的中心點。
若要新增 JavaScript:
Open index.js.
新增全域選項以便更新設定。 定義地圖的變數、快顯視窗、資料來源、圖示圖層及 HTML 標記。 設定 HTML 標記以指示搜尋區域的中心。 而且,定義 Azure 地圖服務搜尋服務客戶端的實例。
//The maximum zoom level to cluster data point data on the map.
var maxClusterZoomLevel = 11;

//The URL to the store location data.
var storeLocationDataUrl = 'data/ContosoCoffee.txt';

//The URL to the icon image.
var iconImageUrl = 'images/CoffeeIcon.png';

//An array of country region ISO2 values to limit searches to.
var countrySet = ['US', 'CA', 'GB', 'FR','DE','IT','ES','NL','DK'];

//
var map, popup, datasource, iconLayer, centerMarker;

// Used in function updateListItems
var listItemTemplate = '<div class="listItem" onclick="itemSelected(\'{id}\')"><div class="listItem-title">{title}</div>{city}<br />Open until {closes}<br />{distance} miles away</div>';
新增下列初始化程式碼。 請確保您使用 Azure 地圖服務訂用帳戶金鑰取代
<Your Azure Maps Key>。Tip
當您使用的快顯視窗時,建議您最好建立單一
Popup執行個體,並藉由更新內容和位置重複使用該執行個體。 您新增至程式碼的每個Popup執行個體,會有多個 DOM 元素新增至頁面。 頁面上的 DOM 元素越多,瀏覽器所須追蹤的項目就越多。 如果項目過多,瀏覽器可能會變慢。function initialize() { //Initialize a map instance. map = new atlas.Map('myMap', { center: [-90, 40], zoom: 2, //Add your Azure Maps subscription key to the map SDK. authOptions: { authType: 'subscriptionKey', subscriptionKey: '<Your Azure Maps Key>' } }); //Create a pop-up window, but leave it closed so we can update it and display it later. popup = new atlas.Popup(); //If the user selects the search button, geocode the value the user passed in. document.getElementById('searchBtn').onclick = performSearch; //If the user presses Enter in the search box, perform a search. document.getElementById('searchTbx').onkeyup = function(e) { if (e.keyCode === 13) { performSearch(); } }; //If the user selects the My Location button, use the Geolocation API to get the user's location. Center and zoom the map on that location. document.getElementById('myLocationBtn').onclick = setMapToUserLocation; //Wait until the map resources are ready. map.events.add('ready', function() { //Add your maps post load functionality. }); } function performSearch() { var query = document.getElementById('searchTbx').value; //Pass in the array of country/region ISO2 for which we want to limit the search to. var url = `https://atlas.microsoft.com/search/fuzzy/json?api-version=1.0&countrySet=${countrySet}&query=${query}&view=Auto`; //Perform a fuzzy search on the users query. fetch(url, { headers: { "Subscription-Key": map.authentication.getToken() } }) .then((response) => response.json()) .then((response) => { if (Array.isArray(response.results) && response.results.length > 0) { var result = response.results[0]; var bbox = [ result.viewport.topLeftPoint.lon, result.viewport.btmRightPoint.lat, result.viewport.btmRightPoint.lon, result.viewport.topLeftPoint.lat ]; //Set the camera to the bounds of the first result. map.setCamera({ bounds: bbox, padding: 40 }); } else { document.getElementById('listPanel').innerHTML = '<div class="statusMessage">Unable to find the location you searched for.</div>'; } }); } function setMapToUserLocation() { //Request the user's location. navigator.geolocation.getCurrentPosition(function(position) { //Convert the geolocation API position into a longitude/latitude position value the map can understand and center the map over it. map.setCamera({ center: [position.coords.longitude, position.coords.latitude], zoom: maxClusterZoomLevel + 1 }); }, function(error) { //If an error occurs when trying to access the users position information, display an error message. switch (error.code) { case error.PERMISSION_DENIED: alert('User denied the request for geolocation.'); break; case error.POSITION_UNAVAILABLE: alert('Position information is unavailable.'); break; case error.TIMEOUT: alert('The request to get user position timed out.'); break; case error.UNKNOWN_ERROR: alert('An unknown error occurred.'); break; } }); } //Initialize the application when the page is loaded. window.onload = initialize;在地圖的
ready事件處理常式中新增縮放控制項,以及用來顯示搜尋區域中心點的 HTML 標記。//Add a zoom control to the map. map.controls.add(new atlas.control.ZoomControl(), { position: 'top-right' }); //Add an HTML marker to the map to indicate the center to use for searching. centerMarker = new atlas.HtmlMarker({ htmlContent: '<div class="mapCenterIcon"></div>', position: map.getCamera().center }); map.markers.add(centerMarker);在地圖的
ready事件處理常式中,新增資料來源。 然後,進行呼叫以載入和剖析資料集。 啟用資料來源的叢集。 資料來源的叢集會將重疊的資料點分組到同一個叢集中。 當使用者放大地圖時,這些叢集會分成個別的資料點。 此行為可提供更好的使用者體驗,並改善效能。//Create a data source, add it to the map, and then enable clustering. datasource = new atlas.source.DataSource(null, { cluster: true, clusterMaxZoom: maxClusterZoomLevel - 1 }); map.sources.add(datasource); //Load all the store data now that the data source has been defined. loadStoreData();將資料集載入至地圖的
ready事件處理常式之後,請定義一組用來呈現資料的圖層。 泡泡圖層會呈現叢集的資料點。 符號圖層會呈現泡泡圖層之上每個叢集中的點數。 第二個符號圖層會呈現地圖上個別位置的自訂圖示。將
mouseover和mouseout事件新增至泡泡和圖示圖層,可變更使用者將滑鼠停留在地圖上的叢集或圖示上方時的滑鼠游標。 將click事件新增至叢集泡泡圖層。 此click事件會在使用者選取任何叢集時將地圖放大兩個層級,並以該叢集作為地圖的中心點。 將click事件新增至圖示圖層。 此click事件會在使用者選取個別位置圖示時顯示快顯視窗,以呈現咖啡廳的詳細資料。 在地圖上新增用來監視地圖何時完成移動的事件。 此事件引發時,請更新清單面板中的項目。//Create a bubble layer to render clustered data points. var clusterBubbleLayer = new atlas.layer.BubbleLayer(datasource, null, { radius: 12, color: '#007faa', strokeColor: 'white', strokeWidth: 2, filter: ['has', 'point_count'] //Only render data points that have a point_count property; clusters have this property. }); //Create a symbol layer to render the count of locations in a cluster. var clusterLabelLayer = new atlas.layer.SymbolLayer(datasource, null, { iconOptions: { image: 'none' //Hide the icon image. }, textOptions: { textField: ['get', 'point_count_abbreviated'], size: 12, font: ['StandardFont-Bold'], offset: [0, 0.4], color: 'white' } }); map.layers.add([clusterBubbleLayer, clusterLabelLayer]); //Load a custom image icon into the map resources. map.imageSprite.add('myCustomIcon', iconImageUrl).then(function() { //Create a layer to render a coffee cup symbol above each bubble for an individual location. iconLayer = new atlas.layer.SymbolLayer(datasource, null, { iconOptions: { //Pass in the ID of the custom icon that was loaded into the map resources. image: 'myCustomIcon', //Optionally, scale the size of the icon. font: ['SegoeUi-Bold'], //Anchor the center of the icon image to the coordinate. anchor: 'center', //Allow the icons to overlap. allowOverlap: true }, filter: ['!', ['has', 'point_count']] //Filter out clustered points from this layer. }); map.layers.add(iconLayer); //When the mouse is over the cluster and icon layers, change the cursor to a pointer. map.events.add('mouseover', [clusterBubbleLayer, iconLayer], function() { map.getCanvasContainer().style.cursor = 'pointer'; }); //When the mouse leaves the item on the cluster and icon layers, change the cursor back to the default (grab). map.events.add('mouseout', [clusterBubbleLayer, iconLayer], function() { map.getCanvasContainer().style.cursor = 'grab'; }); //Add a click event to the cluster layer. When the user selects a cluster, zoom into it by two levels. map.events.add('click', clusterBubbleLayer, function(e) { map.setCamera({ center: e.position, zoom: map.getCamera().zoom + 2 }); }); //Add a click event to the icon layer and show the shape that was selected. map.events.add('click', iconLayer, function(e) { showPopup(e.shapes[0]); }); //Add an event to monitor when the map has finished rendering. map.events.add('render', function() { //Update the data in the list. updateListItems(); }); });需要咖啡廳資料集時,必須先加以下載。 下載後,檔案必須分成數行。 第一行包含標頭資訊。 為了讓程式碼更易於了解,我們將標頭剖析為物件,而此物件隨後可用來查閱每個屬性的資料格索引。 在第一行後面,請循環使用其餘幾行,並建立資料點功能。 將資料點功能新增至資料來源。 最後,更新清單面板。
function loadStoreData() {

//Download the store location data.
fetch(storeLocationDataUrl)
    .then(response => response.text())
    .then(function(text) {

        //Parse the tab-delimited file data into GeoJSON features.
        var features = [];

        //Split the lines of the file.
        var lines = text.split('\n');

        //Grab the header row.
        var row = lines[0].split('\t');

        //Parse the header row and index each column to make the code for parsing each row easier to follow.
        var header = {};
        var numColumns = row.length;
        for (var i = 0; i < row.length; i++) {
            header[row[i]] = i;
        }

        //Skip the header row and then parse each row into a GeoJSON feature.
        for (var i = 1; i < lines.length; i++) {
            row = lines[i].split('\t');

            //Ensure that the row has the correct number of columns.
            if (row.length >= numColumns) {

                features.push(new atlas.data.Feature(new atlas.data.Point([parseFloat(row[header['Longitude']]), parseFloat(row[header['Latitude']])]), {
                    AddressLine: row[header['AddressLine']],
                    City: row[header['City']],
                    Municipality: row[header['Municipality']],
                    AdminDivision: row[header['AdminDivision']],
                    Country: row[header['Country']],
                    PostCode: row[header['PostCode']],
                    Phone: row[header['Phone']],
                    StoreType: row[header['StoreType']],
                    IsWiFiHotSpot: (row[header['IsWiFiHotSpot']].toLowerCase() === 'true') ? true : false,
                    IsWheelchairAccessible: (row[header['IsWheelchairAccessible']].toLowerCase() === 'true') ? true : false,
                    Opens: parseInt(row[header['Opens']]),
                    Closes: parseInt(row[header['Closes']])
                }));
            }
        }

        //Add the features to the data source.
        datasource.add(new atlas.data.FeatureCollection(features));

        //Initially, update the list items.
        updateListItems();
    });
}
當清單面板更新時,會計算距離。 這從地圖中心點到目前地圖檢視中各個資料點特徵的距離。 隨後,這些功能會依距離排序。 系統會產生 HTML 以顯示清單面板中的每個位置。
var listItemTemplate = '<div class="listItem" onclick="itemSelected(\'{id}\')"><div class="listItem-title">{title}</div>{city}<br />Open until {closes}<br />{distance} miles away</div>';

function updateListItems() {
    //Hide the center marker.
    centerMarker.setOptions({
        visible: false
    });

    //Get the current camera and view information for the map.
    var camera = map.getCamera();
    var listPanel = document.getElementById('listPanel');

    //Check to see if the user is zoomed out a substantial distance. If they are, tell them to zoom in and to perform a search or select the My Location button.
    if (camera.zoom < maxClusterZoomLevel) {
        //Close the pop-up window; clusters might be displayed on the map.
        popup.close();
        listPanel.innerHTML = '<div class="statusMessage">Search for a location, zoom the map, or select the My Location button to see individual locations.</div>';
    } else {
        //Update the location of the centerMarker property.
        centerMarker.setOptions({
            position: camera.center,
            visible: true
        });

        //List the ten closest locations in the side panel.
        var html = [], properties;

        /*
        Generating HTML for each item that looks like this:
        <div class="listItem" onclick="itemSelected('id')">
            <div class="listItem-title">1 Microsoft Way</div>
            Redmond, WA 98052<br />
            Open until 9:00 PM<br />
            0.7 miles away
        </div>
        */

        //Get all the shapes that have been rendered in the bubble layer.
        var data = map.layers.getRenderedShapes(map.getCamera().bounds, [iconLayer]);

        //Create an index of the distances of each shape.
        var distances = {};

        data.forEach(function (shape) {
            if (shape instanceof atlas.Shape) {

                //Calculate the distance from the center of the map to each shape and store in the index. Round to 2 decimals.
                distances[shape.getId()] = Math.round(atlas.math.getDistanceTo(camera.center, shape.getCoordinates(), 'miles') * 100) / 100;
            }
        });

        //Sort the data by distance.
        data.sort(function (x, y) {
            return distances[x.getId()] - distances[y.getId()];
        });

        data.forEach(function(shape) {
            properties = shape.getProperties();
            html.push('<div class="listItem" onclick="itemSelected(\'', shape.getId(), '\')"><div class="listItem-title">',
            properties['AddressLine'],
            '</div>',
            //Get a formatted addressLine2 value that consists of City, Municipality, AdminDivision, and PostCode.
            getAddressLine2(properties),
            '<br />',

            //Convert the closing time to a format that is easier to read.
            getOpenTillTime(properties),
            '<br />',

            //Get the distance of the shape.
            distances[shape.getId()],
            ' miles away</div>');
        });

        listPanel.innerHTML = html.join('');

        //Scroll to the top of the list panel in case the user has scrolled down.
        listPanel.scrollTop = 0;
    }
}

//This converts a time that's in a 24-hour format to an AM/PM time or noon/midnight string.
function getOpenTillTime(properties) {
    var time = properties['Closes'];
    var t = time / 100;
    var sTime;

    if (time === 1200) {
        sTime = 'noon';
    } else if (time === 0 || time === 2400) {
        sTime = 'midnight';
    } else {
        sTime = Math.round(t) + ':';

        //Get the minutes.
        t = (t - Math.round(t)) * 100;

        if (t === 0) {
            sTime += '00';
        } else if (t < 10) {
            sTime += '0' + t;
        } else {
            sTime += Math.round(t);
        }

        if (time < 1200) {
            sTime += ' AM';
        } else {
            sTime += ' PM';
        }
    }

    return 'Open until ' + sTime;
}

//Create an addressLine2 string that contains City, Municipality, AdminDivision, and PostCode.
function getAddressLine2(properties) {
    var html = [properties['City']];

    if (properties['Municipality']) {
        html.push(', ', properties['Municipality']);
    }

    if (properties['AdminDivision']) {
        html.push(', ', properties['AdminDivision']);
    }

    if (properties['PostCode']) {
        html.push(' ', properties['PostCode']);
    }

    return html.join('');
}
當使用者選取清單面板中的項目時,系統會從資料來源擷取該項目的相關圖形。 此時會根據圖形中儲存的屬性資訊產生快顯視窗。 以圖形作為地圖的中心點。 如果地圖的寬度少於 700 個像素,地圖檢視就會位移,以顯示快顯視窗。
//When a user selects a result in the side panel, look up the shape by its ID value and display the pop-up window.
function itemSelected(id) {
    //Get the shape from the data source by using its ID.
    var shape = datasource.getShapeById(id);
    showPopup(shape);

    //Center the map over the shape on the map.
    var center = shape.getCoordinates();
    var offset;

    //If the map is fewer than 700 pixels wide, then the layout is set for small screens.
    if (map.getCanvas().width < 700) {
        //When the map is small, offset the center of the map relative to the shape so that there is room for the popup to appear.
        offset = [0, -80];
    }

    map.setCamera({
        center: center,
        centerOffset: offset
    });
}

function showPopup(shape) {
    var properties = shape.getProperties();

    /* Generating HTML for the pop-up window that looks like this:

        <div class="storePopup">
            <div class="popupTitle">
                3159 Tongass Avenue
                <div class="popupSubTitle">Ketchikan, AK 99901</div>
            </div>
            <div class="popupContent">
                Open until 22:00 PM<br/>
                <img title="Phone Icon" src="images/PhoneIcon.png">
                <a href="tel:1-800-XXX-XXXX">1-800-XXX-XXXX</a>
                <br>Amenities:
                <img title="Wi-Fi Hotspot" src="images/WiFiIcon.png">
                <img title="Wheelchair Accessible" src="images/WheelChair-small.png">
            </div>
        </div>
    */

     //Calculate the distance from the center of the map to the shape in miles, round to 2 decimals.
    var distance = Math.round(atlas.math.getDistanceTo(map.getCamera().center, shape.getCoordinates(), 'miles') * 100)/100;

    var html = ['<div class="storePopup">'];
    html.push('<div class="popupTitle">',
        properties['AddressLine'],
        '<div class="popupSubTitle">',
        getAddressLine2(properties),
        '</div></div><div class="popupContent">',

        //Convert the closing time to a format that's easier to read.
        getOpenTillTime(properties),

        //Add the distance information.
        '<br/>', distance,
        ' miles away',
        '<br /><img src="images/PhoneIcon.png" title="Phone Icon"/><a href="tel:',
        properties['Phone'],
        '">',
        properties['Phone'],
        '</a>'
    );

    if (properties['IsWiFiHotSpot'] || properties['IsWheelchairAccessible']) {
        html.push('<br/>Amenities: ');

        if (properties['IsWiFiHotSpot']) {
            html.push('<img src="images/WiFiIcon.png" title="Wi-Fi Hotspot"/>');
        }

        if (properties['IsWheelchairAccessible']) {
            html.push('<img src="images/WheelChair-small.png" title="Wheelchair Accessible"/>');
        }
    }

    html.push('</div></div>');

    //Update the content and position of the pop-up window for the specified shape information.
    popup.setOptions({

        //Create a table from the properties in the feature.
        content:  html.join(''),
        position: shape.getCoordinates()
    });

    //Open the pop-up window.
    popup.open(map);
}
現在,您已有功能完整的商店定位器。 在網頁瀏覽器中開啟 index.html 檔案。 當叢集出現在地圖上時,您可以使用下列任何方法搜尋位置:
- 搜尋方塊。
- 選取 [我的位置] 按鈕
- 選取叢集
- 放大地圖以查看個別位置。
在使用者第一次選取 [我的位置] 按鈕時,瀏覽器會顯示安全性警告,要求提供存取使用者所在位置的權限。 如果使用者同意共用其位置,地圖就會放大使用者的位置,並顯示附近的咖啡廳。

當您將咖啡廳所在位置的區域放大足夠的程度時,叢集就會分成個別的位置。 選取地圖上的其中一個圖示或選取側邊面板中的項目,即可檢視快顯示窗。 快顯視窗會顯示所選位置的資訊。

如果您將瀏覽器視窗的大小調整為少於 700 個像素的寬度,或是在行動裝置上開啟應用程式,則會變更為更適合較小型螢幕的配置。
在本教學課程中,您已了解如何使用 Azure 地圖服務建立基本的商店定位器。 您在本教學課程中建立的商店定位器可能已有您所需的所有功能。 您可以在商店定位器中新增功能,或使用更進階的功能以滿足自訂使用者體驗:
- 啟用在搜尋方塊中鍵入時提供建議的功能。
- 新增支援多種語言。
- 允許使用者沿路線篩選位置。
- 新增設定篩選的功能。
- 新增使用查詢字串指定初始搜尋值的支援。 當您在商店定位器中納入此選項時,使用者可以接著將搜尋加入書籤和共用搜尋。 此外也可讓您輕鬆地將其他頁面上的搜尋傳至此頁面。
- 將商店定位器部署為 Azure App Service Web 應用程式。
- 將資料儲存在資料庫中和搜尋附近的位置。 若要深入了解,請參閱 SQL Server 空間資料類型概觀和查詢最接近像素的空間資料。
Additional information
- 如需完整程式碼,請參閱 GitHub 上的簡單商店定位器教學課程。
- 若要即時檢視此範例,請參閱 Azure 地圖服務程式碼範例網站上的簡單商店定位器 (英文)。
- 使用縮放層級和圖格格線,深入了解 Azure 地圖服務的涵蓋範圍和功能。
- 您也可以使用資料驅動的樣式運算式 ,將其套用至您的商務邏輯。
Next steps
若要查看更多程式碼範例和互動式編碼體驗: