快速入門:使用用戶端連結庫和 REST API 的實體連結
參考文件 | 更多樣本 | 套件 (NuGet) | 程式庫原始程式碼
使用此快速入門建立實體連結應用程式與適用於 .NET 的客戶端連結庫。 在下列範例中,您會建立 C# 應用程式,以識別並釐清文字中找到的實體。
提示
您可以使用 Language Studio 來嘗試語言服務功能,而不需要撰寫程式代碼。
必要條件
- Azure 訂用帳戶 - 建立免費帳戶
- Visual Studio IDE
設定
建立 Azure 資源
若要使用下列程式代碼範例,您必須部署 Azure 資源。 此資源會包含金鑰和端點,您將用來驗證您傳送至語言服務的 API 呼叫。
使用下列連結,使用 Azure 入口網站 建立語言資源。 您必須使用 Azure 訂用帳戶登入。
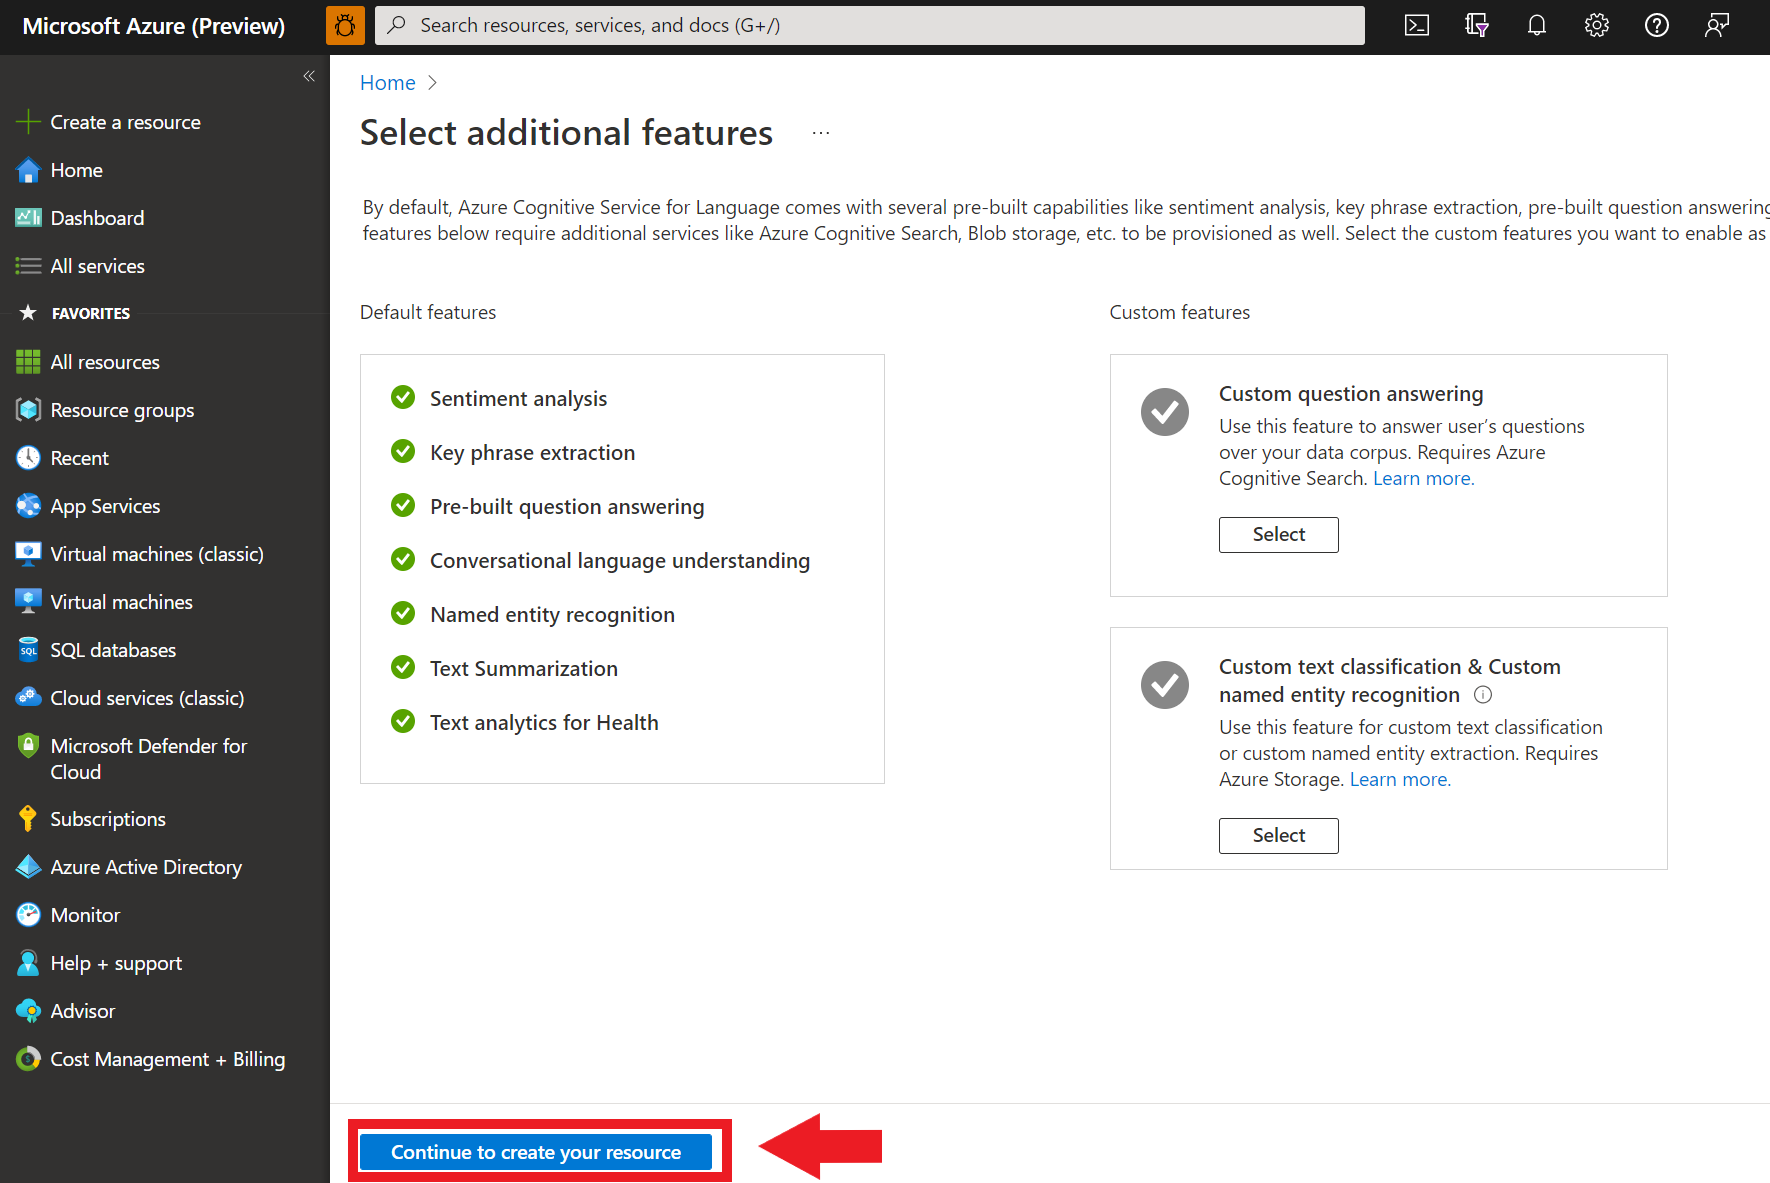
在出現的 [ 選取其他功能] 畫面上,選取 [ 繼續] 以建立您的資源。
在 [ 建立語言] 畫面中,提供下列資訊:
詳細資料 描述 訂用帳戶 您的資源將相關聯的訂用帳戶帳戶。 從下拉功能表中選取您的 Azure 訂用帳戶。 資源群組 資源群組是儲存您所建立資源的容器。 選取 [ 新建 ] 以建立新的資源群組。 區域 語言資源的位置。 不同的區域可能會根據您的實體位置引入延遲,但不會影響資源的運行時間可用性。 在本快速入門中,請選取您附近的可用區域,或選擇 [ 美國東部]。 名稱 語言資源的名稱。 此名稱也會用來建立端點 URL,您的應用程式將用來傳送 API 要求。 定價層 語言資源的定價層。 您可以使用 免費 F0 層來試用服務,稍後升級至生產環境的付費層。 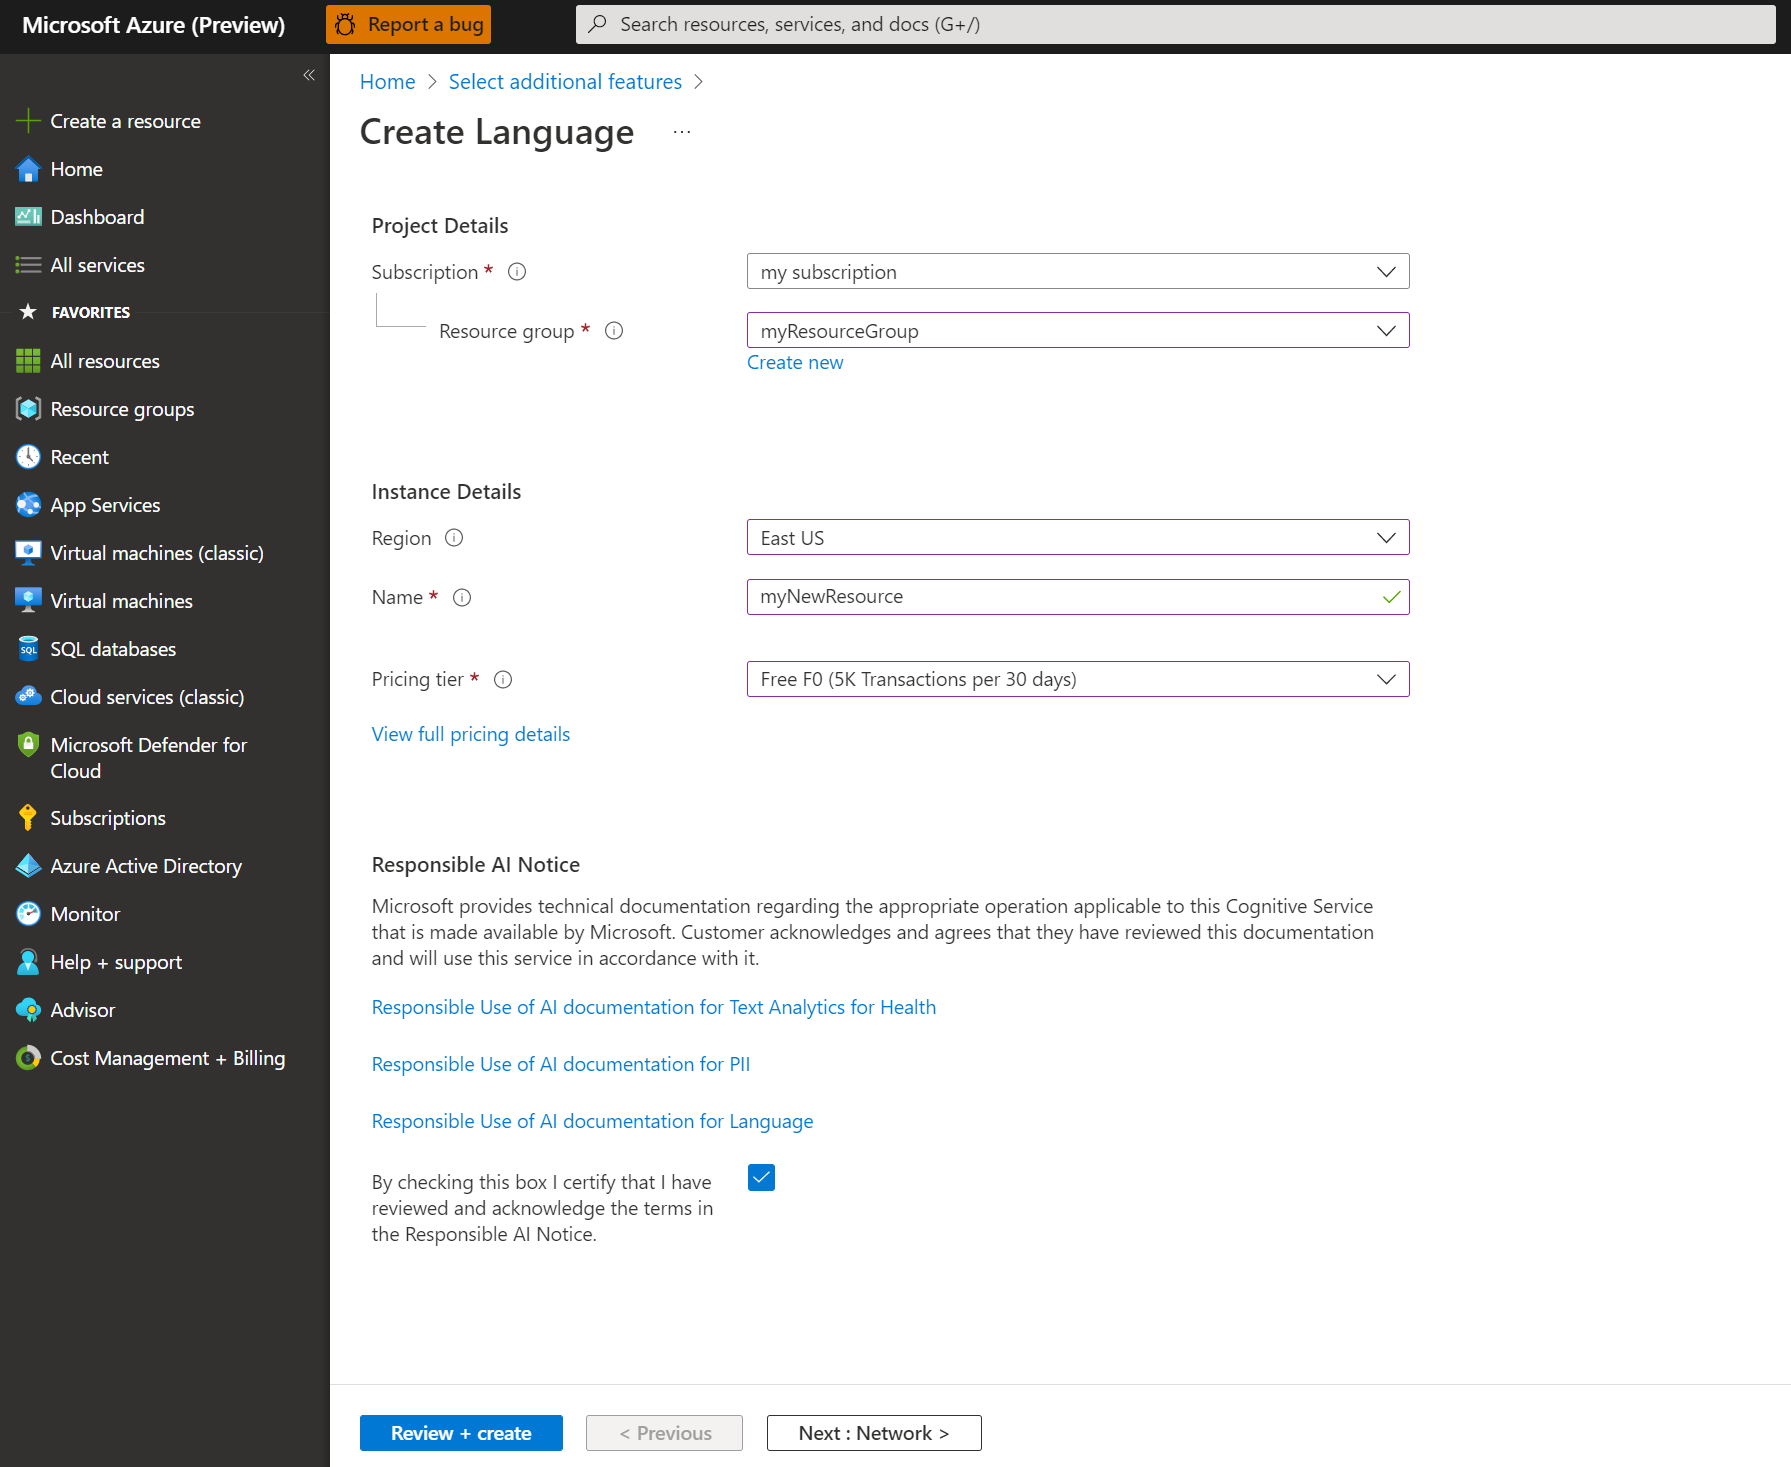
確定已核取 [ 負責任 AI 通知 ] 複選框。
選取頁面底部的 [檢閱 + 建立]。
在出現的畫面中,確定驗證已通過,而且您已正確輸入資訊。 然後選取建立。


取得您的金鑰和端點
接下來,您需要資源的密鑰和端點,才能將應用程式連線到 API。 您稍後會在快速入門中將金鑰和端點貼到程式碼中。
成功部署語言資源之後,按兩下 [後續步驟] 底下的 [移至資源] 按鈕。

在資源的畫面上,選取 左側導覽功能表上的 [金鑰和端點 ]。 您會在下列步驟中使用其中一個金鑰和端點。


建立環境變數
您的應用程式必須經過驗證,才能傳送 API 要求。 針對生產環境,請使用安全的方式來儲存和存取您的認證。 在此範例中,您會將認證寫入執行應用程式的本機計算機上環境變數。
提示
請勿將金鑰直接包含在您的程式代碼中,且絕不會公開發佈。 如需更多驗證選項 (例如 Azure Key Vault),請參閱 Azure AI 服務安全性文章。
若要設定語言資源密鑰的環境變數,請開啟控制台視窗,並遵循作業系統和開發環境的指示。
- 若要設定
LANGUAGE_KEY環境變數,請將 取代your-key為您資源的其中一個密鑰。 - 若要設定
LANGUAGE_ENDPOINT環境變數,請將 取代your-endpoint為您資源的端點。
setx LANGUAGE_KEY your-key
setx LANGUAGE_ENDPOINT your-endpoint
注意
如果您只需要存取目前執行控制台中的環境變數,您可以使用 來設定環境變數 set ,而不是 setx。
新增環境變數之後,您可能需要重新啟動任何需要讀取環境變數的執行中程式,包括主控台視窗。 例如,如果您使用 Visual Studio 作為編輯器,請在執行範例之前重新啟動 Visual Studio。
建立新的 .NET Core 應用程式
使用 Visual Studio IDE,建立新的 .NET Core 主控台應用程式。 這會建立具有單一 C# 原始程序檔的 「Hello World」 專案: program.cs。
以滑鼠右鍵按兩下 方案總管 中的解決方案,然後選取 [管理 NuGet 套件],以安裝客戶端連結庫。 開啟的套件管理員中,選取 [ 瀏覽 ] 並搜尋 Azure.AI.TextAnalytics。 選取 [版本 5.2.0],然後 選取 [安裝]。 您也可以使用 封裝管理員 主控台。
程式碼範例
將下列程式代碼複製到program.cs檔案中,然後執行程序代碼。
using Azure;
using System;
using System.Globalization;
using Azure.AI.TextAnalytics;

namespace EntityLinkingExample
{
    class Program
    {
        // This example requires environment variables named "LANGUAGE_KEY" and "LANGUAGE_ENDPOINT"
        static string languageKey = Environment.GetEnvironmentVariable("LANGUAGE_KEY");
        static string languageEndpoint = Environment.GetEnvironmentVariable("LANGUAGE_ENDPOINT");

        private static readonly AzureKeyCredential credentials = new AzureKeyCredential(languageKey);
        private static readonly Uri endpoint = new Uri(languageEndpoint);

        // Example method for recognizing entities and providing a link to an online data source.
        static void EntityLinkingExample(TextAnalyticsClient client)
        {
            var response = client.RecognizeLinkedEntities(
                "Microsoft was founded by Bill Gates and Paul Allen on April 4, 1975, " +
                "to develop and sell BASIC interpreters for the Altair 8800. " +
                "During his career at Microsoft, Gates held the positions of chairman, " +
                "chief executive officer, president and chief software architect, " +
                "while also being the largest individual shareholder until May 2014.");
            Console.WriteLine("Linked Entities:");
            foreach (var entity in response.Value)
            {
                Console.WriteLine($"\tName: {entity.Name},\tID: {entity.DataSourceEntityId},\tURL: {entity.Url}\tData Source: {entity.DataSource}");
                Console.WriteLine("\tMatches:");
                foreach (var match in entity.Matches)
                {
                    Console.WriteLine($"\t\tText: {match.Text}");
                    Console.WriteLine($"\t\tScore: {match.ConfidenceScore:F2}\n");
                }
            }
        }

        static void Main(string[] args)
        {
            var client = new TextAnalyticsClient(endpoint, credentials);
            EntityLinkingExample(client);

            Console.Write("Press any key to exit.");
            Console.ReadKey();
        }

    }
}
輸出
Linked Entities:
    Name: Microsoft,        ID: Microsoft,  URL: https://en.wikipedia.org/wiki/Microsoft    Data Source: Wikipedia
    Matches:
            Text: Microsoft
            Score: 0.55

            Text: Microsoft
            Score: 0.55

    Name: Bill Gates,       ID: Bill Gates, URL: https://en.wikipedia.org/wiki/Bill_Gates   Data Source: Wikipedia
    Matches:
            Text: Bill Gates
            Score: 0.63

            Text: Gates
            Score: 0.63

    Name: Paul Allen,       ID: Paul Allen, URL: https://en.wikipedia.org/wiki/Paul_Allen   Data Source: Wikipedia
    Matches:
            Text: Paul Allen
            Score: 0.60

    Name: April 4,  ID: April 4,    URL: https://en.wikipedia.org/wiki/April_4      Data Source: Wikipedia
    Matches:
            Text: April 4
            Score: 0.32

    Name: BASIC,    ID: BASIC,      URL: https://en.wikipedia.org/wiki/BASIC        Data Source: Wikipedia
    Matches:
            Text: BASIC
            Score: 0.33

    Name: Altair 8800,      ID: Altair 8800,        URL: https://en.wikipedia.org/wiki/Altair_8800  Data Source: Wikipedia
    Matches:
            Text: Altair 8800
            Score: 0.88
清除資源
如果您想要清除和移除 Azure AI 服務訂用帳戶,則可以刪除資源或資源群組。 刪除資源群組也會刪除與其相關聯的任何其他資源。
下一步
參考文件 | 更多樣本 | 套件 (Maven) | 程式庫原始程式碼
使用此快速入門來建立實體連結應用程式與適用於 Java 的用戶端連結庫。 在下列範例中,您會建立 Java 應用程式,以識別並釐清文字中找到的實體。
必要條件
- Azure 訂用帳戶 - 建立免費帳戶
- 具有 8 版或更新版本的 Java 開發工具套件 (JDK)
設定
建立 Azure 資源
若要使用下列程式代碼範例,您必須部署 Azure 資源。 此資源會包含金鑰和端點,您將用來驗證您傳送至語言服務的 API 呼叫。
使用下列連結,使用 Azure 入口網站 建立語言資源。 您必須使用 Azure 訂用帳戶登入。
在出現的 [ 選取其他功能] 畫面上,選取 [ 繼續] 以建立您的資源。
在 [ 建立語言] 畫面中,提供下列資訊:
詳細資料 描述 訂用帳戶 您的資源將相關聯的訂用帳戶帳戶。 從下拉功能表中選取您的 Azure 訂用帳戶。 資源群組 資源群組是儲存您所建立資源的容器。 選取 [ 新建 ] 以建立新的資源群組。 區域 語言資源的位置。 不同的區域可能會根據您的實體位置引入延遲,但不會影響資源的運行時間可用性。 在本快速入門中,請選取您附近的可用區域,或選擇 [ 美國東部]。 名稱 語言資源的名稱。 此名稱也會用來建立端點 URL,您的應用程式將用來傳送 API 要求。 定價層 語言資源的定價層。 您可以使用 免費 F0 層來試用服務,稍後升級至生產環境的付費層。
確定已核取 [ 負責任 AI 通知 ] 複選框。
選取頁面底部的 [檢閱 + 建立]。
在出現的畫面中,確定驗證已通過,而且您已正確輸入資訊。 然後選取建立。
取得您的金鑰和端點
接下來,您需要資源的密鑰和端點,才能將應用程式連線到 API。 您稍後會在快速入門中將金鑰和端點貼到程式碼中。
成功部署語言資源之後,按兩下 [後續步驟] 底下的 [移至資源] 按鈕。
在資源的畫面上,選取 左側導覽功能表上的 [金鑰和端點 ]。 您會在下列步驟中使用其中一個金鑰和端點。
建立環境變數
您的應用程式必須經過驗證,才能傳送 API 要求。 針對生產環境,請使用安全的方式來儲存和存取您的認證。 在此範例中,您會將認證寫入執行應用程式的本機計算機上環境變數。
提示
請勿將金鑰直接包含在您的程式代碼中,且絕不會公開發佈。 如需更多驗證選項 (例如 Azure Key Vault),請參閱 Azure AI 服務安全性文章。
若要設定語言資源密鑰的環境變數,請開啟控制台視窗,並遵循作業系統和開發環境的指示。
- 若要設定
LANGUAGE_KEY環境變數,請將 取代your-key為您資源的其中一個密鑰。 - 若要設定
LANGUAGE_ENDPOINT環境變數,請將 取代your-endpoint為您資源的端點。
setx LANGUAGE_KEY your-key
setx LANGUAGE_ENDPOINT your-endpoint
注意
如果您只需要存取目前執行控制台中的環境變數,您可以使用 來設定環境變數 set ,而不是 setx。
新增環境變數之後,您可能需要重新啟動任何需要讀取環境變數的執行中程式,包括主控台視窗。 例如,如果您使用 Visual Studio 作為編輯器,請在執行範例之前重新啟動 Visual Studio。
新增 用戶端程式庫
在慣用的 IDE 或開發環境中建立 Maven 專案。 然後將下列相依性新增至專案的 pom.xml 檔案。 您可以在在線找到其他建置工具的實作語法。
<dependencies>
     <dependency>
        <groupId>com.azure</groupId>
        <artifactId>azure-ai-textanalytics</artifactId>
        <version>5.2.0</version>
    </dependency>
</dependencies>
程式碼範例
建立名為 Example.java的 Java 檔案。 開啟檔案並複製下列程序代碼。 然後執行程式碼。
import com.azure.core.credential.AzureKeyCredential;
import com.azure.ai.textanalytics.models.*;
import com.azure.ai.textanalytics.TextAnalyticsClientBuilder;
import com.azure.ai.textanalytics.TextAnalyticsClient;

public class Example {

    // This example requires environment variables named "LANGUAGE_KEY" and "LANGUAGE_ENDPOINT"
    private static String languageKey = System.getenv("LANGUAGE_KEY");
    private static String languageEndpoint = System.getenv("LANGUAGE_ENDPOINT");

    public static void main(String[] args) {
        TextAnalyticsClient client = authenticateClient(languageKey, languageEndpoint);
        recognizeLinkedEntitiesExample(client);
    }
    // Method to authenticate the client object with your key and endpoint
    static TextAnalyticsClient authenticateClient(String key, String endpoint) {
        return new TextAnalyticsClientBuilder()
                .credential(new AzureKeyCredential(key))
                .endpoint(endpoint)
                .buildClient();
    }
    // Example method for recognizing entities and providing a link to an online data source
    static void recognizeLinkedEntitiesExample(TextAnalyticsClient client)
    {
        // The text that need be analyzed.
        String text = "Microsoft was founded by Bill Gates and Paul Allen on April 4, 1975, " +
                "to develop and sell BASIC interpreters for the Altair 8800. " +
                "During his career at Microsoft, Gates held the positions of chairman, " +
                "chief executive officer, president and chief software architect, " +
                "while also being the largest individual shareholder until May 2014.";

        System.out.printf("Linked Entities:%n");
        for (LinkedEntity linkedEntity : client.recognizeLinkedEntities(text)) {
            System.out.printf("Name: %s, ID: %s, URL: %s, Data Source: %s.%n",
                    linkedEntity.getName(),
                    linkedEntity.getDataSourceEntityId(),
                    linkedEntity.getUrl(),
                    linkedEntity.getDataSource());
            System.out.printf("Matches:%n");
            for (LinkedEntityMatch linkedEntityMatch : linkedEntity.getMatches()) {
                System.out.printf("Text: %s, Score: %.2f, Offset: %s, Length: %s%n",
                        linkedEntityMatch.getText(),
                        linkedEntityMatch.getConfidenceScore(),
                        linkedEntityMatch.getOffset(),
                        linkedEntityMatch.getLength());
            }
        }
    }
}
輸出
Linked Entities:

Name: Microsoft, ID: Microsoft, URL: https://en.wikipedia.org/wiki/Microsoft, Data Source: Wikipedia.
Matches:
Text: Microsoft, Score: 0.55, Offset: 0, Length: 9
Text: Microsoft, Score: 0.55, Offset: 150, Length: 9
Name: Bill Gates, ID: Bill Gates, URL: https://en.wikipedia.org/wiki/Bill_Gates, Data Source: Wikipedia.
Matches:
Text: Bill Gates, Score: 0.63, Offset: 25, Length: 10
Text: Gates, Score: 0.63, Offset: 161, Length: 5
Name: Paul Allen, ID: Paul Allen, URL: https://en.wikipedia.org/wiki/Paul_Allen, Data Source: Wikipedia.
Matches:
Text: Paul Allen, Score: 0.60, Offset: 40, Length: 10
Name: April 4, ID: April 4, URL: https://en.wikipedia.org/wiki/April_4, Data Source: Wikipedia.
Matches:
Text: April 4, Score: 0.32, Offset: 54, Length: 7
Name: BASIC, ID: BASIC, URL: https://en.wikipedia.org/wiki/BASIC, Data Source: Wikipedia.
Matches:
Text: BASIC, Score: 0.33, Offset: 89, Length: 5
Name: Altair 8800, ID: Altair 8800, URL: https://en.wikipedia.org/wiki/Altair_8800, Data Source: Wikipedia.
Matches:
Text: Altair 8800, Score: 0.88, Offset: 116, Length: 11
清除資源
如果您想要清除和移除 Azure AI 服務訂用帳戶,則可以刪除資源或資源群組。 刪除資源群組也會刪除與其相關聯的任何其他資源。
下一步
參考檔 | 更多範例 | 套件 (npm) | 連結庫原始程式碼
使用此快速入門來建立具有用戶端連結庫的實體連結應用程式,以Node.js。 在下列範例中,您會建立 JavaScript 應用程式,以識別並釐清文字中找到的實體。
必要條件
- Azure 訂用帳戶 - 建立免費帳戶
- Node.js v14 LTS 或更新版本
設定
建立 Azure 資源
若要使用下列程式代碼範例,您必須部署 Azure 資源。 此資源會包含金鑰和端點,您將用來驗證您傳送至語言服務的 API 呼叫。
使用下列連結,使用 Azure 入口網站 建立語言資源。 您必須使用 Azure 訂用帳戶登入。
在出現的 [ 選取其他功能] 畫面上,選取 [ 繼續] 以建立您的資源。
在 [ 建立語言] 畫面中,提供下列資訊:
詳細資料 描述 訂用帳戶 您的資源將相關聯的訂用帳戶帳戶。 從下拉功能表中選取您的 Azure 訂用帳戶。 資源群組 資源群組是儲存您所建立資源的容器。 選取 [ 新建 ] 以建立新的資源群組。 區域 語言資源的位置。 不同的區域可能會根據您的實體位置引入延遲,但不會影響資源的運行時間可用性。 在本快速入門中,請選取您附近的可用區域,或選擇 [ 美國東部]。 名稱 語言資源的名稱。 此名稱也會用來建立端點 URL,您的應用程式將用來傳送 API 要求。 定價層 語言資源的定價層。 您可以使用 免費 F0 層來試用服務,稍後升級至生產環境的付費層。
確定已核取 [ 負責任 AI 通知 ] 複選框。
選取頁面底部的 [檢閱 + 建立]。
在出現的畫面中,確定驗證已通過,而且您已正確輸入資訊。 然後選取建立。
取得您的金鑰和端點
接下來,您需要資源的密鑰和端點,才能將應用程式連線到 API。 您稍後會在快速入門中將金鑰和端點貼到程式碼中。
成功部署語言資源之後,按兩下 [後續步驟] 底下的 [移至資源] 按鈕。
在資源的畫面上,選取 左側導覽功能表上的 [金鑰和端點 ]。 您會在下列步驟中使用其中一個金鑰和端點。
建立環境變數
您的應用程式必須經過驗證,才能傳送 API 要求。 針對生產環境,請使用安全的方式來儲存和存取您的認證。 在此範例中,您會將認證寫入執行應用程式的本機計算機上環境變數。
提示
請勿將金鑰直接包含在您的程式代碼中,且絕不會公開發佈。 如需更多驗證選項 (例如 Azure Key Vault),請參閱 Azure AI 服務安全性文章。
若要設定語言資源密鑰的環境變數,請開啟控制台視窗,並遵循作業系統和開發環境的指示。
- 若要設定
LANGUAGE_KEY環境變數,請將 取代your-key為您資源的其中一個密鑰。 - 若要設定
LANGUAGE_ENDPOINT環境變數,請將 取代your-endpoint為您資源的端點。
setx LANGUAGE_KEY your-key
setx LANGUAGE_ENDPOINT your-endpoint
注意
如果您只需要存取目前執行控制台中的環境變數,您可以使用 來設定環境變數 set ,而不是 setx。
新增環境變數之後,您可能需要重新啟動任何需要讀取環境變數的執行中程式,包括主控台視窗。 例如,如果您使用 Visual Studio 作為編輯器,請在執行範例之前重新啟動 Visual Studio。
建立新的 Node.js 應用程式
在主控台視窗 (例如 cmd、PowerShell 或 Bash) 中,為您的應用程式建立新的目錄,並瀏覽至該目錄。
mkdir myapp

cd myapp
執行命令 npm init,以使用 package.json 檔案建立節點應用程式。
npm init
安裝用戶端程式庫
安裝 npm 套件:
npm install @azure/ai-language-text
程式碼範例
開啟檔案並複製下列程序代碼。 然後執行程式碼。
"use strict";

const { TextAnalyticsClient, AzureKeyCredential } = require("@azure/ai-text-analytics");

// This example requires environment variables named "LANGUAGE_KEY" and "LANGUAGE_ENDPOINT"
const key = process.env.LANGUAGE_KEY;
const endpoint = process.env.LANGUAGE_ENDPOINT;

//example sentence for recognizing entities
const documents = ["Microsoft was founded by Bill Gates and Paul Allen on April 4, 1975."];

//example of how to use the client to perform entity linking on a document
async function main() {
    console.log("== Entity linking sample ==");

    const client = new TextAnalysisClient(endpoint, new AzureKeyCredential(key));

    const results = await client.analyze("EntityLinking", documents);

    for (const result of results) {
      console.log(`- Document ${result.id}`);
      if (!result.error) {
        console.log("\tEntities:");
        for (const entity of result.entities) {
          console.log(
            `\t- Entity ${entity.name}; link ${entity.url}; datasource: ${entity.dataSource}`
          );
          console.log("\t\tMatches:");
          for (const match of entity.matches) {
            console.log(
              `\t\t- Entity appears as "${match.text}" (confidence: ${match.confidenceScore}`
            );
          }
        }
      } else {
        console.error("  Error:", result.error);
      }
    }
  }

//call the main function
main().catch((err) => {
  console.error("The sample encountered an error:", err);
});
輸出
== Entity linking sample ==
- Document 0
    Entities:
    - Entity Microsoft; link https://en.wikipedia.org/wiki/Microsoft; datasource: Wikipedia
            Matches:
            - Entity appears as "Microsoft" (confidence: 0.48
    - Entity Bill Gates; link https://en.wikipedia.org/wiki/Bill_Gates; datasource: Wikipedia
            Matches:
            - Entity appears as "Bill Gates" (confidence: 0.52
    - Entity Paul Allen; link https://en.wikipedia.org/wiki/Paul_Allen; datasource: Wikipedia
            Matches:
            - Entity appears as "Paul Allen" (confidence: 0.54
    - Entity April 4; link https://en.wikipedia.org/wiki/April_4; datasource: Wikipedia
            Matches:
            - Entity appears as "April 4" (confidence: 0.38
清除資源
如果您想要清除和移除 Azure AI 服務訂用帳戶,則可以刪除資源或資源群組。 刪除資源群組也會刪除與其相關聯的任何其他資源。
下一步
參考文件 | 更多樣本 | 套件 (PyPi) | 程式庫原始程式碼
使用此快速入門來建立實體連結應用程式與適用於 Python 的用戶端連結庫。 在下列範例中,您會建立 Python 應用程式,以識別並釐清文字中找到的實體。
必要條件
- Azure 訂用帳戶 - 建立免費帳戶
- Python 3.7 或更新版本
設定
建立 Azure 資源
若要使用下列程式代碼範例,您必須部署 Azure 資源。 此資源會包含金鑰和端點,您將用來驗證您傳送至語言服務的 API 呼叫。
使用下列連結,使用 Azure 入口網站 建立語言資源。 您必須使用 Azure 訂用帳戶登入。
在出現的 [ 選取其他功能] 畫面上,選取 [ 繼續] 以建立您的資源。
在 [ 建立語言] 畫面中,提供下列資訊:
詳細資料 描述 訂用帳戶 您的資源將相關聯的訂用帳戶帳戶。 從下拉功能表中選取您的 Azure 訂用帳戶。 資源群組 資源群組是儲存您所建立資源的容器。 選取 [ 新建 ] 以建立新的資源群組。 區域 語言資源的位置。 不同的區域可能會根據您的實體位置引入延遲,但不會影響資源的運行時間可用性。 在本快速入門中,請選取您附近的可用區域,或選擇 [ 美國東部]。 名稱 語言資源的名稱。 此名稱也會用來建立端點 URL,您的應用程式將用來傳送 API 要求。 定價層 語言資源的定價層。 您可以使用 免費 F0 層來試用服務,稍後升級至生產環境的付費層。
確定已核取 [ 負責任 AI 通知 ] 複選框。
選取頁面底部的 [檢閱 + 建立]。
在出現的畫面中,確定驗證已通過,而且您已正確輸入資訊。 然後選取建立。
取得您的金鑰和端點
接下來,您需要資源的密鑰和端點,才能將應用程式連線到 API。 您稍後會在快速入門中將金鑰和端點貼到程式碼中。
成功部署語言資源之後,按兩下 [後續步驟] 底下的 [移至資源] 按鈕。
在資源的畫面上,選取 左側導覽功能表上的 [金鑰和端點 ]。 您會在下列步驟中使用其中一個金鑰和端點。
建立環境變數
您的應用程式必須經過驗證,才能傳送 API 要求。 針對生產環境,請使用安全的方式來儲存和存取您的認證。 在此範例中,您會將認證寫入執行應用程式的本機計算機上環境變數。
提示
請勿將金鑰直接包含在您的程式代碼中,且絕不會公開發佈。 如需更多驗證選項 (例如 Azure Key Vault),請參閱 Azure AI 服務安全性文章。
若要設定語言資源密鑰的環境變數,請開啟控制台視窗,並遵循作業系統和開發環境的指示。
- 若要設定
LANGUAGE_KEY環境變數,請將 取代your-key為您資源的其中一個密鑰。 - 若要設定
LANGUAGE_ENDPOINT環境變數,請將 取代your-endpoint為您資源的端點。
setx LANGUAGE_KEY your-key
setx LANGUAGE_ENDPOINT your-endpoint
注意
如果您只需要存取目前執行控制台中的環境變數,您可以使用 來設定環境變數 set ,而不是 setx。
新增環境變數之後,您可能需要重新啟動任何需要讀取環境變數的執行中程式,包括主控台視窗。 例如,如果您使用 Visual Studio 作為編輯器,請在執行範例之前重新啟動 Visual Studio。
安裝用戶端程式庫
安裝 Python 之後,您可以使用下列項目來安裝用戶端連結庫:
pip install azure-ai-textanalytics==5.2.0
程式碼範例
建立新的 Python 檔案,並複製下列程式代碼。 然後執行程式碼。
# This example requires environment variables named "LANGUAGE_KEY" and "LANGUAGE_ENDPOINT"
language_key = os.environ.get('LANGUAGE_KEY')
language_endpoint = os.environ.get('LANGUAGE_ENDPOINT')

from azure.ai.textanalytics import TextAnalyticsClient
from azure.core.credentials import AzureKeyCredential

# Authenticate the client using your key and endpoint.
def authenticate_client():
    ta_credential = AzureKeyCredential(language_key)
    text_analytics_client = TextAnalyticsClient(
            endpoint=language_endpoint,
            credential=ta_credential)
    return text_analytics_client

client = authenticate_client()

# Example function for recognizing entities and providing a link to an online data source.
def entity_linking_example(client):

    try:
        documents = ["""Microsoft was founded by Bill Gates and Paul Allen on April 4, 1975,
        to develop and sell BASIC interpreters for the Altair 8800.
        During his career at Microsoft, Gates held the positions of chairman,
        chief executive officer, president and chief software architect,
        while also being the largest individual shareholder until May 2014."""]
        result = client.recognize_linked_entities(documents = documents)[0]

        print("Linked Entities:\n")
        for entity in result.entities:
            print("\tName: ", entity.name, "\tId: ", entity.data_source_entity_id, "\tUrl: ", entity.url,
            "\n\tData Source: ", entity.data_source)
            print("\tMatches:")
            for match in entity.matches:
                print("\t\tText:", match.text)
                print("\t\tConfidence Score: {0:.2f}".format(match.confidence_score))
                print("\t\tOffset: {}".format(match.offset))
                print("\t\tLength: {}".format(match.length))

    except Exception as err:
        print("Encountered exception. {}".format(err))
entity_linking_example(client)
輸出
Linked Entities:

    Name:  Microsoft        Id:  Microsoft  Url:  https://en.wikipedia.org/wiki/Microsoft
    Data Source:  Wikipedia
    Matches:
            Text: Microsoft
            Confidence Score: 0.55
            Offset: 0
            Length: 9
            Text: Microsoft
            Confidence Score: 0.55
            Offset: 168
            Length: 9
    Name:  Bill Gates       Id:  Bill Gates         Url:  https://en.wikipedia.org/wiki/Bill_Gates
    Data Source:  Wikipedia
    Matches:
            Text: Bill Gates
            Confidence Score: 0.63
            Offset: 25
            Length: 10
            Text: Gates
            Confidence Score: 0.63
            Offset: 179
            Length: 5
    Name:  Paul Allen       Id:  Paul Allen         Url:  https://en.wikipedia.org/wiki/Paul_Allen
    Data Source:  Wikipedia
    Matches:
            Text: Paul Allen
            Confidence Score: 0.60
            Offset: 40
            Length: 10
    Name:  April 4  Id:  April 4    Url:  https://en.wikipedia.org/wiki/April_4
    Data Source:  Wikipedia
    Matches:
            Text: BASIC
            Confidence Score: 0.33
            Offset: 98
            Length: 5
    Name:  Altair 8800      Id:  Altair 8800        Url:  https://en.wikipedia.org/wiki/Altair_8800
    Data Source:  Wikipedia
    Matches:
            Text: Altair 8800
            Confidence Score: 0.88
            Offset: 125
            Length: 11
清除資源
如果您想要清除和移除 Azure AI 服務訂用帳戶,則可以刪除資源或資源群組。 刪除資源群組也會刪除與其相關聯的任何其他資源。
下一步
使用此快速入門,使用 REST API 傳送實體連結要求。 在下列範例中,您將使用 cURL 來識別和釐清文字中找到的實體。
必要條件
- Azure 訂用帳戶 - 建立免費帳戶
設定
建立 Azure 資源
若要使用下列程式代碼範例,您必須部署 Azure 資源。 此資源會包含金鑰和端點,您將用來驗證您傳送至語言服務的 API 呼叫。
使用下列連結,使用 Azure 入口網站 建立語言資源。 您必須使用 Azure 訂用帳戶登入。
在出現的 [ 選取其他功能] 畫面上,選取 [ 繼續] 以建立您的資源。
在 [ 建立語言] 畫面中,提供下列資訊:
詳細資料 描述 訂用帳戶 您的資源將相關聯的訂用帳戶帳戶。 從下拉功能表中選取您的 Azure 訂用帳戶。 資源群組 資源群組是儲存您所建立資源的容器。 選取 [ 新建 ] 以建立新的資源群組。 區域 語言資源的位置。 不同的區域可能會根據您的實體位置引入延遲,但不會影響資源的運行時間可用性。 在本快速入門中,請選取您附近的可用區域,或選擇 [ 美國東部]。 名稱 語言資源的名稱。 此名稱也會用來建立端點 URL,您的應用程式將用來傳送 API 要求。 定價層 語言資源的定價層。 您可以使用 免費 F0 層來試用服務,稍後升級至生產環境的付費層。
確定已核取 [ 負責任 AI 通知 ] 複選框。
選取頁面底部的 [檢閱 + 建立]。
在出現的畫面中,確定驗證已通過,而且您已正確輸入資訊。 然後選取建立。
取得您的金鑰和端點
接下來,您需要資源的密鑰和端點,才能將應用程式連線到 API。 您稍後會在快速入門中將金鑰和端點貼到程式碼中。
成功部署語言資源之後,按兩下 [後續步驟] 底下的 [移至資源] 按鈕。
在資源的畫面上,選取 左側導覽功能表上的 [金鑰和端點 ]。 您會在下列步驟中使用其中一個金鑰和端點。
建立環境變數
您的應用程式必須經過驗證,才能傳送 API 要求。 針對生產環境,請使用安全的方式來儲存和存取您的認證。 在此範例中,您會將認證寫入執行應用程式的本機計算機上環境變數。
提示
請勿將金鑰直接包含在您的程式代碼中,且絕不會公開發佈。 如需更多驗證選項 (例如 Azure Key Vault),請參閱 Azure AI 服務安全性文章。
若要設定語言資源密鑰的環境變數,請開啟控制台視窗,並遵循作業系統和開發環境的指示。
- 若要設定
LANGUAGE_KEY環境變數,請將 取代your-key為您資源的其中一個密鑰。 - 若要設定
LANGUAGE_ENDPOINT環境變數,請將 取代your-endpoint為您資源的端點。
setx LANGUAGE_KEY your-key
setx LANGUAGE_ENDPOINT your-endpoint
注意
如果您只需要存取目前執行控制台中的環境變數,您可以使用 來設定環境變數 set ,而不是 setx。
新增環境變數之後,您可能需要重新啟動任何需要讀取環境變數的執行中程式,包括主控台視窗。 例如,如果您使用 Visual Studio 作為編輯器,請在執行範例之前重新啟動 Visual Studio。
使用範例要求本文建立 JSON 檔案
在程式代碼編輯器中,建立名為 test_entitylinking_payload.json 的新檔案,並複製下列 JSON 範例。 下一個步驟中,這個範例要求將會傳送至 API。
{
    "kind": "EntityLinking",
    "parameters": {
        "modelVersion": "latest"
    },
    "analysisInput":{
        "documents":[
            {
                "id":"1",
                "language":"en",
                "text": "Microsoft was founded by Bill Gates and Paul Allen on April 4, 1975."
            }
        ]
    }
}
在您的 test_entitylinking_payload.json 電腦上儲存某處。 例如,您的桌面。
傳送實體連結 API 要求
使用下列命令,使用您使用的程式來傳送 API 要求。 將命令複製到終端機,然後執行它。
| parameter | 描述 |
|---|---|
-X POST <endpoint> |
指定用於存取 API 的端點。 |
-H Content-Type: application/json |
傳送 JSON 資料的內容類型。 |
-H "Ocp-Apim-Subscription-Key:<key> |
指定用來存取 API 的金鑰。 |
-d <documents> |
包含您要傳送之檔的 JSON。 |
將 取代 C:\Users\<myaccount>\Desktop\test_entitylinking_payload.json 為您在上一個步驟中建立的範例 JSON 要求檔案的位置。
命令提示字元
curl -X POST "%LANGUAGE_ENDPOINT%/language/:analyze-text?api-version=2022-05-01" ^
-H "Content-Type: application/json" ^
-H "Ocp-Apim-Subscription-Key: %LANGUAGE_KEY%" ^
-d "@C:\Users\<myaccount>\Desktop\test_entitylinking_payload.json"
PowerShell
curl.exe -X POST $env:LANGUAGE_ENDPOINT/language/:analyze-text?api-version=2022-05-01 `
-H "Content-Type: application/json" `
-H "Ocp-Apim-Subscription-Key: $env:LANGUAGE_KEY" `
-d "@C:\Users\<myaccount>\Desktop\test_entitylinking_payload.json"
JSON 回應
{
	"kind": "EntityLinkingResults",
	"results": {
		"documents": [{
			"id": "1",
			"entities": [{
				"bingId": "a093e9b9-90f5-a3d5-c4b8-5855e1b01f85",
				"name": "Microsoft",
				"matches": [{
					"text": "Microsoft",
					"offset": 0,
					"length": 9,
					"confidenceScore": 0.48
				}],
				"language": "en",
				"id": "Microsoft",
				"url": "https://en.wikipedia.org/wiki/Microsoft",
				"dataSource": "Wikipedia"
			}, {
				"bingId": "0d47c987-0042-5576-15e8-97af601614fa",
				"name": "Bill Gates",
				"matches": [{
					"text": "Bill Gates",
					"offset": 25,
					"length": 10,
					"confidenceScore": 0.52
				}],
				"language": "en",
				"id": "Bill Gates",
				"url": "https://en.wikipedia.org/wiki/Bill_Gates",
				"dataSource": "Wikipedia"
			}, {
				"bingId": "df2c4376-9923-6a54-893f-2ee5a5badbc7",
				"name": "Paul Allen",
				"matches": [{
					"text": "Paul Allen",
					"offset": 40,
					"length": 10,
					"confidenceScore": 0.54
				}],
				"language": "en",
				"id": "Paul Allen",
				"url": "https://en.wikipedia.org/wiki/Paul_Allen",
				"dataSource": "Wikipedia"
			}, {
				"bingId": "52535f87-235e-b513-54fe-c03e4233ac6e",
				"name": "April 4",
				"matches": [{
					"text": "April 4",
					"offset": 54,
					"length": 7,
					"confidenceScore": 0.38
				}],
				"language": "en",
				"id": "April 4",
				"url": "https://en.wikipedia.org/wiki/April_4",
				"dataSource": "Wikipedia"
			}],
			"warnings": []
		}],
		"errors": [],
		"modelVersion": "2021-06-01"
	}
}
清除資源
如果您想要清除和移除 Azure AI 服務訂用帳戶,則可以刪除資源或資源群組。 刪除資源群組也會刪除與其相關聯的任何其他資源。