在本快速入門中,您會使用適用於 Java 的 Azure SDK 來部署適用於 NoSQL 的基本 Azure Cosmos DB 應用程式。 適用於 NoSQL 的 Azure Cosmos DB 是無架構資料存放區,可讓應用程式將非結構化數據儲存在雲端中。 使用適用於 Java 的 Azure SDK 查詢容器中的數據,並在個別專案上執行一般作業。
API 參考文件 | 程式庫原始程式碼 | 封裝 (Maven) | Azure Developer CLI
Prerequisites
- Azure Developer CLI
- Docker 桌面
- 爪哇21
如果您沒有 Azure 帳戶,請在開始之前建立 免費帳戶 。
初始化專案
使用 Azure 開發人員 CLI (azd) 來建立適用於 NoSQL 的 Azure Cosmos DB 帳戶,並部署容器化範例應用程式。 應用程式範例使用用戶端程式庫管理、建立、讀取和查詢樣本資料。
在空的目錄中開啟終端機。
如果您尚未通過驗證,請使用
azd auth login向 Azure 開發人員 CLI 進行驗證。 依照工具指定的步驟,使用您慣用的 Azure 認證向 CLI 進行驗證。azd auth login使用
azd init來初始化專案。azd init --template cosmos-db-nosql-java-quickstart在初始化期間,請設定唯一的環境名稱。
使用
azd up部署 Azure Cosmos DB 帳戶。 Bicep 模板同時也部署了一個範例網頁應用程式。azd up在布建程式期間,選取您的訂用帳戶、所需的位置和目標資源群組。 等候佈建程序完成。 該過程可能需要大約五分鐘。
一旦 Azure 資源的配置完成,輸出中會包含執行網頁應用程式的 URL。
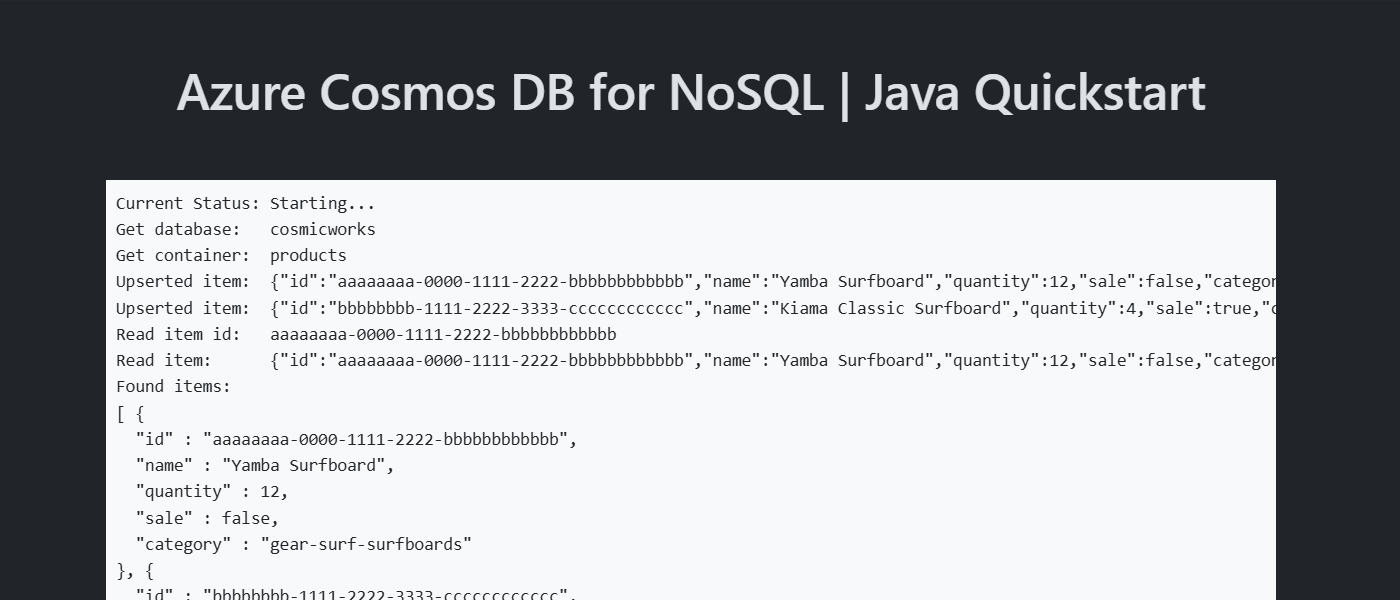
Deploying services (azd deploy)

  (✓) Done: Deploying service web
- Endpoint: <https://[container-app-sub-domain].azurecontainerapps.io>

SUCCESS: Your application was provisioned and deployed to Azure in 5 minutes 0 seconds.
使用控制台中的網址,通過瀏覽器導航到您的網路應用程式。 觀察執行中應用程式的輸出。
安裝用戶端程式庫
用戶端程式庫可透過 Maven 以 azure-spring-data-cosmos 封裝形式提供。
瀏覽到
/src/web資料夾,然後開啟 pom.xml 檔案。如果尚未存在,請為
azure-spring-data-cosmos封裝新增一個項目。<dependency> <groupId>com.azure</groupId> <artifactId>azure-spring-data-cosmos</artifactId> </dependency>此外如果
azure-identity封裝不存在,請新增另一個相依性。<dependency> <groupId>com.azure</groupId> <artifactId>azure-identity</artifactId> </dependency>
匯入程式庫
將所有必要的命名空間匯入您的應用程式程序代碼。
import com.azure.cosmos.CosmosClientBuilder;
import com.azure.cosmos.models.PartitionKey;
import com.azure.identity.DefaultAzureCredential;
import com.azure.identity.DefaultAzureCredentialBuilder;
import com.azure.spring.data.cosmos.config.AbstractCosmosConfiguration;
import com.azure.spring.data.cosmos.config.CosmosConfig;
import com.azure.spring.data.cosmos.core.mapping.Container;
import com.azure.spring.data.cosmos.core.mapping.PartitionKey;
import com.azure.spring.data.cosmos.repository.CosmosRepository;
import com.azure.spring.data.cosmos.repository.Query;
import com.azure.spring.data.cosmos.repository.config.EnableCosmosRepositories;
物件模型
| Name | Description |
|---|---|
EnableCosmosRepositories |
此型別為方法裝飾項目,用於設定存放庫以存取 Azure Cosmos DB for NoSQL。 |
CosmosRepository |
這個類別是主要用戶端類別,用於管理容器內的資料。 |
CosmosClientBuilder |
此類別為用於建立存放庫所使用之用戶端的中心。 |
Query |
這種類型是一種方法裝飾器,用於指定儲存庫執行的查詢。 |
程式碼範例
範本中的程式碼範例使用 cosmicworks 資料庫和 products 容器。
products 容器包含每個產品的名稱、類別、數量、唯一識別碼和銷售旗標這類詳細資料。 容器使用 /category 屬性作為邏輯分割區索引鍵。
驗證用戶端
首先這個樣本會建立繼承自 AbstractCosmosConfiguration 的新類別,以設定與 Azure Cosmos DB for NoSQL 的連接。
@Configuration
@EnableCosmosRepositories
public class CosmosConfiguration extends AbstractCosmosConfiguration {
}
在設定類別中,這個樣本會建立 CosmosClientBuilder 類別的新執行個體,並使用 DefaultAzureCredential 執行個體來設定驗證。
@Bean
public CosmosClientBuilder getCosmosClientBuilder() {
    DefaultAzureCredential credential = new DefaultAzureCredentialBuilder()
        .build();

    return new CosmosClientBuilder()
        .endpoint("<azure-cosmos-db-nosql-account-endpoint>")
        .credential(credential);
}
取得資料庫
在設定類別中,樣本實作了一個方法,傳回現有資料庫 cosmicworks 的名稱。
@Override
protected String getDatabaseName() {
    return "cosmicworks";
}
找一個容器
使用 Container 方法裝飾器來設定一個類別,以表示容器中的項目。 編寫類別,將所有要序列化成 JSON 的成員包含在內。 在這個範例中,該型別有唯一識別碼,以及類別、名稱、數量、價格和權限欄位。
@Container(containerName = "products", autoCreateContainer = false)
public class Item {
    private String id;
    private String name;
    private Integer quantity;
    private Boolean sale;

    @PartitionKey
    private String category;

    // Extra members omitted for brevity
}
建立項目
使用 repository.save 在容器中建立一個項目。
Item item = new Item(
    "aaaaaaaa-0000-1111-2222-bbbbbbbbbbbb",
    "gear-surf-surfboards",
    "Yamba Surfboard",
    12,
    false
);
Item created_item = repository.save(item);
讀取項目
使用唯一識別碼 (id) 和分割區索引鍵欄位,來執行點讀取作業。 使用 repository.findById 有效率地擷取特定項目。
PartitionKey partitionKey = new PartitionKey("gear-surf-surfboards");
Optional<Item> existing_item = repository.findById("aaaaaaaa-0000-1111-2222-bbbbbbbbbbbb", partitionKey);
if (existing_item.isPresent()) {
    // Do something
}
查詢項目
在存放庫介面中定義查詢,即可對容器中的多個項目執行查詢。 此範例使用 Query 方法裝飾器,定義一個執行此參數化查詢的方法:
SELECT * FROM products p WHERE p.category = @category
@Repository
public interface ItemRepository extends CosmosRepository<Item, String> {

    @Query("SELECT * FROM products p WHERE p.category = @category")
    List<Item> getItemsByCategory(@Param("category") String category);

}
Important
@Query-標註的方法必須回傳List<T>或單一T,而不是Optional<T>。
Optional<T> 僅支援導出查詢方法,如 findById。 使用 Optional<T> 和 @Query 編譯時不會出錯,但在執行時會發生一個ClassCastException。
使用 repository.getItemsByCategory 擷取查詢的所有結果。 重複查看查詢的結果。
List<Item> items = repository.getItemsByCategory("gear-surf-surfboards");
for (Item item : items) {
    // Do something
}
探索您的資料
使用適用於 Azure Cosmos DB 的 Visual Studio Code 擴充功能來探索您的 NoSQL 數據。 您可以執行核心資料庫作業,包括但不限於:
- 使用剪貼簿或查詢編輯器執行查詢
- 修改、更新、建立和刪除項目
- 從其他來源匯入大量數據
- 管理資料庫和容器
如需詳細資訊,請參閱 如何使用 Visual Studio Code 擴充功能來探索適用於 NoSQL 數據的 Azure Cosmos DB。
清理資源
當您不再需要範例應用程式或資源時,請移除對應的部署和所有資源。
azd down