這本範例筆記本說明如何在 Databricks 上訓練機器學習分類模型。 Databricks Runtime for 機器學習 預裝了許多函式庫,包括用於訓練與預處理演算法的 scikit-learn、用於追蹤模型開發流程的 MLflow,以及用於擴展超參數調整的 Optuna。
在這本筆記本中,你會建立一個分類模型來預測一款葡萄酒是否被視為「高品質」。 資料集包含不同葡萄酒的 11 個特徵 (例如酒精含量、酸度和殘留糖分),介於 1 到 10 之間的品質排名。
此教學課程涵蓋:
- 第一部分:使用 MLflow 追蹤訓練分類模型
- 第二部分:超參數調校以提升模型效能
- 第三部分:將結果與模型儲存到 Unity 目錄
- 第四部分:部署模型
欲了解更多關於在 Databricks 上生產化機器學習的細節,包括模型生命週期管理與模型推論,請參閱 機器學習端到端範例。
該資料集可於
要求
- 運行 Databricks Runtime 17.3 LTS ML 或以上版本的叢集。 如果你使用的是 Databricks Runtime 16.4 LTS ML 或更低版本,請參考教學:在 Databricks 上建構你的第一個機器學習模型(Hyperopt)。
設定
在本區,你要做以下幾件事:
- 將 MLflow 客戶端設定為使用 Unity 目錄作為模型登錄檔。
- 設定將註冊模型的目錄與資料庫結構。
- 讀取資料並存到 Unity 目錄的表格。
- 資料要進行預處理。
配置 MLflow 客戶端
預設情況下,MLflow Python 用戶端會在 Databricks 工作空間模型登錄中建立模型。 若要在 Unity 目錄中儲存模型,請依以下儲存格配置 MLflow 客戶端。
import mlflow
mlflow.set_registry_uri("databricks-uc")
以下儲存格設定模型將登錄的目錄與結構。 你必須擁有 USE CATALOG 目錄的權限,以及 schema 的 USE_SCHEMA、CREATE_TABLE、CREATE_MODEL 權限。 如有需要,請更改以下儲存格的目錄名稱與結構名稱。
欲了解更多資訊,請參閱 Unity 目錄文件。
# Specify the catalog and schema to use. You must have USE_CATALOG privilege on the catalog and USE_SCHEMA, CREATE_TABLE, and CREATE_MODEL privileges on the schema.
# Change the catalog and schema here if necessary.
CATALOG_NAME = "main"
SCHEMA_NAME = "default"
讀取數據並存到 Unity Catalog 的表格
該資料集可在 databricks-datasets。 在接下來的儲存格中,你會將資料 .csv 從檔案讀取到 Spark DataFrames。 接著你把 DataFrame 寫到 Unity Catalog 的表格裡。 這不僅能持續保存資料,也能讓你控制如何與他人分享。
white_wine = spark.read.csv("/databricks-datasets/wine-quality/winequality-white.csv", sep=';', header=True)
red_wine = spark.read.csv("/databricks-datasets/wine-quality/winequality-red.csv", sep=';', header=True)

# Remove the spaces from the column names
for c in white_wine.columns:
    white_wine = white_wine.withColumnRenamed(c, c.replace(" ", "_"))
for c in red_wine.columns:
    red_wine = red_wine.withColumnRenamed(c, c.replace(" ", "_"))

# Define table names
red_wine_table = f"{CATALOG_NAME}.{SCHEMA_NAME}.red_wine"
white_wine_table = f"{CATALOG_NAME}.{SCHEMA_NAME}.white_wine"

# Write to tables in Unity Catalog
spark.sql(f"DROP TABLE IF EXISTS {red_wine_table}")
spark.sql(f"DROP TABLE IF EXISTS {white_wine_table}")
white_wine.write.saveAsTable(f"{CATALOG_NAME}.{SCHEMA_NAME}.white_wine")
red_wine.write.saveAsTable(f"{CATALOG_NAME}.{SCHEMA_NAME}.red_wine")
預處理資料
# Import required libraries
import numpy as np
import pandas as pd
import sklearn.datasets
import sklearn.metrics
import sklearn.model_selection
import sklearn.ensemble

import matplotlib.pyplot as plt

import optuna
from mlflow.optuna.storage import MlflowStorage
from mlflow.pyspark.optuna.study import MlflowSparkStudy
# Load data from Unity Catalog as Pandas dataframes
white_wine = spark.read.table(f"{CATALOG_NAME}.{SCHEMA_NAME}.white_wine").toPandas()
red_wine = spark.read.table(f"{CATALOG_NAME}.{SCHEMA_NAME}.red_wine").toPandas()

# Add Boolean fields for red and white wine
white_wine['is_red'] = 0.0
red_wine['is_red'] = 1.0
data_df = pd.concat([white_wine, red_wine], axis=0)

# Define classification labels based on the wine quality
data_labels = data_df['quality'].astype('int') >= 7
data_df = data_df.drop(['quality'], axis=1)

# Split 80/20 train-test
X_train, X_test, y_train, y_test = sklearn.model_selection.train_test_split(
  data_df,
  data_labels,
  test_size=0.2,
  random_state=1
)
第一部分。 訓練分類模型
# Enable MLflow autologging for scikit-learn
mlflow.sklearn.autolog()
接著,在 MLflow 執行的情境中訓練分類器,該系統會自動記錄訓練好的模型及許多相關的指標和參數。
你可以用額外的指標來補充日誌記錄,例如模型在測試資料集上的 AUC 分數。
with mlflow.start_run(run_name='gradient_boost') as run:
    model = sklearn.ensemble.GradientBoostingClassifier(random_state=0)

    # Models, parameters, and training metrics are tracked automatically
    model.fit(X_train, y_train)

    predicted_probs = model.predict_proba(X_test)
    roc_auc = sklearn.metrics.roc_auc_score(y_test, predicted_probs[:,1])
    roc_curve = sklearn.metrics.RocCurveDisplay.from_estimator(model, X_test, y_test)

    # Save the ROC curve plot to a file
    roc_curve.figure_.savefig("roc_curve.png")

    # The AUC score on test data is not automatically logged, so log it manually
    mlflow.log_metric("test_auc", roc_auc)

    # Log the ROC curve image file as an artifact
    mlflow.log_artifact("roc_curve.png")

    print("Test AUC of: {}".format(roc_auc))
檢視 MLflow 運行
要查看已記錄的訓練過程,請點擊界面右上角的 實驗 圖示 ![]() 以顯示實驗側邊欄。 如有必要,請按兩下重新整理圖示來擷取並監視最新的執行。
以顯示實驗側邊欄。 如有必要,請按兩下重新整理圖示來擷取並監視最新的執行。
![]()
若要顯示更詳細的 MLflow 實驗頁面,請點擊實驗頁面圖示。 此頁面允許您比較跑道並查看特定跑道的詳細資訊。 請參閱使用 MLflow 追蹤模型開發。
負載模型
你也可以使用 MLflow API 存取特定執行的結果。 以下儲存格的程式碼說明如何載入在特定 MLflow 執行中訓練的模型,並用它來進行預測。 你也可以在 MLflow 執行頁面找到載入特定模型的程式碼片段。
# After a model has been logged, you can load it in different notebooks or jobs
# mlflow.pyfunc.load_model makes model prediction available under a common API
model_loaded = mlflow.pyfunc.load_model(
  'runs:/{run_id}/model'.format(
    run_id=run.info.run_id
  )
)

predictions_loaded = model_loaded.predict(X_test)
predictions_original = model.predict(X_test)

# The loaded model should match the original
assert(np.array_equal(predictions_loaded, predictions_original))
第二部分。 超參數調整
此時,你已經訓練出一個簡單的模型,並使用 MLflow 追蹤服務來組織你的工作。 接著,你可以用 Optuna 進行更複雜的調音。
使用 Optuna 進行平行訓練
Optuna 是一個開源的 Python 超參數調校函式庫,可橫向擴展至多個運算資源。 欲了解更多關於在 Databricks 中使用 Optuna 的資訊,請參見 Optuna 的超參數調整。
def objective(trial):
  # Enable autologging on each worker
  mlflow.sklearn.autolog()
  with mlflow.start_run(nested=True):
    params = {
      'n_estimators': trial.suggest_int('n_estimators', 20, 1000),
      'learning_rate': trial.suggest_float('learning_rate', 0.05, 1.0, log=True),
      'max_depth': trial.suggest_int('max_depth', 2, 5),
    }
    model_hp = sklearn.ensemble.GradientBoostingClassifier(
      random_state=0,
      **params
    )
    model_hp.fit(X_train, y_train)
    predicted_probs = model_hp.predict_proba(X_test)
    # Tune based on the test AUC
    # In production, you could use a separate validation set instead
    roc_auc = sklearn.metrics.roc_auc_score(y_test, predicted_probs[:,1])
    mlflow.log_metric('test_auc', roc_auc)

    # Negate the AUC because Optuna minimizes the objective by default
    return -roc_auc


with mlflow.start_run(run_name='gb_optuna') as run:
  # Use the MLflow Tracking Server as the Optuna storage backend
  experiment_id = mlflow.active_run().info.experiment_id
  mlflow_storage = MlflowStorage(experiment_id=experiment_id)

  # MlflowSparkStudy distributes the tuning using Spark workers
  mlflow_study = MlflowSparkStudy(
    study_name="gb-optuna-tuning",
    storage=mlflow_storage,
  )

  mlflow_study.optimize(objective, n_trials=32, n_jobs=4)
執行搜尋以獲取最佳模型
因為所有的執行都由 MLflow 追蹤,你可以使用 MLflow 搜尋執行 API 來取得最佳執行的指標和參數,以找出測試 AUC 最高的調校執行。
此調校模型應比第一部分訓練的簡單模型表現更好。
# Sort runs by their test auc. In case of ties, use the most recent run.
best_run = mlflow.search_runs(
  order_by=['metrics.test_auc DESC', 'start_time DESC'],
  max_results=10,
).iloc[0]
print('Best Run')
print('AUC: {}'.format(best_run["metrics.test_auc"]))
print('Num Estimators: {}'.format(best_run["params.n_estimators"]))
print('Max Depth: {}'.format(best_run["params.max_depth"]))
print('Learning Rate: {}'.format(best_run["params.learning_rate"]))

best_model_pyfunc = mlflow.pyfunc.load_model(
  'runs:/{run_id}/model'.format(
    run_id=best_run.run_id
  )
)

# Make a dataset with all predictions
best_model_predictions = X_test
best_model_predictions["prediction"] = best_model_pyfunc.predict(X_test)
第三部分。 將結果與模型儲存到 Unity 目錄
predictions_table = f"{CATALOG_NAME}.{SCHEMA_NAME}.predictions"
spark.sql(f"DROP TABLE IF EXISTS {predictions_table}")

results = spark.createDataFrame(best_model_predictions)

# Write results back to Unity Catalog from Python
results.write.saveAsTable(f"{CATALOG_NAME}.{SCHEMA_NAME}.predictions")
model_uri = 'runs:/{run_id}/model'.format(
    run_id=best_run.run_id
  )

mlflow.register_model(model_uri, f"{CATALOG_NAME}.{SCHEMA_NAME}.wine_quality_model")
第四部分。 部署模型
將模型存到 Unity 目錄後,你可以用 Serving UI 部署它。 以下說明為簡要說明。 欲了解更多資訊,請參閱 建立自訂模型服務端點。
- 按下側邊欄的 [服務] 可顯示 [服務] UI。
按一下建立服務端點。
在 [名稱] 欄位中,提供端點的名稱。
在 [服務實體] 區 段中
- 點擊 [實體] 字段,開啟 [選取服務實體] 窗體。
- 選擇 我的模型 - Unity 目錄。 表單會根據您的選擇動態更新。
- 選擇想要提供服務的
wine_quality_model和模型版本。 - 選擇 100 作為你想路由到你所服務模型的流量百分比。
- 在此範例中選擇 CPU 作為計算類型。
- 在 計算擴展中,選擇 「小型」 作為計算擴展的規模。
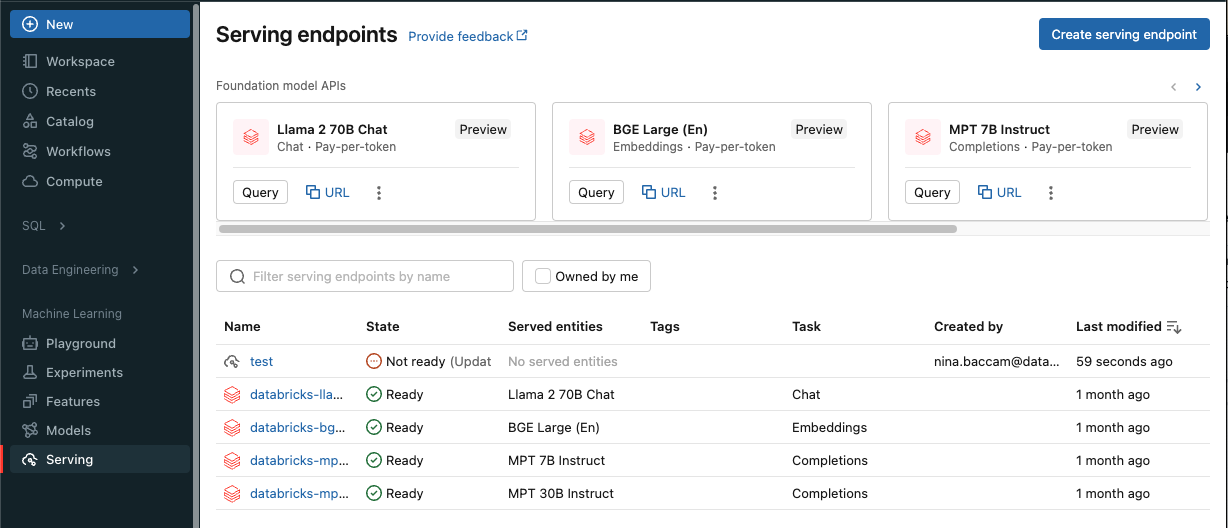
點擊 建立。 服務端點頁面顯示服務端點狀態為「未準備好」。
當你的端點準備好時,選擇「使用」以提交推斷請求至該端點。