PublishTestResults@2 - 發佈測試結果 v2 工作
將測試結果發佈至 Azure Pipelines。
將測試結果發佈至 Azure Pipelines/TFS。
Syntax
# Publish Test Results v2
# Publish test results to Azure Pipelines.
- task: PublishTestResults@2
  inputs:
    testResultsFormat: 'JUnit' # 'JUnit' | 'NUnit' | 'VSTest' | 'XUnit' | 'CTest'. Alias: testRunner. Required. Test result format. Default: JUnit.
    testResultsFiles: '**/TEST-*.xml' # string. Required. Test results files. Default: **/TEST-*.xml.
    #searchFolder: '$(System.DefaultWorkingDirectory)' # string. Search folder. Default: $(System.DefaultWorkingDirectory).
    #mergeTestResults: false # boolean. Merge test results. Default: false.
    #failTaskOnFailedTests: false # boolean. Fail if there are test failures. Default: false.
    #failTaskOnFailureToPublishResults: false # boolean. Fail if there is failure in publishing test results. Default: false.
    #failTaskOnMissingResultsFile: false # boolean. Fail if no result files are found. Default: false.
    #testRunTitle: # string. Test run title.
  # Advanced
    #buildPlatform: # string. Alias: platform. Build Platform.
    #buildConfiguration: # string. Alias: configuration. Build Configuration.
    #publishRunAttachments: true # boolean. Upload test results files. Default: true.
# Publish Test Results v2
# Publish test results to Azure Pipelines.
- task: PublishTestResults@2
  inputs:
    testResultsFormat: 'JUnit' # 'JUnit' | 'NUnit' | 'VSTest' | 'XUnit' | 'CTest'. Alias: testRunner. Required. Test result format. Default: JUnit.
    testResultsFiles: '**/TEST-*.xml' # string. Required. Test results files. Default: **/TEST-*.xml.
    #searchFolder: '$(System.DefaultWorkingDirectory)' # string. Search folder. Default: $(System.DefaultWorkingDirectory).
    #mergeTestResults: false # boolean. Merge test results. Default: false.
    #failTaskOnFailedTests: false # boolean. Fail if there are test failures. Default: false.
    #testRunTitle: # string. Test run title.
  # Advanced
    #buildPlatform: # string. Alias: platform. Build Platform.
    #buildConfiguration: # string. Alias: configuration. Build Configuration.
    #publishRunAttachments: true # boolean. Upload test results files. Default: true.
# Publish Test Results v2
# Publish Test Results to Azure Pipelines/TFS.
- task: PublishTestResults@2
  inputs:
    testResultsFormat: 'JUnit' # 'JUnit' | 'NUnit' | 'VSTest' | 'XUnit'. Alias: testRunner. Required. Test result format. Default: JUnit.
    testResultsFiles: '**/TEST-*.xml' # string. Required. Test results files. Default: **/TEST-*.xml.
    #searchFolder: '$(System.DefaultWorkingDirectory)' # string. Search folder. Default: $(System.DefaultWorkingDirectory).
    #mergeTestResults: false # boolean. Merge test results. Default: false.
    #testRunTitle: # string. Test run title.
  # Advanced
    #buildPlatform: # string. Alias: platform. Build Platform.
    #buildConfiguration: # string. Alias: configuration. Build Configuration.
    #publishRunAttachments: true # boolean. Upload test results files. Default: true.
輸入
testResultsFormat - 測試結果格式
輸入別名: testRunner。 string. 必要。 允許的值:JUnit、、、VSTestNUnitXUnit、、 CTest。 預設值:JUnit。
指定您想要發佈的結果檔案格式。 支援下列格式: CTest、 JUnit、NUnit2、NUnit3、Visual Studio Test (TRX) 和 xUnit 2。
testResultsFormat - 測試結果格式
輸入別名: testRunner。 string. 必要。 允許的值:JUnit、、、NUnitVSTest。XUnit 預設值:JUnit。
指定您想要發佈的結果檔案格式。 支援下列格式: CTest、 JUnit、NUnit2、NUnit3、Visual Studio Test (TRX) 和 xUnit 2。
testResultsFiles - 測試結果檔案
string. 必要。 預設值:**/TEST-*.xml。
指定一或多個測試結果檔案。
- 您可以使用單一資料夾通配符 ()
*和遞迴通配符 (**) 。 例如,**/TEST-*.xml搜尋名稱開頭TEST-為所有子目錄中的所有 XML 檔案。 如果使用 VSTest 做為測試結果格式,則檔類型應該變更為.trx,例如**/TEST-*.trx - 您可以指定多個路徑,並以新行分隔。
- 此外,還接受 迷你模式。
例如, !TEST[1-3].xml 排除名為 TEST1.xml、 TEST2.xml或 的 TEST3.xml檔案。
searchFolder - 搜尋資料夾
string. 預設值:$(System.DefaultWorkingDirectory)。
選擇性。 指定要搜尋測試結果檔案的資料夾。
mergeTestResults - 合併測試結果
boolean. 預設值:false。
當這個布爾值是 true時,工作會針對單一 測試回合報告來自所有檔案的測試結果。 如果值為 false,則工作會為每個測試結果檔案建立個別的測試回合。
注意
使用合併測試結果設定來合併來自相同測試架構的檔案,以確保正確計算結果對應和持續時間。
failTaskOnFailedTests - 如果測試失敗,則失敗
boolean. 預設值:false。
選擇性。 當這個布爾值為 true時,如果結果檔中的任何測試標示為失敗,工作將會失敗。 默認值為 false,只會從結果檔發佈結果。
failTaskOnFailureToPublishResults - 如果發佈測試結果失敗,則失敗
boolean. 預設值:false。
當 時 true,如果發佈測試結果失敗,工作就會失敗。
failTaskOnMissingResultsFile - 如果找不到結果檔案,則失敗
boolean. 預設值:false。
如果找不到結果檔,工作就會失敗。
testRunTitle - 測試回合標題
string.
選擇性。 指定將報告結果的測試回合名稱。 您可以使用組建或發行管線中宣告的變數名稱。
buildPlatform - 建置平臺
輸入別名: platform。 string.
選擇性。 指定應該報告測試回合的組建平臺。 例如:x64 或 x86。 如果您在建置工作中定義平臺的變數,請使用這裡。
buildConfiguration - 組建組態
輸入別名: configuration。 string.
選擇性。 指定應該報告測試回合的組建組態。 例如:Debug 或 Release。 如果您在建置工作中定義組態的變數,請使用這裡。
publishRunAttachments - 上傳測試結果檔案
boolean. 預設值:true。
選擇性。 當這個布爾值是 true時,工作會將所有測試結果檔案上傳為測試回合的附件。
工作控制選項
除了工作輸入之外,所有工作都有控制選項。 如需詳細資訊,請參閱 控制選項和一般工作屬性。
輸出變數
無。
備註
當執行測試以提供完整的測試報告和分析體驗時,此工作會將測試結果發佈至 Azure Pipelines 或 TFS。 您可以使用您選擇的測試執行器,以支援所需的結果格式。 支持的結果格式包括 CTest、 JUnit (包括 PHPUnit) 、 NUnit2、NUnit3、Visual Studio Test (TRX) 和 xUnit 2。
其他內建工作,例如 Visual Studio 測試工作 和 Dot NetCore CLI 工作 會自動將測試結果發佈至管線。 Ant、Maven、Gulp、Grunt 和 Xcode 等工作會提供發佈結果做為工作內的選項,或建置 Cobertura 和 JaCoCo 等連結庫。 如果您使用上述任何工作,則不需要管線中的個別 發行測試結果 工作。
已發佈的測試結果會顯示在管線摘要的 [ 測試 ] 索引標籤中。 結果可協助您測量管線品質、檢閱可追蹤性、疑難解答失敗,以及驅動失敗擁有權。
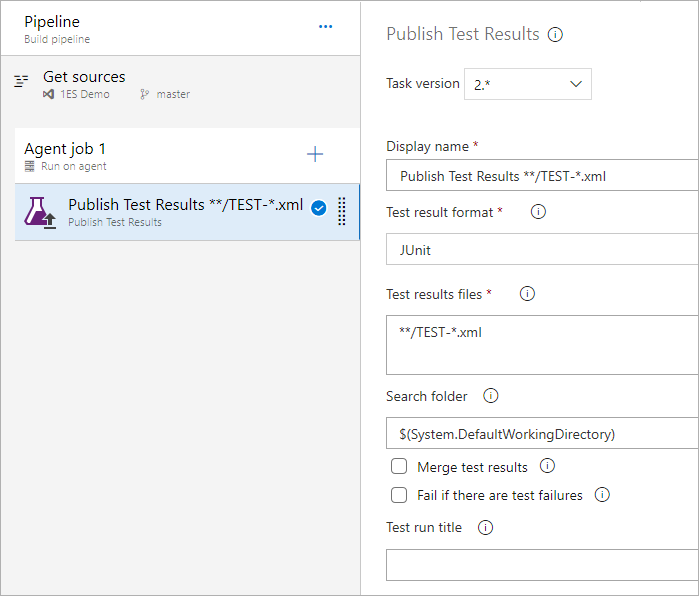
下列範例顯示工作已設定為發佈測試結果。
您也可以在組建管線中使用這項工作,將執行測試時所產生的程式 代碼涵蓋範圍結果發佈 至 Azure Pipelines 或 TFS,以取得涵蓋範圍報告。
必要條件
如果您使用 Windows 自我載入代理程式,您的電腦必須安裝此必要條件:
- .NET Framework 4.6.2 或更新版本
工作預設值
默認選項會使用 JUnit 格式發佈測試結果。 使用 VSTest 作為 testRunner 時, testResultsFiles 選項應變更為 **/TEST-*.trx。
testResultsFormat 是 testRunner 輸入名稱的別名。 結果檔案可由多個執行器產生,而不只是特定執行器。 例如,許多執行器都支援 jUnit 結果格式,而不只是 jUnit。
若要使用 YAML 發佈 Python 的測試結果,請參閱這些主題的生態系統中的 Python 一節,其中也包含其他語言的範例。
結果格式對應
下表列出組建或發行摘要中 [ 測試 ] 索引標籤中報告的欄位,以及與支援測試結果格式之屬性的對應。
| 範圍 | 欄位 | Visual Studio Test (TRX) |
|---|---|---|
| 測試執行 | 標題 | 在工作中指定的測試回合標題 |
| 開始日期 | /TestRun/Times.Attributes[“start”]。價值 | |
| 完成日期 | /TestRun/Times.Attributes[“finish”]。價值 | |
| 持續時間 | 完成日期 - 開始日期 | |
| 附件 | 請參閱下方 的附件支援 一節 | |
| 測試結果 | 標題 | /TestRun/Results/UnitTestResult.Attributes[“testName”]。值或 /TestRun/Results/WebTestResult.Attributes[“testName”]。值或 /TestRun/Results/TestResultAggregation.Attributes[“testName”]。價值 |
| 開始日期 | /TestRun/Results/UnitTestResult.Attributes[“startTime”]。值或 /TestRun/Results/WebTestResult.Attributes[“startTime”]。值或 /TestRun/Results/TestResultAggregation.Attributes[“startTime”]。價值 | |
| 完成日期 | /TestRun/Results/UnitTestResult.Attributes[“startTime”]。Value + /TestRun/Results/UnitTestResult.Attributes[“duration”]。值或 /TestRun/Results/WebTestResult.Attributes[“startTime”]。Value + /TestRun/Results/WebTestResult.Attributes[“duration”]。值或 /TestRun/Results/TestResultAggregation.Attributes[“startTime”]。Value + /TestRun/Results/TestResultAggregation.Attributes[“duration”]。價值 | |
| 持續時間 | /TestRun/Results/UnitTestResult.Attributes[“duration”]。值或 /TestRun/Results/WebTestResult.Attributes[“duration”]。值或 /TestRun/Results/TestResultAggregation.Attributes[“duration”]。價值 | |
| 擁有者 | /TestRun/TestDefinitions/UnitTest/Owner/Owner.Attributes[“name”]。價值 | |
| 成果 | /TestRun/Results/UnitTestResult.Attributes[“result”]。值或 /TestRun/Results/WebTestResult.Attributes[“result”]。值或 /TestRun/Results/TestResultAggregation.Attributes[“result”]。價值 | |
| 錯誤訊息 | /TestRun/Results/UnitTestResult/Output/ErrorInfo/Message.InnerText 或 /TestRun/Results/WebTestResultOutput/ErrorInfo/Message.InnerText 或 /TestRun/Results/TestResultAggregation/Output/ErrorInfo/Message.InnerText | |
| 堆疊追蹤 | /TestRun/Results/UnitTestResult/Output/ErrorInfo/StackTrace.InnerText 或 /TestRun/Results/WebTestResultOutput/ErrorInfo/StackTrace.InnerText 或 /TestRun/Results/TestResultAggregation/Output/ErrorInfo/StackTrace.InnerText | |
| 附件 | 請參閱下方 的附件支援 一節 | |
| 主控台記錄 | /TestRun/Results/UnitTestResult/Output/stdOut.InnerText 或 /TestRun/Results/WebTestResultOutput/Output/StdOut.InnerText 或 /TestRun/Results/TestResultAggregation/Output/stdOut.InnerText | |
| 主控台錯誤記錄檔 | /TestRun/Results/UnitTestResult/Output/StdErr.InnerText 或 /TestRun/Results/WebTestResultOutput/Output/StdErr.InnerText 或 /TestRun/Results/TestResultAggregation/Output/StdErr.InnerText | |
| 代理程式名稱 | /TestRun/Results/UnitTestResult.Attributes[“computerName”]。值或 /TestRun/Results/WebTestResult.Attributes[“computerName”]。值或 /TestRun/Results/TestResultAggregation.Attributes[“computerName”]。價值 | |
| 測試檔案 | /TestRun/TestDefinitions/UnitTest.Attributes[“storage”]。價值 | |
| 優先順序 | /TestRun/TestDefinitions/UnitTest.Attributes[“priority”]。價值 |
注意
只有在 [開始日期] 和 [日期完成] 無法使用時,才會使用持續時間。
testName 的完整名稱格式為 Namespace.Testclass.Methodname,字元限制為 512。 如果測試是數據驅動且具有參數,字元限制將會包含參數。
發佈測試結果時,您可能會收到此錯誤:無法發佈測試結果:指定的優先順序無效
如果任何測試方法的優先順序設定在 255 以上,請修正程式代碼中的測試方法優先順序,然後再次執行測試,就會發生此錯誤。 您可以檢閱產生的 trx 檔案,以查看優先順序大於 255 的所有測試。
附件支援
[發佈測試結果] 工作提供下列格式之測試回合和測試結果附件的支援。 針對公用項目,我們支援 2GB 的總附件。
Visual Studio Test (TRX)
| 範圍 | 類型 | 路徑 |
|---|---|---|
| 測試執行 | 資料收集器 | /TestRun/ResultSummary/CollectorDataEntries/Collector/UriAttachments/UriAttachment/A.Attributes[“href”]。價值 |
| 測試結果 | /TestRun/ResultSummary/ResultFiles/ResultFile.Attributes[“path”]。價值 | |
| 程式碼涵蓋範圍 | /TestRun/TestSettings/Execution/AgentRule/DataCollectors/DataCollector/Configuration/CodeCoverage/Regular/CodeCoverageItem.Attributes[“binaryFile”]。值和 /TestRun/TestSettings/Execution/AgentRule/DataCollectors/DataCollector/Configuration/CodeCoverage/Regular/CodeCoverageItem.Attributes[“pdbFile”]。價值 | |
| 測試結果 | 數據收集器 | /TestRun/Results/UnitTestResult/CollectorDataEntries/Collector/UriAttachments/UriAttachment/A.Attributes[“href”]。值或 /TestRun/Results/WebTestResult/CollectorDataEntries/Collector/UriAttachments/UriAttachment/A.Attributes[“href”]。值或 /TestRun/Results/TestResultAggregation/CollectorDataEntries/Collector/UriAttachments/UriAttachment/A.Attributes[“href”]。價值 |
| 測試結果 | /TestRun/Results/UnitTestResult/ResultFiles/ResultFile.Attributes[“path”]。值或 /TestRun/Results/WebTestResult/ResultFiles/ResultFile.Attributes[“path”]。值或 /TestRun/Results/TestResultAggregation/ResultFiles/ResultFile.Attributes[“path”]。價值 |
注意
將測試結果檔案上傳為附件的選項是工作的預設選項,適用於所有格式。
範例
Docker
針對 Docker 型應用程式,有許多方式可以建置您的應用程式並執行測試:
- 在組建管線中建置和測試:建置和測試會在管線中執行,並使用 [發佈測試結果 ] 工作發佈測試結果。
- 使用多階段 Dockerfile 建置和測試:使用多階段 Docker 檔案在容器內執行組建和測試,例如測試結果不會發佈回管線。
- 使用 Dockerfile 建置、測試及發佈結果:建置和測試會在容器內執行,並將結果發佈回管線。 請參閱下方的範例。
使用 Docker 檔案建置、測試及發佈結果
在此方法中,您會使用 Docker 檔案在容器內建置程式代碼並執行測試。 然後,測試結果會複製到要發佈至管線的主機。 若要將測試結果發佈至 Azure Pipelines,您可以使用 [發佈測試結果] 工作。 最終映像將會發佈至 Docker 或 Azure Container Registry。
取得程式碼
Dockerfile.build使用下列項目目錄的根目錄建立檔案:# Build and run tests inside the docker container FROM mcr.microsoft.com/dotnet/sdk:2.1 WORKDIR /app # copy the contents of agent working directory on host to workdir in container COPY . ./ # dotnet commands to build, test, and publish RUN dotnet restore RUN dotnet build -c Release RUN dotnet test dotnetcore-tests/dotnetcore-tests.csproj -c Release --logger "trx;LogFileName=testresults.trx" RUN dotnet publish -c Release -o out ENTRYPOINT dotnet dotnetcore-sample/out/dotnetcore-sample.dll此檔案包含建置程式代碼和執行測試的指示。 然後,測試會複製到容器內的檔案
testresults.trx。若要讓最終映射盡可能小,只包含運行時間和部署成品,請使用下列專案取代現有的
Dockerfile內容:# This Dockerfile creates the final image to be published to Docker or # Azure Container Registry # Create a container with the compiled asp.net core app FROM mcr.microsoft.com/dotnet/aspnet:2.1 # Create app directory WORKDIR /app # Copy only the deployment artifacts COPY /out . ENTRYPOINT ["dotnet", "dotnetcore-sample.dll"]
定義組建管線
如果您有 Docker Hub 帳戶,而且想要將映像推送至 Docker 登錄,請使用下列內容取代檔案的內容
.vsts-ci.docker.yml:# Build Docker image for this app, to be published to Docker Registry pool: vmImage: 'ubuntu-latest' variables: buildConfiguration: 'Release' steps: - script: | docker build -f Dockerfile.build -t $(dockerId)/dotnetcore-build:$BUILD_BUILDID . docker run --name dotnetcoreapp --rm -d $(dockerId)/dotnetcore-build:$BUILD_BUILDID docker cp dotnetcoreapp:app/dotnetcore-tests/TestResults $(System.DefaultWorkingDirectory) docker cp dotnetcoreapp:app/dotnetcore-sample/out $(System.DefaultWorkingDirectory) docker stop dotnetcoreapp - task: PublishTestResults@2 inputs: testRunner: VSTest testResultsFiles: '**/*.trx' failTaskOnFailedTests: true - script: | docker build -f Dockerfile -t $(dockerId)/dotnetcore-sample:$BUILD_BUILDID . docker login -u $(dockerId) -p $pswd docker push $(dockerId)/dotnetcore-sample:$BUILD_BUILDID env: pswd: $(dockerPassword)或者,如果您設定 Azure Container Registry,並想要將映像推送至該登錄,請使用下列內容取代檔案的內容
.vsts-ci.yml:# Build Docker image for this app to be published to Azure Container Registry pool: vmImage: 'ubuntu-latest' variables: buildConfiguration: 'Release' steps: - script: | docker build -f Dockerfile.build -t $(dockerId)/dotnetcore-build:$BUILD_BUILDID . docker run --name dotnetcoreapp --rm -d $(dockerId)/dotnetcore-build:$BUILD_BUILDID docker cp dotnetcoreapp:app/dotnetcore-tests/TestResults $(System.DefaultWorkingDirectory) docker cp dotnetcoreapp:app/dotnetcore-sample/out $(System.DefaultWorkingDirectory) docker stop dotnetcoreapp - task: PublishTestResults@2 inputs: testRunner: VSTest testResultsFiles: '**/*.trx' failTaskOnFailedTests: true - script: | docker build -f Dockerfile -t $(dockerId).azurecr.io/dotnetcore-sample:$BUILD_BUILDID . docker login -u $(dockerId) -p $pswd $(dockerid).azurecr.io docker push $(dockerId).azurecr.io/dotnetcore-sample:$BUILD_BUILDID env: pswd: $(dockerPassword)將變更推送至存放庫中的主要分支。
如果您使用 Azure Container Registry,請確定您已在 Azure 入口網站 中預先建立登錄。 複製 Azure 入口網站 中登入設定的 [存取金鑰] 區段中顯示的系統管理員使用者名稱和密碼。
使用下列專案更新您的組建管線
- 代理程式集區:
Hosted Ubuntu 1604- dockerId:將值設定為 DockerHub 的 Docker 識別符,或 Azure Container Registry 的系統管理員用戶名稱。
- dockerPassword:將值設定為 DockerHub 的密碼或系統管理員密碼 Azure Container Registry。
- YAML 檔案路徑:
/.vsts-ci.docker.yml
- 代理程式集區:
將新組建排入佇列,並 watch 建立 Docker 映射推送至您的登錄,並將測試結果推送至 Azure DevOps。
規格需求
| 需求 | 描述 |
|---|---|
| 管線類型 | YAML、傳統組建、傳統版本 |
| 在上執行 | Agent、DeploymentGroup |
| 要求 | 無 |
| Capabilities | 此工作不符合作業中後續工作的任何需求。 |
| 命令限制 | 任何 |
| 可設定變數 | 任何 |
| 代理程式版本 | 2.0.0 或更新版本 |
| 工作類別 | 測試 |