在本文中,您將瞭解如何從 Azure Resource Manager (ARM) 範本建立 Azure DevTest Labs 環境。 您可以使用 DevTest Labs 環境,透過多部虛擬機 (VM) 或平台即服務 (PaaS) 資源輕鬆且一致地佈建實驗室。 您可能會使用此做法為多層式 Web 應用程式或 SharePoint 伺服器陣列建立實驗室。
DevTest Labs 環境中的資源會共用相同的生命週期,而且您可以一起管理。 您能以和追蹤個別實驗室 VM 的成本一樣的方式,追蹤實驗室環境和 PaaS 資源的成本。
您可以設定 Azure DevTest Labs,直接從公用或私人 GitHub 存放庫使用 ARM 範本。 下圖顯示如何從公用或自訂範本存放庫中的 ARM 範本使用 DevTest Labs 建立環境。 實驗室的範本存放庫一節會詳細說明此流程。

注意
強烈建議使用 Azure 部署環境 (ADE) 來建立環境。 ADE 可讓開發人員使用以專案為基礎的範本快速部署應用程式基礎結構,確保開發小組的一致且安全的環境。
若要深入瞭解 Azure 部署環境,請參閱 Azure 部署環境檔。
必要條件
- 具備在 DevTest Labs 中設定實驗室環境的經驗將會很有幫助。 如果您不熟悉處理實驗室,請從檢閱設定公用環境設定一節中的指示開始。 您必須了解如何設定範本存放庫、啟用或停用公用環境,以及選取要用來建立實驗室的範本。
限制
當您在 DevTest Labs 中從 ARM 範本建立實驗室時,請記住一些限制:
DevTest Labs 針對從 ARM 範本建立的 PaaS 資源,並不支援虛擬機器 (VM) 自動關機功能。
當您部署 ARM 範本時,DevTest Labs 不會評估所有實驗室原則。 不會評估下列原則:
- 每個實驗室使用者的 VM 數目
- 每個使用者的進階 VM 數目
- 每個使用者的進階磁碟數目
假設您有一個實驗室原則,可讓每個使用者建立最多五部 VM。 在 DevTest Labs 中,每個使用者都可以部署能建立數十部 VM 的 ARM 環境範本。
根據範本建立環境
您可以從 Azure DevTest Labs 公用範本存放庫建立環境,也可以將私人範本存放庫新增至實驗室。
遵循下列步驟來從範本建立環境:
在 Azure 入口網站中,移至您的 DevTest Labs 實驗室資源。
在實驗室的 [概觀] 頁面上,展開左側功能表上的 [我的實驗室] 區段,然後選取 [我的環境]。
在 [我的環境] 頁面上,選取工具列上的 [新增]。
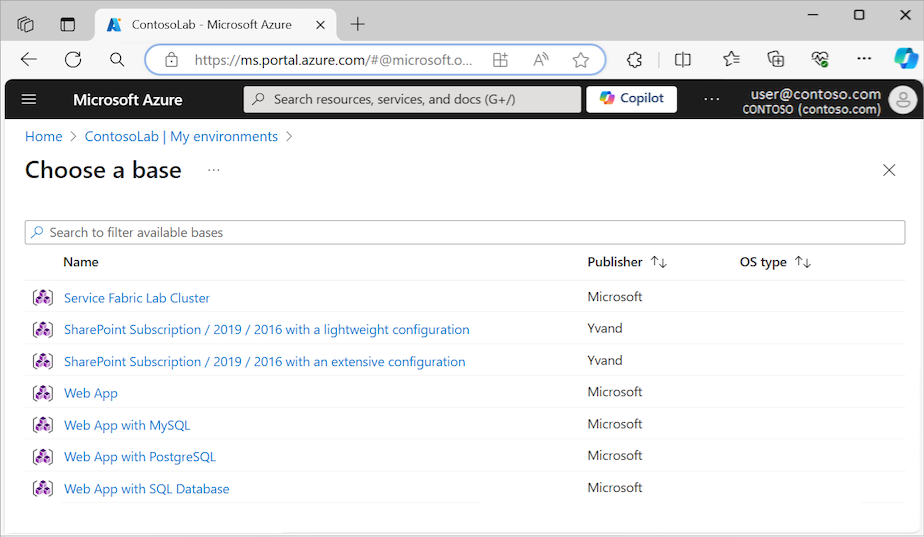
在 [選擇基底] 頁面上,選取要使用的 ARM 環境範本:
在 [新增] 窗格中,輸入 [環境名稱],然後設定其他參數設定。
每個 ARM 範本的參數類型和數目都是唯一的。 紅色星號 (*) 表示必要的設定。 您必須為所有必要設定輸入值。
ARM 範本檔案 (azuredeploy.parameters.json) 中的某些參數值會在 [新增] 窗格上產生空白設定欄位 (沒有預設值)。 這些參數值包括
GEN-UNIQUE、GEN-UNIQUE-[N]、GEN-SSH-PUB-KEY和GEN-PASSWORD。![顯示 [新增] 窗格的螢幕擷取畫面,其中包含要針對 SharePoint 環境設定的設定。](media/devtest-lab-create-environment-from-arm/add-environment.png)
針對如密碼之類的「安全字串」參數,您可以使用 Azure Key Vault 中的祕密。 若要了解如何在金鑰保存庫中儲存祕密,以及在建立實驗室資源時加以使用,請參閱在 Azure Key Vault 中儲存祕密。
選取 [新增] 以建立環境。 此環境會立即開始佈建。
注意
佈建環境的流程可能需要很長的時間。 總時間取決於 DevTest Labs 作為實驗室環境的一部分建立的服務執行個體、VM 和其他資源的數目。
若要監視佈建狀態,請返回實驗室的 [我的環境] 頁面:
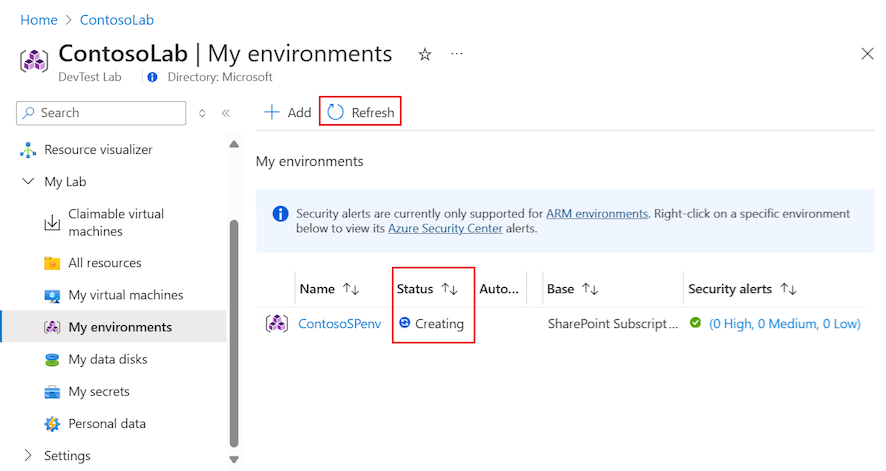
佈建進行時,環境狀態會顯示 [建立中]。 佈建完成之後,狀態會變更為 [就緒]。 您可以在工具列上選取 [重新整理] 以更新頁面檢視,並檢查目前的狀態。
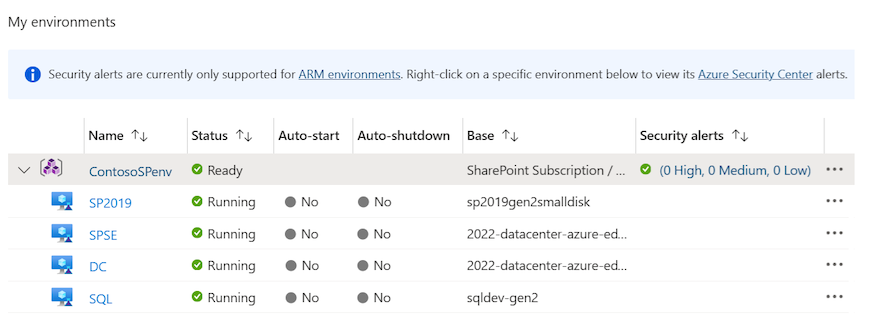
當環境就緒時,您可以在 [我的環境] 清單中展開環境,以查看範本所佈建的 VM:
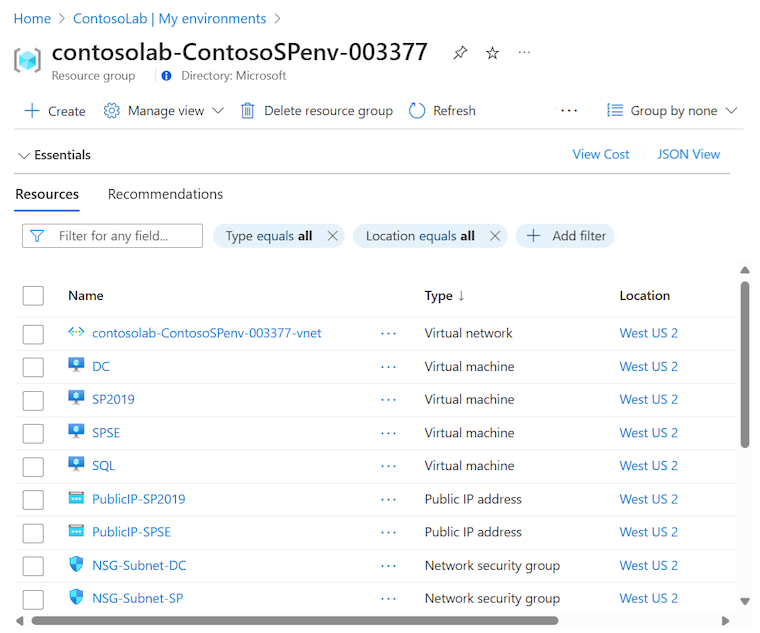
部署會建立新的資源群組,來佈建 ARM 範本所定義的所有環境資源。 在 [我的環境] 清單中選取環境名稱,以檢視範本所建立的資源群組和所有資源:
選取清單中的環境 VM 以查看 VM 可用的動作,例如管理設定、排程和原則:
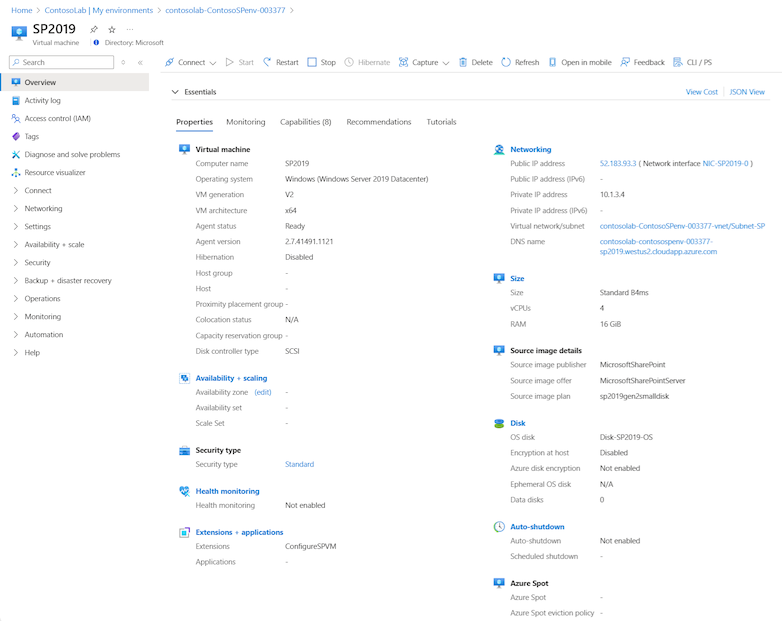

![顯示 [新增] 窗格的螢幕擷取畫面,其中包含要針對 SharePoint 環境設定的設定。](media/devtest-lab-create-environment-from-arm/add-environment-large.png#lightbox)


探索範本存放庫
適用於在 DevTest Labs 中建立環境的 ARM 範本可從兩個來源取得:
DevTest Labs 具有公用 ARM 範本存放庫 (英文),其中包括 Azure Web Apps、Azure Service Fabric 叢集和開發 SharePoint 伺服器陣列的預先撰寫環境範本。 範本具有最少的輸入參數,可讓您順暢地開始體驗 PaaS 資源。 您可以按原狀使用公用環境範本,或加以自訂以符合您的需求。 您也可以針對 GitHub 公用範本存放庫提交提取要求,以針對公用範本建議修訂或新增。
您可以將環境範本儲存在自己的公用或私人 GitHub 存放庫中,並將那些存放庫新增到您的實驗室,讓您的範本可供所有實驗室使用者使用。
設定公用環境設定
您可以設定實驗室,以啟用從公用範本 GitHub 存放庫使用範本。 當您為實驗室啟用公用範本存放庫時,則使用者可以直接在 Azure 入口網站中選取這些範本以快速建立實驗室環境,類似於他們在實驗室中建立 VM 的方式。 此外,您可以選取哪些範本可供使用者用來建立實驗室環境。
設定新實驗室的公用環境存取
依照下列步驟設定新實驗室的公用環境存放庫存取權:
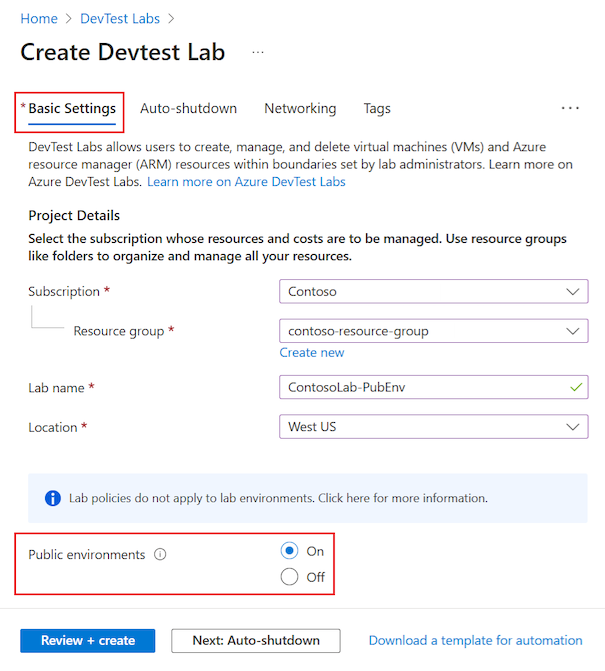
在建立 DevTest Labs 資源的流程中,選取 [基本設定] 索引標籤。
將 [公用環境] 選項設定為 [開啟]:

設定現有實驗室的公用環境存取
針對使用 ARM 範本建立的現有實驗室或實驗室,可能無法啟用公用環境。 您可以使用 [為此實驗室啟用公用環境] 選項,控制對任何現有實驗室的公用環境存放庫的存取。
遵循這些步驟來啟用或停用任何現有實驗室的公用環境存放庫存取:
在 Azure 入口網站中,移至您想要設定公用環境存取權的 DevTest Labs 實驗室資源。
在您實驗室的 [概觀] 頁面上,展開左側功能表中的 [設定] 區段,然後選取 [設定與原則]。
在 [設定與原則] 頁面上,展開左側功能表中的 [虛擬機器基底] 區段,然後選取 [公用環境]。
在 [公用環境] 頁面上,將 [為此實驗室啟用公用環境] 選項設定為 [是]:
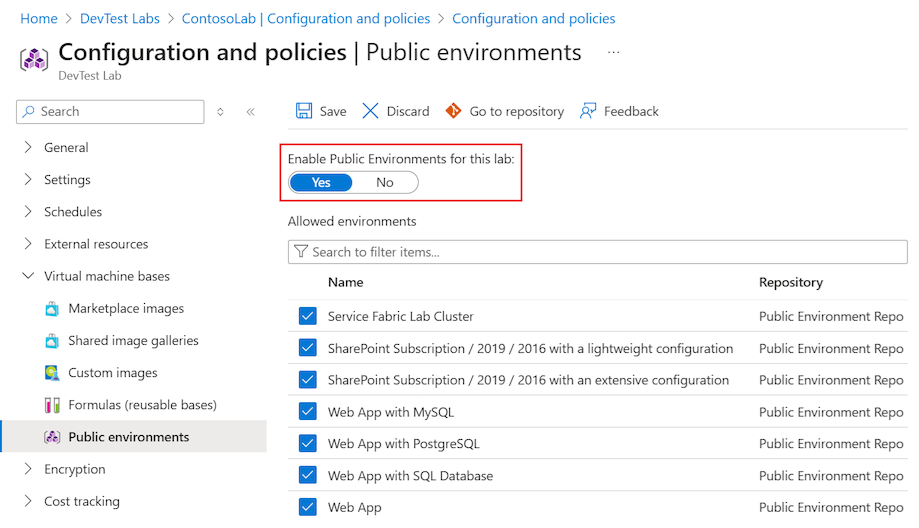
選取 [儲存]。

選取可用的公用環境範本
當您設定 [為此實驗室啟用公用環境] 選項以控制實驗室對公用環境的存取時,預設會選取所有環境範本。 根據您的選取項目,該選項設定會允許或不允許對「所有」環境的存取權。 您可以使用清單中的選取項目核取方塊來指定使用者可以存取的環境。
遵循這些步驟來僅允許實驗室存取特定環境:
在 [公用環境] 頁面上,將 [為此實驗室啟用公用環境] 選項設定為 [是]。
取消選取清單中的特定環境來讓實驗室使用者無法加以使用:
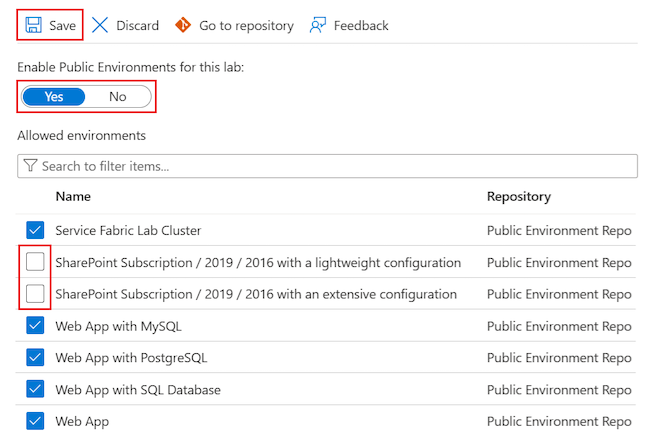
選取 [儲存]。

設定環境使用者權限
根據預設,會將公用環境存放庫中的 [讀者] 角色指派給實驗室使用者。 他們無法變更環境資源,且他們無法停止或啟動資源。
使用下列步驟來將 [參與者] 角色給予實驗室使用者,並允許他們編輯環境資源:
在 Azure 入口網站中,移至您想要調整使用者角色指派的 DevTest Labs 實驗室資源。
在您實驗室的 [概觀] 頁面上,展開左側功能表中的 [設定] 區段,然後選取 [設定與原則]。
在 [設定與原則] 頁面上,展開左側功能表中的 [設定] 區段,並選取 [實驗室設定]。
在 [實驗室設定] 頁面上,將 [環境存取]>[資源群組使用者權限] 選項設定為 [參與者]:
![顯示如何在 DevTest Labs 中為實驗室使用者設定 [參與者] 角色權限的螢幕擷取畫面。](media/devtest-lab-create-environment-from-arm/user-access-rights.png)
選取 [儲存]。
![顯示如何在 DevTest Labs 中為實驗室使用者設定 [參與者] 角色權限的螢幕擷取畫面。](media/devtest-lab-create-environment-from-arm/user-access-rights-large.png#lightbox)
自動化環境建立
如果您需要針對開發或測試案例建立多個環境,您可以使用 Azure PowerShell 或 Azure CLI 將環境部署自動化。
實驗室擁有者和管理員可以使用 Azure PowerShell,根據 ARM 範本建立 VM 和環境。 您也可以透過 Azure CLI 使用 az deployment group create (部分機器翻譯) 命令來建立環境,以將部署自動化。 如需詳細資訊,請參閱使用 ARM 範本和 Azure CLI 部署資源 (部分機器翻譯)。
注意
建議您使用 Azure Az PowerShell 模組來與 Azure 互動。 若要開始使用,請參閱安裝 Azure PowerShell (部分機器翻譯)。 若要了解如何移轉至 Az PowerShell 模組,請參閱將 Azure PowerShell 從 AzureRM 移轉至 Az。
使用下列步驟利用 Azure PowerShell 將 ARM 環境範本部署自動化:
將下列 PowerShell 指令碼儲存至您的電腦,並將檔案名稱命名為 deployenv.ps1。 此指令碼會呼叫 ARM 範本,以在實驗室中建立環境。
#Requires -Module Az.Resources

[CmdletBinding()]

param (
# ID of the Azure subscription for the lab
[string] [Parameter(Mandatory=$true)] $SubscriptionId,

# Name of the lab in which to create the environment
[string] [Parameter(Mandatory=$true)] $LabName,

# Name of the template repository connected to the lab
[string] [Parameter(Mandatory=$true)] $RepositoryName,

# Name of the template (folder name in the GitHub repository)
[string] [Parameter(Mandatory=$true)] $TemplateName,

# Name of the environment to create in the lab
[string] [Parameter(Mandatory=$true)] $EnvironmentName,

# The parameters to pass to the template. Each parameter is prefixed with "-param_".
# For example, if the template has a parameter named "TestVMName" with a value of "MyVMName",
# the string in $Params is "-param_TestVMName MyVMName".
# This convention allows the script to dynamically handle different templates.
[Parameter(ValueFromRemainingArguments=$true)]
    $Params
)

# Sign in to Azure, or comment out this statement to completely automate environment creation.
Connect-AzAccount

# Select the subscription for your lab.
Set-AzContext -SubscriptionId $SubscriptionId | Out-Null

# Get the user ID to use later in the script.
$UserId = $((Get-AzADUser -UserPrincipalName ((Get-AzContext).Account).Id).Id)

# Get the lab location.
$lab = Get-AzResource -ResourceType "Microsoft.DevTestLab/labs" -Name $LabName
if ($lab -eq $null) { throw "Unable to find lab $LabName in subscription $SubscriptionId." }

# Get information about the repository connected to your lab.
$repository = Get-AzResource -ResourceGroupName $lab.ResourceGroupName `
    -ResourceType 'Microsoft.DevTestLab/labs/artifactsources' `
    -ResourceName $LabName `
    -ApiVersion 2016-05-15 `
    | Where-Object { $RepositoryName -in ($_.Name, $_.Properties.displayName) } `
    | Select-Object -First 1
if ($repository -eq $null) { throw "Unable to find repository $RepositoryName in lab $LabName." }

# Get information about the ARM template base for the environment.
$template = Get-AzResource -ResourceGroupName $lab.ResourceGroupName `
    -ResourceType "Microsoft.DevTestLab/labs/artifactSources/armTemplates" `
    -ResourceName "$LabName/$($repository.Name)" `
    -ApiVersion 2016-05-15 `
    | Where-Object { $TemplateName -in ($_.Name, $_.Properties.displayName) } `
    | Select-Object -First 1
if ($template -eq $null) { throw "Unable to find template $TemplateName in lab $LabName." }

# Build the template parameters by using parameter names and values.
$parameters = Get-Member -InputObject $template.Properties.contents.parameters -MemberType NoteProperty | Select-Object -ExpandProperty Name
$templateParameters = @()

# Extract the custom parameters from $Params and format them as name/value pairs.
$Params | ForEach-Object {
    if ($_ -match '^-param_(.*)' -and $Matches[1] -in $parameters) {
        $name = $Matches[1]
    } elseif ( $name ) {
        $templateParameters += @{ "name" = "$name"; "value" = "$_" }
        $name = $null #reset name variable
    }
}

# Create an object to hold the necessary template properties.
$templateProperties = @{ "deploymentProperties" = @{ "armTemplateId" = "$($template.ResourceId)"; "parameters" = $templateParameters }; }

# Deploy the environment in your lab by using the New-AzResource command.
New-AzResource -Location $Lab.Location `
    -ResourceGroupName $lab.ResourceGroupName `
    -Properties $templateProperties `
    -ResourceType 'Microsoft.DevTestLab/labs/users/environments' `
    -ResourceName "$LabName/$UserId/$EnvironmentName" `
    -ApiVersion '2016-05-15' -Force

Write-Output "Environment $EnvironmentName completed."
將指令碼中的下列預留位置更新為您自己的實驗室值:
SubscriptionIdLabNameResourceGroupNameRepositoryNameTemplateName(GitHub 存放庫中的範本資料夾)EnvironmentName
下列程式碼片段示範如何使用範例參數值執行指令碼:
./deployenv.ps1 -SubscriptionId "000000000-0000-0000-0000-0000000000000" -LabName "mydevtestlab" -ResourceGroupName "mydevtestlabRG000000" -RepositoryName "myRepository" -TemplateName "ARM template folder name" -EnvironmentName "myNewEnvironment"執行指令碼。