整合 Azure Digital Twins 與 Azure Time Series Insights
在本文中,您將了解如何整合 Azure Digital Twins 與 Azure Time Series Insights (TSI)。
本文所述的解決方案會使用 Time Series Insights 來收集和分析有關 IoT 解決方案的歷程記錄資料。 Azure Digital Twins 是將資料送入 Time Series Insights 的適合供應產品,因為其可讓您將多個資料流相互關聯,並將資訊標準化,再將其傳送至時間序列深入解析。
提示
一段時間分析歷程記錄對應項資料的最簡單方式是使用資料歷程記錄功能,將 Azure Digital Twins 實例連線至 Azure Data Explorer 叢集,讓圖表更新會自動記錄至 Azure Data Explorer。 然後,您可以使用適用於 Azure Data Explorer 的 Azure Digital Twins 查詢外掛程式,在 Azure Data Explorer 中查詢此資料。 如果您不需要特別使用 Time Series Insights,您可以考慮此替代方案以獲得更簡單的整合體驗。
必要條件
在您可以設定與 Time Series Insights 的關聯性之前,您必須先設定下列資源:
- Azure Digital Twins 執行個體。 如需相關指示,請參閱設定 Azure Digital Twins 執行個體和驗證。
- Azure Digital Twins 執行個體中的模型和對應項。 您必須更新對應項的資訊數次,才能查看 Time Series Insights 中所追蹤的資料。 如需相關指示,請參閱新增模型和對應項。
提示
在本文中,為了簡化起見,會手動更新在 Time Series Insights 中檢視的不斷變化的數字對應項值。 不過,如果您想要使用即時模擬資料來完成本文中的作業,您可以設定 Azure 函式,以根據模擬裝置的 IoT 遙測事件來更新數位對應項。 如需相關指示,請照著內嵌 IoT 中樞資料中的內容進行,包括執行裝置模擬器並驗證資料流程運作的最後步驟。
稍後,尋找另一個秘訣,以告訴您從哪裡開始執行裝置模擬器,並讓您的 Azure 函式自動更新對應項,而不是傳送手動數位對應項更新命令。
解決方案架構
您將透過下列路徑來將 Time Series Insights 連結至 Azure Digital Twins。

建立事件中樞命名空間
建立事件中樞之前,您必須先建立事件中樞命名空間,以接收來自 Azure Digital Twins 執行個體的事件。 您可以使用下面的 Azure CLI 指令,或按照「使用 Azure 入口網站來建立事件中樞」內容來使用 Azure 入口網站。 若要查看哪些地區支援事件中樞,請造訪依地區提供的 Azure 產品。
az eventhubs namespace create --name <name-for-your-Event-Hubs-namespace> --resource-group <your-resource-group> --location <region>
提示
如果您收到指出 BadRequest: The specified service namespace is invalid. 的錯誤,請確定您為命名空間選擇的名稱符合下列參考文件中所述的命名要求:建立命名空間。
您將使用此事件中樞命名空間來保存本文所需的兩個事件中樞:
- 對應項中樞 - 接收對應項變更事件的事件中樞
- 時間序列中樞 - 將事件串流至 Time Series Insights 的事件中樞
下列各節將逐步引導您在事件中樞命名空間內建立和設定這些中樞。
建立對應項中樞
您將在本文中建立的第一個事件中樞是對應項中樞。 此事件中樞會收到來自 Azure Digital Twins 的對應項變更事件。 若要設定對應項中樞,您將需要完成本節中的下列步驟:
- 建立對應項中樞
- 建立授權規則來控制中樞的權限
- 在 Azure Digital Twins 中建立使用授權規則來存取中樞的端點
- 在 Azure Digital Twins 中建立路由,以將對應項更新事件傳送至端點和連接的對應項中樞
- 取得對應項中樞連線字串
使用下列 CLI 命令來建立對應項中樞。 指定對應項中樞的名稱。
az eventhubs eventhub create --name <name-for-your-twins-hub> --resource-group <your-resource-group> --namespace-name <your-Event-Hubs-namespace-from-earlier>
建立對應項中樞授權規則
建立包含「傳送」和「接收」權限的授權規則。 指定規則的名稱。
az eventhubs eventhub authorization-rule create --rights Listen Send --name <name-for-your-twins-hub-auth-rule> --resource-group <your-resource-group> --namespace-name <your-Event-Hubs-namespace-from-earlier> --eventhub-name <your-twins-hub-from-earlier>
建立對應項中樞端點
建立 Azure Digital Twins 端點,以將您的事件中樞連結到您的 Azure Digital Twins 執行個體。 指定對應項中樞端點的名稱。
az dt endpoint create eventhub --dt-name <your-Azure-Digital-Twins-instance-name> --eventhub-resource-group <your-resource-group> --eventhub-namespace <your-Event-Hubs-namespace-from-earlier> --eventhub <your-twins-hub-name-from-earlier> --eventhub-policy <your-twins-hub-auth-rule-from-earlier> --endpoint-name <name-for-your-twins-hub-endpoint>
建立對應項中樞事件路由
只要對應項的狀態更新,Azure Digital Twins 執行個體就可以發出對應項更新事件。 在本節中,您將會建立 Azure Digital Twins 事件路由,其會將這些更新事件導向到應項中樞以進行進一步的處理。
在 Azure Digital Twins 中建立路由,以從上方將對應項更新事件傳送至您的端點。 此路由中的篩選器只會允許將對應項更新訊息傳遞至您的端點。 指定對應項中樞事件路由的名稱。 針對此命令中的 Azure Digital Twins 執行個體名稱預留位置,您可以使用易記的名稱或主機名稱來提升效能。
az dt route create --dt-name <your-Azure-Digital-Twins-instance-hostname-or-name> --endpoint-name <your-twins-hub-endpoint-from-earlier> --route-name <name-for-your-twins-hub-event-route> --filter "type = 'Microsoft.DigitalTwins.Twin.Update'"
取得對應項中樞連線字串
使用您在上方中為對應項中樞建立的授權規則,來取得對應項事件中樞連線字串。
az eventhubs eventhub authorization-rule keys list --resource-group <your-resource-group> --namespace-name <your-Event-Hubs-namespace-from-earlier> --eventhub-name <your-twins-hub-from-earlier> --name <your-twins-hub-auth-rule-from-earlier>
記下結果中的 primaryConnectionString 值,以設定本文中稍後的對應項中樞應用程式設定。
建立時間序列中樞
您將在本文中建立的第二個事件中樞是時間序列中樞。 此事件中樞是將 Azure Digital Twins 事件串流至 Time Series Insights 的事件中樞。 若要設定時間序列中樞,您將需要完成下列步驟:
- 建立時間序列中樞
- 建立授權規則來控制中樞的權限
- 取得時間序列中樞連線字串
稍後,當您建立 Time Series Insights 執行個體時,您會將此時間序列中樞連線為 Time Series Insights 執行個體的事件來源。
使用下列命令來建立時間序列中樞。 指定時間序列中樞的名稱。
az eventhubs eventhub create --name <name-for-your-time-series-hub> --resource-group <your-resource-group> --namespace-name <your-Event-Hub-namespace-from-earlier>
建立時間序列中樞授權規則
建立包含「傳送」和「接收」權限的授權規則。 指定時間序列中樞授權規則的名稱。
az eventhubs eventhub authorization-rule create --rights Listen Send --name <name-for-your-time-series-hub-auth-rule> --resource-group <your-resource-group> --namespace-name <your-Event-Hub-namespace-from-earlier> --eventhub-name <your-time-series-hub-name-from-earlier>
取得時間序列中樞連線字串
使用您在上方中為時間序列中樞建立的授權規則,來取得時間序列中樞連線字串:
az eventhubs eventhub authorization-rule keys list --resource-group <your-resource-group> --namespace-name <your-Event-Hub-namespace-from-earlier> --eventhub-name <your-time-series-hub-name-from-earlier> --name <your-time-series-hub-auth-rule-from-earlier>
記下結果中的 primaryConnectionString 值,以設定本文中稍後的時間序列中樞應用程式設定。
此外,也請記下下列值,以便稍後使用它們來建立 Time Series Insights 執行個體。
- 事件中樞命名空間
- 時間序列中樞名稱
- 時間序列中樞授權規則
建立函式
在本節中,您將建立一個 Azure 函式,其會將對應項更新事件從其作為 JSON 補檔文件的原始格式轉換為僅包含來自您的對應項的更新值和新增值的 JSON 物件。
首先,建立一個新的函式應用程式專案。
您可以使用 Visual Studio (如需相關指示,請參閱使用 Visual Studio 來開發 Azure Functions)、Visual Studio Code (如需相關指示,請參閱使用 Visual Studio Code 以在 Azure 中建立 C# 函式) 或 Azure CLI (如需相關指示,請參閱從命令列在 Azure 中建立 C# 函式) 來執行此動作。
建立一個名為 ProcessDTUpdatetoTSI.cs 的新 Azure 函式,以將裝置遙測事件更新為 Time Series Insights。 函式類型將會是事件中樞觸發程序。

將下列套件新增至您的專案 (您可以使用 Visual Studio NuGet 套件管理員,或命令列工具中的 dotnet add package 命令)。
以下列程式碼來取代 ProcessDTUpdatetoTSI.cs 檔中的程式碼:
using System.Collections.Generic;
using System.Threading.Tasks;
using System.Text;
using Microsoft.Azure.WebJobs;
using Microsoft.Extensions.Logging;
using Newtonsoft.Json;
using Newtonsoft.Json.Linq;
using Azure.Messaging.EventHubs;

namespace UpdateTSI
{
    public static class ProcessDTUpdatetoTSI
    {
        [FunctionName("ProcessDTUpdatetoTSI")]
        public static async Task Run(
            [EventHubTrigger("twins-event-hub", Connection = "EventHubAppSetting-Twins")]EventData myEventHubMessage,
            [EventHub("tsi-event-hub", Connection = "EventHubAppSetting-TSI")]IAsyncCollector<string> outputEvents,
            ILogger log)
        {
            JObject message = (JObject)JsonConvert.DeserializeObject(Encoding.UTF8.GetString(myEventHubMessage.Body));
            log.LogInformation($"Reading event: {message}");

            // Read values that are replaced or added
            var tsiUpdate = new Dictionary<string, object>();
            foreach (var operation in message["patch"])
            {
                if (operation["op"].ToString() == "replace" || operation["op"].ToString() == "add")
                {
                    //Convert from JSON patch path to a flattened property for TSI
                    //Example input: /Front/Temperature
                    //        output: Front.Temperature
                    string path = operation["path"].ToString().Substring(1);
                    path = path.Replace("/", ".");
                    tsiUpdate.Add(path, operation["value"]);
                }
            }
            // Send an update if updates exist
            if (tsiUpdate.Count > 0)
            {
                tsiUpdate.Add("$dtId", myEventHubMessage.Properties["cloudEvents:subject"]);
                await outputEvents.AddAsync(JsonConvert.SerializeObject(tsiUpdate));
            }
        }
    }
}
更新您的函式程式碼。
使用 ProcessDTUpdatetoTSI.cs 函式來將專案發佈至 Azure 中的函式應用程式。
如需如何使用 Visual Studio 來發佈函式的相關指示,請參閱使用 Visual Studio 來開發 Azure Functions。 對於如何使用 Visual Studio Code 來發佈函數,如需相關指示,請參閱使用 Visual Studio Code 在 Azure 中建立 C# 函數。 如需如何使用 Azure CLI 來發佈函式的相關指示,請參閱從命令列在 Azure 中建立 C# 函式。

儲存函式應用程式名稱,以供稍後用來設定這兩個事件中樞的應用程式設定。
設定函式應用程式
接下來,指派函式的存取角色,並設定應用程式設定,使其可以存取您的資源。
在 Azure Cloud Shell 或本機 Azure CLI 中執行下列命令。
注意
此區段必須由有權限管理使用者對 Azure 資源存取權的 Azure 使用者來完成,包括授與和委派權限。 符合此需求的常見角色包括:擁有者、帳戶管理員,或使用者存取管理員與參與者的組合。 如需 Azure Digital Twins 角色權限需求的詳細資訊,請參閱設定執行個體和驗證。
指派存取角色
Azure 函數需要傳遞給角色的持有人權杖。 若要確定已傳遞持有人權杖,請為函數應用程式授與 Azure Digital Twins 執行個體的 Azure Digital Twins 資料擁有者角色,這會授與函數應用程式在執行個體上執行資料平面活動的權限。
使用下列命令建立函式 的系統受控識別 , (如果函式已經有,此命令將會列印其詳細資料) 。 記下輸出中的
principalId欄位。 您將使用此識別碼來參考函數,以便可以在下一個步驟中授與其權限。az functionapp identity assign --resource-group <your-resource-group> --name <your-function-app-name>使用下列命令中的
principalId值,將函數提供給您 Azure Digital Twins 執行個體的 Azure Digital Twins 資料擁有者角色。az dt role-assignment create --dt-name <your-Azure-Digital-Twins-instance> --assignee "<principal-ID>" --role "Azure Digital Twins Data Owner"
設定應用程式設定
接下來,為函數設定環境變數,讓您的 Azure Digital Twins 執行個體的 URL 存取函數。
提示
Azure Digital Twins 執行個體的 URL 是藉由將 https:// 新增至執行個體主機名稱的開頭加以建立。 若要查看主機名稱,以及執行個體的所有屬性,請執行 az dt show --dt-name <your-Azure-Digital-Twins-instance>。
下列命令會設定執行個體 URL 的環境變數,每當函式需要存取執行個體時,就會使用該環境變數。
az functionapp config appsettings set --resource-group <your-resource-group> --name <your-function-app-name> --settings "ADT_SERVICE_URL=https://<your-Azure-Digital-Twins-instance-host-name>"
接下來,在函式應用程式的設定中新增環境變數,以允許它存取對應項中樞和時間序列中樞。
使用您稍早儲存的對應項中樞 primaryConnectionString 值,以在包含對應項中樞連線字串的函式應用程式中建立應用程式設定:
az functionapp config appsettings set --settings "EventHubAppSetting-Twins=<your-twins-hub-primaryConnectionString>" --resource-group <your-resource-group> --name <your-function-app-name>
使用您稍早儲存的時間序列中樞 primaryConnectionString 值,以在包含時間序列中樞連線字串的函式應用程式中建立應用程式設定:
az functionapp config appsettings set --settings "EventHubAppSetting-TSI=<your-time-series-hub-primaryConnectionString>" --resource-group <your-resource-group> --name <your-function-app-name>
建立及連接時間序列深入解析執行個體
在本節中,您將設定 Time Series Insights 執行個體,以接收來自時間序列中樞的資料。 如需此程序的詳細資訊,請參閱設定 Azure Time Series Insights Gen2 PAYG 環境。 請遵循下列步驟來建立 Time Series Insights 環境。
在 Azure 入口網站中,搜尋 Time Series Insights 環境,然後選取 [建立] 按鈕。 選擇下列選項來建立時間序列環境。
- 訂用帳戶 - 選擇您的訂用帳戶。
- 資源群組 - 選擇您的資源群組。
- 環境名稱 - 指定您的時間序列環境的名稱。
- 位置 - 選擇位置。
- 層 - 選擇 Gen2(L1) 定價層。
- 屬性名稱 - 輸入 $dtId (請閱讀「選擇時間序列 ID 的最佳做法」中有關選取 ID 值的詳細資訊)。
- 儲存體帳戶名稱 - 指定儲存體帳戶名稱。
- 啟用暖存放區 - 將此欄位保持設為 [是]。
您可以保留此頁面上其他屬性的預設值。 選取 [下一步:事件來源>] 按鈕。


- 訂用帳戶 - 選擇您的訂用帳戶。
在 [事件來源] 索引標籤中,選擇下欄欄位:
- 建立事件來源? - 選擇 [是]。
- 來源類型 - 選擇 [事件中樞]。
- 名稱 - 指定事件來源的名稱。
- 訂用帳戶 - 選擇您的 Azure 訂用帳戶。
- 事件中樞命名空間 - 選擇您稍早在本文中建立的命名空間。
- 事件中樞名稱 - 選擇您稍早在本文中建立的時間序列中樞名稱。
- 事件中樞存取原則名稱 - 選擇您稍早在本文中建立的時間序列中樞授權規則。
- 事件中樞取用者群組 - 選取 [新增],並指定事件中樞取用者群組的名稱。 然後選取 [新增]。
- 屬性名稱 - 將此欄位保留空白。
選擇 [檢閱 + 建立] 按鈕以檢閱所有詳細資料。 然後,再次選取 [檢閱 + 建立] 按鈕以建立時間序列環境。


將 IoT 資料傳送至 Azure Digital Twins
若要開始將資料傳送至 Time Series Insights,您必須開始使用變化中的資料值來更新 Azure Digital Twins 中的數位對應項屬性。
使用 az dt twin update CLI 命令,更新您在必要先決條件一節中新增之對應項上的屬性。 如果您使用「從 IoT 中樞擷取遙測」中的對應項建立指示,則可以在本機 CLI 或 Cloud Shell bash 終端機中使用下列命令來更新 thermostat67 對應項上的溫度屬性。 Azure Digital Twins 執行個體的主機名稱有一個預留位置 (您也可以使用執行個體的易記名稱,但效能會稍微降低)。
az dt twin update --dt-name <your-Azure-Digital-Twins-instance-hostname-or-name> --twin-id thermostat67 --json-patch '{"op":"replace", "path":"/Temperature", "value": 20.5}'
使用不同屬性值來重複命令至少 4 次,以建立數個資料點,稍後可以在 Time Series Insights 環境中觀察。
提示
如果您想要使用即時模擬資料來完成本文的作業 (而不是手動更新數位對應項值),請先確定您已完成先決條件一節中的「秘訣」,才來設定更新模擬裝置中的對應項的 Azure 函式。 之後,您可以立即執行裝置,以開始傳送模擬的資料,並透過該資料流程來更新您的數位對應項。
將時間序列深入解析中的資料視覺化
現在,資料應該會流入您的 Time Series Insights 執行個體,準備好進行分析。 請遵循下列步驟來探索傳入的資料。
在 Azure 入口網站中,搜尋您稍早建立的時間序列環境名稱。 在左側的功能表選項中,選取 [概觀] 來查看 Time Series Insights 總管 URL。 選取 URL 以檢視 Time Series Insights 環境中反映的溫度變更。
![Azure 入口網站的螢幕擷取畫面,其中顯示了 Time Series Insights 環境 [概觀] 索引標籤中的 [Time Series Insights 總管 URL]。](media/how-to-integrate-time-series-insights/view-environment.png)
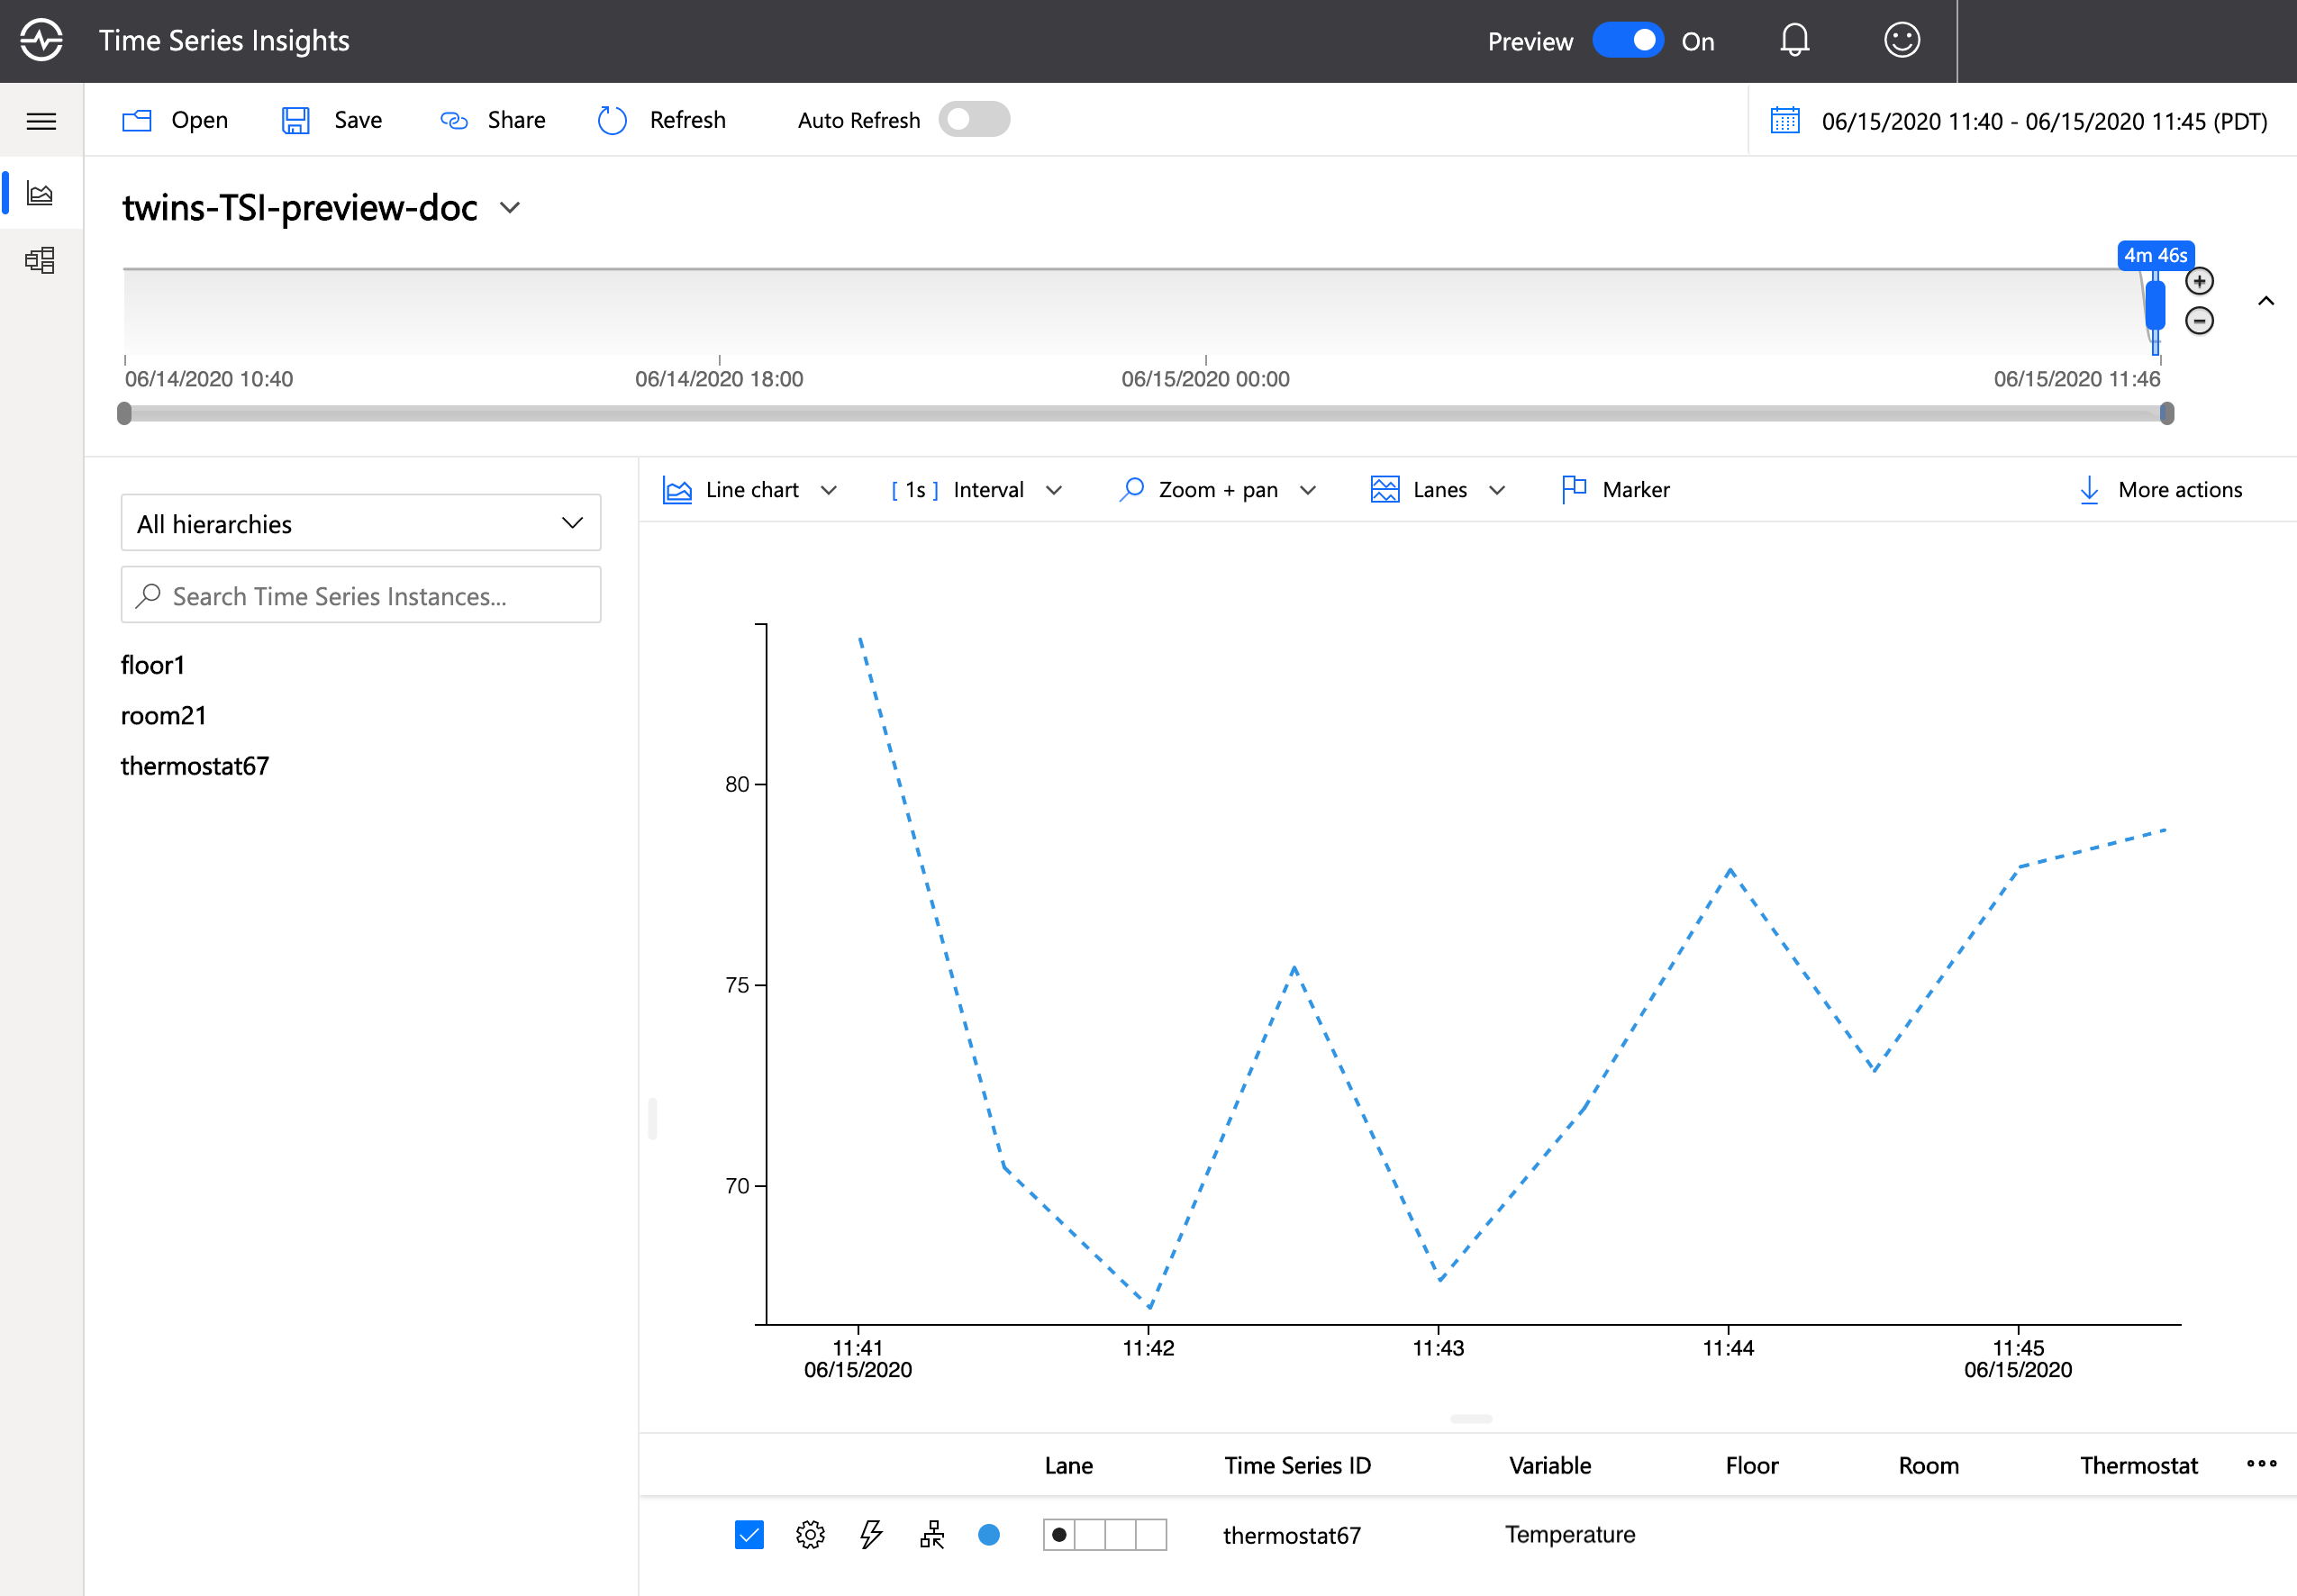
在該總管中,您會看到左側顯示的 Azure Digital Twins 執行個體中的對應項。 選取您已編輯其屬性的對應項,選擇您已變更的屬性,然後選取 [新增]。
![Time Series Insights 總管的螢幕擷取畫面,其中反白了選取 thermostat67、選取屬性溫度,然後再選取 [新增] 的步驟。](media/how-to-integrate-time-series-insights/add-data.png)
您現在應該會看到您所做的屬性變更反映在圖中,如下所示。
![Azure 入口網站的螢幕擷取畫面,其中顯示了 Time Series Insights 環境 [概觀] 索引標籤中的 [Time Series Insights 總管 URL]。](media/how-to-integrate-time-series-insights/view-environment.png#lightbox)
![Time Series Insights 總管的螢幕擷取畫面,其中反白了選取 thermostat67、選取屬性溫度,然後再選取 [新增] 的步驟。](media/how-to-integrate-time-series-insights/add-data.png#lightbox)

如果您允許模擬執行更長的時間,則您的視覺效果看起來會像這樣:

下一步
建立資料管線以將時間序列資料從 Azure Digital Twins 傳送至 Time Series Insights 之後,您可能想要考慮如何將針對 Azure Digital Twins 設計的資產模型轉譯為 Time Series Insights 的資產模型。 如需整合程序中下一個步驟的教學課程,請參閱 Azure Digital Twins 與 Time Series Insights Gen2 之間的模型同步處理。