您可以設定事件中樞,以便在 Azure 儲存體帳戶或 Azure Data Lake Storage Gen 1 或 Gen 2 中擷取傳送至事件中樞的資料。 本文說明如何撰寫 Python 程式碼,將事件傳送至事件中樞,以及從 Azure Blob 儲存體讀取擷取的資料。 如需此功能的詳細資訊,請參閱 事件中樞擷取功能概觀。
本快速入門會使用 Azure Python SDK 來示範擷取功能。 sender.py 應用程式會以 JSON 格式將模擬的環境遙測傳送至事件中樞。 事件中樞會設定為使用擷取功能,以批次將此資料寫入 Blob 儲存體。 capturereader.py 應用程式會讀取這些 Blob,並為每個裝置建立附加檔案。 然後,應用程式會將資料寫入 CSV 檔案。
在本快速入門中,您將:
- 在 Azure 入口網站中建立 Azure Blob 儲存體帳戶和容器。
- 使用 Azure 入口網站建立事件中樞命名空間。
- 建立已啟用擷取功能的事件中樞,並將它連線到您的儲存體帳戶。
- 使用 Python 指令碼將資料傳送至事件中樞。
- 使用另一個 Python 腳本,從事件中樞擷取讀取和處理檔案。
先決條件
Python 3.8 或更高版本,已安裝並更新 pip。
Azure 訂用帳戶。 如果您沒有 Azure 訂用帳戶,請在開始前建立免費帳戶。
作用中的事件中樞命名空間和事件中樞。 建立事件中樞命名空間並在該命名空間內建立事件中樞。 記錄事件中樞命名空間的名稱、事件中樞的名稱,以及命名空間的主要存取金鑰。 若要取得存取金鑰,請參閱 取得事件中樞連接字串。 預設金鑰名稱是 RootManageSharedAccessKey。 在本快速入門中,您只需要主金鑰。 您不需要連接字串。
Azure 儲存體帳戶、儲存體帳戶中的 Blob 容器,以及儲存體帳戶的連接字串。 如果您沒有這些項目,請執行下列步驟:
請務必記錄連接字串和容器名稱,以供稍後在本快速入門中使用。
啟用事件中樞的擷取功能
啟用事件中心的擷取功能。 若要這樣做,請遵循 使用 Azure 入口網站啟用事件中樞擷取中的指示。 選取您在上一個步驟中建立的儲存體帳戶和 Blob 容器。 選取 Avro 作為 輸出事件序列化格式。
建立 Python 腳本以將事件傳送至事件中樞
在本節中,您會建立 Python 腳本,將 200 個事件 (10 個裝置 * 20 個事件) 傳送至事件中樞。 這些事件是以 JSON 格式傳送的範例環境讀取。
開啟您最愛的 Python 編輯器,例如 Visual Studio Code。
建立名為 sender.py 的指令碼。
將下列程式碼貼到 sender.py 中。
import time
import os
import uuid
import datetime
import random
import json

from azure.eventhub import EventHubProducerClient, EventData

# This script simulates the production of events for 10 devices.
devices = []
for x in range(0, 10):
    devices.append(str(uuid.uuid4()))

# Create a producer client to produce and publish events to the event hub.
producer = EventHubProducerClient.from_connection_string(conn_str="EVENT HUBS NAMESPACE CONNECTION STRING", eventhub_name="EVENT HUB NAME")

for y in range(0,20):    # For each device, produce 20 events.
    event_data_batch = producer.create_batch() # Create a batch. You will add events to the batch later.
    for dev in devices:
        # Create a dummy reading.
    reading = {
            'id': dev,
            'timestamp': str(datetime.datetime.utcnow()),
            'uv': random.random(),
            'temperature': random.randint(70, 100),
            'humidity': random.randint(70, 100)
        }
        s = json.dumps(reading) # Convert the reading into a JSON string.
        event_data_batch.add(EventData(s)) # Add event data to the batch.
    producer.send_batch(event_data_batch) # Send the batch of events to the event hub.

# Close the producer.
producer.close()
取代指令碼中的下列值:
- 將
EVENT HUBS NAMESPACE CONNECTION STRING取代為事件中樞命名空間的連接字串。 - 請將
EVENT HUB NAME替換為您的事件中樞名稱。
- 將
執行指令碼,將事件傳送至事件中樞。
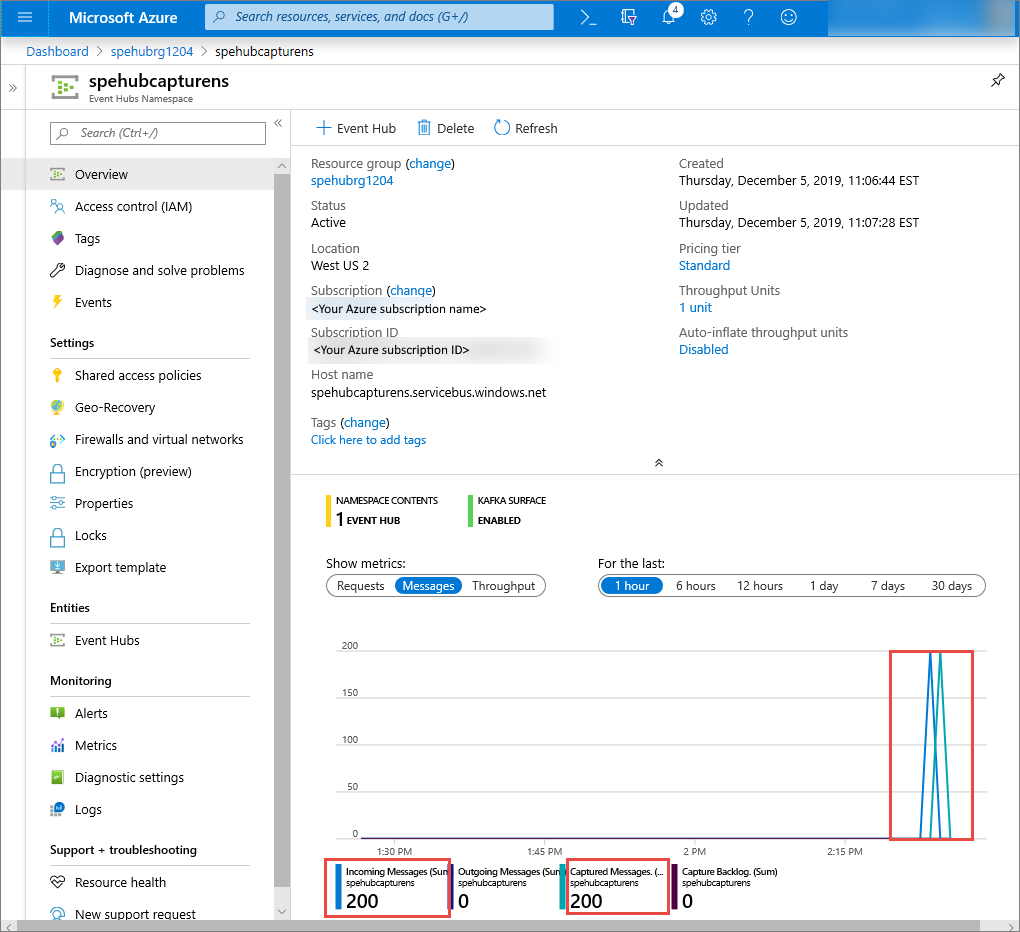
在 Azure 入口網站中,您可以確認事件中樞已收到訊息。 切換至「指標」區段中的「訊息」檢視。 重新整理頁面以更新圖表。 頁面可能需要幾秒鐘的時間才能顯示已收到訊息。

建立 Python 指令碼來讀取 Capture 檔案
在此範例中,擷取的資料會儲存在 Azure Blob 儲存體中。 本節中的指令碼會從您的 Azure 儲存體帳戶讀取擷取的資料檔案,並產生 CSV 檔案,讓您輕鬆開啟和檢視。 您會在應用程式的目前工作目錄中看到 10 個檔案。 這些檔案包含 10 個裝置的環境讀數。
在 Python 編輯器中,建立名為 capturereader.py 的指令碼。 此腳本會讀取擷取的檔案,並為每個裝置建立檔案,以僅寫入該裝置的資料。
將下列程式碼貼到 capturereader.py 中。
import os
import string
import json
import uuid
import avro.schema

from azure.storage.blob import ContainerClient, BlobClient
from avro.datafile import DataFileReader, DataFileWriter
from avro.io import DatumReader, DatumWriter


def processBlob2(filename):
    reader = DataFileReader(open(filename, 'rb'), DatumReader())
    dict = {}
    for reading in reader:
        parsed_json = json.loads(reading["Body"])
        if not 'id' in parsed_json:
            return
        if not parsed_json['id'] in dict:
            list = []
            dict[parsed_json['id']] = list
        else:
            list = dict[parsed_json['id']]
            list.append(parsed_json)
    reader.close()
    for device in dict.keys():
        filename = os.getcwd() + '\\' + str(device) + '.csv'
        deviceFile = open(filename, "a")
        for r in dict[device]:
            deviceFile.write(", ".join([str(r[x]) for x in r.keys()])+'\n')

def startProcessing():
    print('Processor started using path: ' + os.getcwd())
    # Create a blob container client.
    container = ContainerClient.from_connection_string("AZURE STORAGE CONNECTION STRING", container_name="BLOB CONTAINER NAME")
    blob_list = container.list_blobs() # List all the blobs in the container.
    for blob in blob_list:
        # Content_length == 508 is an empty file, so process only content_length > 508 (skip empty files).
        if blob.size > 508:
            print('Downloaded a non empty blob: ' + blob.name)
            # Create a blob client for the blob.
            blob_client = ContainerClient.get_blob_client(container, blob=blob.name)
            # Construct a file name based on the blob name.
            cleanName = str.replace(blob.name, '/', '_')
            cleanName = os.getcwd() + '\\' + cleanName
            with open(cleanName, "wb+") as my_file: # Open the file to write. Create it if it doesn't exist.
                my_file.write(blob_client.download_blob().readall()) # Write blob contents into the file.
            processBlob2(cleanName) # Convert the file into a CSV file.
            os.remove(cleanName) # Remove the original downloaded file.
            # Delete the blob from the container after it's read.
            container.delete_blob(blob.name)

startProcessing()
將
AZURE STORAGE CONNECTION STRING取代為 Azure 儲存體帳戶的連接字串。 您在本快速入門中建立的容器名稱是 capture。 如果您對容器使用不同的名稱,請將 capture 取代為儲存體帳戶中的容器名稱。
執行指令碼
開啟路徑中有 Python 的命令提示字元,然後執行下列命令來安裝 Python 必要條件套件:
pip install azure-storage-blob
pip install azure-eventhub
pip install avro-python3
將您的目錄變更為您儲存 sender.py 和 capturereader.py 的目錄,然後執行以下命令:
python sender.py此命令會啟動新的 Python 處理程序來執行寄件者。
等待幾分鐘讓擷取執行,然後在原始命令視窗中輸入下列命令:
python capturereader.py此擷取處理器會使用本機目錄,從儲存體帳戶和容器下載所有 Blob。 它會處理非空的檔案,並將結果作為 CSV 檔案寫入本機目錄。