使用 Azure IoT 中樞 將檔案從您的裝置上傳至雲端(Java)
本文示範如何使用 Java 執行 IoT 中樞的檔案上傳功能,將檔案上傳至 Azure blob 儲存體。
將遙測從裝置傳送至 IoT 中樞快速入門和使用 IoT 中樞傳送雲端到裝置訊息文章會示範 IoT 中樞的基本裝置到雲端和雲端到裝置傳訊功能。 使用 IoT 中樞設定訊息路由教學課程說明將裝置到雲端訊息儲存在 Azure Blob 儲存體中的可靠方法。 不過,在某些情況下,您無法輕易地將裝置所傳送的資料對應至 IoT 中樞接受且相對較小的裝置到雲端的訊息。 例如:
- 影片
- 包含映像的大型檔案
- 取樣高頻率的震動資料
- 某種經前置處理過的資料。
這些檔案通常會使用工具 (例如 Azure Data Factory 或 Hadoop 堆疊) 在雲端中進行批次處理。 當您需要從裝置上傳檔案時,您仍然可以使用安全可靠的 IoT 中樞。 本文會說明如何操作。 在 GitHub 中檢視 azure-iot-sdk-java 中的兩個範例。
注意
IoT 中樞透過 Azure IoT 裝置 SDK 來支援許多裝置平台和語言 (包括 C、.NET 及 JavaScript)。 若要了解如何將裝置連線至 Azure IoT 中樞,請參閱 Azure IoT 開發人員中心。
重要
在使用 X.509 憑證授權 (CA) 驗證裝置上的檔案上傳功能目前為公開預覽狀態,請務必啟用預覽模式。 該功能已在以下裝置上正式發行:搭配 Azure 裝置佈建服務之使用 X.509 指紋驗證或 X.509 憑證證明的裝置。 若要深入了解使用 IoT 中樞的 X.509 驗證,請參閱支援的 X.509 憑證。
必要條件
一個 IoT 中樞。 使用 CLI 或 Azure 入口網站建立一個。
已註冊的裝置。 在 Azure 入口網站中註冊一個。
Java SE 開發套件 8。 請務必選取 [長期支援] 下的 [Java 8],以取得 JDK 8 的下載。
應該在您的防火牆中開放連接埠 8883。 本文中的裝置範例會使用 MQTT 通訊協定,其會透過連接埠 8883 進行通訊。 某些公司和教育網路環境可能會封鎖此連接埠。 如需此問題的詳細資訊和解決方法,請參閱連線至 IoT 中樞 (MQTT)。
讓 Azure 儲存體帳戶與 IoT 中樞產生關聯
如果要從裝置上傳檔案,您必須擁有 Azure 儲存體帳戶及與 IoT 中樞相關聯的 Azure Blob 儲存體容器。 當您將儲存體帳戶和容器與您的 IoT 中樞建立關聯後,IoT 中樞可以在裝置要求時提供 SAS URI 的元素。 接著裝置可以使用這些元素來建構 SAS URI,其用來向 Azure 儲存體進行驗證,並將檔案上傳至 blob 容器。
若要將 Azure 儲存體帳戶與 IoT 中樞產生關聯:
請在 [中樞設定] 底下,選取 IoT 中樞左窗格中的 [檔案上傳]。
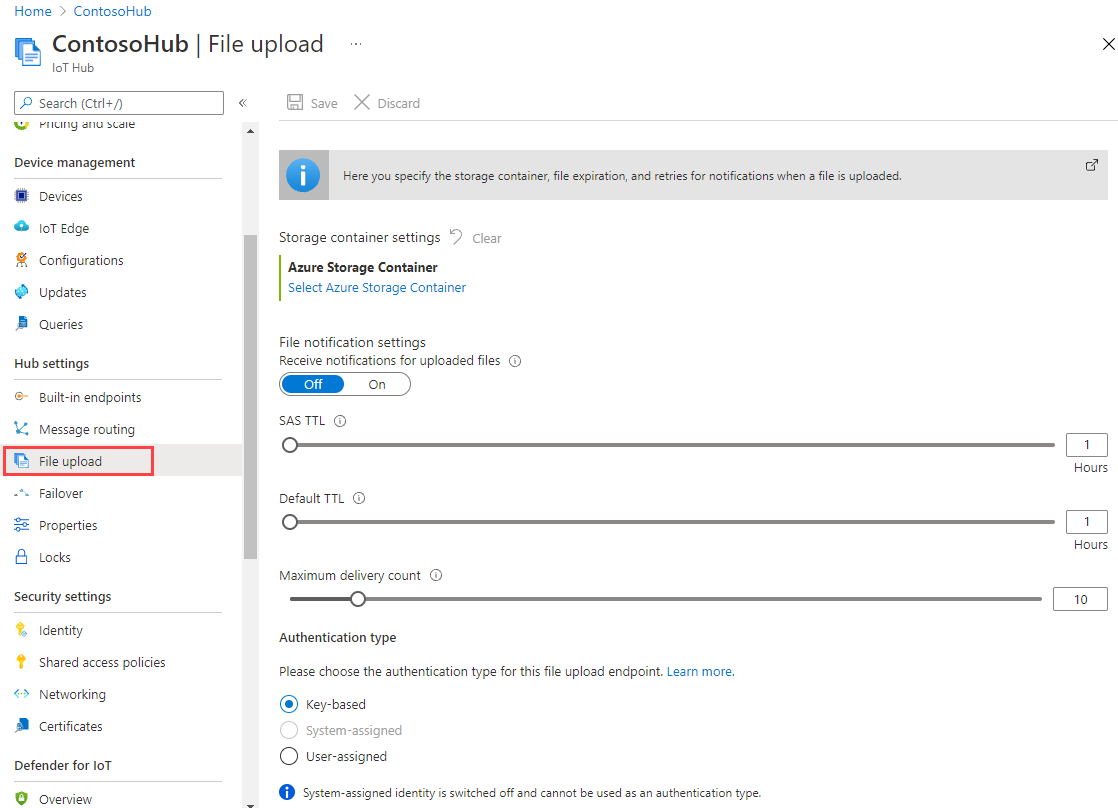
在 [檔案上傳] 窗格中,選取 [Azure 儲存體容器]。 在本文中,建議您將儲存體帳戶及 IoT 中樞設為相同區域。
如果您已經有想要使用的儲存體帳戶,請從清單中選取。
若要建立新的儲存體帳戶,請選取 [+ 儲存體帳戶]。 提供儲存體帳戶的名稱,確定 [位置] 設為與 IoT 中樞相同的區域,然後選取 [確定]。 新帳戶會建立在與 IoT 中樞相同的資源群組中。 部署完成時,請從清單中選取儲存體帳戶。
選取儲存體帳戶後,[容器] 窗格隨即開啟。
在 [容器] 窗格中,選取 blob 容器。
如果您已經有要使用的 blob 容器,請從清單中選取,然後按一下 [選取]。
若要建立新的 blob 容器,請選取 [+ 容器]。 提供新容器的名稱。 針對本文的目的,您可以將所有其他欄位保留為預設值。 選取 建立。 部署完成時,從清單中選取容器,然後按一下 [選取]。
返回 [檔案上傳] 窗格,確定檔案通知已設為 [開啟]。 您可以保留所有其他設定的預設值。 選取 [儲存],並等待設定完成,再繼續進行下一小節。


如需如何建立 Azure 儲存體帳戶的詳細指示,請參閱 [建立儲存體帳戶]。 如需如何將儲存體帳戶及 Blob 容器與 IoT 中樞建立關聯的詳細指示,請參閱使用 Azure 入口網站設定檔案上傳。
使用 Maven 建立專案
為您的專案建立目錄,並在該目錄中啟動殼層。 在命令列上,執行下列命令
mvn archetype:generate -DgroupId=com.mycompany.app -DartifactId=my-app -DarchetypeArtifactId=maven-archetype-quickstart -DarchetypeVersion=1.4 -DinteractiveMode=false
這會產生與 artifactId 相同的名稱,以及標準專案結構:
  my-app
  |-- pom.xml
   -- src
      -- main
         -- java
            -- com
               -- mycompany
                  -- app
                     --App.Java
使用文字編輯器,以下列內容取代 pom.xml 檔案:
<?xml version="1.0" encoding="UTF-8"?>

<project xmlns="http://maven.apache.org/POM/4.0.0" xmlns:xsi="http://www.w3.org/2001/XMLSchema-instance"
  xsi:schemaLocation="http://maven.apache.org/POM/4.0.0 http://maven.apache.org/xsd/maven-4.0.0.xsd">
  <modelVersion>4.0.0</modelVersion>

  <groupId>com.mycompany.app</groupId>
  <artifactId>my-app</artifactId>
  <version>1.0-SNAPSHOT</version>

  <name>my-app</name>
  <!-- FIXME change it to the project's website -->
  <url>http://www.example.com</url>

  <properties>
    <project.build.sourceEncoding>UTF-8</project.build.sourceEncoding>
    <maven.compiler.source>1.7</maven.compiler.source>
    <maven.compiler.target>1.7</maven.compiler.target>
  </properties>

  <dependencies>
      <dependency>
      <groupId>com.microsoft.azure.sdk.iot</groupId>
      <artifactId>iot-device-client</artifactId>
      <version>1.30.1</version>
    </dependency>
    <dependency>
      <groupId>org.slf4j</groupId>
      <artifactId>slf4j-log4j12</artifactId>
      <version>1.7.29</version>
    </dependency>
    <dependency>
      <groupId>junit</groupId>
      <artifactId>junit</artifactId>
      <version>4.11</version>
      <scope>test</scope>
    </dependency>
  </dependencies>

  <build>
    <pluginManagement><!-- lock down plugins versions to avoid using Maven defaults (may be moved to parent pom) -->
      <plugins>
        <plugin>
          <groupId>org.apache.maven.plugins</groupId>
            <artifactId>maven-compiler-plugin</artifactId>
            <version>3.3</version>
            <configuration>
              <source>1.7</source>
              <target>1.7</target>
            </configuration>
        </plugin>
        <plugin>
          <artifactId>maven-shade-plugin</artifactId>
          <version>2.4</version>
          <executions>
              <execution>
                  <phase>package</phase>
                  <goals>
                    <goal>shade</goal>
                  </goals>
                  <configuration>
                      <filters>
                          <filter>
                              <artifact>*:*</artifact>
                              <excludes>
                                  <exclude>META-INF/*.SF</exclude>
                                  <exclude>META-INF/*.RSA</exclude>
                              </excludes>
                          </filter>
                      </filters>
                      <shadedArtifactAttached>true</shadedArtifactAttached>
                      <shadedClassifierName>with-deps</shadedClassifierName>
                  </configuration>
              </execution>
          </executions>
        </plugin>
      </plugins>
    </pluginManagement>
  </build>
</project>
從裝置應用程式上傳檔案
將您要上傳的檔案複製到專案樹狀目錄中的 my-app 資料夾。 使用文字編輯器,以下列程式碼取代 App.java。 提供您記下的的裝置連接字串和檔案名稱。 當您註冊裝置時,已複製裝置連接字串。
package com.mycompany.app;

import com.azure.storage.blob.BlobClient;
import com.azure.storage.blob.BlobClientBuilder;
import com.microsoft.azure.sdk.iot.deps.serializer.FileUploadCompletionNotification;
import com.microsoft.azure.sdk.iot.deps.serializer.FileUploadSasUriRequest;
import com.microsoft.azure.sdk.iot.deps.serializer.FileUploadSasUriResponse;
import com.microsoft.azure.sdk.iot.device.DeviceClient;
import com.microsoft.azure.sdk.iot.device.IotHubClientProtocol;

import java.io.BufferedInputStream;
import java.io.File;
import java.io.FileInputStream;
import java.io.IOException;
import java.net.URISyntaxException;
import java.util.Scanner;

public class App
{
    /**
     * Upload a single file to blobs using IoT Hub.
     *
     */
    public static void main(String[] args)throws IOException, URISyntaxException
    {
        String connString = "Your device connection string here";
        String fullFileName = "Path of the file to upload";

        System.out.println("Starting...");
        System.out.println("Beginning setup.");

        // File upload will always use HTTPS, DeviceClient will use this protocol only
        //   for the other services like Telemetry, Device Method and Device Twin.
        IotHubClientProtocol protocol = IotHubClientProtocol.MQTT;

        System.out.println("Successfully read input parameters.");

        DeviceClient client = new DeviceClient(connString, protocol);

        System.out.println("Successfully created an IoT Hub client.");

        try
        {
            File file = new File(fullFileName);
            if (file.isDirectory())
            {
                throw new IllegalArgumentException(fullFileName + " is a directory, please provide a single file name, or use the FileUploadSample to upload directories.");
            }

            System.out.println("Retrieving SAS URI from IoT Hub...");
            FileUploadSasUriResponse sasUriResponse = client.getFileUploadSasUri(new FileUploadSasUriRequest(file.getName()));

            System.out.println("Successfully got SAS URI from IoT Hub");
            System.out.println("Correlation Id: " + sasUriResponse.getCorrelationId());
            System.out.println("Container name: " + sasUriResponse.getContainerName());
            System.out.println("Blob name: " + sasUriResponse.getBlobName());
            System.out.println("Blob Uri: " + sasUriResponse.getBlobUri());

            System.out.println("Using the Azure Storage SDK to upload file to Azure Storage...");

            try
            {
                BlobClient blobClient =
                    new BlobClientBuilder()
                        .endpoint(sasUriResponse.getBlobUri().toString())
                        .buildClient();

                blobClient.uploadFromFile(fullFileName);
            }
            catch (Exception e)
            {
                System.out.println("Exception encountered while uploading file to blob: " + e.getMessage());

                System.out.println("Failed to upload file to Azure Storage.");

                System.out.println("Notifying IoT Hub that the SAS URI can be freed and that the file upload failed.");

                // Note that this is done even when the file upload fails. IoT Hub has a fixed number of SAS URIs allowed active
                // at any given time. Once you are done with the file upload, you should free your SAS URI so that other
                // SAS URIs can be generated. If a SAS URI is not freed through this API, then it will free itself eventually
                // based on how long SAS URIs are configured to live on your IoT Hub.
                FileUploadCompletionNotification completionNotification = new FileUploadCompletionNotification(sasUriResponse.getCorrelationId(), false);
                client.completeFileUpload(completionNotification);

                System.out.println("Notified IoT Hub that the SAS URI can be freed and that the file upload was a failure.");

                client.closeNow();
                return;
            }

            System.out.println("Successfully uploaded file to Azure Storage.");

            System.out.println("Notifying IoT Hub that the SAS URI can be freed and that the file upload was a success.");
            FileUploadCompletionNotification completionNotification = new FileUploadCompletionNotification(sasUriResponse.getCorrelationId(), true);
            client.completeFileUpload(completionNotification);
            System.out.println("Successfully notified IoT Hub that the SAS URI can be freed, and that the file upload was a success");
        }
        catch (Exception e)
        {
            System.out.println("On exception, shutting down \n" + " Cause: " + e.getCause() + " \nERROR: " +  e.getMessage());
            System.out.println("Shutting down...");
            client.closeNow();
        }

        System.out.println("Press any key to exit...");

        Scanner scanner = new Scanner(System.in);
        scanner.nextLine();
        System.out.println("Shutting down...");
        client.closeNow();
    }
}
建立和執行應用程式
在 my-app 資料夾的命令提示字元中,執行下列命令:
mvn clean package -DskipTests
建置完成時,請執行下列命令以執行應用程式:
mvn exec:java -Dexec.mainClass="com.mycompany.app.App"
您可以使用入口網站檢視您所設定之儲存體容器中的上傳檔案:

接收檔案上傳通知
在本節中,您要建立一個 Java 主控台應用程式,接收來自 IoT 中樞的檔案上傳通知訊息。
為您的專案建立目錄,並在該目錄中啟動殼層。 在命令列上,執行下列命令
mvn archetype:generate -DgroupId=com.mycompany.app -DartifactId=my-app -DarchetypeArtifactId=maven-archetype-quickstart -DarchetypeVersion=1.4 -DinteractiveMode=false在命令提示字元中,巡覽至新的
my-app資料夾。使用文字編輯器,以下列內容取代
my-app資料夾中的pom.xml檔案。 新增服務用戶端相依性可讓您在應用程式中使用 iothub-java-service-client 套件與 IoT 中樞服務進行通訊:<?xml version="1.0" encoding="UTF-8"?> <project xmlns="http://maven.apache.org/POM/4.0.0" xmlns:xsi="http://www.w3.org/2001/XMLSchema-instance" xsi:schemaLocation="http://maven.apache.org/POM/4.0.0 http://maven.apache.org/xsd/maven-4.0.0.xsd"> <modelVersion>4.0.0</modelVersion> <groupId>com.mycompany.app</groupId> <artifactId>my-app</artifactId> <version>1.0-SNAPSHOT</version> <name>my-app</name> <!-- FIXME change it to the project's website --> <url>http://www.example.com</url> <properties> <project.build.sourceEncoding>UTF-8</project.build.sourceEncoding> <maven.compiler.source>1.7</maven.compiler.source> <maven.compiler.target>1.7</maven.compiler.target> </properties> <dependencies> <dependency> <groupId>com.microsoft.azure.sdk.iot</groupId> <artifactId>iot-device-client</artifactId> <version>1.30.1</version> </dependency> <dependency> <groupId>com.microsoft.azure.sdk.iot</groupId> <artifactId>iot-service-client</artifactId> <version>1.7.23</version> </dependency> <dependency> <groupId>org.slf4j</groupId> <artifactId>slf4j-log4j12</artifactId> <version>1.7.29</version> </dependency> <dependency> <groupId>junit</groupId> <artifactId>junit</artifactId> <version>4.11</version> <scope>test</scope> </dependency> </dependencies> <build> <pluginManagement><!-- lock down plugins versions to avoid using Maven defaults (may be moved to parent pom) --> <plugins> <plugin> <groupId>org.apache.maven.plugins</groupId> <artifactId>maven-compiler-plugin</artifactId> <version>3.3</version> <configuration> <source>1.7</source> <target>1.7</target> </configuration> </plugin> <plugin> <artifactId>maven-shade-plugin</artifactId> <version>2.4</version> <executions> <execution> <phase>package</phase> <goals> <goal>shade</goal> </goals> <configuration> <filters> <filter> <artifact>*:*</artifact> <excludes> <exclude>META-INF/*.SF</exclude> <exclude>META-INF/*.RSA</exclude> </excludes> </filter> </filters> <shadedArtifactAttached>true</shadedArtifactAttached> <shadedClassifierName>with-deps</shadedClassifierName> </configuration> </execution> </executions> </plugin> </plugins> </pluginManagement> </build> </project>注意
您可以使用 Maven 搜尋來檢查最新版的 iot-service-client。
儲存並關閉
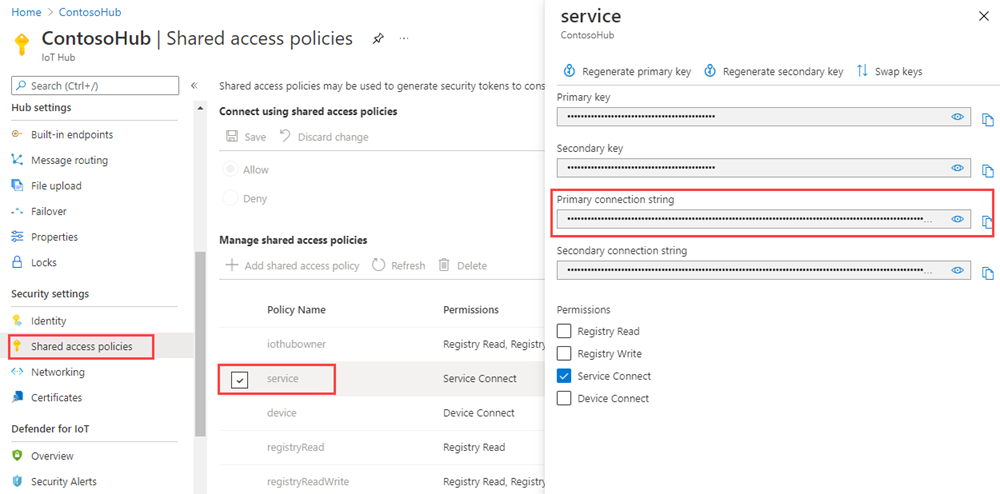
pom.xml檔案。取得 IoT 中樞服務連接字串。
若要取得服務原則的 IoT 中樞連接字串,請遵循下列步驟:
在 Azure 入口網站中,選取 [資源群組]。 選取中樞所在的資源群組,然後從資源清單選取中樞。
在 IoT 中樞的左側窗格中,選取 [共用存取原則]。
從原則清單中,選取服務原則。
複製 [主要連接字串] 並儲存該值。
如需 IoT 中樞共用存取原則和權限的詳細資訊,請參閱存取控制及權限。
使用文字編輯器,開啟
my-app\src\main\java\com\mycompany\app\App.java檔案,並以下列程式碼取代程式碼。package com.mycompany.app; import com.microsoft.azure.sdk.iot.service.*; import java.io.IOException; import java.net.URISyntaxException; import java.util.concurrent.ExecutorService; import java.util.concurrent.Executors; public class App { private static final String connectionString = "{Your service connection string here}"; private static final IotHubServiceClientProtocol protocol = IotHubServiceClientProtocol.AMQPS; public static void main(String[] args) throws Exception { ServiceClient sc = ServiceClient.createFromConnectionString(connectionString, protocol); FileUploadNotificationReceiver receiver = sc.getFileUploadNotificationReceiver(); receiver.open(); FileUploadNotification fileUploadNotification = receiver.receive(2000); if (fileUploadNotification != null) { System.out.println("File Upload notification received"); System.out.println("Device Id : " + fileUploadNotification.getDeviceId()); System.out.println("Blob Uri: " + fileUploadNotification.getBlobUri()); System.out.println("Blob Name: " + fileUploadNotification.getBlobName()); System.out.println("Last Updated : " + fileUploadNotification.getLastUpdatedTimeDate()); System.out.println("Blob Size (Bytes): " + fileUploadNotification.getBlobSizeInBytes()); System.out.println("Enqueued Time: " + fileUploadNotification.getEnqueuedTimeUtcDate()); } else { System.out.println("No file upload notification"); } receiver.close(); } }儲存並關閉
my-app\src\main\java\com\mycompany\app\App.java檔案。使用下列命令組建應用程式,並檢查錯誤:
mvn clean package -DskipTests

執行應用程式
現在您已經準備好執行應用程式。
在 my-app 資料夾的命令提示字元中,執行下列命令:
mvn exec:java -Dexec.mainClass="com.mycompany.app.App"
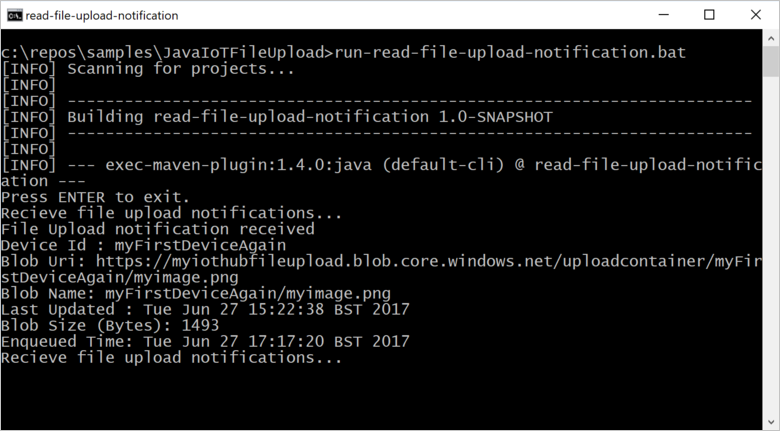
下列螢幕擷取畫面顯示 read-file-upload-notification 應用程式的輸出:
下一步
在本文中,您已學到如何使用 IoT 中樞的檔案上傳功能來簡化從裝置上傳檔案。 您可以閱讀下列文章來繼續探索這個功能:
若要進一步探索 IoT 中樞的功能,請參閱︰