開始使用 IoT 中樞模組身分識別和模組對應項 (Node.js)
模組身分識別與模組對應項類似於 Azure IoT 中樞裝置身分識別與裝置對應項,但提供更精細的細微性。 雖然 Azure IoT 中樞裝置身分識別與裝置對應項可讓後端應用程式設定裝置並提供裝置狀況的可見性,但模組身分識別和模組對應項可提供裝置個別元件的上述功能。 在具備多個元件的可用裝置 (例如作業系裝置或韌體裝置) 上,它允許每個元件有獨立的設定和狀況。
注意
本文中所述的功能僅適用於 IoT 中樞的標準層。 如需基本和標準/免費IoT 中樞層的詳細資訊,請參閱為您的解決方案選擇正確的IoT 中樞層。
在本文結束時,您會有兩個 Node.js 應用程式:
CreateIdentities:這會建立裝置身分識別、模組身分識別和相關聯的安全性金鑰,以連線到您的裝置和模組用戶端。
UpdateModuleTwinReportedProperties:這會將已更新的模組對應項報告的屬性傳送到您的 IoT 中樞。
注意
如需可建置裝置和後端應用程式之 SDK 工具的詳細資訊,請參閱 Azure IoT SDK。
必要條件
IoT 中樞。 使用 CLI 或 Azure 入口網站建立一個。
Node.js 10.0.x 版或更新版本。 準備開發環境說明如何在 Windows 或 Linux 上安裝本文的 Node.js。
模組驗證
您可以使用對稱金鑰或 X.509 憑證來驗證模組身分識別。 針對 X.509 憑證驗證,模組的憑證 必須 具有其一般名稱, (CN) 格式如下 CN=<deviceid>/<moduleid> 。 例如:
openssl req -new -key d1m1.key.pem -out d1m1.csr -subj "/CN=device01\/module01"
取得 IoT 中樞連接字串
在本文中,您會建立後端服務,以在身分識別登錄中新增裝置,然後將模組新增至該裝置。 您的服務需要登錄寫入權限。 根據預設,每個 IoT 中樞都是使用授與此權限且名為 registryReadWrite 的共用存取原則所建立。
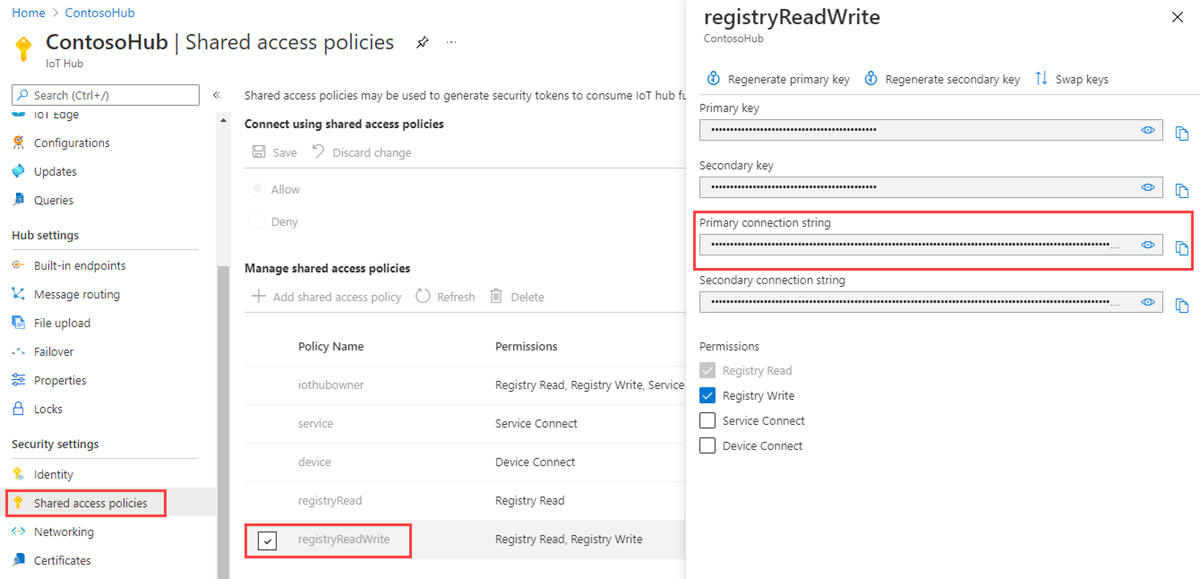
若要取得 registryReadWrite 原則的 IoT 中樞連接字串,請遵循下列步驟:
在 Azure 入口網站中選取 [資源群組]。 選取中樞所在的資源群組,然後從資源清單選取中樞。
在中樞的左側窗格中,選取 [共用存取原則]。
從原則清單中,選取 registryReadWrite 原則。
複製 [主要連接字串] 並儲存該值。

如需 IoT 中樞共用存取原則和權限的詳細資訊,請參閱存取控制及權限。
在 IoT 中樞中建立裝置身分識別與模組身分識別
在本節中,您會建立 Node.js 應用程式,它會在 IoT 中樞的身分識別登錄中建立裝置身分識別和模組身分識別。 裝置或模組無法連線到 IoT 中樞,除非其在身分識別登錄中具有項目。 如需詳細資訊,請參閱了解 IoT 中樞中的身分識別登錄。 當您執行此主控台應用程式時,它會針對裝置和模組產生唯一的識別碼和金鑰。 識別碼和金鑰區分大小寫。 當裝置和模組將裝置到雲端的訊息傳送給 IoT 中樞時,裝置和模組會使用這些值來識別自己。
建立目錄來保存您的程式碼。
在該目錄的內部,先執行 npm init -y 以使用預設值建立空白的 package.json。 這是程式碼的專案檔。
執行 npm install -S azure-iothub@modules-preview 將服務 SDK 安裝在 node_modules 子目錄內。
注意
子目錄名稱 node_modules 使用字組模組來表示「節點程式庫」。 此詞彙在此處與 IoT 中樞模組無關。
在您的目錄中建立以下 .js 檔案。 將它命名為 add.js。 複製並貼上中樞連接字串與中樞名稱。
var Registry = require('azure-iothub').Registry;
var uuid = require('uuid');
// Copy/paste your connection string and hub name here
var serviceConnectionString = '<hub connection string from portal>';
var hubName = '<hub name>.azure-devices.net';
// Create an instance of the IoTHub registry
var registry = Registry.fromConnectionString(serviceConnectionString);
// Insert your device ID and moduleId here.
var deviceId = 'myFirstDevice';
var moduleId = 'myFirstModule';
// Create your device as a SAS authentication device
var primaryKey = new Buffer(uuid.v4()).toString('base64');
var secondaryKey = new Buffer(uuid.v4()).toString('base64');
var deviceDescription = {
  deviceId: deviceId,
  status: 'enabled',
  authentication: {
    type: 'sas',
    symmetricKey: {
      primaryKey: primaryKey,
      secondaryKey: secondaryKey
    }
  }
};

// First, create a device identity
registry.create(deviceDescription, function(err) {
  if (err) {
    console.log('Error creating device identity: ' + err);
    process.exit(1);
  }
  console.log('device connection string = "HostName=' + hubName + ';DeviceId=' + deviceId + ';SharedAccessKey=' + primaryKey + '"');

  // Then add a module to that device
  registry.addModule({ deviceId: deviceId, moduleId: moduleId }, function(err) {
    if (err) {
      console.log('Error creating module identity: ' + err);
      process.exit(1);
    }

    // Finally, retrieve the module details from the hub so we can construct the connection string
    registry.getModule(deviceId, moduleId, function(err, foundModule) {
      if (err) {
        console.log('Error getting module back from hub: ' + err);
        process.exit(1);
      }
      console.log('module connection string = "HostName=' + hubName + ';DeviceId=' + foundModule.deviceId + ';ModuleId='+foundModule.moduleId+';SharedAccessKey=' + foundModule.authentication.symmetricKey.primaryKey + '"');
      process.exit(0);
    });
  });
});
此應用程式會在 myFirstDevice 裝置下方建立識別碼為 myFirstDevice 的裝置身分識別,以及識別碼為 myFirstModule 的模組身分識別。 (如果該模組識別碼已存在於身分識別登錄中,程式碼只會擷取現有的模組資訊。) 然後應用程式會顯示該身分識別的主要索引鍵。 您會在模擬模組應用程式中使用此金鑰來連線到您的 IoT 中樞。
使用 add.js 節點執行。 它會為裝置身分識別提供一個連接字串,並為模組身分識別提供另一個連接字串。
注意
IoT 中樞身分識別登錄只會儲存裝置和模組身分識別,以啟用對 IoT 中樞的安全存取。 身分識別登錄會儲存裝置識別碼和金鑰,以作為安全性認證使用。 身分識別登錄也會儲存每個裝置的已啟用/已停用旗標,以便您用來停用該裝置的存取權。 如果您的應用程式需要儲存其他裝置特定的中繼資料,它應該使用應用程式專用的存放區。 模組身分識別沒有啟用/停用旗標。 如需詳細資訊,請參閱了解 IoT 中樞開發人員指南中的了解 IoT 中樞中的身分識別登錄。
使用 Node.js 裝置 SDK 更新模組對應項
在這一節中,您會在模擬裝置上建立 Node.js 應用程式,以便更新模組對應項報告的屬性。
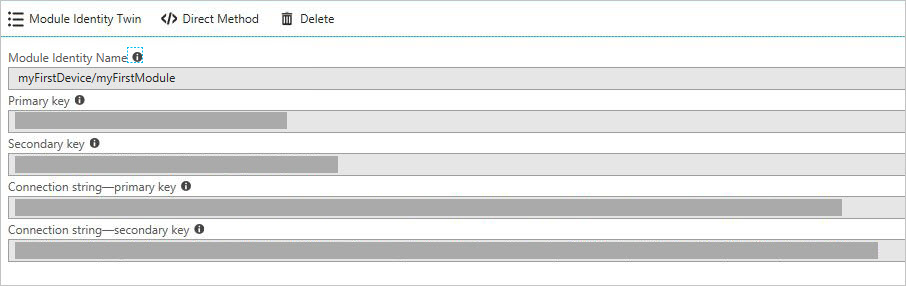
取得模組連接字串。 登入 Azure 入口網站。 流覽至您的IoT 中樞,然後選取[IoT 裝置]。 尋找 myFirstDevice 並加以開啟,您會看到已成功建立 myFirstModule。 複製模組連接字串。 在下一個步驟中需要用到它。
類似于您在上一節中所做的動作,請建立裝置程式碼的目錄,並使用 NPM 將其初始化,並安裝裝置 SDK (npm install -S azure-iot-device-amqp@modules-preview) 。
注意
您可能會感覺 npm 安裝命令執行速度慢。 請耐心等候;它會從套件存放庫提取許多程式碼。
注意
如果您看見錯誤訊息表示 npm ERR! registry error parsing json,可放心忽略此訊息。 如果您看見錯誤訊息表示 npm ERR! registry error parsing json,可放心忽略此訊息。
建立名為 twin.js 的檔案。 將模組身分識別字串複製貼上。
var Client = require('azure-iot-device').Client;
var Protocol = require('azure-iot-device-amqp').Amqp;
// Copy/paste your module connection string here.
var connectionString = '<insert module connection string here>';
// Create a client using the Amqp protocol.
var client = Client.fromConnectionString(connectionString, Protocol);
client.on('error', function (err) {
  console.error(err.message);
});
// connect to the hub
client.open(function(err) {
  if (err) {
    console.error('error connecting to hub: ' + err);
    process.exit(1);
  }
  console.log('client opened');
// Create device Twin
  client.getTwin(function(err, twin) {
    if (err) {
      console.error('error getting twin: ' + err);
      process.exit(1);
    }
    // Output the current properties
    console.log('twin contents:');
    console.log(twin.properties);
    // Add a handler for desired property changes
    twin.on('properties.desired', function(delta) {
        console.log('new desired properties received:');
        console.log(JSON.stringify(delta));
    });
    // create a patch to send to the hub
    var patch = {
      updateTime: new Date().toString(),
      firmwareVersion:'1.2.1',
      weather:{
        temperature: 72,
        humidity: 17
      }
    };
    // send the patch
    twin.properties.reported.update(patch, function(err) {
      if (err) throw err;
      console.log('twin state reported');
    });
  });
});
使用 node twin.js 命令執行此動作。
F:\temp\module_twin>node twin.js然後您會看到:
client opened
twin contents:
{ reported: { update: [Function: update], '$version': 1 },
  desired: { '$version': 1 } }
new desired properties received:
{"$version":1}
twin state reported
後續步驟
若要繼續開始使用 IoT 中樞並瀏覽其他 IoT 案例,請參閱︰